
Introduction
This guide explains when to use concrete slabs of 4, 5, or 6 inches.
The thickness you choose depends on the finished use, soil conditions, and expected load. Always check local rules and project requirements before pouring.
In the field, folks often opt for lighter slabs for simple patios, while heavier loads call for thicker slabs. For casual projects like sheds or walkways, 4 inches is a common starting point; driveways or heavier equipment may justify 5 or 6 inches. Cross-check with the label, manufacturer instructions, and local building rules to make the right choice.
Key takeaways
- Choose slab thickness based on intended load, occupancy, and future attachment needs.
- Expect 4-inch slabs for light, non-vehicular areas like sheds or patios.
- Use 6-inch or thicker when heavy equipment, vehicles, or storage loads possible.
- Reinforcement planning and joints control cracking; align with contractor or code guidance.
- Follow mixing, curing, and protection steps to prevent premature cracking and drying.
- Inspect site prep, drainage, and form work; wear PPE near wet concrete.
Table of Contents
- Introduction
- Key takeaways
- Quick Overview: Why Slab Thickness Matters
- Typical Uses for 4-Inch Slabs
- When to Choose 6-Inch Slabs and Thicker
- Design Factors That Influence Slab Thickness Choice
- Reinforcement, Joints, and Cracking Control
- Mixing, Concrete Strength, and Curing Best Practices
- Site Prep, Tools, and Materials Checklist
- Cost Comparison and Decision Guide
- Conclusion
- FAQ
Quick Overview: Why Slab Thickness Matters
Slab thickness is how deep the concrete sits from top to bottom. It affects strength, durability, load support, cracking risk, and cost. 4 inches is common for light patios, 5 inches for typical driveways and most sidewalks, and 6 inches for heavier use like vehicle areas.
Choose thickness based on how much weight and traffic your slab will carry and the environment it will sit in. Always check the label or datasheet from the product you’re using for limits, and don’t rely on guesswork. If in doubt, plan for a thicker slab to reduce cracking and damage.
Key structural concepts in one minute
Concrete slabs support loads, so their thickness affects how much weight they can bear. This is called bearing capacity.
Thickness also influences the stresses – flexural (bending) and compressive (squashing) – acting on the slab. Thicker slabs spread these stresses over a larger area, reducing stress intensity.
Reinforcement – steel bars or mesh embedded in concrete – boosts strength. But thicker slabs need less reinforcement per square foot, making them more economical.
The subbase – the layer beneath your slab – must be solid and level. Thicker slabs are more forgiving if the subbase isn’t perfect, but they still need a good foundation to perform well.
How thickness affects lifecycle cost
Thinner slabs (4 inches) are cheaper upfront. But they’re more prone to cracking and wear, leading to costly repairs down the line.
Thicker slabs (5 or 6 inches) cost more initially but last longer with less maintenance needed. They’re a better choice if you plan to stay in your home long-term or want to minimize future repair costs.
Think of it like tires: Cheap, thin ones wear out fast and need frequent replacement. Thicker, pricier ones last longer but cost more upfront.
So, consider your budget, timeline, and maintenance tolerance when deciding on slab thickness. It’s a trade-off between initial cost and long-term lifecycle expenses.
Typical Uses for 4-Inch Slabs
A 4-inch slab covers common residential tasks like sidewalks, patios, and shed floors. It handles light-duty loads from foot traffic and typical garden equipment, but check the label or datasheet for exact limits.
Knowing the limits helps you avoid cracks and premature failure. Plan with good subgrade, proper edging, and any reinforcement the product calls for. If you need exact numbers, check the label or datasheet and follow local rules.
Driveways, patios, and walkways
4-inch slabs are perfect for surfaces that don’t bear heavy loads. That includes driveways, patios, and walkways in your home.
Driveways: If you’ve got a single car or light-duty vehicles, 4 inches is fine. Avoid heavy trucks or RVs.
Patios and Walkways: These areas see foot traffic only. A 4-inch slab handles that just right.
Garage floors and light-use sheds
A 4-inch garage floor works for single-car garages with passenger vehicles. But remember, it’s not built to handle heavy machinery or equipment.
Reinforcement: To strengthen your slab, add rebar or wire mesh. This helps distribute weight evenly.
Subbase: A solid subbase – like compacted gravel – is crucial. It prevents settling and keeps your slab level.
When to Choose 6-Inch Slabs and Thicker
Choose 6-inch slabs when you expect serious load bearing, machinery, or frequent heavy truck traffic. They work for heavy residential slabs, commercial pads, and industrial floors where thinner concrete would crack. If you’re unsure, check the label or datasheet for the exact guidance.
Thicker slabs resist cracking and sag under heavy use, and they tend to last longer in tough environments. For a DIY homeowner, think about equipment weight, wheel loads, and maintenance needs, and follow manufacturer instructions or local rules.
Parking lots, commercial loading, and workshops
6-inch concrete slabs are standard for heavy-duty residential, commercial, and industrial applications. Here’s why:
Parking lots: They handle repeated heavy truck traffic. Thinner slabs might crack or crumble under such stress.
Commercial loading areas: Forklifts and pallet jacks put immense pressure on the slab. A 6-inch thickness distributes this load evenly, preventing damage.
Workshops and garages: If you’re parking heavy machinery or vehicles, a 6-inch slab provides the necessary support. For even heavier loads like aircraft hangars or large manufacturing equipment, consider thicker slabs or special design.
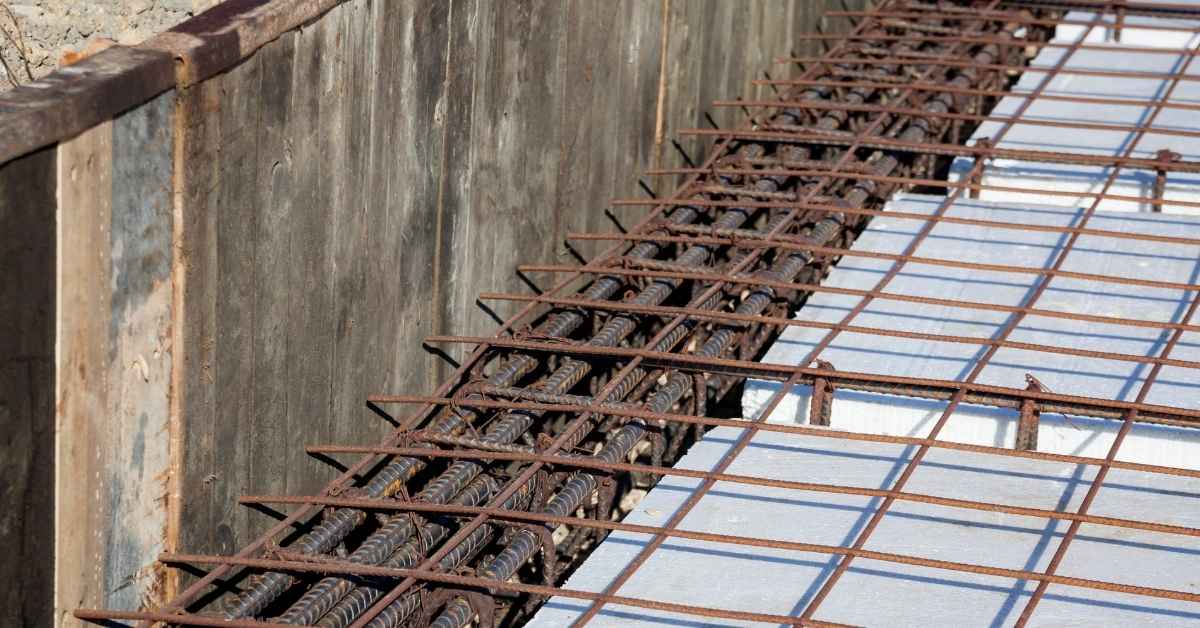
Reinforcement strategies for thicker slabs
Thicker concrete slabs need robust reinforcement to handle increased loads. Here are common methods:
Rebar grid: For 6-inch and thicker slabs, use a rebar grid. Place #4 or #5 rebar in both directions, spaced at 12 inches on center.
Welded wire fabric: This is another option for thicker slabs. It’s quicker to install than rebar but offers similar strength. Use W1.7M or W2.9M for 6-inch slabs and up.
As slab thickness increases, so should the size of your aggregate. This helps distribute loads more evenly and prevents cracking.
Design Factors That Influence Slab Thickness Choice
Designing a concrete slab starts with several key factors that push you toward a thicker or thinner slab. Soil bearing capacity, frost depth considerations, the kind of loads you expect, slab geometry, the concrete mix, and local codes all influence thickness. There are no one-size-fits-all numbers here—these choices come from your site conditions.
Understanding these factors helps you avoid cracks, over-engineering, and wasted material. It matters because the wrong thickness can fail under frost or heavy use, or waste money on a slab that’s too thick. If you need a number, use a simple rule of thumb and check the label/datasheet for exact guidance from the mix or product you plan to use.
Subgrade and Subbase Preparation
The first step in any concrete slab job is preparing the subgrade. You need to assess its strength, known as soil bearing capacity.
Compact the soil properly. For a 4-inch slab, aim for at least 90% compaction. For thicker slabs, go for 95%.
Next, add a subbase layer. This is typically crushed stone or gravel, 2-3 inches deep for 4-inch slabs, and up to 6 inches for 6-inch slabs.
Climate and Freeze-Thaw Considerations
In cold climates, frost heave is a risk. This happens when water in the soil freezes and expands, lifting your slab.
To prevent this, add insulation under your slab. For 4-inch slabs, use 2 inches of foam board. For thicker slabs, go up to 4 inches.
Also, ensure proper drainage around your slab. This stops water from pooling and freezing.
Reinforcement, Joints, and Cracking Control
Reinforcement type, joint spacing, and careful finishing are your main tools to keep concrete from cracking. Choose the right reinforcement for the job, set joints at sensible distances, and finish properly to control shrinkage cracks as the slab thickens or changes application. No guesswork here—follow the product label and manufacturer guidance for your situation.
Doing this right matters because cracks are hard to repair later and can ruin a DIY project. It’s about consistent spacing, clean joints, and smooth finishing to slow or stop cracks before they start. If you’re unsure, check the label or datasheet for the exact recommendations and adapt to your thickness and use.
Reinforcement types and placement
Choosing the right reinforcement is crucial for slab strength. Here’s what you need to know:
Rebar is steel bars used in 4-inch slabs, placed on a grid pattern. Spacing should be around 12 inches apart. Cover (distance from rebar to top of slab) should be at least 2 inches.
Welded wire mesh is a sheet of wires welded together, used in 5-inch slabs and thicker. It’s faster to install than rebar but offers less flexibility. Spacing is typically 6×6 inches or 8×8 inches, with cover at least 2 inches.
Fiber reinforcement is synthetic fibers mixed into the concrete. It’s ideal for thin slabs (4-inch) and areas where rebar isn’t practical. Use around 1-2 pounds of fiber per cubic yard of concrete.
Joint design and timing
Control, expansion, and isolation joints help manage cracking by allowing the slab to move naturally. Here’s how:
Control joints are saw cuts made at regular intervals (every 10-15 feet for 4-inch slabs, every 8-12 feet for thicker) to direct where the concrete will crack.
Expansion joints allow the slab to expand and contract with temperature changes. They should be placed every 60-90 feet, depending on slab thickness and climate.
Isolation joints separate slabs from buildings or other structures to prevent stress transfer. They should be at least 1/4-inch wide, filled with a flexible sealant.
Mixing, Concrete Strength, and Curing Best Practices
For 4–6 inch slabs, the mix strength, slump, and curing method determine how well it will perform. Don’t guess—check the label or datasheet for the right options, admixtures, and curing steps.
Using the right curing approach and honest expectations helps avoid cracking and weak spots. Understand that weather, timing, and product instructions matter, so follow the manufacturer guidance and local rules when unsure.
Recommended strengths and admixtures
The compressive strength of concrete is crucial. For 4-6 inch slabs, aim for a range of 2500-3000 psi (17-21 MPa). Check local building codes for specific requirements.
Admixtures can improve durability and workability:
- Air entrainment: Adds tiny air bubbles, improving freeze-thaw resistance. Use 5-8% by volume of cement.
- Water reducer: Improves workability without adding water. Use as needed to achieve desired slump.
Proper curing and finishing tips
Curing is vital for slab strength and durability:
- Wet curing: Keep the slab moist for at least 7 days. Cover with plastic sheeting or sprinkle with water.
- Curing compounds: Apply a liquid membrane after initial set to seal moisture in, improving strength and durability.
Finishing techniques minimize surface defects:
- Bull floating: Spreads concrete evenly, eliminating low spots. Do immediately after placing.
- Finishing: Use a straight edge to level the surface. Wait until bleed water has evaporated.
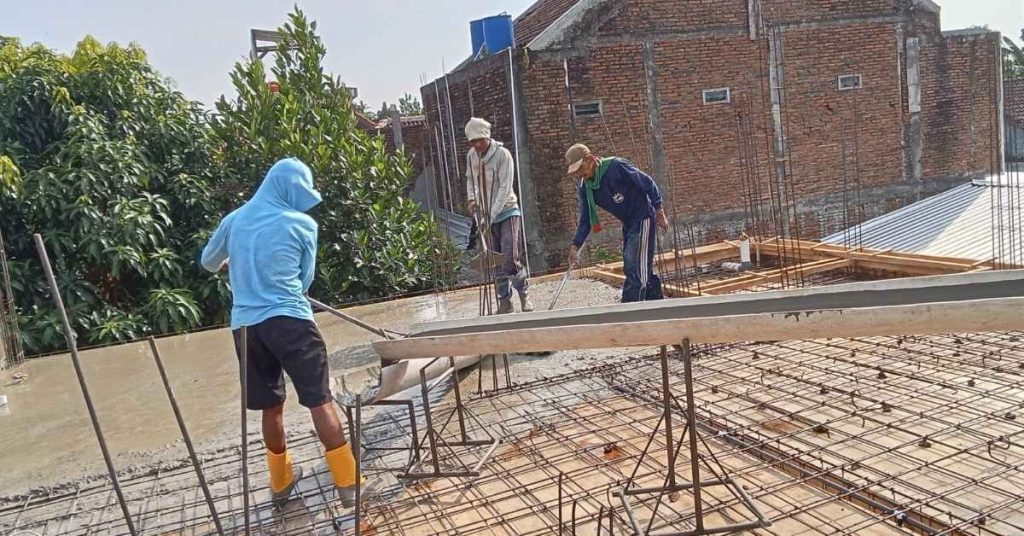
Site Prep, Tools, and Materials Checklist
This section lays out a practical checklist for site prep, tools, materials, and tests you’ll need for a slab installation. It covers safety gear, basic tools, mixing and curing supplies, and the inspection checkpoints to verify before you pour.
Having the right items on hand saves time and reduces mistakes. Following the checklist helps you spot problems early, keeps the project moving, and keeps the job safer.
Essential tools and equipment
Before you start mixing concrete, ensure you have all the necessary tools and safety gear. Use this checklist to double-check everything.
- Concrete forms: Inspect for straightness, secure fit, and proper bracing. Check that they’re level and plumb using a construction level or laser level.
- Screed: Ensure it’s long enough to span your form width. Check for any damage or warping that could affect the finish.
- Concrete float: Inspect for straight edges and no missing tines. A damaged float can leave marks on the surface.
- Bullfloat (optional): Check for a smooth, undamaged surface. This tool helps to smooth out the concrete’s surface.
- Concrete saw: Ensure it’s in good working order with sharp blades. A dull blade can cause excessive chipping and cracking.
- Trowel (optional): Inspect for straight edges and no missing parts. A trowel helps to finish the surface smooth and level.
- Safety gear: Check that you have hard hats, safety glasses, work gloves, steel-toed boots, and high-visibility vests. Ensure all equipment is in good condition and fits properly.
- Hearing protection (if using power tools): Inspect for any damage or wear. Protecting your hearing is crucial when operating loud machinery.
Quick rule: Always check your tools before starting work to avoid costly mistakes and rework.
Material quantities and ordering tips
Use this checklist before you order concrete to ensure you get the right amount and type for your project.
- Calculate volume: Measure length, width, and depth of your pour. Multiply them together and divide by 27 (cubic feet in a yard).
- Check slump: Order concrete with the right slump for your job – typically 3-5 inches for most residential work.
- Order delivery time: Schedule delivery when you’re ready to pour, not before. Concrete sets quickly once mixed.
- Include contingency: Add 5-10% extra for waste, spills, and weather delays. It’s better to have too much than too little.
- Check admixtures: If using air entrainment or other admixtures, ensure they’re added at the plant, not on-site.
- Verify aggregate size: Check if your mix requires coarse (3/4″) or fine (1/2″) aggregate. Wrong size can cause weak concrete.
- Check water-cement ratio: Ensure it’s within safe range (0.45-0.6) for your project. Too much water weakens concrete.
- Order from a reputable supplier: Check reviews and certifications to ensure you’re getting quality concrete.
Quick rule: Always order more than you think you’ll need. It’s easier (and cheaper) to return excess concrete than to rush another delivery when you run out.
Cost Comparison and Decision Guide
Slab thickness affects material cost, labor time, subbase work, and reinforcement. A thicker slab costs more overall, but may be worth it for long service life or heavy loads. For DIYers, compare 4, 5, and 6 inches by these drivers and choose based on use.
Remember that labor and subbase cost scale with thickness, so plan for extra prep and concrete. If you’re unsure, check the label or datasheet for guidance, and use a practical rule of thumb to decide when to go thicker. A simple decision checklist can help you pick the right thickness and avoid overbuilding or under-sizing.
Quick cost trade-offs and breakeven thinking
Thicker slabs mean more concrete, more reinforcement, and more labor. So, they cost more upfront.
But, thicker slabs last longer, crack less, and need fewer repairs. That’s a lifetime cost savings.
Example: A 4-inch slab might save you $1 per sq ft now, but it could cost $3 extra per sq ft in repairs later.
When the upfront cost is close to the long-term savings, that’s your breakeven point. Go thicker if you’re near it.
When to call an engineer or inspector
DIY is great, but some jobs need a pro’s eye. Here are when:
Heavy vehicle traffic: If you’ve got heavy trucks or equipment rolling around, get an engineer.
Poor soils: If your subgrade’s weak or unstable, call an inspector first.
Structural slabs: If your slab needs to support walls, columns, or other structures, consult a pro.
Commercial use: Businesses need special designs. Don’t DIY this one.
Ambiguous local code: If you’re not sure what your local codes say, get an inspector to check.
Conclusion
Choose slab thickness with safety, durability, and appearance in mind, then back it up with solid prep, proper mixing, and careful curing. The right joint, reinforcement, and curing plan save you from cracks and costly fixes down the line.
To break it down in practical terms: verify your load and use, confirm soil and drainage, check local codes and recommended thickness ranges, lay out joints and reinforcement as needed, set up accurate forms and curing procedures, and plan a fence-line rule of thumb for timing and mistakes to avoid, while following the site prep and material checklist and testing strength on a small area first.
Common missteps to avoid include underestimating load, skipping proper joints or curing, and rushing form removal or drainage work. Always wear eye and footing protection, keep mixing to the right slump, and never pour without a solid plan for reinforcement, joints, and curing. When in doubt about soil conditions, structural loads, or local requirements, call a professional before you push ahead, and stay focused on finishing with a solid, durable slab that looks right and lasts.
FAQ
How do I choose between 4, 5, or 6 inches for my slab?
Think about what the slab will support and how it will be used. Check the product label and manufacturer instructions, and ask at the supplier or local building office if you’re unsure.
Can I pour a 4-inch slab for a garage or workshop?
A 4-inch slab can work for light loads, but confirm with the material specs and local guidance. If in doubt, plan for a thicker slab or ask for professional input before pouring.
What practical steps help ensure a thicker slab is safe and stable?
Follow proper subgrade prep, adequate reinforcement per the product instructions, and correct jointing and curing. Always check the strength class and any limits on thickness from the concrete supplier or label.
What questions should I ask when buying materials for a slab?
Ask about recommended thickness for the product, curing requirements, and any limitations on forms, reinforcement, or joint design. If a spec matters, verify it on the label, datasheet, or with local rules before purchasing.