

Introduction
Feather-edge overlay failures happen when the thin edge of a concrete overlay chips or breaks under use. This usually shows up where the overlay tapers to a fine edge and carries a lot of traffic or weight. In plain terms, the edge bore the brunt and started to crumble instead of staying solid.
Signs to look for include small chips, cracking, or flaking along the feathered edge. To repair or prevent future problems, confirm the edge thickness and the recommended curing or protection steps from the product label or manufacturer instructions, and follow sound surface prep practices. If in doubt, check local rules or guidance and use conservative limits for edge handling and traffic until the overlay has fully set.
Key takeaways
- Identify feather-edge overlays by thin, feathered margins near edges, prone to chipping.
- Chip failures often stem from inadequate substrate prep and over-troweled edges.
- Visual signs: spalls, hairline cracks, delamination, and uneven thickness signal unsoundness.
- Use compatible sealers and reinforcement; wrong mix harms bond and edge durability.
- Perform edge adhesion tests and moisture checks during curing to catch failures early.
- DIY risks: costly repairs, potential trip hazards, and hidden structural damage; weigh options.
Table of Contents
- Introduction
- Key takeaways
- What a Feather-Edge Overlay Is and Where It’s Used
- Why Thin Edges Chip — Core Causes
- Application Errors That Accelerate Failure
- Materials, Sealers, and Reinforcement That Change Outcomes
- Detecting Problems Early — Visual Checkpoints and Tests
- Repair Methods for Chipped Feather Edges
- DIY Vs Professional Work: Risks, Costs, and Decision Points
- Planning and Specification Checklist to Prevent Feather-Edge Failures
- Conclusion
- FAQ
What a Feather-Edge Overlay Is and Where It’s Used
A feather-edge overlay is a thin layer designed to skim the edge of a concrete surface, not a full-depth application. It generally runs lighter than a standard overlay and relies on bonding to the substrate rather than internal thickness for strength. You’ll hear it described in terms of edge thickness and a feathered transition to the surrounding material. This setup differs from full-depth overlays and skim coats, which have distinct performance expectations and structural requirements. Knowing where this approach works helps prevent overreach and disappointment in durability.
Common applications include counter surfaces, repair patches, and skim coats where a lighter touch is needed. Expect performance limits tied to edge support and substrate prep. Thin edges chip due to bond issues, shrinkage, or traffic stresses. Design and prep considerations cover substrate readiness, bonding agents, curing, and appropriate edge detailing. This isn’t a universal fix—recognize when feather-edge isn’t appropriate and plan accordingly with practical alternatives to protect long-term integrity.
Definition and typical applications
A feather-edge overlay is a thin layer of concrete, typically between 6 to 12 millimeters thick, used to repair, reinforce, or resurface existing concrete structures.
It’s called ‘feather-edge’ because the edges are tapered to blend smoothly with the surrounding substrate, creating a seamless look. Unlike full-depth overlays (50mm+), feather-edges don’t replace the entire slab but rather strengthen and protect what’s already there.
You’ll find feather-edge overlays used in various applications:
- Resurfacing worn-out countertops
- Repairing cracks or chips in stairs, floors, or walls
- Adding a decorative finish to plain concrete
Edge geometry and “thin” edge characteristics
The ‘feather’ in feather-edge overlay refers to the thin, tapered edges that blend into the substrate. These edges are typically 1-2 millimeters thick at their thinnest point.
To ensure durability, it’s crucial to use a feather-edge overlay within its specified thickness range. Going too thin can compromise strength and cause chipping. Check your product’s manufacturer specifications for safe thickness ranges.
Remember, the thinner the edge, the more critical proper preparation and application techniques become. A well-prepared substrate and proper curing conditions are key to a successful feather-edge overlay.
Why Thin Edges Chip — Core Causes
The core mechanical issue is that the edge is thin and lacks solid support, making it prone to micro-chips under even modest loads. Edge flex, abrasion, and an indistinct feather-edge boundary create stress risers that promote cracking. You’ll often see the problem where the edge isn’t adequately reinforced or is subjected to heavy use without sufficient edge thickness to carry the load.
Substrate and bond problems show up as weak adhesion and poor surface preparation, with primers or bonding agents mismatched to the feather-edge material. Chemical stresses include solvents or moisture wicking into microcracks at the edge. Environmental factors such as rapid or uneven curing, temperature swings, and vibration during curing compound the risk. Edge-related material factors—aggregates near the edge, low feather-layer strength, and lack of edge controls—play a role. Diagnostics require edge thickness checks, visual inspection for micro-chips, bond tests, and moisture indicators to guide diagnosis and repair planning.
Mechanical stresses and impacts
Thin feather edges are vulnerable to mechanical damage. Here’s why:
Impact: Dropping tools or heavy objects on the edge can cause immediate chipping.
Abrasion: Foot traffic, especially in high-traffic areas like hallways or kitchens, wears down the thin edge over time. Even a small amount of abrasion can lead to micro-chips that grow larger with continued use.
Concentrated loading: Placing heavy objects near the edge (like furniture against a wall) puts extra pressure on the thin layer, making it prone to cracking and chipping.
Bond failure and unsound substrate
Poor adhesion between your feather-edge overlay and the substrate beneath can lead to edge loss:
Laitance, a weak layer of cement paste that forms on concrete surfaces over time, can prevent proper bonding. Ensure you remove this before application.
Contaminants: Dirt, grease, or other substances on the substrate can hinder adhesion. Thoroughly clean and prepare your surface before applying any overlay.
Delaminated concrete has layers that are already separating. Applying an overlay to this won’t fix the problem – it will just move the issue to the edge, causing chipping.
Material behavior: shrinkage, curing, and thermal movement
The materials you choose for your feather-edge overlay can significantly impact its performance at the edge:
- Improper cure: Insufficient curing time or inadequate moisture retention can cause the overlay to shrink and crack at the thin edges. Always follow the manufacturer’s recommended curing schedule.
- Moisture movement: Exposure to moisture during curing can lead to excessive shrinkage, causing micro-cracks that grow over time. Protect your overlay from rain or high humidity during the curing process.
- Thermal cycling: Extreme temperature swings cause materials to expand and contract, putting stress on thin edges. Use materials with compatible thermal expansion coefficients to minimize this effect.
- Freeze-thaw cycles: Repeated freezing and thawing can weaken the overlay, making it more susceptible to chipping at the edge. Ensure your material has good freeze-thaw resistance if you live in a cold climate.
- Vibration or impact during curing: Any disturbance while the overlay is curing can cause preferential damage at the thin edges. Keep the area quiet and free from vibration sources during this critical period.
Application Errors That Accelerate Failure
The wrong mixing and slump control can wreck the bond at the feather edge. Over-wetting feather-edge blends or using rapid-setting admixtures creates a softer, more brittle edge that chips under load. Follow the product directions and avoid guesswork, especially on high-traffic surfaces. Aim for a consistent mix and controlled placement to keep the edge cohesive with the body of the overlay.
Substrate prep and compatibility matter, including removing dust, oils, and curing compounds. Ensure the feather-edge thickness remains uniform and the substrate is sound and damp rather than soaking wet. Pouring technique should emphasize even pressure with t rollers and avoiding over-troweling that can disrupt the bond and introduce micro-flaws. Finishing too early or sealing while the overlay is green invites fiber-tearing and edge rounding, while insufficient curing or harsh conditions induce edge stresses. Practice patches help verify bond strength and clarify whether feather-edge or full-overlay approaches are appropriate for the project.
Mix design and over-thinning
The mix is the foundation of your feather-edge overlay. Get it wrong, and you’re asking for trouble at thin edges.
Too much water weakens the mix. It’s like making a sandcastle with wet sand – it won’t hold together under pressure. Same goes for your overlay. Over-wetting makes edges brittle and prone to chipping.
Rapid-setting admixtures can also cause issues if not used right. They speed up setting time, but too much can make the mix harden before you’ve had a chance to finish it properly. This leaves weak interfaces that’ll crack under load.
Stick to your mix design. Don’t guess on water or additive amounts. Measure and follow your recipe for strong, durable edges.
Inadequate surface prep and profiling
A clean, sound substrate is key to a good bond. Skimp on prep, and you’re setting yourself up for failure.
Start by cleaning the surface. Remove all dust, dirt, and old coatings. Use a vacuum or brush-off to get it really clean. Then, profile the surface. This could be shotblasting, grinding, or using a profiling tool. The goal is to open up the substrate’s pores for better adhesion.
Don’t forget to prime! A good primer seals the substrate and provides a consistent surface for your overlay to bond with. It also helps control moisture.
Consistent feather-edge thickness is crucial too. If you’ve got highs and lows, thin spots won’t have enough material to support themselves. Make sure your substrate is even before you start applying the overlay.
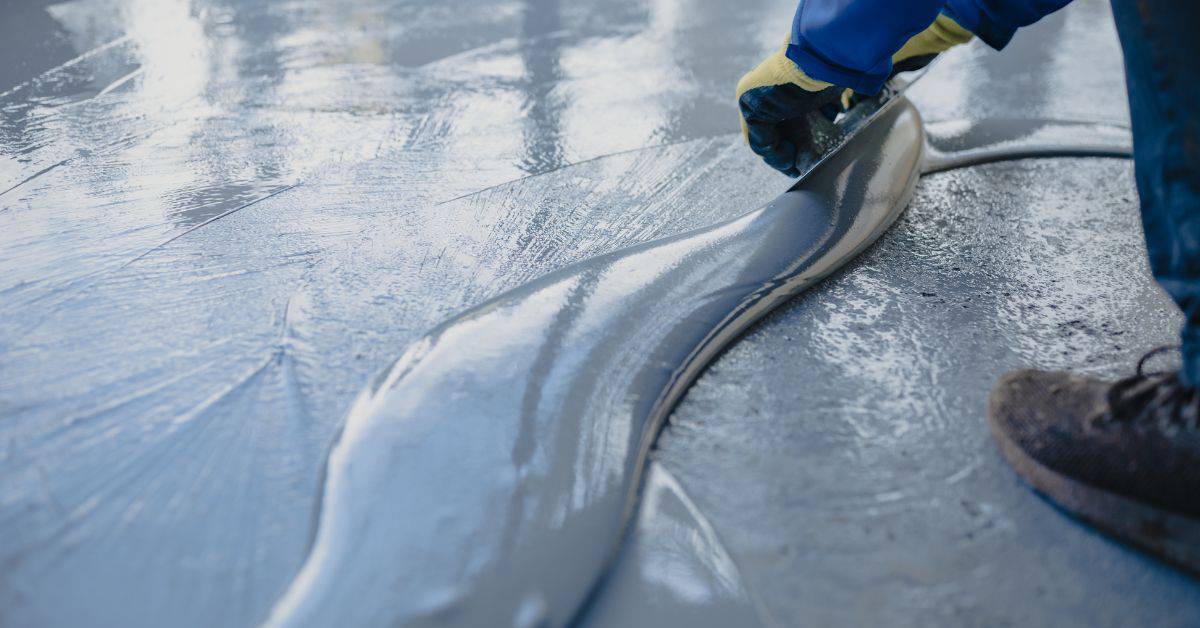
Poor finishing and feathering technique
Proper placement and finishing are vital for thin edges. Mess this up, and your overlay won’t support itself at the edges.
Avoid thick or mistaken feather-edge zones. These areas have too much material and not enough support. They’ll crack under stress. Instead, maintain even pressure with your trowel. Use a straight edge to ensure consistent thickness.
Over-troweling can disrupt the bond and create micro-flaws at edges. It’s like over-kneading dough – you’re breaking down the structure. So, be gentle. Use smooth, even strokes.
Avoid aggressive feathering or excessive sanding. These techniques can weaken edges and leave them unsupported. Remember, thin edges need careful handling to stay strong.
Materials, Sealers, and Reinforcement That Change Outcomes
Overlay type choices matter: self-leveling cementitious overlays differ from polymer-modified mixes in cure times, bonding needs, and slurry strength, which all impact feather-edge performance. The right choice balances workability, edge support, and the intended traffic. Expect to verify product labels and manufacturer instructions to ensure suitability for thin-edge applications. A mismatched system can silently undermine edge integrity.
Reinforcement options include mesh, fiberglass fibers, macro fibers, or wire mesh. Each has tradeoffs for edge distribution and chip resistance, so check how reinforcement is embedded and cured near edges. Sealers, whether penetrating or film-forming, influence moisture movement and edge texture. Substrate prep and edge design—etching, grinding, or beveling—help improve grip for thin edges. Compatibility with feather-edge finishes, curing requirements, and environmental conditions all factor into a durable result. A practical decision flow helps select the right combo and may include a test patch plan and failure indicators to watch for during early service.
Overlay compounds and reinforcement options
The first step in a successful feather-edge overlay is choosing the right compound. Here’s what you need to know:
Cementitious Overlays: These are self-leveling, fast-setting, and great for thin edges. They bond well but require proper surface prep. Cure time is around 24-72 hours.
Polymer-Modified Overlays: Slower curing (36-72 hours), better flexibility, and improved edge chipping resistance. Ideal for feather-edge applications with expected impacts.
Reinforcement: Use when edges are thin or expect heavy traffic. Options include mesh, fiberglass fibers, macro fibers, and wire mesh. Distribution methods vary; follow manufacturer’s guidelines to ensure even coverage.
Sealers and topcoats — selection and function
Sealers protect your overlay and enhance durability. Here’s how to choose:
Penetrating Sealers: Soak into the surface, protecting from within. Ideal for natural stone or concrete looks. Don’t expect slip resistance.
Film-Forming Coatings: Create a barrier on top. Better slip resistance but can peel if not applied correctly. Great for high-traffic areas like kitchens.
Consider food safety needs too. Some sealers may not be suitable for countertops or food prep surfaces.
Tools and materials checklist
Before you start, gather these tools and materials to ensure a successful job:
- Adhesion Primer: Ensures the overlay bonds well. Skip it, risk delamination.
- Profiling Tools: Grinders, scrapers, or profilers for edge preparation. Miss this step, edges won’t be even.
- Compatible Mixes: Check manufacturer’s recommendations to avoid curling or cracking.
- Sealers: Choose based on your overlay type and expected wear.
- Personal Protective Equipment (PPE): Safety glasses, gloves, dust mask. Don’t skip; safety first!
- Trowels & Spatulas: For application and finishing. Wrong size, expect uneven surfaces.
- Mixing Bucket: Clean, dedicated bucket for consistent mix quality.
- Measuring Tools: Tape measure, level. Inaccurate measurements lead to poor results.
Quick rule: Always verify compatibility with manufacturers to avoid costly mistakes.
Detecting Problems Early — Visual Checkpoints and Tests
The objective is to catch edge-weakness before it becomes catastrophic failure. Start with simple, non-destructive checks you can perform on site without dismantling the surface. Early cues often show up at the feather edge as cracks or changes in texture. Use these checkpoints to decide whether to proceed or pause work for repairs.
Visual checkpoints include microcracks along the feather edge, edge chipping or rounding, spalling, delamination, and moisture staining near the transition. Non-invasive tests cover tactile or knock checks to hear hollow versus solid zones, surface sheen and texture consistency, and water beading or dye tests at the edge. A basic adhesion check with a plastic scraper can gauge bond without causing damage. Document findings with photos and notes to guide next steps and safety considerations for fragile areas.
Visual symptoms to watch for
Regularly inspect your feather-edge overlay for these telltale signs. Catching issues early prevents costly repairs.
- Microcracks: Tiny hairline cracks along the edge or perimeter. Ignoring them allows moisture intrusion, leading to further damage.
- Edge chipping/rounding: Chips or rounded edges indicate impact damage or improper finishing. Prompt repair prevents progression.
- Spalling: Flaking or peeling of the overlay surface. This signals bond failure and requires immediate attention.
- Delamination: Lifting or separation of the overlay from the substrate. This weakens the structure and may cause catastrophic failure.
- Blisters: Puffy areas on the surface indicate trapped moisture, which can compromise the overlay’s integrity.
- Moisture staining: Dark spots or discoloration suggest water intrusion, leading to edge weakness and potential failure.
Quick rule: Inspect regularly. Address any signs of distress promptly to prevent major issues.
Simple tests and when to escalate
Perform these quick checks at home. If results are suspect, consult a pro or lab for further testing.
- Tactile/knock test: Gently tap the perimeter with a hammer. A hollow sound indicates delamination; solid, all’s well.
- Surface sheen/texture check: Inspect for uneven sheen or texture changes. These may signal bond failure or unsound substrate.
- Water bead/dye penetration test: Apply water or dye to the edge. Quick absorption indicates porosity and potential moisture intrusion.
- Adhesion check (plastic scraper): Gently lift at the edge with a plastic scraper. If it lifts easily, bond failure is likely.
Quick rule: If simple tests raise concerns, don’t hesitate to seek professional help or lab analysis.
Repair Methods for Chipped Feather Edges
Start with a diagnostic flow: measure the chip, assess substrate integrity, and identify causes such as impact or poor finishing. This guides whether a quick cosmetic fix or a deeper repair is needed. Tailor the approach to restore edge contour and texture while preserving the surrounding finish. Always aim for compatible materials and bonding systems to minimize color or texture mismatch.
Quick cosmetic fixes cover surface fills, feathering, texture matching, and color tinting with sealers to blend with the surrounding finish. Medium-duty patching establishes edge thickness again using compatible cementitious repairs and curing guidelines to minimize mismatch. For structural rehab, consider thicker overlays or partial resurfacing if the edge cannot be rebuilt with a reliable bond. Texture and color matching methods help recreate the feathered micro-texture and sheen, while proper curing and maintenance preserve uniform appearance. Surface prep, primers, and bonding agents are essential, and safety, timelines, and rough cost estimates should be clear for planning and communication.
Cosmetic Patching and Blending Techniques
For minor chips, focus on surface-level repairs. First, clean the area to remove any loose material and debris.
Choose a compatible patch material that matches your existing overlay’s texture and color. Use a small amount of water to create a smooth, creamy mix.
Apply the mix using a trowel or putty knife, feathering it out towards the edges to blend with the surrounding finish. Let it set for 15-30 minutes before smoothing any high spots with a damp sponge.
Structural Repair and Replacement Criteria
Patching may not be enough if the chip is extensive, or if the substrate shows signs of movement or poor bonding. In these cases, consider removing and rebuilding the edge or even the entire overlay.
Inspect the area for any underlying issues like cracks or delamination. If you find these, it’s best to remove the affected material completely before proceeding with repairs.
Safety first: Always wear appropriate PPE when removing old concrete. Use a chisel and hammer or an angle grinder with a diamond blade to carefully chip away at the damaged area.
Best Practices for Curing and Finishing Repairs
After patching, protect your repair from direct sunlight and wind during the initial cure. Use damp burlap or plastic sheeting to keep moisture levels consistent.
Once cured, lightly sand any high spots with fine-grit sandpaper. Vacuum off dust and wipe clean with a damp cloth.
Apply a sealer that matches your existing finish’s sheen level. This will help protect the repair from staining and wear, ensuring it blends seamlessly with the surrounding overlay.
DIY Vs Professional Work: Risks, Costs, and Decision Points
Define risk categories for DIY feather-edge overlays, focusing on adhesion failures, edge chipping, moisture-related issues, and surface prep pitfalls. Map how these risks escalate with thinner edges and plan contingencies. Understanding the potential for rework helps set expectations and informs when to call in a pro. Use this awareness to decide if the savings are worth the risk of a warranty or long-term damage.
Establish a concise cost framework by weighing initial savings against potential rework, material waste, downtime, and possible substrate changes that a pro might require. Create decision points based on your tools, substrate condition, moisture levels, and access to professional-grade equipment. A practical assessment checklist helps you determine when to proceed, pause, or hire help. Outline warranty considerations and where professional evaluation is prudent, especially if the substrate shows unknown moisture, prior failures, or complex edge conditions that exceed DIY capabilities.
Cost drivers and decision criteria
The cost of a feather-edge overlay isn’t just about materials. Substrate prep, reinforcement, and labor all play a part.
Substrate Prep: Proper surface preparation is key. It’s time-consuming but crucial to avoid failures. If your substrate needs extensive prep, consider hiring a pro.
Material Quality: Cheaper materials might save you money initially, but they could lead to rework down the line. Weigh initial savings against potential future costs.
Labor: DIY saves on labor costs, but if you’re unsure about your skills or tools, it might be worth hiring a professional to avoid costly mistakes.
Common DIY mistakes and how to avoid them
Even with the best intentions, homeowners can make mistakes. Here are some common ones and how to steer clear of them.
- Insufficient Prep: Skimping on surface prep is a recipe for disaster. Always clean, prime, and sand before applying your overlay.
- Improper Mix: Following the manufacturer’s instructions to the letter ensures your mix is right every time.
- Skipping Primer: Primer might seem optional, but it improves adhesion and seals the surface. Don’t skip it.
- Thinning Edges Too Much: Thin edges are more prone to chipping. Be careful not to thin them too much.
A little extra time and effort upfront can save you from costly mistakes later on.
Safety and regulatory considerations
Safety should always be your top priority. Here are some things to keep in mind when working with feather-edge overlays.
PPE: Wear appropriate personal protective equipment, including gloves, goggles, and a respirator if needed.
Silica Exposure: Overlays can contain crystalline silica. Ensure proper ventilation and follow safety guidelines to minimize exposure.
Food Safety/Building Codes: If you’re working in areas where food is prepared or served, ensure your materials comply with relevant codes and regulations. Always check local building codes before starting any project.
Planning and Specification Checklist to Prevent Feather-Edge Failures
Provide a concise pre-project specification that defines the overlay’s purpose, target performance, and expected service life. This anchors decisions and avoids scope creep. Include edge details and cure expectations to guide material selection and workmanship. Clarify what success looks like at service entry and over time, and reference manufacturer specs or codes for accountability.
Detail substrate and edge requirements, including soundness, cleanability, moisture testing, and edge geometry tolerances. Specify material compatibility and system details—primer, bond coat, overlay mix, admixtures, and curing methods—to prevent delamination or chemical incompatibilities. Establish edge-detail design guidelines like exposure thickness, control joints, and protection during curing to minimize microcracking and edge spalling. Add a testing and verification plan with adhesion tests, mock-ups, cure-at-service conditions, and acceptance criteria. Finish with a practical QA checklist, documentation flow, and a decision-tree for pausing or modifying the scope if issues arise.
Edge geometry, transitions, and reinforcement details
Use this checklist before starting your feather-edge overlay project to minimize chipping risks.
- Check edge geometry: Ensure edges are not too sharp or thin. Sharp edges increase the risk of chipping.
- Inspect transitions: Look for abrupt changes in thickness that can cause stress points and microcracking.
- Support backing: Check if there’s sufficient support behind the edge to prevent it from breaking off.
- Reinforcement options: Consider using fiber reinforcement, mesh, or other additives to strengthen the overlay at edges.
- Feather-edge tolerances: Ensure edges are not too thin. A general rule is no thinner than 1/8 inch (3mm).
- Edge rounding: Consider rounding off sharp edges to reduce stress points and chipping risks.
- Control joints: Plan for control joints at regular intervals to manage cracking.
- Protection during curing: Ensure edges are protected from physical damage during the curing process.
Quick rule: The key is gentle transitions, proper support, and reinforcement to minimize stress points and prevent chipping.
Test protocols, warranties, and acceptance criteria
Use this checklist before starting your project to ensure accountability and long-term performance of your feather-edge overlay.
- Adhesion tests: Conduct pull-off or push-off adhesion tests on mock-ups to confirm bond strength with the substrate.
- Service conditions: Document expected service conditions (temperature, humidity, etc.) for accurate performance expectations.
- Warranty terms: Clearly define warranty terms, including coverage, duration, and claims process.
- Delamination tests: Perform delamination tests on mock-ups to check for any signs of premature failure.
- Chemical compatibility: Test the overlay’s compatibility with existing substrates and finishes using small-scale mock-ups.
- Cure-at-service conditions: Cure test samples under expected service conditions to verify performance.
- Acceptance criteria: Establish clear pass/fail criteria for all tests based on industry standards or manufacturer recommendations.
- Documentation flow: Keep records of all tests, results, and any modifications made to the scope.
Quick rule: Thorough testing, clear warranties, and well-defined acceptance criteria ensure long-term performance and accountability.
Conclusion
Keeping feather-edge overlays from chipping comes down to sound prep, sensible materials, and careful monitoring. When edges stay solid, you get safety, durability, and a clean look that lasts.
Proceed with a simple, read-it-and-do-it flow: inspect the existing edge, verify your material choices, apply in small sections, test the edge after each step, and document any signs of failure early. Start in a low-risk spot, confirm that your sealers and reinforcement align with the product directions, and move your work forward only after you’ve seen a solid test result. If it won’t hold a test spot, back up, reassess, and fix before you proceed.
Common mistakes to avoid are rushing the cure or seal, using too-thick edges, and skipping proper surface prep. Always protect yourself with the right personal gear, work in dry conditions, and test in a small area first. If you see repeated chipping in spite of careful work, or if the project scope grows beyond a DIY routine, call in a professional sooner rather than later to prevent costly damage.
When the job is bigger than a quick patch will safely handle, get a pro involved and use the planning and specification checklist to guide the discussion. Stay focused, follow the steps, and you’ll finish with a feather-edge that lasts. You can do this, one careful step at a time.
FAQ
What usually causes feather-edge overlay failures to start cracking or chipping?
Bad surface prep and weak bonding are the main culprits. If the substrate isn’t clean, dry, and properly primed, the overlay can’t grab hold and will fail at the thin edges. Check the manufacturer’s prep steps and local guidelines, then follow them to the letter.
What kinds of damage should I look for beyond just chipping?
Cracking and flaking along the feather edge are common signs of stress. Look for soft spots, hollow sounds when tapped, and edges that don’t lay flat. These symptoms point to unsound adhesion or excessive flex in the substrate.
How can I repair a feather-edge overlay that’s chipped or cracked?
Repair starts with cleaning the damaged area and feathering the edges for a smooth transition. Apply a matching overlay patch or repair material as directed by the product instructions, then cure or set as required. If the damage is widespread, consider re-prepping the area and reapplying with correct bonding and curing steps.
What safety steps should I take to prevent problems during application?
Wear eye protection, gloves, and a respirator if dust or fumes are present. Work in good lighting and keep the area well ventilated. Always read the product label and follow PPE, mixing, and curing directions; if you’re unsure, pause and check with the manufacturer or local rules.