
Introduction
Skylights don’t always leak; most leaks stem from aging seals, worn flashing, or poor installation.
You’ll learn how to tell what is normal versus not, and how to inspect, diagnose, and fix common skylight issues with practical, step by step guidance.
Key takeaways
- Not all skylight drips indicate failure; some condensation is normal in certain seasons.
- Identify true leaks by active water intrusion after rain and visible gaps.
- Skylight type affects leak risk: flat vs. pitched, curb-mounted vs. deck-installed.
- Regular inspection and seasonal maintenance reduces unseen damage and cost.
- DIY fixes: sealants and flashing repairs only if you have proper access and safety.
- Compare repair vs. replacement costs with warranties before committing.
Table of Contents
- Introduction
- Key takeaways
- Do skylights always leak?
- Common causes of real skylight leaks
- Condensation vs. true leaks — how to tell the difference
- Skylight types and how they affect leak risk
- What to inspect and how to diagnose a skylight problem
- DIY fixes homeowners can try (and common mistakes to avoid)
- Repair vs. replace: cost factors and decision guide
- Prevention, warranties, and seasonal maintenance plan
- Conclusion
- FAQ
Do skylights always leak?
No—modern skylights can be leak-free when they are correctly installed and regularly maintained, and the quality of installation matters far more than the skylight itself. Leaks are usually about how the unit is flashed to the roof, how the curb or box is attached, and how well the surrounding roof interface handles movement, temperature changes, and weather. Older installations tended to leak more because flashing systems were less robust, seals were less durable, glazing options were simpler, and the overall interface with the roof did not tolerate aging as well.
Key leak-risk factors to watch for include proper roof flashing, correct curb mounting, compatibility with roof pitch, material quality, and the way any skylight flashing, joints, and sealants interact with the surrounding roof surface over time. Quick homeowner checks: look for gaps or missing flashing pieces, pooling around the curb, cracked glazing or sealant, damaged flashing, or condensation patterns that look like water intrusion rather than humidity; if leaks persist or you see visible roof damage around the skylight, call a professional.
Short answer and quick takeaway
Modern skylights don’t inherently leak if installed correctly. A well-installed skylight with proper flashing, sealing, and maintenance can last decades without leaks.
The key is to ensure the roof-flashing is done right and that the curb or box mounting fits snugly against the roof surface. Check for gaps around the edges where water might seep in. Regular inspections help catch issues early before they turn into leaks.
Remember, a skylight leak isn’t just about the skylight itself—it’s mostly about how it interfaces with your roof and flashing system. So keep an eye on those areas for any signs of wear or damage.
How leak risk has changed over time
The way skylights are designed today is vastly different from older models. Modern skylights come with better flashing systems, improved glazing options, and more durable materials that reduce the chance of leaks.
Historically, many skylight leaks were due to poor installation practices or inferior materials. But now, manufacturers offer warranties that cover both the product and proper installation, ensuring a leak-free experience for homeowners.
New designs also include better curbs and flashing systems that fit seamlessly with your roof’s slope and pitch. This means less chance of water pooling around the edges and getting into your home.
So if you’re considering installing or replacing an old skylight, know that modern technology has significantly reduced the risk of leaks compared to older models. Just make sure it’s installed by a professional who understands these improvements.

Common causes of real skylight leaks
Most skylight leaks come from three culprits: improper installation and flashing, aging materials, and manufacturer defects. In real homes, improper flashing and curb alignment is the most common issue, followed by worn seals, gaskets, and degraded sealants, with factory or glazing defects being less frequent. Examples include water dripping from the ceiling near the skylight, damp drywall around the opening, and stained insulation showing through the attic or ceiling.
This matters because it guides where to look first: inspect flashing integrity, check for gaps around roof penetrations, and assess glazing seals and gaskets for cracking or hardening. Start with quick fixes like resealing and tightening flashing, but plan for replacement or a pro if the flashing is damaged beyond simple repair or the unit shows aging or a known defect.
Improper installation and flashing failures
One of the most common reasons skylights leak is due to improper installation. A key issue here is flashing misalignment. If the curb or flange isn’t properly aligned with the roof, water can find its way in around the edges.
Damaged or insufficient flashing also leads to leaks. Flashing should overlap shingles and be sealed tightly to prevent water from seeping through. Using the wrong type of sealant or failing to follow manufacturer instructions for sealing gaps is another major mistake that causes issues down the line.
Improper installation can also mean not addressing step-flashing correctly, especially on roofs with multiple slopes. Each layer needs to be sealed properly and overlap the next one to prevent water from getting underneath.
To fix these issues, start by inspecting the flashing for any gaps or damage. If you spot problems, reseal them using a high-quality sealant recommended by the skylight manufacturer. In some cases, replacing damaged flashing might be necessary.
Aging, wear, and failed seals/glazing
Over time, UV exposure and thermal cycling can cause the materials around your skylight to degrade. Cracked glazing seals or deteriorated gaskets are common signs that your skylight is aging.
Vinyl and foam components lose flexibility over years, leading to cracks and gaps where water can enter. Inspect these areas regularly for any signs of wear. If you notice fogging inside the glass panes, it could mean a seal has failed and needs immediate attention.
Replacing worn-out seals or glazing is crucial to prevent leaks. Use high-quality materials that match what was originally installed. This might involve removing old parts and applying new sealant carefully around all edges.
If you’re unsure about the condition of your skylight, it’s best to consult a professional who can assess whether repairs are enough or if replacement is needed.
Manufacturing defects and rare product failures
Sometimes leaks occur because of factory defects in the skylight itself. This could be issues like cracked glazing from improper handling during transport or seal failure in dual-pane units.
If your skylight is leaking shortly after installation, it might be worth checking if there are any signs of manufacturing defects. Look for unusual wear patterns or damage that shouldn’t have occurred naturally over time.
When you suspect a defect, contact the manufacturer to see if your unit falls under warranty coverage. They may offer repairs or replacements at no cost to you. If not covered by warranty, professional assessment is key to determine next steps.
In cases where leaks appear before expected service life, it’s important to document any issues thoroughly and communicate them clearly with the manufacturer for potential resolution.
Condensation vs. true leaks — how to tell the difference
Condensation is interior humidity that shows up as a uniform fog on skylight glass and the surrounding frame, while a true roof leak produces irregular drips, stains, or puddling near the skylight after rainfall. Simple checks include wiping the glass and frame and noting if moisture reappears quickly; feel for dampness on the skylight frame or nearby ceiling material and inspect for water stains or soft spots near the skylight interior. If you see moisture recur after a wipe or obvious dampness without rain, that points to condensation rather than a leak.
Condensation tends to be higher in bathrooms, kitchens, laundry spaces, and humid climates, especially when use spikes humidity or outdoor rain and wind conditions align. Quick diagnostics include watching during or after rain, checking any roof-side flashing if you can access it, and testing airflow by opening vents or using a hygrometer to gauge humidity and dew point. Keep moisture under control with ventilation and dehumidification, and call a pro if you suspect flashing, glass failure, or persistent leaks after moisture management.
Visual clues and simple tests
To distinguish condensation from a true leak, start by looking for uniform fog on the glass. If you see consistent moisture across the entire skylight surface, it’s likely condensation due to high indoor humidity.
After rain or wind, inspect the edges of your skylight and surrounding ceiling material. Irregular drips, stains, or puddling indicate water intrusion from outside. Use a cloth to wipe the glass and frame; if moisture reappears quickly, it’s condensation inside.
Feel for dampness on the skylight frame or nearby drywall. Water stains, peeling paint, or soft spots near the ceiling are signs of an exterior leak. Check these areas after rain to confirm water intrusion patterns.
Note any changes in moisture behavior when you adjust ventilation settings or use a hygrometer to measure indoor humidity and dew point. This helps pinpoint whether the issue is internal condensation or external leakage.
When humidity control is the solution
If your skylight shows signs of condensation, start by improving ventilation in high-humidity rooms like bathrooms and kitchens. Exhaust fans can help reduce moisture buildup.
Consider using a dehumidifier to lower indoor humidity levels, especially during humid seasons or climates where condensation is common. This reduces the likelihood of interior fogging on your skylight glass.
Increase insulation around your home’s envelope to prevent warm air from reaching cold surfaces like windows and skylights. Proper insulation also helps maintain consistent temperatures inside, reducing condensation risks.
Monitor humidity levels with a hygrometer and aim for indoor conditions below 60% relative humidity. This simple step can significantly reduce condensation issues without the need for professional intervention.
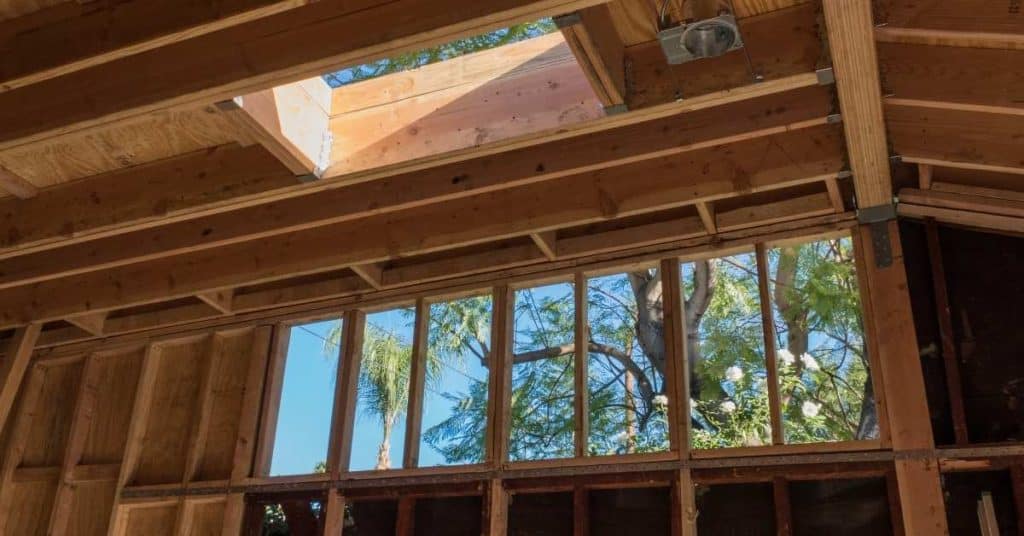
Skylight types and how they affect leak risk
Skylight type drives leak risk: fixed, tubular sun tunnels, venting, curb-mounted, and deck-mounted options each bring different flashing, seal, and drainage challenges. In general, more complex flashing around the rough opening and the glazing perimeter increases the chance of leaks, so curb-mounted and venting units often require careful attention, while deck-mounted units can be simpler but depend on proper sealing at the deck interface and counterflashing.
Roof slope and material matter a lot: low-slope roofs, tile, and membrane systems change how flashing and waterproofing behave around skylights. For DIYers, expect more maintenance emphasis on flashing transitions, drainage paths, and condensation control for each type, plus specific checks for compatibility with your roof material and slope. Use this to guide selection and plan targeted inspection and fixes, with a focus on the most common failure points like sealant degradation, improper flashing transitions, and drainage issues.
Fixed vs. venting skylights
When it comes to skylight types, you’ve got two main choices: fixed and venting. Fixed skylights are simpler, with fewer moving parts, which means less chance for leaks due to wear and tear. Venting skylights have mechanical components that allow them to open and close, adding more seal points where water can sneak in.
With venting skylights, you need to keep an eye on those seals and hinges regularly. They require maintenance to stay leak-free. Fixed skylights are easier to maintain since they don’t have moving parts that wear out over time.
Tubular skylights and unique failure modes
Tubular skylights are great for bringing natural light into small spaces without the bulk of a traditional skylight. However, they have their own set of issues to watch out for.
One common problem is at the roof flashing where it meets the shingles. Make sure this area is sealed properly and regularly inspected for leaks. Also, check the ceiling connection inside your home; poor sealing here can lead to water damage over time.
Another issue with tubular skylights is condensation inside the tube itself. This happens when warm indoor air meets cold tubing surfaces during winter months. To prevent this, ensure proper insulation around the tube and consider installing a venting system if needed.
Curb-mounted vs. deck-mounted installations
When it comes to skylights, curb-mounted and deck-mounted setups have their pros and cons when it comes to leaks.
Curb-mounted skylights sit on a raised frame that extends above your roof’s surface. This setup is great for adding height and making installation easier since you don’t need to worry about the slope of the roof as much. However, if not flashed properly, water can find its way in around the curb or underflashing. Make sure the flashing fits tightly and overlaps correctly with existing roofing materials.
Deck-mounted skylights are flush with your roof’s surface, blending in better aesthetically. They’re simpler to install if you have a flat roof area but require meticulous attention to detail around the edges where water can sneak in. Use high-quality sealants and flashing that match your roofing material for best results.

What to inspect and how to diagnose a skylight problem
This section guides you through a prioritized visual checklist you can act on from outside and inside the house, with a clear emphasis on flashing integrity, seams around the curb, the skylight unit itself, the roof surface around the opening, and any signs of condensation or moisture intrusion in the attic or ceiling. It also lays out a safe roof-access protocol, what to document for a pro, and a practical diagnostic sequence to help you distinguish between active leaks and condensation, plus a few concrete pre-visit homeowner actions like sealing obvious gaps if safe and clearing debris around the skylight. You should capture wide exterior shots, close-ups of flashing corners and joints, any cracks or gaps, interior condensation stains, attic cross-sections, and a simple moisture log with date and time, along with questions and data to share with a professional about skylight type, age, last flashing work, nearby roof repairs, and whether the leak is intermittent or continuous.
Why it matters: a thorough, well-documented quick start saves time and money by guiding the pro to the right source of the problem and reducing back-and-forth questions after a visit. The goal is to establish a logical sequence—observe after rain or thaw, verify if water entry is active or just condensation, check drainage around the skylight, inspect ceiling staining progression, and confirm attic ventilation status—so you can talk specifics and give the contractor solid context. Doing sensible pre-visit actions, like clearing leaves and ensuring gutters are clear, plus noting any recent roof work, helps prevent misdiagnosis and speeds up repairs without compromising safety or the job.
Exterior inspection checklist
Use this checklist after a rainstorm or during thawing periods when leaks are most likely to occur.
- Flashing seams: Look for gaps, cracks, or missing pieces. Confirm by touching the seam; it should feel solid and secure. Skipping can lead to water seepage.
- Sealant condition: Check for dry, cracked, or peeling sealant around flashing edges. Test with a screwdriver; it shouldn’t sink in deeply. Neglecting this step allows moisture entry.
- Cracked glazing: Inspect the skylight glass for cracks or chips. Tap gently to check if it sounds hollow. Ignoring can cause water infiltration.
- Debris buildup: Clear leaves, twigs, and other debris from around the skylight opening. Confirm by ensuring no obstructions are present. Debris blocks proper drainage.
- Roof-surface drainage issues: Check for standing water or pooling near the skylight. Use a stick to poke at low spots; it should drain away quickly. Poor drainage leads to leaks.
Quick rule: Address any visible damage immediately to prevent further moisture intrusion.
Interior inspection checklist
Use this checklist when you notice dampness, stains, or unusual odors in the room below your skylight.
- Ceiling stains: Look for dark spots or water marks on the ceiling. Confirm by checking if they are getting larger over time. Ignoring can cause structural damage.
- Peeling paint: Inspect walls and ceilings for peeling, bubbling paint. Test with a fingernail; it should be firmly attached. Neglecting this step allows moisture to seep into the wall.
- Mold signs: Check for dark patches or musty smells near the ceiling. Use a flashlight to inspect corners and edges. Mold growth indicates ongoing water issues.
- Damp insulation: Feel inside your attic for wet spots in the insulation. Confirm by checking if it feels cold and damp. Dampness can lead to mold and structural damage.
- Fogging between panes: Look for condensation or foggy areas on double-paned skylights. Use a cloth to wipe away moisture; it should clear up quickly. Persistent fogging indicates seal failure.
Quick rule: Document any signs of water damage and act promptly to prevent further issues.
When to call a pro vs. DIY-friendly fixes
Homeowners can handle minor repairs like resealing gaps and clearing debris around the skylight, but major issues such as flashing replacement or structural problems should be left to professionals.
If you notice cracked glazing or significant damage to the flashing, it’s best to call a licensed contractor. Attempting DIY fixes on these can lead to further complications and costly repairs down the line.
DIY fixes homeowners can try (and common mistakes to avoid)
This section covers safe, doable DIY fixes homeowners can try to stop leaks, focusing on cleaning around the skylight flange, re-caulking cracked exterior seams, and replacing interior trim where the flange remains watertight, all while keeping the work clear of structural concerns and following the product labels. Stick to non-structural sealant work, minor trim tasks, and thorough surface prep, and never attempt roof work in wet or icy conditions; if you suspect structural elements, halt and reassess. Keep expectations realistic, and beware hazards such as loose flashing, exposed electrical components, or weather delays that can turn a small fix into a bigger problem.
Before you start, do a careful site check: clear dirt and old sealant, inspect exposed areas for cracks or corrosion, and plan a safe sequence for cleaning, priming, and sealing. Use the right exterior-grade, flexible sealants and tool joints smoothly; backer rods may be needed for wider gaps, and avoid over-tightening that can squeeze out sealant or crack the surface. If you notice compromised flashing, persistent leaks after a DIY attempt, or signs of structural damage, stop and call a pro for flashing repair or more extensive work.
Resealing and Caulking Best Practices
To prevent leaks, start by cleaning the skylight flange thoroughly. Use a soft brush or cloth to remove dirt, debris, and old sealant. Inspect for cracks, corrosion, or detached flashing before applying new sealant.
Select an exterior-grade, flexible polyurethane or silicone sealant that matches your roof material. Apply backer rod if the joint gap is more than 1/4 inch wide to ensure a proper seal. Tool the joints smoothly and let them cure according to the manufacturer’s instructions—typically 24 hours for initial tackiness and up to 7 days for full strength.
Remember, wrong materials can lead to failure. Always check compatibility with your skylight material and roof type. Use a primer if needed to ensure adhesion.
Mistakes That Lead to Repeat Leaks
Avoid these common errors when resealing your skylight to prevent future leaks:
- Wrong sealant type: Using a non-weatherproof or incompatible material can lead to failure. Always choose exterior-grade, flexible polyurethane or silicone.
- Over-tightening screws: This can damage the flashing and create gaps for water to enter. Tighten screws just enough to secure trim without overdoing it.
- Neglecting flashing: Damaged or improperly installed flashing is a major cause of leaks. Inspect and replace any damaged pieces before applying new sealant.
- Applying too much sealant: Excessive sealant can crack, peel, and fail over time. Apply only enough to fill gaps without squeezing out.
Making these mistakes can lead to costly repairs down the road. Take your time and follow best practices for a lasting fix.
Repair vs. replace: cost factors and decision guide
The key idea is to separate costs into clear tiers: reseal or caulk and minor flashing repairs, glass replacement (single pane vs double glazing), full skylight unit replacement, and any incidental roofing work that pops up. Cost drivers include skylight type, size and number of units, roof access, flashing and materials, existing roof condition, and local labor rates. Use a simple buy-or-fix lens and weigh ROI and warranty coverage to decide what to tackle now.
This matters because it shapes what you actually save or spend over time and how long a repair will last. It helps you plan a quick assessment, estimate repair vs replace costs, and recognize when a full unit swap makes more sense for energy efficiency, leaks, or resale value. A short maintenance checklist can help you avoid recurring leaks and catch problems early; check the label/datasheet for any specific guidance on your skylight model.
Typical repair cost ranges and what they cover
Resealing a skylight can run you between $100 to $250, depending on the size of the unit and whether it’s curb-mounted or deck-mounted. This fix usually covers applying new sealant around the edges where water might seep in.
If minor flashing issues are the problem, expect to pay roughly $300 to $600 for a professional to replace damaged or improperly installed flashing. Flashing repair can also include adding additional layers of protection like rubberized membrane under the metal pieces.
For glass replacement, costs jump significantly. A single pane might cost between $500 and $1,200, while double-glazed units could run you from $800 to $2,000 or more. This price includes not just the new glass but also labor to remove the old unit and install the new one.
Remember, if your roof is in poor condition or has extensive damage under the skylight, additional costs for roofing repairs will add up quickly. It’s a good idea to inspect both the roof and the skylight together to avoid future leaks.
When replacement is the smarter option
If your skylight has been leaking repeatedly despite multiple repairs, it might be time to consider a full unit replacement. Chronic leaks can signal deeper issues like structural damage or an outdated design that’s no longer effective.
A new skylight can cost anywhere from $1,000 to over $5,000 depending on the type and size of the unit. While this upfront expense is high, it often pays off in long-term savings by reducing energy costs and avoiding ongoing repair bills.
Replacing an old or damaged insulated glass unit (IGU) is another scenario where a full replacement makes sense. If your skylight’s insulation has failed, it won’t just leak water—it’ll also let heat escape, driving up your heating bills.
If you have an older model that doesn’t meet current energy efficiency standards or lacks modern features like solar control and ventilation options, upgrading to a newer unit can improve both comfort and resale value. A new skylight might seem pricey now, but it’s often the best investment for long-term home maintenance.
Prevention, warranties, and seasonal maintenance plan
This section covers a yearly maintenance plan by season, how to document issues for warranty claims, and what to look for in manufacturer warranties like leak-prevention promises. You’ll get a simple seasonal calendar, key signs of potential leaks, and the basic maintenance that keeps a warranty valid. It also flags contractor tips and permit checks to keep projects moving smoothly.
Using this plan helps you spot problems early, document them clearly, and know who to contact when a claim is needed. It’s about building a practical routine you can follow, with clear notes and photos to support any warranty work and to keep your skylight system performing well over time.
Seasonal maintenance schedule
In the spring, clear away any debris that might have accumulated around your skylight during winter. This includes leaves and branches that could interfere with proper drainage or cause damage to seals.
Fall is a good time for a thorough inspection of flashing and seals. Look for signs of corrosion or wear on metal parts, which can lead to leaks if not addressed early. Also, check the venting mechanisms to ensure they’re working properly before winter sets in.
Both spring and fall are ideal times to reseal around your skylight if needed. Use a high-quality silicone caulk designed for exterior use, and make sure it adheres well to both glass and metal surfaces. This simple step can save you big headaches down the road.
Remember, regular maintenance is key to keeping your skylight leak-free year-round. A few minutes each season can prevent costly repairs later on.
Understanding and using warranties
When you install a new skylight, make sure to read the warranty documentation carefully. Look for specific coverage details like the VELUX No Leak Promise, which guarantees your skylight won’t leak under normal conditions.
To keep your warranty valid, follow the manufacturer’s recommended maintenance schedule closely. Document any issues you find with photos and notes, including dates and descriptions of problems. This documentation is crucial if you need to file a claim later on.
If you notice signs of water damage or leaks, act fast. Contact both the installer and the manufacturer immediately. Provide them with detailed information about when and how often the issue occurred, along with any photos or videos that show the problem clearly.
Remember, warranties typically cover defects in materials and workmanship but may not include damages from misuse or lack of maintenance. Stay on top of your skylight’s upkeep to avoid voiding your warranty.

Conclusion
Skylights aren’t magic; they’re openings in your roof. Get a clear picture of what’s happening and act with care so you protect your ceiling, your insulation, and your wallet. The right fix today reduces tomorrow’s water stains and misery.
Rule of thumb: inspect in this order and move only to the next step when each check is solid. Look for obvious gaps or cracks, check the flashing where the skylight meets the roof, test for leaks after a light rain or run a gentle water trail across the glass if you can do so safely, and keep notes of what you find. If you’re not sure, test a small area first, and don’t push past what you can handle without risking interior damage.
Common mistakes to avoid are skipping a proper sealant or flashing, using the wrong type of caulk for roofs or skylights, and diving into DIY fixes when you’re not sure whether the leak is a true leak or just condensation. Always treat the area as potentially wet, dry it safely, and work with minimal weight on wet framing. Safety first means wearing eye protection, using a stable ladder, and avoiding high-pressure water or climbing on a slick surface. If it’s unclear, stop and reassess before you cause bigger damage.
If the problem involves flashing, structural leaks, or you’re facing frequent leaks after a repair attempt, it’s time to call a professional. A pro can verify whether you should repair or replace, and they can do it with the right materials and safety practices. With a clear plan, a sensible budget, and a seasonal maintenance routine, you’ll keep skylights performing well for years to come.
FAQ
Can skylights leak even when it hasn’t rained recently?
Yes. Condensation, failing flashing, or a tiny crack in the seal can let water in long after a storm. Inspect the flashing around the skylight and the sealant on the curb.
What is normal leakage after heavy rain?
A small amount of dampness on the inner frame can happen. Large pools of water mean flashing or curb issues. If you see that, fix it fast.
What mistakes should I avoid?
Don’t shove shingles under the skylight flange. Don’t skip flashing or rely on cheap sealant. Don’t assume cosmetic caulk will fix a real leak.
How do I fix common leaks myself?
Start by cleaning the area and resealing with proper skylight sealant. Reinstall or replace flashing if it’s damaged. If the curb is warped or the skylight is cracked, hire a pro.