
Introduction
You should consider a mold inspection if you notice mold growth, a persistent musty odor, or health symptoms that repeat in damp areas.
The guide explains how to assess common signs at home, what practical steps you can take to verify the issue, and how to approach fixes safely with clear, doable actions you can perform yourself.
Key takeaways
- Look for persistent musty odor and visible or stained wallpaper, ceilings, walls.
- Musty smells plus runny eyes, headaches, or asthma triggers indicate exposure risk.
- Test moisture sources: leaks, condensation, or high humidity suggesting mold-friendly environment.
- DIY steps: capture samples only as screening, not confirmation that mold is present.
- Removal risks: improper cleanup spreads spores, always seal, ventilate, and protect skin.
- Costs vary widely; budget for professional inspection if visible growth expands quickly.
Table of Contents
- Introduction
- Key takeaways
- Quick checklist: Signs you may have a mold problem
- Health risks and who’s most vulnerable
- DIY diagnostic steps before calling a pro
- Common hotspots and hidden mold scenarios
- Step-by-step DIY mold removal and remediation
- When to hire a professional inspector or remediation company
- Costs, budgeting, and timeline planning
- Avoid common mistakes and follow safety best practices
- Conclusion
- FAQ
Quick checklist: Signs you may have a mold problem
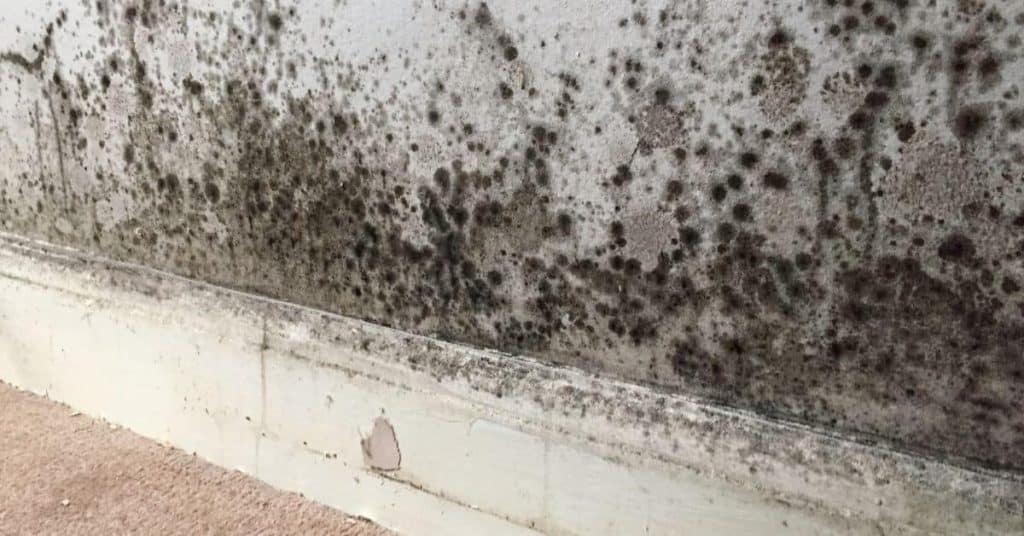
Look for the big clue: moisture problems and mold show up as dark spots, peeling paint, or fuzzy growth; and you’ll often smell a musty, earthy odor that sticks around. Also watch for persistent damp spots, condensation, leaks, and any wall or baseboard warping that doesn’t dry out. If you see mold near HVAC, or behind walls after a flood, treat it as a red flag and don’t ignore it.
These signs tell you when to inspect further rather than guess. Understanding them helps you act before hidden growth spreads, keeps you safe, and guides what to check next or call in a pro.
Visible mold and staining
Use this checklist to spot signs of visible mold growth in your home.
- Dark spots on walls: Look for patches that are black, brown, or green. Mold often appears as discoloration.
- Fuzzy growth corners: Check behind furniture and in dark corners where moisture accumulates.
- Powdery residue surfaces: Notice white, gray, or yellow powders on walls or ceilings.
- Slime near pipes: Look for slimy patches around plumbing fixtures or water lines.
- Bubbling paint areas: Paint that is peeling or bubbling can indicate moisture issues below the surface.
- Damp towels persisting: If towels remain damp after use, it could be a sign of high humidity and potential mold growth.
- Water stains reappearing: Persistent water marks on walls or ceilings suggest ongoing leaks or condensation issues.
- Grout discoloration bathrooms: Darkened grout lines in showers or tubs often indicate mold presence.
Quick rule: Any dark, fuzzy, powdery, or slimy patches that persist should be inspected for mold growth.
Musty smells and unexplained odors
Use this checklist to identify persistent musty or earthy scents in your home.
- Persistent musty smell: A constant damp, earth-like odor is a common sign of mold growth.
- Sour scent basements: Mustiness in the basement often indicates hidden moisture issues.
- Odor near plumbing: Check around pipes and water fixtures for musty or sour smells.
- Floors smell damp: Damp floors, especially carpeting, can emit a persistent odor due to mold growth.
- Cleaned but persists: If the smell remains after cleaning, it likely indicates ongoing moisture problems.
- Strongest in laundry rooms: Musty odors are common near washing machines and dryers due to dampness.
- Sinus congestion indoors: Increased sinus issues when inside can point to mold-related irritation.
- Coughing worsens evenings: Persistent coughing or throat irritation that gets worse in the evening might indicate indoor air quality issues.
Quick rule: If a musty smell persists despite cleaning efforts, it’s time for an inspection.
Health and symptom clues
Use this checklist to track health symptoms related to potential mold exposure in your home.
- New allergy-like symptoms: Notice if you develop new or worsening allergies, such as sneezing or itchy eyes.
- Sinus congestion indoors: Increased sinus issues when inside can point to mold-related irritation.
- Coughing worsens evenings: Persistent coughing or throat irritation that gets worse in the evening might indicate indoor air quality issues.
- Respiratory discomfort: Breathing difficulties, wheezing, or shortness of breath can be signs of mold exposure.
- Skin rashes persisting: Itchy skin or rashes that do not improve with over-the-counter treatments might indicate a mold problem.
- Headaches worsen indoors: Frequent headaches, especially when inside the home, can be linked to poor air quality.
- Symptoms concentrated areas: If symptoms are worse in specific rooms or zones, it could point to localized mold issues.
- Asthma attacks increase: More frequent asthma attacks indoors may indicate a need for professional evaluation.
Quick rule: Track symptom patterns and consult a doctor if health issues worsen when inside your home.
Health risks and who’s most vulnerable
Mold exposure can trigger immediate irritation—nasal congestion, throat itching, and red eyes—and over time can affect breathing and trigger allergies. Some groups are at higher risk, including kids, older adults, people with weakened immune systems, asthma or COPD, and those with existing allergies. If someone suddenly struggles to breathe, has chest tightness, high fever, or vision changes after exposure, seek medical help right away.
In DIY work, damp spots, poor ventilation, and disturbing settled mold can flare symptoms fast. That’s why limit disturbance, wear proper PPE, and pause work if symptoms worsen; do not scrub or fog mold without the right precautions. If the job gets hairy, or you’re unsure, call a mold remediation pro.
Short-term and long-term health effects
Mold exposure can hit you hard right away, causing sneezing fits, itchy eyes, and a scratchy throat. These are your body’s immediate reactions to the irritants in mold spores.
If these symptoms stick around or get worse over time, that’s when things start to become chronic. You might notice persistent coughs, wheezing, and shortness of breath. For some folks, especially those with existing respiratory issues like asthma, this can lead to more serious complications down the line.
It’s important to recognize these signs early on because prolonged exposure can weaken your immune system and make you more susceptible to other illnesses. If you’re dealing with damp conditions or poor ventilation in your home, it’s crucial to address them quickly before symptoms escalate.
The vulnerable groups, like kids, the elderly, pregnant women, and those with compromised immunity, need extra care. They can suffer more severe reactions from mold exposure compared to others.
When symptoms mean “call a doctor” or “call a pro”
If you experience sudden onset of severe symptoms like high fever, chest tightness, vision changes, or extreme wheezing after exposure to mold, it’s time to seek medical help right away. These are red flags that indicate an urgent need for professional intervention.
For those with existing respiratory conditions such as asthma or COPD, worsening of these symptoms can be a sign that you’re in a mold-contaminated area and need immediate attention from both your doctor and a mold remediation expert.
If DIY efforts to clean up minor mold issues aren’t working and the problem seems to be spreading, it’s best to stop and call in the pros. Professional mold inspections can identify hidden sources of moisture and ensure thorough removal without causing further health risks.
Remember, your safety is top priority. Don’t hesitate to reach out for help when you see these warning signs. It’s better to err on the side of caution than risk prolonged exposure that could lead to serious health issues.
DIY diagnostic steps before calling a pro
Use basic DIY steps to map out mold and moisture before calling a pro. Start with a simple visual inspection for visible mold, stains, and odors, and note moisture sources while being honest about safety and scope limits. Then run quick moisture checks and light tests, keeping a written record of findings.
This approach helps you spot priority areas, plan immediate fixes, and decide when to bring in a pro. For any simple test, check the label/datasheet for guidance, and document your mold map with photos, dates, and room conditions to create a clear action plan.
Systematic visual inspection (room-by-room)
Use this checklist when you suspect mold but haven’t found the source yet. It helps prioritize rooms and identify potential problem areas.
- Ceiling: Look for water stains, discoloration, or peeling paint; confirm by checking attic for leaks.
- Walls: Inspect corners and baseboards for dark spots or dampness; check behind furniture for hidden mold growth.
- Crawlspaces: Check for standing water, wet insulation, or musty odors; ensure proper ventilation to prevent moisture buildup.
- HVAC system: Inspect ductwork and air filters for signs of mold; confirm by checking condensation on cooling coils.
- Basements: Look for damp walls, water stains near windows or floors, and musty odors; check sump pump operation during heavy rain.
- Kitchen sink area: Inspect under sinks for leaks or moisture damage; confirm by checking plumbing connections.
- Bathroom tiles: Look behind shower curtains and around tubs for water stains, mold growth, or condensation.
- Windowsills: Check for condensation, dampness, or signs of peeling paint; ensure proper insulation to prevent moisture buildup.
Quick rule: If you find any sign of moisture or mold in one area, expand your search to adjacent spaces and common water sources like plumbing fixtures.
Moiure detection and basic testing
Start by using a moisture meter or humidistat to measure humidity levels in different rooms. High readings indicate potential mold growth areas.
For surface tests, use inexpensive kits that can detect mold spores on walls or carpets. These tests are quick but may not be as accurate for hidden mold behind surfaces.
Interpret results carefully: If the meter shows high moisture levels without visible signs of mold, it could mean there’s hidden mold in wall cavities or under floors. This is a clear sign to proceed with more detailed testing or professional help.
W a DIY test is enough vs when it’s misleading
DIY mold tests can give you an idea of the situation but have limitations. Over-the-counter kits may miss hidden mold or provide inaccurate results due to environmental factors.
If your home has extensive water damage, visible signs of black mold, or if family members are experiencing severe health issues linked to mold exposure, professional testing is essential.
Professional labs can conduct more accurate tests and identify specific types of mold that might be harmful. They also provide detailed reports on the extent of contamination and remediation recommendations.
Common hotspots and hidden mold scenarios
Mold loves moisture, so you’ll find it in obvious spots like bathrooms, kitchens, basements, and laundry rooms where humidity lingers, leaks drip, or ventilation is weak, even if you think the area is clean. It also hides where you don’t see it—behind wall panels, under flooring, in ceilings, crawl spaces, attics, and within HVAC plenums and ductwork, where damp air can collect and feed growth over time. Building features that trap moisture—poor ventilation, frequent leaks, roof or pipe failures, or tight exterior envelopes—drive mold risk, because you’re constantly fighting damp conditions that you can’t easily feel with the naked eye.
Watch for cues: visible growth patterns, brown or black stains, fuzzy or powdery textures, musty odors, and sudden changes in indoor humidity or paint bubbling that tell you something is wrong behind the surface. Do practical DIY checks: surface inspections with a flashlight, moisture meters if available, and infrared cameras to spot hidden dampness, plus a careful sniff test and looking for musty airflow or condensation on windows. When you see mold or suspect extensive intrusion, stop DIY and call a pro, and if you suspect hidden mold behind walls, asbestos, or large water intrusion, err on the safe side and bring in qualified help.
HVAC, ductwork, and insulation
Mold loves the dark, damp spots inside your HVAC system. Check the drip pans under air handlers for standing water or mold growth. Also, look at supply and return vents for signs of moisture.
Inside the ducts, you might find mold growing where there’s condensation from cold surfaces. Use a borescope to peek into tight spots if you can’t reach them easily. If you see any signs, it’s time to clean or replace those parts.
The insulation around your pipes and air ducts is another spot for mold to hide. Wet insulation won’t do its job properly, so make sure it stays dry. Use a moisture meter to check the condition of the material in these areas.
Behind walls, under flooring, and in crawlspaces
Mold can hide behind wall panels or under floors where it’s hard to see. Use a moisture meter to check for damp spots that might be harboring mold.
In crawl spaces, look for signs of water intrusion near sump pumps or dehumidifiers. Mold loves the dark and moist conditions found here. If you spot any issues, address them quickly before they spread.
Thermal imaging can help detect hidden moisture that’s not visible to the naked eye. Look for temperature differences in walls or floors where mold might be growing behind surfaces.
Bathrooms, kitchens, and basements
In these rooms, moisture is a constant threat. Check around plumbing fixtures for leaks that can lead to mold growth. Look under sinks and behind toilets where pipes might be sweating.
Basements are another common spot for hidden water damage. Inspect the walls and floor for signs of dampness or stains. Use a moisture meter to confirm if there’s an issue.
Maintaining these areas with regular cleaning and quick fixes when you see problems can prevent mold from taking hold. Keep your gutters clean, too, so rainwater drains away properly.

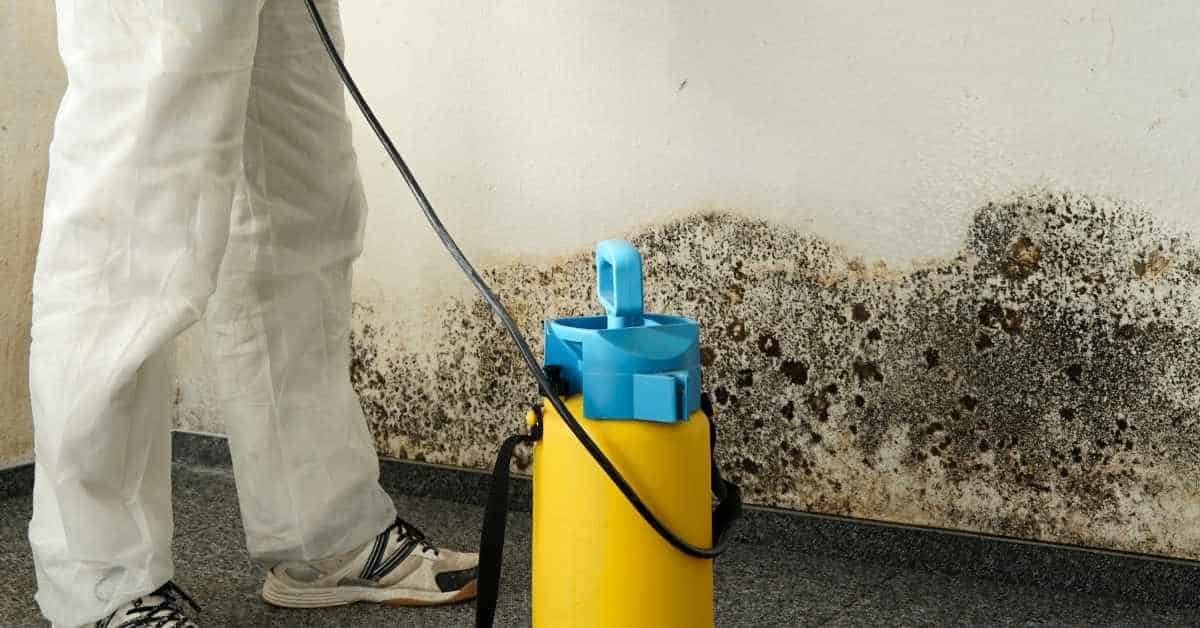
Step-by-step DIY mold removal and remediation
Small, manageable mold problems can be cleaned safely at home if you limit the scope to a tiny area on non-porous surfaces and confirm there is no active water intrusion, because larger jobs demand professionals. Keep the mold from spreading by setting up containment with plastic sheeting, sealing doors and vents when possible, and, if you can, creating at least a negative air movement and using HEPA filtration to trap particles. Follow a staged protocol, establish clear roles for PPE, select cleaning agents that match the surface, perform a pre-clean, scrub, rinse, and thorough drying, and dispose of waste in labeled bags so nothing drags through the house.
Containment and PPE should be your boundary: seal the space, control air movement, wear appropriate protection like a suitable respirator or mask, gloves, goggles, and coveralls, and clean tools and reusable gear after the job. If you notice red flags such as persistent symptoms, ongoing moisture, extensive or hidden mold, growth behind walls, or mold in the HVAC, stop, escalate to professional remediation, and document moisture sources and remediation steps for your records.
Step-by-Step Cleaning Process
This sequence ensures safe and thorough mold removal, from prep to cleanup.
- Identify the affected area and mark its boundaries. Wear PPE before entering.
- Cover surrounding areas with plastic sheeting to contain spores. Use tape for secure seals.
- Mix cleaning solution as per surface type: soap and water for non-porous, diluted detergent or bleach for porous surfaces.
- Scrub moldy spots vigorously until no more residue remains. Rinse thoroughly but avoid splashing elsewhere.
- Dry the area completely with fans or dehumidifiers to prevent regrowth. Check moisture levels with a hygrometer.
Safety first: PPE and containment
Protect yourself from mold spores by wearing N95 masks, gloves, goggles, and coveralls. Seal off the work area with plastic sheeting to prevent contamination spread.
If possible, set up negative air pressure using an exhaust fan in a window or door opening. This pulls contaminated air out of the room rather than letting it circulate.
Use HEPA filters to clean the air during and after cleanup. Dispose of all waste materials properly in sealed bags labeled as mold-contaminated.
Cleaning methods and approved products
Select a cleaning agent based on surface type: soap and water for non-porous surfaces, diluted detergent or bleach solution (1 part bleach to 10 parts water) for porous ones. Never mix bleach with ammonia.
Apply the cleaner evenly, scrubbing until all mold is removed. Let it sit for at least five minutes before rinsing thoroughly. Dry completely afterward to prevent regrowth.
For large areas or persistent growth, consider commercial biocides designed specifically for mold removal. Follow manufacturer instructions carefully regarding application and dwell times.
Post-cleanup verification and drying
After cleaning, visually inspect the area to ensure all visible mold is gone. Use a moisture meter to check that surfaces are dry—ideally below 60% relative humidity.
Continue running fans or dehumidifiers until the space is fully dried out. This prevents future mold growth and ensures structural integrity of affected materials.
If you notice any lingering dampness or signs of regrowth, re-clean the area immediately. Proper drying is crucial for long-term success in mold remediation efforts.
When to hire a professional inspector or remediation company
You should hire a professional when mold growth is widespread or touches multiple rooms or hidden spaces, or when the scope exceeds DIY ability. Look for health risks and HVAC involvement, like persistent odors or moisture in ducts. Also call in pros for structural damage, wet/drywall, or failed DIY attempts that keep returning moisture and contamination.
They offer testing, containment, HEPA cleanup, decontamination, waste disposal, and post-remediation verification, plus access to licensed contractors with warranties and regulatory compliance. For choosing, verify licenses and insurance, get a written scope and estimate, and check references. Ask about training on indoor air quality and safety protocols.
What to expect from a professional mold inspection
If you suspect extensive mold growth that spans multiple rooms, levels, or hidden spaces, it’s time for a pro. Here’s what they’ll do:
- Visual survey: Inspect every room and crevice for visible signs of mold.
- Mold mapping: Identify moisture sources using specialized tools.
- Air sampling: Collect air samples to determine the type and concentration of spores.
- Surface testing: Take swabs or tape lifts from suspect areas for lab analysis.
- Written report: Provide a detailed summary with remediation recommendations.
Quick rule: A thorough inspection helps pinpoint the extent and type of mold, guiding effective treatment plans.
Remediation vs removal: standards and certifications
When hiring a professional for mold remediation, ensure they follow industry standards like the IICRC S520 guideline. This ensures proper containment, cleaning methods, and waste disposal.
Look for contractors with IICRC certification, which covers mold remediation training. They should also have state-specific licenses and insurance to protect your home during work.
A certified pro will provide a detailed scope of work, including steps like HEPA vacuuming, decontamination, and post-remediation verification. This ensures the job is done right without risking further contamination or health issues.
Costs, budgeting, and timeline planning
Costs break into DIY supplies (mold test kits, protective gear, HEPA vacuums), potential professional inspections, remediation, and post-remediation verification, plus hidden bits like equipment rental or disposal. Plan a realistic budget by outlining these categories and avoiding shortcut fixes that save pennies but waste time. Check labels and datasheets for any tool or product you buy.
Map a sample timeline with phases: moisture source fix, dry-out window, testing/inspection, remediation, and post-treatment verification, noting that size and severity change the pace. This helps you decide when to DIY and when to hire, set a contingency, and compare upfront vs long-term costs.
Budgeting examples for small, medium, and large jobs
When it comes to budgeting for mold remediation, the size of your job will dictate how much you’ll spend. For a small project like fixing mold in a single bathroom corner, expect to pay around $200–$500 for DIY supplies and labor. This includes mold test kits, protective gear, HEPA vacuums, and cleaning products.
For medium-sized jobs involving multiple rooms or areas with hidden mold behind walls or under flooring, budget between $1,000 to $3,000. This range covers professional inspection fees, remediation costs, and post-treatment verification. The exact price will depend on the extent of damage and whether you need structural repairs.
Large-scale projects covering entire floors or multiple rooms with extensive mold growth can cost upwards of $5,000 to $15,000. This includes professional remediation services, third-party clearance testing, and any necessary equipment rentals. The exact amount will vary based on the area affected and whether you need HVAC system repairs.
Insurance, warranties, and saving strategies
Homeowners insurance may cover mold remediation if it’s a result of water damage from burst pipes or roof leaks. Document any incidents thoroughly with photos and repair receipts to support your claim.
To save on costs, consider investing in low-cost prevention measures such as dehumidifiers, air purifiers, and regular HVAC maintenance. These can prevent mold growth before it starts, saving you thousands in remediation fees down the road.
Shop around for supplies and equipment to get the best deals. Buying cleaning products and protective gear in bulk can also save money. Additionally, renting specialized equipment like HEPA vacuums is often cheaper than purchasing them outright.
Avoid common mistakes and follow safety best practices
The core message here is simple: don’t cut corners on containment, ventilation, or protective gear, and never ignore the moisture source that started the problem in the first place. Plan a proper work area with sturdy plastic barriers, isolate and control airflow, and wear a complete PPE kit because rushing cleanup or using the wrong cleaners invites rebound mold and unsafe exposure for you and your family. Keep the moisture source front and center—locate leaks, improve drainage, and address humidity before moving on, or you’ll be chasing mold again after every re-clean and rework.
This matters because occupant safety hinges on a controlled job site, thorough drying, and strict adherence to product labels and any local expectations you’ve got to follow, not guesswork. Document your process with before/after photos, log moisture readings when possible, and note each cleaning step so you can prove you followed reasonable steps and avoided skipping important containment or drying stages. Know when to call a licensed pro—red flags such as extensive or hidden growth, health symptoms, structural concerns, or uncertain mold extent mean vetting a contractor rather than trying to DIY the whole job.
Mistakes that make mold worse
Avoid these common mistakes to prevent spreading spores and damaging materials during your DIY mold removal project.
- Improper containment: Failing to seal off the work area can spread mold spores throughout your home. Use plastic sheeting, tape, and negative pressure if possible.
- Inadequate ventilation: Not ventilating properly can trap mold spores in the air you breathe. Run fans or use a HEPA filter during cleanup.
- Misusing cleaners: Using the wrong cleaner for porous surfaces like concrete can leave behind residue and cause regrowth. Always read labels and test on small areas first.
- Sanding without protection: Sanding moldy drywall or wood without proper PPE can release spores into the air. Wear a respirator, goggles, gloves, and coveralls when sanding.
Making these mistakes can lead to more extensive damage and health risks. Take your time and follow safety guidelines carefully.
Safe disposal and post-remediation cleaning
Once you’ve removed moldy materials, it’s crucial to dispose of them safely. Seal all contaminated items in heavy-duty plastic bags before taking them out.
After cleanup, ensure the area is thoroughly cleaned again with an EPA-approved disinfectant. This step helps prevent regrowth and ensures a clean environment.
Finally, monitor air quality post-remediation using moisture meters or hygrometers to confirm that humidity levels are within safe limits for preventing future mold growth.

Conclusion
Mold problems risk your health, the structure, and the way your space looks. Do this right, and you keep people safe while avoiding costly fixes later.
Start with a simple, practical check: look for visible mold and odors, verify moisture sources and humidity, test tight spots behind walls or under sinks, and map out where leaks happen so you know where to focus your DIY work. If you find moisture you can’t fix or mold spreading beyond where you can reach safely, pause, call a pro, and plan your approach from there.
Common mistakes to avoid are clear: don’t mix bleach with other cleaners or use it on porous materials, don’t ignore hidden or behind-the-wall areas, and don’t skip PPE or proper containment—work gradually, test small areas first, and don’t rush fragile removals. Always control moisture first, ventilate well, and seal off cleaned zones so spores can’t wander through the house.
If the problem is large, persistent, or involves your HVAC, or if anyone in the home has asthma, allergies, or immune issues, it’s time to call a professional inspector or remediation company. For smaller, contained issues you can handle safely, stay disciplined, follow steps, and keep your timeline realistic. You’ve got this—steady work now saves headaches and dollars later.
FAQ
How do I tell if I need a mold inspection?
If you spot mold, smell a must, or see damp spots, you probably need inspection. If water damage happened recently, bring in a pro sooner rather than later.
Can I DIY diagnose and fix mold?
You can do some basics, like dry out the area and clean small patches. But hidden mold in walls or insulation needs a professional with proper containment and equipment.
What should I expect from a mold inspection?
The inspector will check moisture, look for hidden mold, take samples if needed, and write a report. You’ll get findings, remediation steps, and a list of fixes.