

Introduction
You can diagnose ceiling water damage yourself and follow a practical, step-by-step repair.
You’ll learn how to spot signs of leakage, assess damage, and choose safe, effective methods to stop leaks and restore the ceiling.
The guide walks through planning, basic materials, and common fixes you can perform with home-maintenance know-how.
Key takeaways
- Identify ceiling stains, sagging, and musty odors as early damage signs.
- Trace leaks by inspecting attic, pipes, and roof for moisture pathways.
- Begin safety: shut off water, wear PPE, and assess electrical risks.
- Gather essential tools and materials on the checklist before starting.
- Use staged repairs: quick fixes to full restoration with inspection.
- Prevent recurrence with proper ventilation, insulation, and roof maintenance annually.
Table of Contents
- Introduction
- Key takeaways
- How to recognize ceiling water damage
- Common causes of ceiling leaks and how to trace the source
- Safety precautions before any DIY ceiling repair
- Tools, materials, and preparation checklist
- Step-by-step repair process (quick fixes to full restoration)
- Advanced techniques for hard-to-reach or complex cases
- Cost estimates, budgeting, and when to hire a pro
- Preventive measures and maintenance to avoid future ceiling water damage
- Conclusion
- FAQ
How to recognize ceiling water damage
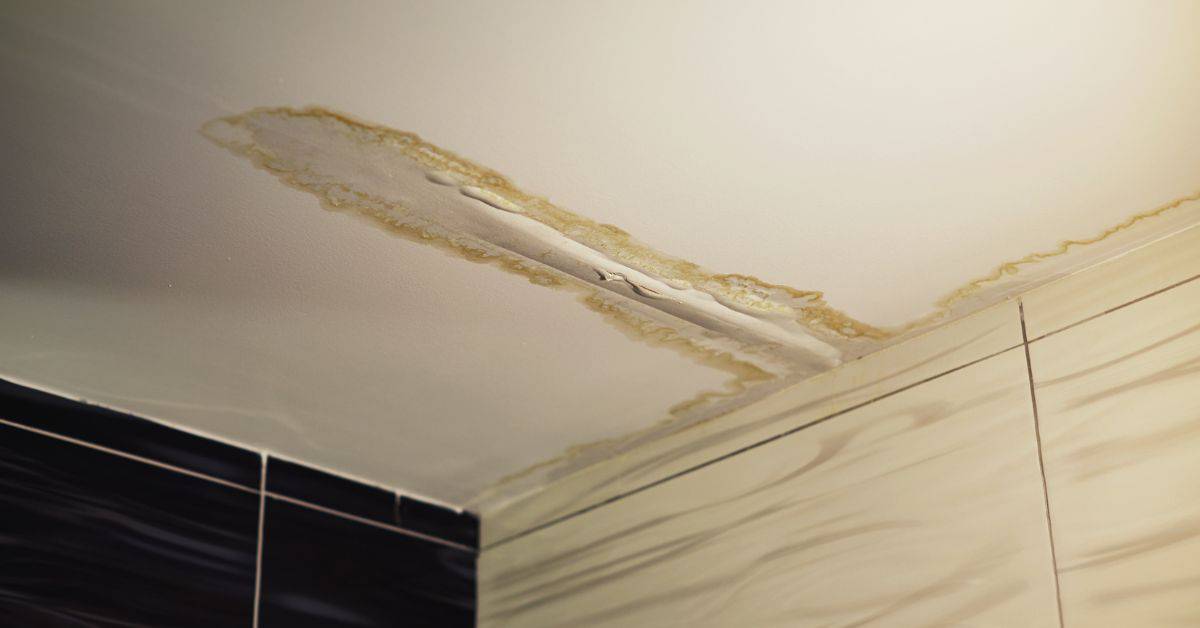
Look for visible signs: water stains, yellow or brown discoloration, ringed or halo patterns, bulging drywall or plaster, peeling or blistering paint, warped ceilings, and a musty odor. Stains often run along joists or reach into adjoining rooms, and you may notice fresh damp spots when the leak is active.
Fresh leaks usually show active dampness, recent staining, or new drip marks, while old damage tends to be dry, flaky, or faded with no ongoing moisture. Quick checks like looking above in the attic for signs of leaks and noting odors, plus using a moisture meter or infrared tool if available, help you decide next steps and document findings with photos before any probing or drying.
Step-by-Step Process
This sequence will guide you through recognizing ceiling water damage and taking necessary actions to address it.
- Action: Inspect the ceiling for signs of discoloration, stains, or peeling paint.
Reason: These are early indicators of moisture intrusion.
Check: Look for dark spots or water marks that appear wet to touch.
Professional Call: If you see mold growth or extensive damage. - Action: Feel the ceiling with your hand for dampness or soft spots.
Reason: This helps confirm if there’s active leakage.
Check: The area feels cool and slightly wet compared to surrounding dry areas.
Professional Call: If you find large, soft patches that could be structural issues. - Action: Use a moisture meter or hygrometer to measure humidity levels in the room.
Reason: High humidity can indicate ongoing water problems.
Check: Readings above 60% relative humidity suggest excess moisture.
Professional Call: If you have no experience with these tools or interpreting results. - Action: Look for water stains on walls, floors, and around windows and doors.
Reason: Water often travels down surfaces before showing up in the ceiling.
Check: Dark streaks or droplets along edges indicate where water is coming from.
Professional Call: If you find significant damage that needs immediate repair. - Action: Check plumbing fixtures and HVAC systems for leaks or drips.
Reason: These are common sources of ceiling moisture issues.
Check: Look for water droplets, rust stains, or wet insulation around pipes and ducts.
Professional Call: If you suspect a major plumbing issue like burst pipes. - Action: Inspect the attic space for signs of moisture intrusion from above.
Reason: This helps identify if water is coming through roof or walls.
Check: Look for wet insulation, mold growth, and condensation on metal surfaces.
Professional Call: If you find extensive damage that requires professional repair. - Action: Document the extent of any damage with photos and notes.
Reason: This is crucial for insurance claims or repairs.
Check: Take clear, detailed pictures from different angles to show all affected areas.
Professional Call: If you need help assessing the full scope of damage. - Action: Temporarily cover damaged areas with plastic sheeting until a repair can be made.
Reason: This prevents further water damage and mold growth.
Check: Ensure the plastic is securely taped to prevent leaks from spreading.
Professional Call: If you cannot safely reach or secure the damaged area. - Action: Clean up any standing water with a wet/dry vacuum.
Reason: This helps reduce moisture and prevents mold growth.
Check: The affected areas should feel dry to touch after cleaning.
Professional Call: If you find significant amounts of contaminated water.
Pro tip: Always wear protective gear like gloves, masks, and goggles when dealing with potential mold or contaminated water. This protects your health during cleanup.
Visual indicators and what they mean
When you spot water damage on your ceiling, the first thing to look at is the color of the stain. A dark brown or black stain usually means old water damage that’s been there for a while. If it’s fresh, you might see lighter shades like yellow or gray.
The shape and spread of the stain can tell you where the leak is coming from. Small, round stains often mean a small hole or crack in pipes above. A long, thin line could be a gap around a pipe fitting or vent. If it’s spreading out in all directions, it might be a bigger issue like a roof leak or a failed seal.
Remember, spotting these signs early can save you big headaches later on. Don’t wait until the ceiling starts sagging to take action. Check your attic and walls for more clues if the source isn’t clear from the ceiling alone.
Tactile and smell checks
Once you’ve spotted visual signs of ceiling water damage, it’s time to get hands-on. Gently probe soft spots with your fingers or a small tool like a screwdriver to see how deep the dampness goes without causing any structural issues. Be careful not to poke holes that could weaken the ceiling further.
Sniff around for musty or mildew smells, which are telltale signs of water damage and mold growth. If you detect these odors, it’s a clear indicator that there’s hidden moisture behind the drywall or plaster. Don’t ignore this smell; addressing it early can save your home from bigger problems down the line.
Using simple moisture-detection tools
To spot ceiling water damage, you can use a few basic tools that won’t break the bank. A multipurpose moisture meter is great for checking wood and drywall. If it shows high readings, there’s likely water inside the material.
An infrared thermometer helps by showing temperature differences on your ceiling. Wet spots will usually be cooler than dry areas because they lose heat faster. This tool can give you a quick overview without touching anything.
Remember, these tools are just aids. They won’t replace the visual and tactile checks we talked about earlier. Use them to confirm what you see and feel is water damage.
Common causes of ceiling leaks and how to trace the source
Ceiling leaks usually come from roof, plumbing, HVAC, condensation, or appliance failures. A practical trace starts at the highest point and works downward toward the problem area. Look for stains, mold, and the drip pattern to infer the origin.
Inspect the attic or crawl space for roof leaks and moisture, then check interior walls and ceiling penetrations before testing fixtures on lower levels. Use a ladder, flashlight, and a moisture meter if you have one, and photograph leaks to map the likely source for repairs. Keep towels or tarps ready for temporary mitigation and know shutoff locations in case of active leaks.
Roof and attic-related sources
Start by checking your roof after a rainstorm. Look for missing, damaged, or lifted shingles, especially around chimneys, valleys, and skylights. Flashing is another critical area; inspect it closely where it meets walls, vents, and other protrusions.
In the attic, look for water stains on insulation or wood beams. Wet spots can indicate a roof leak above that spot. Check plumbing vent pipes in the attic too—they often have rubber gaskets that can fail over time.
Use a flashlight to inspect dark corners and edges where moisture tends to hide. If you find wet areas, mark them with tape or paint dots for future reference. This helps track ongoing issues versus past leaks.
Interior plumbing and appliance failures
Begin by checking visible pipes in the attic or basement. Look for wet spots, rust marks, or drips around joints and connections. Turn off water supply valves to each fixture if you suspect a leak.
In bathrooms and kitchens, inspect under sinks and behind toilets for signs of moisture damage. Check dishwasher hoses and washing machine lines for leaks too. These appliances often sit right below ceiling areas where leaks can occur.
Water heaters are another common source. Inspect the bottom and around connections for wetness or rust. If you find a leak, turn off the water supply immediately to prevent further damage.
Condensation and HVAC problems
High humidity can cause condensation on cold surfaces like air conditioning ducts or pipes. This moisture can drip down onto ceilings, especially in basements or poorly insulated areas.
Clogged condensate lines are a frequent issue with AC units. Check the drain pan under your HVAC unit for standing water and inspect the line leading to it. A clog here will cause overflow into your ceiling.
Inspect the coil pan and condensation pump if you have one. Ensure there’s no blockage or damage that could lead to leaks. Also, check the insulation around ductwork; poor sealing can allow moisture to form inside walls.
Safety precautions before any DIY ceiling repair
Before you touch the ceiling, shut off power at the main panel and lock out if you can, test outlets and fixtures to confirm there’s no live electricity above you, and identify gas lines or other hazards that could blow up a simple repair; this is safety work, not an afterthought. Do a quick structural risk check for sagging or stained drywall, warped joists, active leaks, and signs of long‑term water intrusion, and decide whether the ceiling can be accessed safely without causing a collapse.
Wear proper PPE—hard hat, eye protection, waterproof gloves, and a respirator or N95 if you smell mold or see growth—set up drop cloths, seal the room with plastic, and use a stable ladder with a helper foot or spotter; keep the work area contained and dry as you proceed. Containment, dehumidification, and clear criteria for proceeding or calling a pro will keep you from making a bad situation worse and help you decide whether to hire a licensed plumber, electrician, structural contractor, or mold remediation specialist when hazards outweigh DIY capabilities.
Electrical hazard and power-off checklist
Before you start any ceiling repair, always check for electrical hazards. This is especially important if water damage has occurred near wiring or outlets.
- Locate circuit breaker: Find the main panel and identify which circuits serve the damaged area; turn off these breakers to ensure no live electricity.
- Test outlets/fixtures: Use a voltage tester on nearby outlets and switches to confirm power is off; proceed with caution if unsure.
- Inspect wiring: Look for exposed or wet wires near the ceiling; avoid touching them directly, use insulated tools instead.
- Check for water damage: Inspect around light fixtures and electrical boxes for signs of moisture intrusion; replace damaged components before proceeding.
- Consult an electrician: If unsure about wiring conditions or repairs needed, call a licensed professional to assess the situation.
Quick rule: Always ensure power is off in affected areas and consult professionals if you’re uncertain about electrical safety.
Asbestos and lead paint considerations
If your home was built before 1980, there’s a chance it contains asbestos or lead-based paints. Both materials can be hazardous if disturbed during repairs.
Identify potential asbestos by looking for textured finishes on walls and ceilings, pipe insulation, floor tiles, and roofing materials. If you suspect asbestos, do not attempt to remove it yourself; contact a licensed professional for testing and removal.
For lead paint, check painted surfaces for chipping or peeling paint, especially around windowsills and doors. Lead dust can be harmful if inhaled or ingested. Use wet methods like damp wiping when cleaning up debris to minimize exposure risks.
Ladder, containment, and mold safety
When working on a ceiling, always use a stable ladder with a helper foot or spotter. Avoid using chairs or other unstable supports that could lead to falls.
To prevent further water damage, set up temporary containment measures like tarps or plastic sheeting around the work area. This helps contain any additional moisture and prevents it from spreading to other parts of your home.
If mold is present, wear a respirator or N95 mask to avoid inhaling spores. Ensure good ventilation by opening windows or using fans to circulate air while working in enclosed spaces.
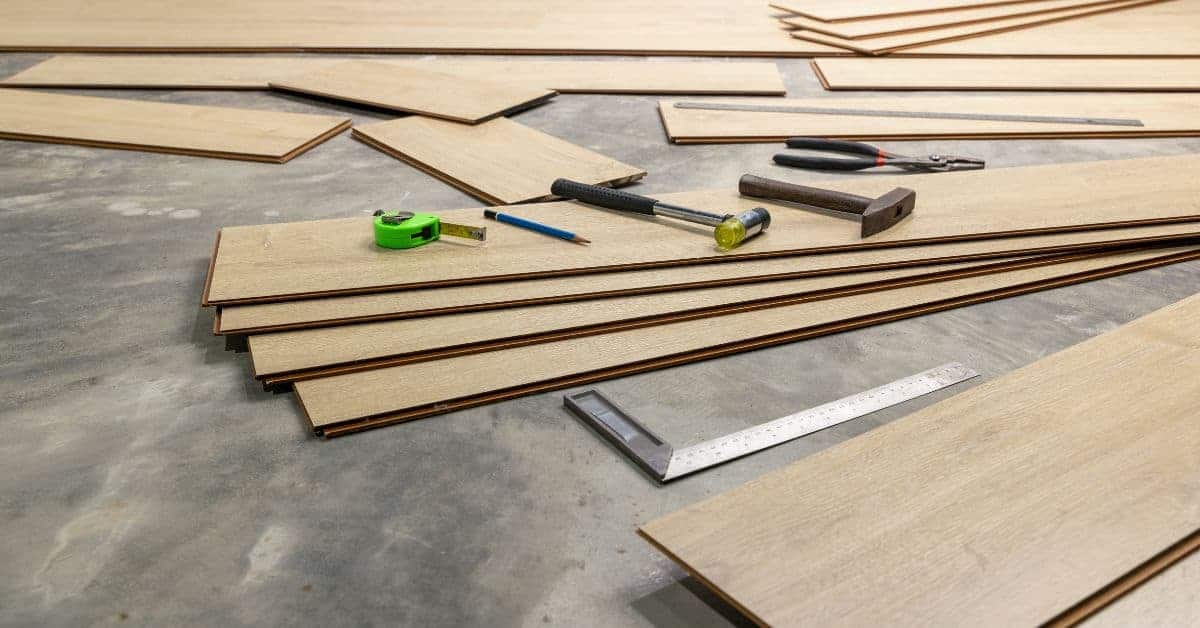
Tools, materials, and preparation checklist
The Tools, materials, and preparation checklist keeps you focused from the first scan to the final patch, listing PPE, access gear, containment steps, and a plan to shut off power or water if needed. It covers diagnostic gear like moisture meters, optional infrared cameras, moisture sensors, and a systematic readout schedule, plus methods to map ceiling stains and screen for mold risk while documenting damage with photos. It also pairs core repair materials—patching compounds, bonding agents, polymer-modified mortars, sealers, and primers—with finishing supplies such as compatible paints, texture or skim coats, and joints seals to prevent future leaks.
Think of this as your jobsite playbook, helping you sequence removal, diagnosis, and repair without guessing, and it flags budget-friendly alternatives like renting or borrowing high-cost gear, using inexpensive patch products, and repurposing leftover patches or ready-to-use kits where applicable. It guides your workflow so you don’t waste time hunting for tools, and it explains how to stage materials and keep the HVAC and living spaces protected while you work. This matters because a clear plan reduces guesswork, minimizes damage to surrounding areas, and keeps the project moving safely and efficiently.
Basic tools for inspection and repair
Before you start any ceiling repair, make sure you have the right tools on hand to diagnose and fix the problem.
- Mositure meter: Check moisture levels in the ceiling. Confirm by testing dry areas as a baseline.
If skipped: May miss hidden water damage. - Utility knife: Cut through tape or old repairs for access. Confirm by seeing clean cuts without tearing.
If skipped: Risk of damaging surrounding material. - Pry bar: Remove damaged sections safely. Confirm by prying out pieces without breaking them.
If skipped: May cause more damage trying to remove with hands. - Drywall tools: Repair holes and cracks. Confirm by checking that patches are smooth and even.
If skipped: Uneven repairs will be noticeable. - Tarp: Protect floors from water or debris. Confirm by laying it out before starting work.
If skipped: Floors may get damaged during repair. - Buckets: Collect water or debris. Confirm by having enough buckets to catch all runoff.
If skipped: Water can spread and cause more damage. - Ladder or scaffolding: Reach high areas safely. Confirm by setting up securely before climbing.
If skipped: Risk of falling or dropping tools. - Masking tape: Protect surrounding surfaces from paint or sealant. Confirm by taping off edges.
If skipped: Paint may spread to unwanted areas.
Quick rule: Always have the right tools on hand before starting any repair work.
Materials by repair type
Select materials based on whether you’re patching, sealing leaks, or treating mold.
- Drywall: For small holes and cracks. Confirm fit with measurements.
If skipped: Larger repairs will be needed later. - Joint compound: Smooth out drywall patches. Confirm by mixing to a smooth consistency.
If skipped: Patches won’t look professional. - Polymer-modified mortar: For concrete or plaster ceilings. Confirm by checking packaging for ceiling use.
If skipped: Regular mortar may not adhere properly. - Mold remediation products: Kill and prevent mold growth. Confirm by following instructions carefully.
If skipped: Mold can spread and cause health issues. - Pipe repair kit: Fix plumbing leaks quickly. Confirm fit with pipe diameter.
If skipped: Water damage will continue. - Roof cement: Seal roof penetrations or flashing. Confirm by testing on a small area first.
If skipped: Roof leaks can worsen. - Mortar mixer: Mix large quantities of repair materials. Confirm by setting up and testing before use.
If skipped: Mixing by hand may not be thorough enough. - Bonding agent: Ensure new material adheres to old. Confirm by applying according to instructions.
If skipped: New repairs may fall off over time.
Quick rule: Choose materials based on the specific repair needed for best results.
Prep steps and workspace setup
Before you start any ceiling work, make sure your workspace is ready and safe.
- Floor protection: Lay down plastic sheeting. Confirm by covering all floors under the repair area.
If skipped: Floors may get damaged from water or debris. - Lights and power: Set up adequate lighting. Confirm by testing lights before starting work.
If skipped: May not see details clearly, risking mistakes. - Drying time: Allow for proper drying after repairs. Confirm by checking moisture levels regularly.
If skipped: Repairs may fail due to remaining moisture. - Furniture protection: Cover furniture with tarps or plastic. Confirm by wrapping securely around edges.
If skipped: Furniture can get damaged from water or debris. - Containment: Set up barriers for mold and water containment. Confirm by sealing off HVAC systems.
If skipped: Mold spores may spread to other areas. - Disposal plan: Have bags ready for wet debris. Confirm by having enough bags on hand before starting.
If skipped: Debris can cause more damage if left lying around. - Ladder setup: Secure ladder or scaffolding safely. Confirm by checking stability and safety features.
If skipped: Risk of falling during repair work. - Mold testing: Check for mold before starting repairs. Confirm by using a moisture meter and visual inspection.
If skipped: Mold can spread to other areas during repair.
Quick rule: Always set up your workspace properly before beginning any ceiling work.
Step-by-step repair process (quick fixes to full restoration)
Start with an emergency stop: shut the water source or fix the leak if you can, move valuables out, lay down drop cloths, and block electrical hazards. Expect a rapid containment step to take about 10–20 minutes before you move to assessment and drying, then follow a clear, ordered sequence from patching to full restoration.
This approach keeps you safe and reduces secondary damage, while giving you a practical path through minor fixes, major repairs, and final cosmetic work. It matters because moisture control, proper sequencing, and documented progress help you avoid mold, peel, and rework, and it helps you plan material needs and timelines—from light repairs to full restoration—without getting overwhelmed.
Step-by-Step Repair Process
This sequence will guide you through repairing a damaged wall from start to finish, ensuring your work is safe and effective.
-
Cut away any loose or damaged drywall. This clears the area for new material without compromising structural integrity. Check by running your hand over the surface; it should feel solid and even. If you encounter extensive damage beyond your expertise, call a professional.
-
Install new drywall pieces to fill gaps. Use screws that are slightly countersunk but not too deep. The wall should look smooth with no visible screw heads sticking out. Tighten any loose screws by hand before moving on.
-
Tape joints and apply joint compound, feathering it out smoothly. This ensures a seamless finish when painted later. Check that the tape is flat and fully covered without bulges or gaps. If you find uneven application, sand lightly to smooth out bumps.
-
Let the first coat of compound dry completely before sanding. Drying time depends on humidity but typically takes 24 hours. Sand until surface feels smooth with no ridges or rough spots. Wipe down the area to remove dust before applying another coat.
-
Apply a second coat of joint compound, feathering out edges as needed. This step further hides seams and imperfections for a professional look. Check that the wall is free from any visible lines or joints when viewed closely. If you notice significant gaps or cracks, consider reapplying more compound.
Pro tip: Always wear protective gear like gloves and masks during sanding to avoid inhaling dust and irritating your skin.
Emergency measures and temporary fixes
If you’ve got an active leak or a burst pipe, your first job is to stop the water from causing more damage. Grab a bucket or a trash can and place it under the leak to catch the drips. If there’s a bulge in a pipe, poke a small hole with a screwdriver to drain out the water before it bursts. For roof leaks, cover the area with a tarp or heavy-duty plastic sheeting until you can get proper repairs done.
When dealing with valves and connections that are leaking, tighten them first. If they’re loose, a quick turn might stop the leak temporarily. But remember, these fixes are just to buy time while you plan your next steps. Don’t rely on buckets or tarps as permanent solutions—they’ll only delay necessary repairs.
Removing damaged material and drying
The materials you choose for cutting out damaged drywall and cleaning mold can significantly affect how well your repairs hold up over time. Use the right tools to avoid weakening surrounding structures.
- Drywall saw: For cutting out damaged sections of drywall, look for a fine-toothed blade that cuts straight lines without splintering. A cheap homeowner’s model is fine if you’re only doing this once or twice.
- Utility knife: Use to score and snap off small pieces of drywall. Make sure the blade is sharp; dull blades can tear paper and leave ragged edges.
- Mold cleaner: Choose a product specifically labeled for mold removal, not just bleach or detergent. Look for one that kills spores rather than just removing surface stains. Avoid using harsh chemicals on drywall as they can weaken the paper backing.
- Dehumidifier: Essential for drying out cavities after water damage. Rent a large unit if you don’t own one; it’s not worth skimping here. Look for models with adjustable humidity settings to control the environment precisely.
- Fans: Use box fans or oscillating fans to circulate air and speed up drying. Place them so they blow across wet areas, not directly into walls or ceilings where moisture can get trapped.
- Respirator mask: Wear a respirator when cleaning mold to protect your lungs from harmful spores. A basic N95 mask is sufficient for most DIY projects.
- Drywall repair kit: For patching holes after removal, use a lightweight compound that dries quickly and sands easily. Avoid heavy compounds as they can crack over time due to movement in the wall structure.
Pro tip: Always store drywall materials like joint compound in a cool, dry place to prevent clumping or spoilage. Mix only what you need for immediate use to avoid waste.
Repairing and refinishing the ceiling
To fix a damaged ceiling, start by patching any holes or cracks in the drywall. Use a lightweight compound to fill these areas, then let it dry completely before sanding smooth. Don’t rush this step; proper drying is key for a solid repair.
Next, apply tape over the patched area and cover with more compound. Smooth out any bumps or ridges as you go. Once everything dries, give it a light sand to ensure a seamless finish before priming. Use a stain-blocking primer to prevent old paint from bleeding through your new work.
Finally, match the texture of the existing ceiling with your repair area. This might mean using a spray can or sponge for stippling if that’s how it was originally done. Once you’re happy with the texture, apply two coats of paint to blend in perfectly with the rest of the room.
Advanced techniques for hard-to-reach or complex cases
This section covers step-by-step ways to handle hard-to-reach areas. Plan an assessment workflow for complex spaces like multi-story paths, vaulted ceilings, and hidden plumbing, so you can map water sources and leakage patterns without making things worse. Pair it with practical access strategies and safety rules for crawlspaces, attics, elevated joists, or temporary platforms, plus a plan to coordinate shutoffs with occupants or management.
You’ll learn how to choose and use inspection cameras, borescopes, fiber-optic probes, moisture meters, and lighting, with clear data-logging to trace leaks and document conditions. The goal is safer openings, controlled dust, and minimal disruption, while keeping some tasks DIY-safe and flagging when a licensed trade is needed. This approach helps prevent mold, limit structural surprises, and reduce costly callbacks by planning carefully from the start.
Working on high or vaulted ceilings
When dealing with high or vaulted ceilings, safety is your top priority. Use scaffolding for stability and reach over tall ladders. Rigging must be secure to prevent falls. When applying compound or texture overhead, use a longer pole extension or a specialized spray gun designed for high-reach work.
For scaffold setup, ensure it’s level and anchored properly. Always wear fall protection gear like harnesses and safety nets. Work in sections to avoid overreaching and causing damage to the ceiling structure. If you’re working alone, consider hiring a professional for scaffolding or rigging assistance.
When applying compound or texture overhead, be mindful of your technique. Use lighter strokes and less pressure to prevent drips and sags. Allow each layer to dry completely before adding another coat. This prevents the weight from pulling down on the ceiling structure.
Locating hidden leaks with cameras and dye tests
To find hidden leaks, use borescopes or inspection cameras to look inside walls and ceilings without tearing them apart. These tools can spot water stains, mold growth, and damaged insulation that indicate a leak.
Infrared imaging helps detect moisture by showing temperature differences on the ceiling surface. Wet areas will appear cooler than dry ones. This method is non-invasive and gives you a clear picture of where to focus your repair efforts.
For plumbing leaks, food-safe dye tests can pinpoint the exact location. Injecting a small amount of colored dye into the suspected pipe or joint allows you to trace the leak path easily. Be sure to use only approved dyes that won’t harm pipes or cause environmental issues.
Repairing structural or repetitive leak problems
If leaks are recurring, it’s time to look at the bigger picture. Structural repairs might be necessary if framing is compromised by water damage. Reinforcing weakened areas with new supports can prevent further issues.
In cases of attic sheathing damage due to roof leaks, replacing damaged sections ensures a watertight seal. Use high-quality materials and proper installation techniques to avoid future problems. This may involve removing old shingles or flashing to access the damaged area.
For plumbing-related leaks, rerouting pipes might be necessary if joints are repeatedly failing. Consult with a licensed plumber to assess the situation and provide solutions that won’t compromise your home’s integrity. Properly sealing and insulating new pipe runs is crucial for long-term effectiveness.
Cost estimates, budgeting, and when to hire a pro
You’ll want a clear cost breakdown by repair scope: minor (a small ceiling patch), moderate (water intrusion and drywall), and major (structural work or extensive mold remediation). Include materials, tool rental, and labor, plus inspection or diagnostic fees, permit costs if needed, equipment rental, cleanup, and possible insulation changes; note that prices vary by region and method.
Use a budgeting framework with a contingency and a plan for unexpected problems, plus clarity on whether labor is billed hourly or by project and whether you’re DIY or hiring a licensed pro. Red flags for hiring a pro include missing license or insurance, vague estimates, no written scope of work, no warranties, or outdated references; practical vetting steps are to obtain multiple quotes, schedule a site visit, check references, and request lien waivers before payment.
Ballpark costs by damage level
For minor ceiling water damage, such as a small patch from a leaky pipe, you can expect to spend around $50 to $150. This includes materials like drywall and joint compound, plus any necessary tools or rentals.
Moderate repairs, involving more extensive water intrusion and potential mold remediation, could cost between $300 and $800. Here, you’ll need additional supplies for cleaning and sealing the area, along with labor costs if you’re not handling it yourself.
Major structural or roof-related issues can run into thousands of dollars. Expect to pay anywhere from $2,500 to over $10,000 depending on the extent of repairs needed. This includes hiring professionals for inspections and specialized equipment rentals.
Comparing DIY vs. professional tradeoffs
DIY ceiling repair can save you money, but it also comes with risks like improper fixes or hidden damage that could lead to bigger problems down the line. Professionals have experience and insurance, which is crucial if something goes wrong.
If your home has significant water damage or structural issues, hiring a pro might be necessary to ensure compliance with building codes and safety standards. A licensed contractor will also provide warranties on their work, giving you peace of mind.
For minor repairs, DIY makes sense if you have the tools and know-how. However, for anything beyond basic patching or when dealing with mold, it’s best to consult a professional to avoid costly mistakes.
Tips for renters vs. homeowners
Homeowners should document all repairs and keep receipts as part of their home maintenance records. For major issues, consider setting aside a contingency fund to cover unexpected costs.
Renters need to notify their landlord immediately upon discovering water damage. Document the extent of the damage with photos or videos and follow your lease agreement for reporting procedures. Your landlord is responsible for repairs under most rental agreements.
While waiting for professional help, renters can take temporary measures like placing towels over leaks or using fans to dry out damp areas. However, avoid making permanent fixes without permission from your landlord.
Preventive measures and maintenance to avoid future ceiling water damage
A solid preventive plan beats chasing leaks. Do a seasonal routine that covers pre-winter and post-winter checks on the roof, attic insulation, and vent seals, plus ongoing ceiling and moisture monitoring after heavy rain. Learn to spot the small stuff early, seal minor gaps, and know when to call a licensed pro for roofing or plumbing work.
This approach pays off by reducing surprise damage and costly drywall repairs. It also stacks long-term upgrades—better roofing components, upgraded insulation, and smarter plumbing options—around reliable maintenance habits. Build in regular inspections, document what you see, and practice shutting off water or vents during problems or vacations to limit exposure and slow leaks while you fix the issue.
Routine inspections and seasonal tasks
Use this checklist before winter to prevent leaks and after heavy storms to catch early signs of damage.
- Roof integrity check: Look for missing or damaged shingles, cracks in flashing. Skip at risk of major roof failure.
- Gutter cleaning: Remove debris from gutters and downspouts. Clogged gutters can cause water to overflow and damage your home.
- Attic ventilation: Ensure proper airflow through vents, preventing moisture buildup. Neglecting this leads to condensation issues.
- Chimney seals: Inspect for gaps or cracks around the chimney cap. Missing seals allow water entry during rain.
- Ceiling moisture monitoring: Check ceilings and walls for signs of dampness, staining, or mold growth. Early detection prevents major damage.
- Plumbing valve maintenance: Test and replace faulty valves to prevent leaks. Skipping this can lead to significant water damage.
- Downspout extensions: Ensure downspouts direct water away from your foundation. Improper drainage causes basement flooding.
- Roof flashing inspection: Look for loose or deteriorated metal pieces around roof penetrations. Weak flashing allows water to seep into the attic.
Quick rule: Regular inspections catch small issues before they become big problems.
Upgrades that reduce recurrence
Investing in better flashing, high-quality pipe materials, and insulation can significantly lower the risk of future ceiling water damage. Upgrading your plumbing system with smart leak detectors also provides an early warning system.
For example, installing ice-and-water shield under shingles adds a waterproof layer to prevent leaks around roof edges during heavy snow or ice storms. Similarly, using PVC pipes instead of galvanized steel can reduce corrosion and extend the lifespan of your plumbing system.
In addition, consider adding insulation in areas prone to condensation like attics or crawl spaces. Proper insulation helps maintain consistent temperatures and reduces moisture buildup that leads to mold growth.
Long-term monitoring and warranty tips
Maintain a proactive approach by installing wireless moisture sensors in key areas like attics, basements, or around plumbing fixtures. These devices alert you to potential leaks before they cause significant damage.
Keep detailed records of all repairs and maintenance work. Documenting these efforts can be crucial for warranty claims or insurance purposes if future issues arise.
Schedule professional inspections every few years, especially in older homes with aging infrastructure. Regular checkups help identify hidden problems early on before they escalate into major concerns.

Conclusion
Fixing a ceiling water problem is doable, but safety and durability come first. A solid plan saves you time, protects your home, and keeps the repair from turning into a bigger mess.
Start with a simple, practical checklist: inspect for active leaks above, shut off the water if needed, dry the area, assess the damage, gather the right tools and materials, trace the source, perform any quick fixes only after drying, then decide if you can handle full restoration or if you need a pro, and finally test for leaks and keep monitoring the area.
Common mistakes to avoid include ignoring small stains or damp spots, rushing repairs on wet materials, skipping safety gear, and sealing a leak without finding and fixing the actual source. Always dry thoroughly, work in a well-ventilated space, and work from a safe stance with proper PPE. If the leak is active above the ceiling or you’re unsure about tracing the source, pause and reassess instead of pushing ahead.
When in doubt about hard-to-reach areas, unusual materials, or structural concerns, a professional should be consulted. You can push through simple fixes with care, but a pro saves time, money, and future headaches. Stay methodical, respect safety, and you’ll keep the ceiling strong and the room looking good.
FAQ
What causes ceiling water damage?
Water damage comes from leaks above. It can be a bad roof, a burst pipe, or a dripping upstairs bath. Find the source before you fix the ceiling.
Can I DIY repair a water damaged ceiling right away?
You can patch the ceiling, but do not ignore the leak. Dry the area to prevent mold. If the leak is active, stop it first or your repair will fail.
What tools do I need for a basic repair?
Keep a utility knife, drywall saw, sanding block, and joint compound ready. You’ll also need drywall screws, tape, and a patch or replacement sheet. Have a drop cloth and eye protection on hand to stay safe.
How do I prevent future ceiling leaks?
Fix the root cause first. Check for missing shingles, damaged flashing, and clogged gutters. Regular roof and plumbing checks save big headaches later.