
Introduction
A flush drywall access panel is a removable hatch that sits level with the wall to reach plumbing shutoffs and valves. Installing one means planning a clean opening, securing it to the studs, and making sure it blends with the drywall. It’s a practical DIY job that emphasizes careful cutting, fitting, and finishing so the panel disappears when closed.
Start by locating plumbing lines behind the wall and choosing a spot that stays accessible yet unobtrusive. Carefully cut the drywall opening, fit the panel, and secure it according to the panel’s instructions or local rules. Check for proper alignment, a clean edge, and a good seal to keep moisture and dust out, and know how to remove it for future maintenance.
Key takeaways
- Plan panel placement for easy access while maintaining hidden finish behind drywall.
- Choose panel size based on available wall space and framing clearances.
- Shut off relevant services and verify no flow before opening area.
- Mark precise opening, align with studs, and confirm structural support.
- Use waterproof sealants and tile-safe gaskets around the flush opening.
- Follow manufacturer instructions for mounting hardware; avoid overtightening screws.
- Test operation, check for leaks, and verify access remains unobstructed.
Table of Contents
- Introduction
- Key takeaways
- Why Install a Flush Drywall Access Panel and Where to Use It
- Tools and Materials Checklist
- Measuring and Selecting the Correct Panel Size and Placement
- Preparing the Wall and Framing the Opening
- Installing Different Flush Panel Mounting Systems
- Working with Tile, Waterproof Assemblies, and Cleanouts
- Finishing, Paint Matching, and Visual Checkpoints
- Testing, Maintenance, and Troubleshooting Common Problems
- Conclusion
- FAQ
Why Install a Flush Drywall Access Panel and Where to Use It
Flush panels hide plumbing shutoffs, valves, and cleanouts while keeping walls clean and accessible. They are a good choice when you want a low-profile look and protection from damage or dirt. They can be easier to maintain than recessed or surface-mounted options.
Typical locations include behind sinks, in utility rooms, behind tubs, and at cleanouts. Use them where you want quick access without a visible door or bulky door frame. Consider also how the panel blends with nearby finishes for the best aesthetic result.
Common use cases and damage-prevention benefits
A flush drywall access panel is a must-have for various plumbing scenarios. It’s your go-to when you need quick, easy access to:
Service – For routine maintenance or repairs on valves, shutoffs, and traps.
Emergency shutoff – To quickly turn off water flow in case of leaks or bursts.
Trap cleanouts – To clear clogs without tearing up walls. Plus, it helps prevent accidental damage and trip hazards by keeping access points flush with the wall.
Contraindications and alternatives
A flush panel isn’t always the best solution. Here are some situations where you might want to consider alternatives:
Large access needs – If you need wide or tall access, a larger cabinet or removable trim might be better.
Chase systems – For extensive plumbing work, chase systems can provide wider access.
Not suitable for all walls – Avoid using flush panels on walls with heavy traffic or where damage is likely. In these cases, surface-mounted options might be more appropriate.
Tools and Materials Checklist
Prepare common handheld tools like a tape measure, utility knife, straightedge, pry bar, ruler, and a level. Have a drill/driver with assorted bits and a screwdriver set on hand. Include a hammer and a small framing square for accuracy.
For cutting, you may need a drywall saw, oscillating tool, or tile-cutting tool if you are cutting behind tiled surfaces. Stock a magnetic strip, caulk, paint supplies, and any mounting hardware called out by the panel manufacturer. Check labels or instructions for tile or waterproof assemblies to see if specialty tools are required.
Tools — cutting, fastening, and finishing
Before you start any concrete work, make sure you have the right tools. Use this checklist to double-check your inventory.
- Drywall saw or jigsaw: For making clean cuts in concrete forms. Check blade is rated for concrete and in good condition.
- Reciprocating saw: For rougher, faster cuts. Ensure blade is designed for concrete.
- Drill with masonry bit: For drilling holes in concrete forms. Check bit size matches anchor or rebar requirements.
- Level: To ensure forms are straight and plumb. Use a 2′ or 4′ level for best accuracy.
- Tape measure: For accurate measurements. Check zero point and markings are clear.
- Chalk line: For marking cut lines on forms. Ensure chalk is fresh and visible.
- Finishing tools (trowel, edger, float): For smoothing and finishing concrete surfaces. Check trowel size matches job requirements.
- Optional: Concrete vibrator: For consolidating concrete in forms. Reduces air pockets and improves strength.
Quick rule: Always check your tools before starting work to avoid costly mistakes or delays.
Materials and panel types to choose from
Before you start installing your wall panels, use this checklist to ensure you’ve got the right materials for your job. This will save you time, money, and frustration.
- Panel Material: Check if it’s suitable for your location. Wet areas like bathrooms need moisture-resistant materials like PVC or acrylic. Dry areas can use MDF, plywood, or even metal.
- Panel Thickness: Measure the panel thickness to ensure it matches your wall stud spacing. Common thicknesses are 1/4″, 3/8″, and 1/2″.
- Panel Size: Verify the panel size fits your wall dimensions. Measure your walls and check if panels need to be cut.
- Mounting Style: Choose between magnetic, hinged, screw-on, or gasketed based on your needs. Magnetic is easy to install but not secure. Screw-on is secure but visible.
- Panel Edges: Check if edges are finished or need trimming. Some panels come with prefinished edges, others may require sanding and painting.
- Seams: Ensure you have enough seaming material (like adhesive or tape) to cover all joints. Check the manufacturer’s recommendations for seam width.
- Trim Pieces: Verify you’ve got all necessary trim pieces (like corner beads, baseboards, and capping) to finish your job.
- Underlayment: If using panels over existing walls, check if you need an underlayment for leveling or soundproofing. Green board is moisture-resistant, blue board is cement-based.
Quick rule: Always check product labels and manufacturer instructions to ensure you’re using the right materials in the right way. It’s your best defense against costly mistakes.
Material specs and standards explained
Before you head to the store or start any work, use this checklist to ensure your materials meet your project’s needs. This will help you avoid costly mistakes and rework.
- Fire Rating: Check product labels for fire resistance ratings. Ensure they meet local building codes and your project’s requirements. Ignoring this can lead to safety hazards and potential fines.
- IP/Water Resistance: Verify the Ingress Protection (IP) rating on products that will be exposed to moisture or weather. A quick visual check of the label should suffice. Neglecting this can result in water damage and reduced lifespan of materials.
- Load Rating: Confirm load ratings for any materials bearing weight, like concrete slabs or joists. Measure and calculate your loads to ensure they’re within safe limits. Overloading can cause structural failures.
- Panel Size: Check panel sizes match your project’s dimensions. Measure twice before ordering to avoid costly mistakes. Incorrect sizes lead to waste, rework, and additional costs.
- Thickness: Ensure panel thicknesses are suitable for your application. Too thin can cause structural issues, too thick may not fit within your design. Always measure and double-check.
- Finish/Texture: Verify the finish or texture of materials matches your project’s aesthetic goals. Check samples in person to ensure they meet expectations. Discrepancies can lead to unhappy results.
- Manufacturer Specs: Always check manufacturer instructions and specifications before purchase. This ensures you’re getting the right product for your needs. Skipping this step can result in incompatible materials.
- Local Code Requirements: Consult local building codes to ensure all materials comply with regulations. Non-compliance can lead to fines, rework, or even project halts.
Quick rule: Always double-check measurements and specifications before purchasing materials. It’s cheaper to verify at the store than to correct mistakes on-site.
Measuring and Selecting the Correct Panel Size and Placement
Locate the plumbing element you need to access before cutting. Confirm that you have enough working clearance to open and operate the panel completely. Recheck surrounding finishes to ensure a flush look when installed.
Choose a panel size that provides full access without crowding the opening. Do a mock-up with cardboard or scrap drywall to verify clearance and alignment. If unsure, consult the product data sheet or manufacturer Instructions for recommended dimensions.
How to locate valves, shutoffs, and cleanouts behind finished wall surfaces
First off, you need to find those hidden plumbing fixtures. If you’ve got the plans, use ’em. Otherwise, grab a stud finder with a deep scanning sensor.
Mark the center of each fixture on the wall. Then, carefully cut out small access holes using a drywall saw or utility knife. Just big enough to poke your finger through and feel around.
Once you’ve located the exact spot, mark it clearly. You’ll need this for measuring and cutting your panel later. Be gentle with that drywall – we don’t want no unnecessary damage here.
Sizing guidelines and clearance considerations
Now, measure the size of your valve or cleanout. You’ll need room to work, so add at least 2 inches on all sides. That’s for your hands and tools.
Check if there are any obstructions nearby like studs or other pipes. You don’t want no surprises when you’re cutting that panel out.
If you’re unsure about the size, it’s better to go bigger than smaller. Consult the manufacturer if needed. Remember, we want this panel to be flush, not sticking out like a sore thumb.
Preparing the Wall and Framing the Opening
Mark the cutout carefully on the wall, avoiding existing pipes or wires. Protect nearby finishes with tape or protective coverings. Double-check your layout before cutting to minimize mistakes.
Cut the drywall opening to match the panel dimensions and clear any rough edges. If you are backing a cavity for mounting, ensure studs or blocking provide solid support. Keep plumbing lines protected during any framing work.
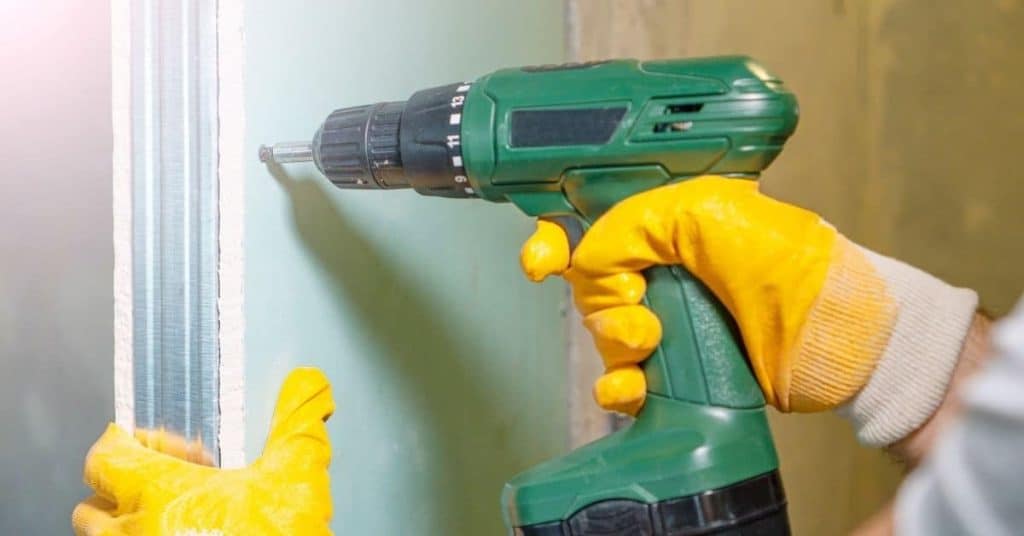
Marking and cutting clean, square openings in drywall or tile
First, mark your cut lines using a level to ensure they’re straight. For drywall, score along the line with a utility knife before snapping it off. This prevents chipping.
For tile, use a wet saw to make clean cuts. Keep the blade well-lubricated and move slowly for best results. Protect adjacent tiles by scoring them lightly first.
Use a drywall saw or multi-tool with a blade designed for cutting drywall to cut out the square opening. Work from both sides if possible, to avoid cracking the paper facing.
Framing, blocking, and backing requirements
If your panel isn’t flush with studs, add blocking or a simple frame for support. Use 2x4s or 1x4s, depending on the size of your panel.
Measure and cut pieces to fit snugly between studs. Secure them with screws, ensuring they’re level and plumb. This provides a solid backing for your panel.
If you have an irregular cavity or offset plumbing, you might need to build out the frame to create a flat surface for the panel. Use shims if necessary, but ensure everything is secure and won’t move over time.

Installing Different Flush Panel Mounting Systems
For magnetic trim panels, align the trim with the opening and secure per the instructions. Check that magnets hold firmly and the panel sits flush when closed. Adjust if needed to prevent binding.
Hinged access doors require proper hinge alignment and a secure latch. Ensure the door remains removable for emergencies and check it opens smoothly without gaps. For screw-on face panels, align the face plate and fasten evenly to avoid warping.
Magnetic or trimless flush panels
Start by positioning your panel. Mark the center and edges on the wall.
Secure magnetic receiver plates or inserts using drywall screws. Keep them level and aligned with your marks.
Ensure a flush fit. Use shims if needed. Match the finish to your wall for a seamless look.
To keep magnets aligned, use a small amount of removable adhesive on the back of the panel or apply magnetic tape along the edges.
Hinged access doors (swing-open)
Mount hinges first. Position them so the door swings open fully without hitting obstacles.
Ensure reveal clearance. The door should close flush with the wall, not overlap or gap.
Install strike and latch hardware according to manufacturer instructions. Test the door to ensure it latches securely.
To keep the door flush when closed, adjust hinge screws as needed. Tighten or loosen until the door sits level and flush with the wall.
Screw-on and gasketed panels
Mark pilot hole locations. Drill holes slightly smaller than your screws to prevent cracking drywall.
Choose the right fastener type. Self-drilling screws work well for drywall, while wood screws are better for framing.
Install the gasket around the panel’s edge for moisture resistance. Ensure it’s properly seated and covers any gaps.
Tighten screws evenly using a screwdriver or drill. Follow manufacturer instructions for torque guidance. Don’t overtighten and warp the panel.
Working with Tile, Waterproof Assemblies, and Cleanouts
In tiled walls, plan for clean tile cuts and maintain waterproof layers beneath. Use appropriate sealants and backer board as required by the waterproofing system. Verify tile thickness and profile to keep the panel flush.
When dealing with cleanouts or wet-area cleanouts, preserve access while maintaining the waterproof envelope. Follow manufacturer guidance for grout, membranes, and sealants. If in doubt, check the tile-cutting and waterproofing instructions before proceeding.
Installing flush panels in tiled walls or behind shower surrounds
Before you start, prep the substrate. Tiles need a solid base to stick to.
Mark and cut openings for your panel. Use a tile saw if needed. Keep cuts clean and square.
Use tile trim or edge profiles around the opening to maintain aesthetic continuity. They’ll hide any gaps between tiles and the panel.
Install the panel, then grout. Work in small sections to keep grout lines clean and consistent.
Waterproofing, vapor barriers, and gaskets
Manage waterproof membranes carefully. Cut them around the panel opening, then seal with tape.
Use a vapor barrier behind the panel to prevent moisture buildup. Seal it too.
Gaskets or sealants go on the panel before installation. They create a watertight seal. Don’t block access points though.
Follow manufacturer guidance. Some panels need specific gasket types or sealant applications.
Cleanout-specific access considerations
Typical cleanouts need at least 18″ of clearance. More if you’re working in tight spaces.
Access frequency matters too. If it’s a monthly check, easy access is crucial. Less often? You can compromise a bit.
Install panels so cleanouts are easy to reach. But don’t compromise waterproofing. Use gaskets or sealants around the cleanout opening.
When reinstalling after cleaning, make sure it’s watertight. Check for any leaks before moving on.
Finishing, Paint Matching, and Visual Checkpoints
Blend the panel seam with paint or texture that matches the surrounding drywall. Apply edge treatments or caulk carefully to minimize visible gaps. Inspect the panel and wall from different angles to confirm flush alignment.
If gaps or misalignment appear, reassess the cutout and panel fit. Rework edges or reseal as needed, using compatible paint and texture products. Confirm that hardware operates smoothly after finishing.
Finishing techniques for drywall and textured walls
Use these techniques to blend your flush panel seamlessly into surrounding finishes.
- Skim-coating: Apply joint compound thinly over the seam, feathering out to match wall texture.
- Feathering: Spread compound wider and thinner as you move away from the seam for a smooth transition.
- Texture replication: Use a texture spray or brush-on texture to mimic surrounding walls’ finish.
- Avoid over-sanding: Too much sanding can create dust and remove compound, leaving visible marks.
- Check for high/low spots: Feel the seam with your hand; any raised or sunken areas need more attention.
- Prime before painting: Apply a coat of primer to seal the area and help paint adhere evenly.
- Avoid heavy handedness: Too much compound or pressure can cause ridges or uneven surfaces.
- Test small areas first: Ensure your techniques match surrounding finishes before committing to large areas.
Quick rule: Patience and light touch are key for a seamless finish.
Visual checkpoints and an inspection checklist
Use this checklist to ensure your flush panel is installed correctly and looks great.
- Alignment: Check that the panel is level, plumb, and square with surrounding walls using a torpedo level or laser level.
- Flushness: Ensure the panel sits even with the wall surface; no gaps or bulges.
- Paint match: Compare the panel’s color to surrounding walls under different lighting conditions.
- Seal integrity: Check that caulk or sealant around the panel is intact and looks natural.
- Unobstructed access: Open the panel (if applicable) to ensure it swings freely without obstruction.
- Check for warping: Press gently on the panel; any give or warp indicates a problem.
- Look for nail pops: Check around the panel’s edges for any popped nails that could cause gaps.
- Inspect hardware: Ensure hinges, latches, or other hardware are secure and functioning properly.
Quick rule: A thorough inspection ensures your flush panel looks great and functions perfectly.
Testing, Maintenance, and Troubleshooting Common Problems
Test the panel by opening and closing it to verify operation and clearance. Check access to valves and shutoffs through the panel without force. Look for smooth movement and any rubbing or binding.
For maintenance, inspect seals, screws, and mounting repeatedly. Address sticking panels, loose fittings, or signs of water intrusion with recommended fixes from the manufacturer. If issues persist, consult the product instructions or label for specific remedies.
How to test and verify reliable access
First, make sure you know where your panel is located. Mark it if needed.
Gently pull the panel to open it. If it’s stuck, try jiggling it or using a flathead screwdriver to pry it loose. Never force it open.
Once open, use a flashlight to inspect inside. Ensure there are no obstructions and you have enough room to work. Try operating the valves by hand to ensure they’re functional and move freely.
Troubleshooting: misalignment, leaks, and loose panels
If your panel is leaking, first check the gasket around the edge. If it’s damaged or missing, replace it.
For misaligned panels, adjust the framing behind the drywall. You might need to add or remove shims. Never try to force a misaligned panel into place.
If your panel is loose, check the screws. Tighten them if necessary. If they’re stripped, you’ll need to replace them with longer ones that grab the framing securely. Never use drywall screws alone; they won’t hold in this application.
Conclusion
A flush drywall access panel is not just neat; it protects plumbing, keeps serviceable shutoffs accessible, and preserves the room’s look when done right. Stay focused on safe installation, correct sizing, and solid sealing so you won’t have to tear it out later.
Verify the panel size and placement, frame the opening accurately, follow the mounting system instructions, and respect tile and waterproof assemblies. Do a dry fit first, then cut once, then test the system for clearance, leaks, and paint match. Finish with a clean coat of paint to blend the panel and verify operation by opening and closing it several times in a controlled way.
Common mistakes to avoid are skipping proper waterproofing or backer support, mismeasuring and oversized or undersized openings, and over-tightening fittings that crack tile or drywall. Always cut square, measure twice, turn off water and power when needed, and test a small area before committing. If you’re unsure about flameproof or waterproof details, or the tile enclosure and cleanout connections, call a pro instead of pushing forward.
When the job is within your comfort zone, complete the installation confidently and check it every season. A well-executed panel saves time, prevents damage, and keeps your plumbing easily reachable without sacrificing appearance.
FAQ
How do I choose the panel location to avoid interfering with plumbing and framing?
Plan around existing pipes and shutoffs. Check the panel’s required clearances and use the framing plan to locate studs or blocking for solid mounting. Always review the panel’s label and manufacturer instructions for placement guidelines.
Can I install over tile or waterproof membranes without issues?
Yes, but it needs careful compatibility with tile, waterproofing, and finish. Make sure the panel sits flush with the final surface and that any membrane details aren’t compromised. Follow the product instructions and local rules for tile and waterproof assemblies.
What mounting method is best for drywall versus masonry walls?
Use the mounting system designed by the panel and anchor it to solid backing. For drywall, secure to studs or blocking; for masonry, use appropriate anchors and sealants. If in doubt, check the label for where and how it should be installed.
How should I maintain the access panel and troubleshoot leaks after installation?
Test the shutoffs and any cleanouts regularly. If you notice moisture or leaks, shut off the supply and inspect the panel area first. If the issue isn’t obvious, refer to the manufacturer instructions and local guidelines for service steps.