
Introduction
Concrete scaling from de-icers is surface flaking and loss of the concrete paste caused or accelerated by salt exposure and freeze-thaw action. I’ll walk you through how to spot salt damage, what causes it, and practical ways to reset the surface so your slab is safe and serviceable again. This is written for a homeowner who wants hands-on fixes rather than a textbook explanation.
Look for powdery, rough areas, loose chips, and map-like peeling that start at the surface and often get worse after winter; test suspect spots by probing with a screwdriver and checking for white salt residue. I’ll cover simple repairs, material choices to bond a new surface, and sensible prevention steps while noting when to check product labels, manufacturer instructions, or local rules.
Key takeaways
- Diagnose scaling by de-icers starts with surface moisture, discoloration, and curling edges.
- Symptoms include flaking, powdery dust, hollow sounds when tapped, and rough texture.
- Use on-site checks like moisture staining and side-by-side comparison of old vs new concrete.
- Repair options range from surface retouch to removal and re-paving if compromised.
- Prevention hinges on design choices, proper curing, and controlled de-icer use.
- Safety note: avoid high-concentration de-icers, follow label instructions.
Table of Contents
- Introduction
- Key takeaways
- What Is Concrete Scaling from De-Icers?
- Key Causes and Risk Factors for De-Icer Scaling
- Identifying Salt-Related Symptoms and Visual Checkpoints
- Diagnostic Tests and on-Site Checks
- Prevention Strategies During Design, Placement, and Curing
- Winter Maintenance: Safe De-Icer Use and Alternatives
- Repair Options for Scaled Concrete Surfaces
- Common Diagnostic and Repair Mistakes, and Planning for New Installations
- Conclusion
- FAQ
What Is Concrete Scaling from De-Icers?
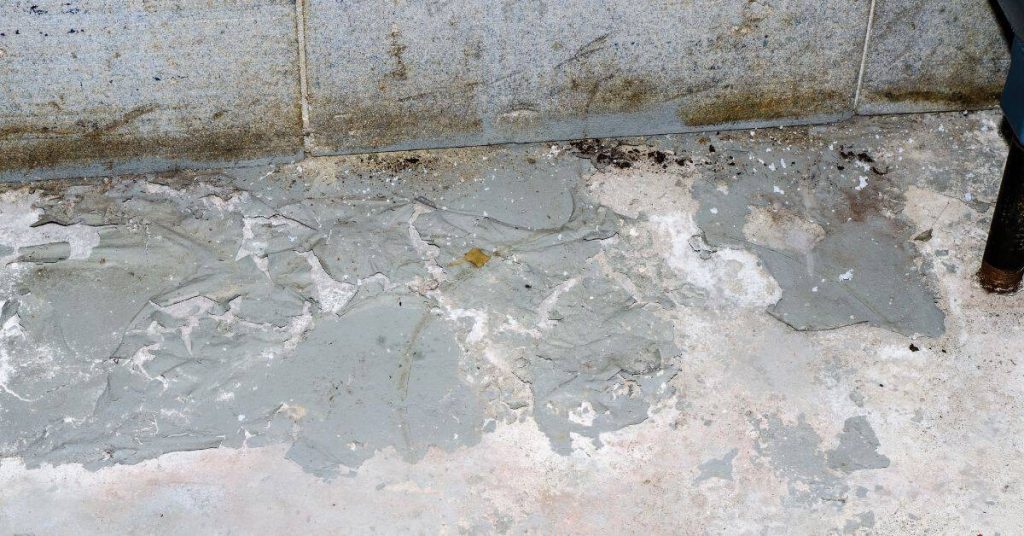
Scaling is the peeling or flaking of thin surface layers of concrete that is caused or accelerated by de-icing salts; it looks like a powdery, flaky skin coming off rather than large chunks missing. Unlike spalling, which penetrates deeper and often exposes aggregate, or popouts, which are localized chips from internal voids or aggregate reaction, salt scaling is shallow and surface-focused.
Look for visual and tactile cues such as a chalky residue, salt staining, and edges that lift or crumble when probed rather than deep cracks or voids. To confirm salt-related scaling, compare surface thickness and texture, check for recent salt exposure or freeze–thaw cycles, and do simple moisture and residue checks—verify any specific test or product guidance on the label or product data sheet before proceeding.
How scaling differs from spalling and popouts
Scaling, spalling, and popouts are all signs of concrete deterioration, but they differ in appearance, depth, and cause.
Scaling is the peeling or flaking of thin surface layers. It’s like a bad sunburn on your skin – it only affects the top layer. This happens when de-icing salts break down the concrete’s surface over time.
On the other hand, spalling goes deeper. It’s like a severe burn that reaches into the flesh. Spalling involves larger pieces of concrete breaking off, exposing the aggregate and steel reinforcement underneath. This is often caused by excessive loading or improper curing.
Popouts are even more severe. They’re like sudden blisters – explosive failures of the concrete surface. Popouts happen when air pockets in the concrete expand due to heat or pressure, pushing out pieces of the surface. This is usually a result of poor concrete placement and finishing.
Chemical and physical mechanism of salt damage
De-icing salts cause concrete scaling through a combination of chemical and physical processes.
The chemical part involves chloride ions from the salt penetrating the concrete surface. These chlorides react with the concrete’s moisture, causing it to expand and contract. This process, called freeze-thaw cycling, weakens the top layer of concrete over time.
At the same time, the salts also speed up surface carbonation. Carbon dioxide from the air reacts with the concrete’s calcium hydroxide, forming calcium carbonate. This makes the surface more porous and vulnerable to further damage.
The combination of these processes leaves the top layer of concrete brittle and prone to scaling. It’s like a tree with dead bark – it looks fine on the outside, but it’s already detached from the living wood underneath.
Key Causes and Risk Factors for De-Icer Scaling
Direct salt contact and repeated wetting/drying or freeze–thaw cycles are the primary drivers: salts draw moisture into the surface, can crystallize, and stress microcracks until thin layers flake off. Inadequate early curing and wrong material choices (high permeability mix, missing air-entrainment) leave concrete more porous and vulnerable to this surface attack.
Also watch substrate and usage factors—poor surface prep, laitance, open joints, and heavy traffic magnify salt abrasion and surface loss. Use basic field checks (visual salt halos, moisture patterns, simple absorption tests) and consult manufacturer instructions or a local spec when picking mixes, curing methods, or sealers to reduce risk.
De-icing chemicals and how they attack concrete
De-icers are designed to lower the freezing point of water, but they can be harsh on your concrete. Common de-icers include:
- Chloride-based de-icers: Like rock salt (sodium chloride) and calcium chloride. These are cheap but aggressive on concrete.
- Sands and cinders: Abrasive, they wear down the surface over time.
- Alternative de-icers: Less harsh options like magnesium chloride or acetate-based products, which cause less damage but may be more expensive.
The problem with de-icers is that they penetrate concrete’s porous surface. When water freezes within these tiny capillaries, it expands and forces the concrete to scale off in layers.
Curing temperature, timing, and early exposure risks
Proper curing is crucial for concrete’s strength development. Inadequate curing or early exposure to salts and freezing can make your concrete vulnerable:
Ideal curing temperature should be around 65–85°F (18–29°C) for several days after placement. This helps the concrete gain enough strength to resist de-icer attacks.
Exposing concrete to freezing temperatures before it’s properly cured can cause rapid scaling and damage. Keep your concrete protected from these early threats.
Mix design, finishing, and aggregate-related vulnerabilities
A well-designed mix is key to salt-resistant concrete. Here’s what to watch out for:
Low air entrainment: Air bubbles help water expand without causing damage. Low air content makes your concrete more susceptible to scaling.
Poor aggregate selection: Soft or porous aggregates can absorb de-icers and cause scaling from within. High water-cement ratios and overworking the surface also increase risk by creating a weak, permeable top layer.
Identifying Salt-Related Symptoms and Visual Checkpoints
Salt-related scaling shows as flaky, powdery surface loss, whitish crusts or efflorescence, and dull or bleached patches near salted zones; it differs from deeper freeze–thaw cracking or structural spalling. Run your eye along joints, edges, and areas closest to roads or salt bins—patterns concentrated near treatment routes point to de-icer involvement.
Do tactile checks: gentle scratching should reveal thin layers that come off easily, and darker wet patches may indicate retained moisture that feeds damage. Photograph affected areas, note location relative to salted routes, and if uncertain, perform a wipe/rinse to see if residues are soluble; follow any test procedures on product labels or data sheets for confirmation.
Visual checkpoints for scaling vs other defects
Use this checklist to differentiate salt scaling from other concrete deterioration.
- Surface texture: Salt scaling feels gritty or chalky. Other defects may feel rough but not powdery.
- Color shifts: Look for duller gray or white patches on scaled surfaces. Spalls and popouts usually have sharp edges.
- Flaking edges: Scaled surfaces lose thin, uniform flakes. Popouts leave deep, abrupt holes.
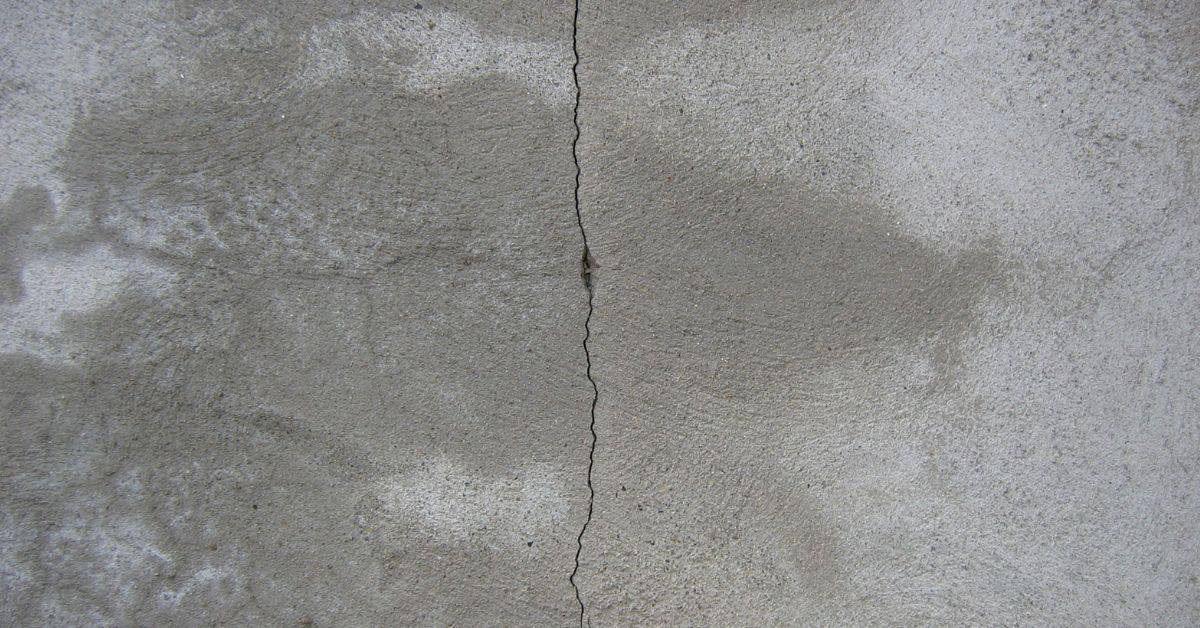
- Microcracking: Salt scaling causes parallel cracks near reinforcing or joints. Crazing is more random and widespread.
- Crack patterns: Diagonal or vertical cracks suggest differential salt exposure. Other defects often follow random paths.
- Efflorescence: Whitish deposits indicate salt presence, but not all efflorescence is caused by de-icers.
- Depth of damage: Salt scaling affects the surface layer only. Spalls and popouts expose underlying layers or aggregate.
- Edge definition: Scaled edges are usually well-defined, while spalls and popouts have ragged, irregular borders.
Quick rule: If you see thin, powdery flakes with a gritty texture, it’s likely salt scaling. Other defects typically look different.
Contextual clues that indicate salt involvement
Consider these factors to strengthen your case for salt-caused scaling.
- Location: Check areas near curbs, driveways, or wheel paths – common salt application zones.
- Proximity to salt sources: The closer to salt bins or treated zones, the more likely it’s salt damage.
- Shaded vs. sunlit spots: Salt scaling is more common in shaded areas due to slower drying and increased moisture retention.
- Seasonal timing: Recent snow melt cycles or prolonged exposure after salting increases the likelihood of salt damage.
- Comparative assessment: Check non-salted areas for localized damage. If symptoms are worse near treated zones, it’s likely salt scaling.
- Weather events: Recent heavy snowfall or freeze-thaw cycles may indicate increased salt use and potential damage.
- Salt type: Different de-icers cause varying levels of damage. Rock salt (halite) is typically the most aggressive.
- Application method: Piles, spreaders, or automatic applicators can leave telltale signs of salt use.
Quick rule: If you find damage in typical salt application zones, with recent exposure to de-icers, it’s likely salt scaling.
Severity grading and when structural concern is likely
Assess the severity of salt scaling to decide if professional assessment is needed.
- Light cosmetic scaling: Minor flaking with no aggregate exposure. No immediate action required, but monitor for progression.
- Moderate surface loss: Widespread flaking exposing some aggregate. Consider early interventions to prevent further damage.
- Heavy surface loss: Extensive flaking and exposed aggregate. Professional assessment recommended to check structural integrity.
- Cracking severity: Wide, deep cracks suggest advanced deterioration. Structural concern is likely; consult a professional immediately.
- Moisture retention: Darker patches may indicate moisture retention, increasing the risk of further damage and structural issues.
- Salt crust reformation: If salt crusts reform after cleaning, it indicates ongoing damage and the need for professional assessment.
- Structural components: Check if scaling affects beams, columns, or other load-bearing elements. If so, consult a structural engineer immediately.
- Repair history: Frequent repairs in the same area may indicate recurring damage and underlying issues that require professional attention.
Quick rule: If you see heavy surface loss, wide cracks, or moisture retention, it’s time to consult a professional. Better safe than sorry with structural concerns.
Diagnostic Tests and on-Site Checks
Start with mapping visible patterns—edge-focused flaking, dusting, and efflorescence—and separate those from curing defects by comparing location, timing, and severity. Use simple on-site methods like a moisture meter, surface depth checks, and a small water absorption test to assess how trapped salts and moisture interact with the concrete surface.
For quick differentiation, rinse or wipe suspect areas to see if residues dissolve and reappear after drying, and consider non-destructive chloride spot tests or conductivity checks before coring. When lab confirmation is needed, ask about chloride ion analysis, petrographic exams, or core testing per manufacturer or lab instructions to decide between resurfacing, sealing, or full repair; verify sampling procedures with the testing lab first.
Simple field checks and visual/sounding tests
Start your on-site assessment with simple, non-invasive techniques. These help identify loose surface layers and salt residue without needing fancy equipment.
Hammer sounding: Tap the concrete with a hammer. A dull thud could indicate delamination or scaling due to salt damage. Compare sounds from affected areas to unaffected ones.
Scraping: Gently scrape the surface with a screwdriver or coin. If material comes off easily, it’s a sign of loose layers. Be careful not to create new damage.
Wet wipes/efflorescence checks: Wipe the surface with a damp cloth. If white residue (efflorescence) appears and washes away, it’s likely soluble salts. If the surface remains dusty or damaged after drying, salt damage is more likely.
When to send samples to a lab and what to request
While field tests give quick insights, lab analysis provides deeper understanding. Here’s when and what to send:
Send samples when: Field tests suggest salt damage but you’re not sure. Or, if the damage is severe and you need precise data for repair decisions.
Request these tests:
- Chloride analysis: Measures chloride ion content to confirm salt presence.
- Petrographic examination: Microscopic study of concrete’s microstructure to identify damage types and causes.
- Moisture profiling: Determines moisture distribution throughout the slab, helping understand how salts move and affect the surface.
Consult the lab for result interpretation. They can provide clear explanations and help you make informed decisions about repairs.
Prevention Strategies During Design, Placement, and Curing
Design to keep salts off the slab: provide slope and drainage, protect edges, and detail joints to limit salt migration. Choose a low-permeability mix with appropriate air entrainment and select admixtures and sealers that the manufacturer specifies as compatible with de-icer environments.
During placement, control finishing timing and surface texture to avoid overly dense skins that trap moisture, and follow curing practices that maintain surface humidity until the concrete develops adequate early strength. Protect new concrete from salts until it’s properly cured—check curing compound or membrane instructions and delay de-icer exposure according to product guidance.
Specifying mixes and air entrainment best practices
When it comes to preventing salt scaling, the mix design is your first line of defense. You want a concrete that’s strong, durable, and resistant to de-icing chemicals.
Air entrainment is crucial. It introduces tiny air bubbles into the concrete, which act as little shock absorbers during freeze-thaw cycles. Ask for a mix with 6-8% air content, not too much or it’ll weaken the concrete.
Go for a low water-cement ratio – around 0.45 to 0.55. This makes your concrete denser and less permeable, so salts can’t penetrate as easily. And use sound aggregates – clean, hard, and durable stones that won’t break down under stress.
Consider using salt-tolerant admixtures or sealants if you’re in a harsh de-icing environment. But remember, these are no substitute for good mix design practices.
Proper curing practices and protection from early salt exposure
Curing is when your concrete gains most of its strength. It’s also when it’s most vulnerable to de-icing salts.
Keep the temperature between 65-85°F (18-29°C) for at least a week after placement. This helps the concrete gain strength quickly and reduces the risk of early salt damage. Use curing blankets or other methods to control temperature if needed.
Moisture is also key. Keep the surface damp, but not wet. You can use curing compounds or membranes to help with this. But avoid plastic sheeting – it traps moisture and can cause more harm than good.
And here’s the big one: keep de-icers away until the concrete has gained enough strength. That’s usually around 7 days, but check with your mix designer to be sure.
Surface treatments and long-term moisture control
Once your concrete is cured, it’s time to think about long-term protection. The goal here is to keep salts out and moisture under control.
Sealers can help. They create a barrier that prevents salt penetration. But they’re not a cure-all – they won’t protect against freeze-thaw cycles if the concrete itself isn’t strong enough.
Water repellents are another option. They don’t form a surface film like sealers, but they do help to repel water and reduce moisture intrusion.
Good drainage is also vital. Make sure your slab has proper slope and drainage paths so brine can’t pool on the surface. And if you’re in a harsh environment, consider using salt-tolerant aggregates or even special concrete mixes for overlays.
Winter Maintenance: Safe De-Icer Use and Alternatives
Select de-icing methods with concrete impact in mind: chloride salts are aggressive on some surfaces while non-chloride alternatives and mechanical traction aids reduce chemical exposure—consult product labels and local guidance when choosing. Time and rate of application matter; apply only what’s needed, avoid use on fresh or uncured concrete, and prevent runoff that concentrates salts against slabs.
Use sand or traction products for immediate safety, and consider physical methods (shoveling, heated mats) in sensitive areas. Keep records of applications and weather conditions, store de-icers properly, and follow manufacturer safety and handling instructions for people and pets.
Safer de-icer selection and application practices
Choosing the right de-icer is crucial to minimize concrete damage. Chloride-based de-icers like sodium, calcium, and magnesium chloride are effective but can cause scaling over time. Non-chloride alternatives such as calcium magnesium acetate (CMA), potassium acetate, or urea-based blends are less damaging.
Apply de-icers sparingly and only where needed. Too much can lead to run-off and increased damage. Avoid applying salts to new concrete (under 1 year old) or during extreme cold temperatures (below -25°F/-32°C) as it increases the risk of scaling.
Pre-wetting de-icers before application helps distribute them evenly and reduces waste. Never apply de-icers on fresh or sealed surfaces, as they won’t work effectively and may cause damage.
Mechanical and non-chemical alternatives
Physical removal methods like shoveling and plowing are effective in areas with light snowfall. They don’t rely on chemicals, reducing the risk of salt damage.
Traction materials such as sand or non-abrasive grits can provide immediate grip without causing damage. Apply them sparingly to avoid clogging drains and causing additional issues.
Heated mats or thawing systems are ideal for critical zones like stairs, ramps, or high-traffic areas. They melt ice on contact, eliminating the need for chemicals.
Environmental and runoff considerations
De-icer runoff can harm nearby soil, plants, and water bodies. Chloride-based de-icers are particularly harmful to aquatic life and vegetation. Limit their use and target application to high-traffic areas only.
Contain de-icers where possible to prevent run-off into storm drains or water sources. Use barriers or catchment systems to collect melted snow and ice, allowing you to reuse or dispose of it responsibly.
Consider using non-chloride alternatives in environmentally sensitive areas. They’re less harmful but may not be as effective at lower temperatures.
Repair Options for Scaled Concrete Surfaces
Decide repair scope by testing: shallow, isolated scaling can often be repaired with DIY patching or light resurfacing, while widespread or recurring surface loss may require overlays or professional restoration. Use probe and moisture checks to ensure you are addressing surface failure from salts rather than deeper structural issues before choosing materials.
Prepare the surface by removing loose material, cleaning salt residues, and profiling to achieve proper bond; select materials and bonding agents per manufacturer directions. After repair, follow recommended cure and sealing practices and set a maintenance plan to limit future salt exposure—check product data sheets for compatibility and cure requirements.
DIY Spot Repairs and Tools/Materials Checklist
Use this checklist when dealing with shallow, isolated scaling on your concrete surface.
- Visual Inspection: Ensure the damage is not extensive or structural. If in doubt, consult a pro.
- Probe Test: Gently probe suspect areas to confirm weak material. Discard any crumbling pieces.
- Bonding Agent: Apply a suitable bonding agent to improve patch adhesion.
- Mortar Mix: Prepare a polymer-modified mortar mix for patching.
- Trowel/Float: Use these tools to apply and smooth the patch.
- Scrub Brush: Clean the area before applying the bonding agent and patch.
- Safety Glasses/Gloves: Protect yourself from debris and chemicals.
- Tape Measure/Level: Ensure your patch is even and fits well within the damaged area.
Quick rule: Always test a small, hidden area first to ensure compatibility of materials.
Resurfacing, Overlays, and Coating Solutions
For moderate scaling issues, consider resurfacing or applying a thin overlay. This method is more involved than spot repairs but provides a uniform, durable finish.
Preparation: Clean, profile, and moisten the surface before application. Remove any loose material and fill cracks or bug holes.
Apply a bonding agent, then spread the polymer-modified overlay evenly using a trowel or screed. Ensure the new surface is level and smooth. Allow it to cure according to manufacturer’s instructions.
Sealing: Apply a suitable sealer after curing to protect the new surface from moisture and de-icers.
When to Call a Professional and Cost/Benefit Pointers
If you notice widespread scaling, structural issues, or drainage problems, it’s time to call in the pros. They have specialized equipment and expertise to handle extensive damage.
Cost Factors: The extent of damage, labor costs, and material prices all influence repair costs. Prevention is often cheaper in the long run.
Professionals can also identify underlying issues like poor drainage or inadequate concrete mix design that may be contributing to your scaling problems. Addressing these root causes prevents recurring damage and saves money over time.
Prevention Pays: Investing in proper design, placement, curing, and maintenance practices yields better long-term value than repeated repairs.
Common Diagnostic and Repair Mistakes, and Planning for New Installations
Frequent errors include misreading efflorescence as deep damage, using incompatible patch materials, or sealing without removing salt residue—these can worsen scaling or hide ongoing issues. Always document conditions with photos and basic tests (moisture, probe, rinse) before repairs to avoid misdiagnosis.
For new work, include subgrade drainage, air-entraining admixtures, proper curing plans, and joint layouts in specifications, and plan winter construction controls to limit early salt exposure. Create an inspection and maintenance checklist tied to salt-use schedules, and consult product instructions or local code for permitted de-icer exposure limits when selecting materials and protections.
Mistakes to avoid in diagnosis and treatment
Not all surface damage is salt-related. Here are common mistakes to avoid when diagnosing and treating concrete scaling.
- Assuming all damage is salt-related: Other issues like freeze-thaw cycles, poor compaction, or improper curing can cause similar symptoms. Always test and verify the cause.
- Using incompatible repair materials: Different types of damage require specific repair methods. Using the wrong material can worsen the problem.
- Skipping proper surface prep and testing: Before repairs, ensure the surface is clean, dry, and free from contaminants to promote adhesion.
- Over-applying sealers: Too much sealer can trap moisture, leading to further damage. Follow manufacturer guidelines for application rates.
- Neglecting underlying issues: Addressing only the surface symptoms without resolving underlying problems like moisture or freeze-thaw cycles will lead to recurring damage.
Always diagnose accurately and prepare surfaces properly before treating concrete scaling.
Winter construction and maintenance planning for new pours
Planning is crucial when pouring concrete in winter to protect the slab from harsh conditions. Here’s a practical plan:
Scheduling: Pour concrete when temperatures are consistently above freezing. Use heated blankets or insulated forms if necessary.
Protective measures: Implement proper curing strategies, such as keeping the slab moist and warm during early stages. Monitor temperature fluctuations to prevent freeze-thaw cycles.
Winter maintenance plan: Ban de-icers on fresh concrete for at least 30 days after pouring. Regularly inspect the slab for signs of damage or distress, especially during extreme weather conditions. Address any issues promptly to prevent further deterioration.
Conclusion
Salt damage can be stopped in its tracks if you diagnose early and act decisively. The goal is to keep safety intact, preserve durability, and maintain a clean, even surface.
Run the checks like this: start with a visual scan for salt-related symptoms, perform the on-site tests only as directed in the article, confirm what design, placement, and curing steps you already followed, then test any repair idea on a small area first before committing to the whole surface, and finally plan winter maintenance with safe alternatives so you don’t repeat the same mistakes.
Common mistakes to avoid are guessing the cause, using the wrong de-icer or applying it too thick, skipping small-area testing, and rushing repairs without curing time or proper surface prep. Safety comes first: wear eye and skin protection, work in daylight or good lighting, and never proceed with repairs when you’re unsure about moisture or structural integrity. If the damage is widespread, cosmetic-only fixes won’t last; err on the side of caution and verify with a test patch before scaling up.
If the damage feels beyond your scope or the surface shows structural cracking, spalling with hollow spots, or you’re unsure about the right repair method, call a professional. They can confirm the diagnosis, select the right repair option, and prevent costly re-damage. Stay steady, follow the checks, and you’ll keep the project moving with confidence and a solid, lasting result.
FAQ
How can I tell if concrete scaling is caused by de-icing salts?
Look for a flaky, powdery surface with salt residue where the top skin is shedding. Check for staining or crystallized patches near doors or walkways that see a lot of salt use. If the damage follows salt exposure patterns, it’s a strong clue.
What symptoms should I look for on existing concrete surfaces?
Edges and corners that chip or spall easily are common signs. A rough, uneven surface with a chalky feel or white streaks after cleaning points to salt damage. Moisture wicking and repeated flaking after freeze-thaw cycles make symptoms worse.
How do I repair salt-induced scaling and stop it from coming back?
Remove loose, damaged concrete and clean the surface thoroughly before patching. Use a patch material that matches the area and follow the manufacturer’s prep steps exactly. For prevention, use non-salt de-icers or apply sealers compatible with your concrete after the surface has cured.
How do environmental factors and curing temperatures affect durability?
Wide temperature swings and repeated freeze-thaw cycles make salt damage worse. Keep curing conditions in the range recommended by the product you’re using, and avoid exposing fresh concrete to salts until it’s fully cured. If in doubt, check product labels or local guidance for temp and moisture expectations.