

Introduction
Discovering concrete scaling from de-icers can be disheartening, but with a systematic approach, you can restore your surfaces in no time. This step-by-step timeline guide walks you through diagnosing salt damage and repairing your concrete efficiently.
Understanding the duration of each stage helps you plan your project effectively and ensures you don’t miss any crucial steps. Let’s dive into the process and get your concrete looking as good as new.
The Concrete Scaling Timeline: Diagnosis to Repair
Concrete scaling from de-icers follows a clear timeline, from initial diagnosis to final repair and protection. Here’s a detailed breakdown of each stage and the estimated time commitment for each:
- Diagnosis (1-3 days): Inspect your concrete, identify salt damage, and assess the extent of scaling.
- Preparation (1 day): Gather tools, materials, and safety gear. Set up containment for dust control if grinding is required.
- Cleaning (1-2 days): Thoroughly clean salt-contaminated surfaces using pH-neutral cleaners and methodical rinsing.
- Repair (1-5 days): Remove loose material, choose a repair or resurfacing approach based on damage extent, and apply the chosen solution. Spot fixes may take only a few hours, while overlays can require several days to cure.
- Sealing & Protection (1 day): Apply sealers and protective strategies as recommended by product guidance to prevent future scaling.
Total estimated time: 5-12 days, depending on the extent of damage and chosen repair method. Keep in mind that these are rough estimates, and your project’s timeline may vary based on factors like weather conditions and available resources.
Key takeaways
The prep time for gathering tools and setting up containment can significantly impact your overall schedule, so plan accordingly to minimize delays.
- Inspect concrete edges for scaling, roughness, and spalling near exposed rebar.
- Identify salt damage by chalky residue, dark staining, and lift underfoot.
- Use proper PPE and avoid grinding until containment and dust control are set.
- Clean contaminated surfaces with methodical rinsing and pH-neutral cleaners as recommended by manufacturer guidance.
- Choose repair option based on damage extent: spot fixes, concrete resurfacing, or overlays.
- Sealing and protective strategies require timely reapplication per product guidance.
Table of Contents
- Introduction
- Key takeaways
- What Is Concrete Scaling and How De-Icers Cause It
- Types of De-Icers and How Each Affects Concrete
- Diagnosing Salt Damage Vs Other Concrete Distress
- Tools and Materials Checklist for Diagnosis and Repair
- On-Site Triage: Cleaning and Neutralizing Salt-Contaminated Surfaces
- Resetting the Surface: Repair Options from Spot Fixes to Overlays
- Sealing, Protection, and Preventive Strategies
- Inspection Checklist, Standards to Reference, and When to Hire a Professional
- Conclusion
- FAQ
What Is Concrete Scaling and How De-Icers Cause It
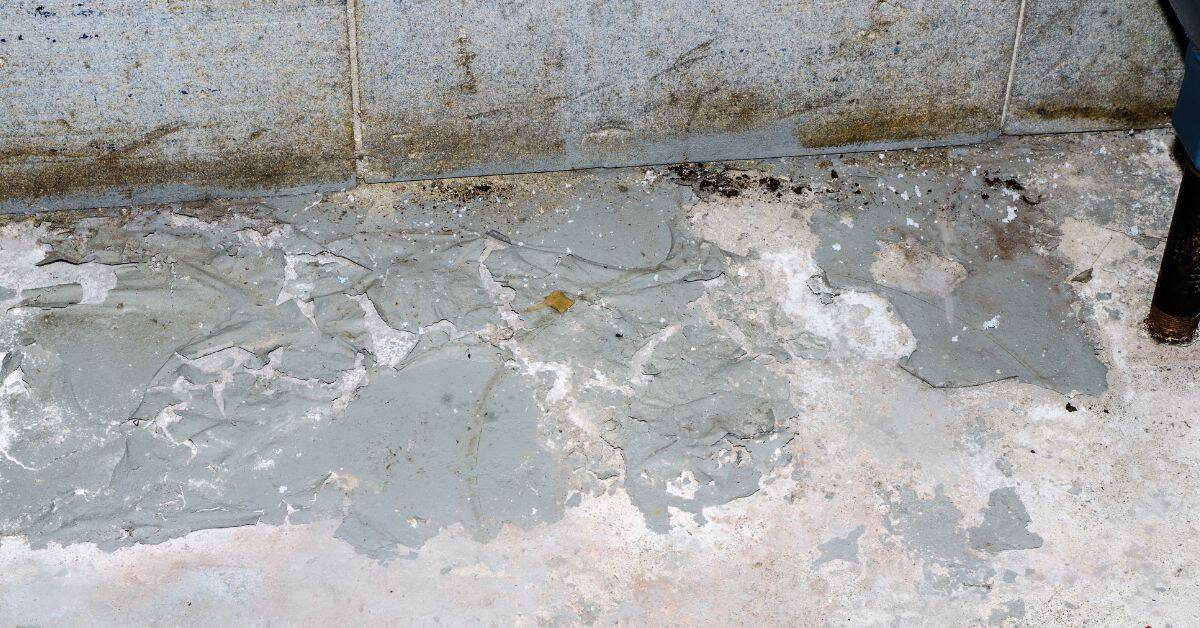
Scaling is surface concrete loss that shows as flaking, cupping, or a rough, exposed-aggregate face rather than full-depth cracking. It’s distinct from spalling, which often involves deeper chunks breaking out, and from delamination, which is a separation within the slab that sounds hollow when tapped.
Freeze–thaw cycles expand pore water and break apart weak surface paste while salts draw water into the concrete and lower freezing points, increasing cycles and chemical attack. Check product labels and manufacturer instructions to learn how a specific de-icer’s salts or chemicals penetrate pores and accelerate surface loss.
Physical mechanism of scaling
Concrete scaling is a result of water freezing and thawing within the concrete’s pores. When temperatures drop below freezing, the water inside these tiny spaces expands as it turns into ice. This expansion creates pressure that can flake off the surface.
Salts from de-icers speed up this process by lowering the freezing point of water. They also change how ice crystals form and grow near the surface, making them larger and more damaging.
The combination of these forces causes small pieces of concrete to break away, creating a scaled appearance on the surface.
Typical timeline and progression
Concrete scaling starts with tiny rough spots on the surface. These are barely noticeable at first but grow larger over time as more material is lost.
In early stages, you might see small flakes or powdery residue when you brush your hand over the concrete. As it progresses, these areas become more widespread and deeper, exposing aggregate and weakening the structure.
If left untreated, scaling can lead to significant damage, including potholes and structural instability. Regular inspections are key to catching scaling early.
Why some mixes resist scaling better
Not all concrete is equally susceptible to scaling. Several factors influence a mix’s resistance:
Air entrainment introduces tiny bubbles into the concrete that provide space for water to expand without causing pressure buildup.
A lower water-cement ratio makes concrete denser and less porous, reducing the amount of water available to freeze and thaw.
Proper curing helps concrete develop its full strength and resistance to scaling. Similarly, a smooth, dense surface finish reduces the number of pores where water can collect and freeze.
Types of De-Icers and How Each Affects Concrete
De-icers fall into chemical groups such as chlorides, acetates/formates, and blended compounds; each group interacts differently with concrete chemistry and embedded steel. Some are more hygroscopic or corrosive, others are formulated to be less chloride-heavy, and each will have different tendencies to draw moisture into the slab or attack paste.
When evaluating a product, read the product data sheet or label to learn about chloride content, recommended use, and compatibility with concrete or reinforcing steel. Use that information to judge whether a de-icer is likely to speed scaling, promote rebar corrosion, or be safer for surface treatments and sealers you plan to apply.
Chloride-based salts (sodium, calcium, magnesium chloride)
Chlorides are the most common de-icers. They work by lowering the freezing point of water. But they’re tough on concrete.
Why? Chlorides penetrate deep into concrete. They draw in moisture, making concrete wetter and more prone to scaling. The type of chloride matters too:
– Sodium chloride (table salt) is cheap but penetrates the most, causing the worst damage.
– Calcium chloride works faster but also penetrates deeply.
– Magnesium chloride is less harmful but still causes scaling.
Alternative de-icers and organic options
Not all de-icers are created equal. Chlorides aren’t your only option. Consider these alternatives:
– Acetate-based products, like calcium magnesium acetate (CMA), are gentler on concrete. They don’t penetrate as deeply and cause less scaling.
– Organic options, like beet juice or ethanol, are also kinder to concrete. But they’re more expensive.
Pros and cons: Alternatives are better for your concrete but may not melt ice as fast or be as effective at lower temperatures. They’re also often pricier.
Application practices that worsen damage
How you apply de-icers matters. Bad habits can make scaling worse:
– Over-applying or applying concentrated brine increases the salt load on your concrete.
– Repeated spot treatments create a high-salt area, making those spots more prone to scaling.
What to do? Apply de-icers sparingly. Spread them evenly. And switch to alternatives if you can. Less is more when it comes to protecting your concrete.
Diagnosing Salt Damage Vs Other Concrete Distress
Start by inspecting surface patterns: salt-related scaling often shows shallow, patchy surface loss with salt crystals, efflorescence, or dark staining near joints and edges. Compare that to the random map-cracking of alkali-silica reaction or the vertical cracking and displacement typical of structural settlement or heavy loads.
Follow a step-by-step approach: swab for chlorides, probe depth of loss, check for hollow sounds, and review local winter maintenance history and de-icer types used. If test results or visual clues are ambiguous, consult product data sheets and consider lab testing to rule out ASR, sulfate attack, or other chemical causes before choosing a repair.
Visual checkpoints and surface patterns
Before you start digging into the cause of your concrete’s distress, grab a flashlight and take a close look. This quick visual checklist helps pinpoint salt-related scaling.
- Flake size: Small flakes (less than 1/4 inch) often indicate salt damage.
- Edge rounding: Sharp, well-defined edges suggest mechanical abrasion, not salts.
- Residue patterns: Salts leave behind a white or gray residue. If you see it, that’s a red flag.
- Color change: Discoloration, especially around cracks or joints, can signal salt intrusion.
- Cracking pattern: Wide, deep cracks with no visible scaling may point to freeze-thaw damage without salts.
- Joints and edges: Check for excessive scaling here. Salts love these weak points.
- Surface texture: A rough, pitted surface might suggest alkali-silica reaction (ASR).
- Moisture content: High moisture can exacerbate salt damage. Check for dampness.
Quick rule: If you see a mix of these signs, it’s time to dig deeper with field tests.
Simple field tests to confirm presence of salts
Now that you’ve got your suspicions, let’s confirm the presence of salts. These non-destructive tests are easy and quick.
First, check for efflorescence. Salts leave behind a white, powdery residue when they migrate to the surface. If you see it, that’s a strong indicator.
Next, try the soluble salt swab test. Moisten a cotton swab and rub it on the affected area. If it turns white or gray, salts are present. Send samples for lab confirmation if critical.
Visual chloride residue indicators can also help. These tests use a chemical reaction to show where chloride ions are present. Follow package instructions carefully.
When lab testing is needed
Sometimes, you need more than a visual check or simple field test. That’s when lab tests come in handy. Here are three common ones:
Chloride concentration test: This measures the amount of chloride ions in your concrete. Too many can spell trouble for your slab. It’s critical if you’re planning repairs.
Petrological analysis: If you suspect ASR, this test can confirm it. It examines the concrete’s mineral composition under a microscope.
Moisture mapping: This test shows where moisture is present in your slab. High moisture levels can exacerbate salt damage and should be addressed.
Rule of thumb: If you’re seeing severe scaling, discoloration, or other signs of significant distress, it’s time to call in the lab pros.
Tools and Materials Checklist for Diagnosis and Repair
Gather basic inspection tools: hammer for sounding, chisel and scraper for loose material, a moisture meter, and a chloride test kit or pH strips for quick field checks. For safety and prep include gloves, eye protection, dust mask or respirator, knee pads, and a tarp to catch debris.
For repairs bring wire brushes, grinders or cup wheels, patching mortar or polymer-modified cement, bond primer or slurry, and appropriate sealers or overlays if planning surface treatments. Check manufacturer instructions for each repair product to confirm substrate prep, mixing, and curing requirements.
Diagnostic tools and test kits
Before you start repairs, use these tools to diagnose the damage accurately.
- Moisture meter: Check for excess moisture that could hinder repair. Skip this and you might end up with failed patches.
- Salt test kit: Confirm presence of salts. Without testing, you won’t know if de-icers are the culprit.
- pH strips: Measure surface pH to ensure it’s within acceptable range for repair materials.
- Damage mapping template: Mark out damaged areas for targeted repairs and tracking progress.
- Chloride test kit (optional): If you suspect specific salts, test for chlorides. Skipping this might lead to wrong repair strategies.
- Portable drill with bits: For collecting concrete dust samples if lab testing is needed.
- Tape measure and markers: To accurately mark out damaged areas and measure for materials.
- Gloves and safety glasses: Always protect yourself when handling chemicals or drilling.
Quick rule: Use these tools to diagnose, not guess. Guessing leads to wasted time and money.
Repair and surface-preparation tools
Before applying new materials, prepare the surface properly with these tools.
- Grinder or scarifier: Remove loose concrete and scale. Skipping this step leaves a weak surface for repairs.
- Pressure washer: Clean the surface thoroughly. Dirt undermines repair material adhesion.
- Stiff-bristled brush: For manual cleaning of hard-to-reach areas or stubborn dirt.
- Vacuum (wet/dry): Remove water and debris after washing to prevent safety hazards and ensure proper bonding.
- Trowel or squeegee: Smooth out the surface for even material application. Irregular surfaces lead to poor patch quality.
- Safety gear (PPE): Wear gloves, safety glasses, ear protection, and a dust mask when using power tools or handling chemicals.
- Respirator (optional): For highly dusty operations. Skipping this can lead to health issues.
- Drop cloths or plastic sheeting: Protect surrounding areas from debris and chemicals during repair work.
Quick rule: Thorough preparation is half the job done. Rushing through prep leads to failed repairs.
Recommended repair materials and sealers (selection guidance)
Choose the right materials for your repair job with these guidelines.
- Patching mortar: Select one that matches your existing concrete’s strength. Mismatched strengths lead to patch failure over time.
- Bonding agent: Use one to improve adhesion between old and new concrete. Skipping this can cause delamination.
- Overlay material: Choose a product designed for your specific repair needs (e.g., topical overlays, self-leveling overlays). Wrong choice leads to poor results.
- Sealer chemistry: Select one that’s compatible with your repair materials and provides the desired protection. Incompatibility can cause seal failure.
- Concrete densifier (optional): To improve surface hardness and reduce water penetration if required.
- Epoxy or polyurethane sealer: For enhanced chemical resistance, especially in areas exposed to de-icers. Skip this and you might face recurring scaling issues.
- Acrylic sealer (optional): For a more natural look, but with less protection against chemicals.
- Manufacturer guidelines: Always check and follow manufacturer instructions for application, mixing ratios, and safety precautions.
Quick rule: Match materials to your needs. Wrong choices lead to wasted money and time.
On-Site Triage: Cleaning and Neutralizing Salt-Contaminated Surfaces
Begin by removing loose material with a stiff broom and scraping, then rinse thoroughly to flush out soluble salts; repeat rinsing until visible salt residues are reduced. Avoid aggressive scrubbing on fragile surfaces; work progressively to prevent further surface loss.
If neutralizing agents or salt-removal cleaners are used, follow the product label or technical data sheet for application and rinsing instructions, and allow the slab to dry to the moisture level required by your repair products. While the surface dries, protect the area from traffic and fresh salt exposure using signage, temporary covers, or barriers.
Safe washing and rinsing protocols
First, wet the surface thoroughly to prevent soluble salts from being pushed deeper into the concrete. Use a garden hose with a nozzle set to a fine mist.
Never use high-pressure washers as they can cause erosion and drive salts further into the concrete.
Rinse the area repeatedly, allowing water to soak in between cycles. This helps flush out soluble chlorides. Repeat this process 3-4 times, or until no visible salt residue remains.
Chemical neutralization and residue removal
After rinsing, use a benign cleaning agent like dish soap diluted in water to remove any remaining residue. Apply it with a soft-bristled brush or mop, then rinse thoroughly.
Acid etching can be used if necessary, but it changes the surface chemistry and should only be done after testing on a small patch first. Always wear appropriate PPE when handling acids.
Rinse again with clean water to remove all cleaning agents and residues. Ensure no traces are left behind as they can interfere with repairs or sealers.
Drying, monitoring, and moisture control
Allow the concrete to dry naturally using ambient ventilation. You can speed up this process by placing temporary covers or fans, but avoid direct sunlight which can cause rapid drying and cracking.
Monitor the moisture content regularly using a concrete moisture meter. Repairs should not be made until the surface is dry (typically around 15-20% moisture content).
If you’re unsure about the moisture level, take readings at multiple points across the surface to ensure consistent drying.
Resetting the Surface: Repair Options from Spot Fixes to Overlays
Select a repair approach based on the depth and extent of scaling: small, shallow areas can be spot-patched; widespread thin-depth loss may call for shot-blasting or grinding and a thin overlay; deeply damaged sections might require saw-cut and replacement. Each method has trade-offs in cost, labor, and longevity.
Match repair materials and procedures to the condition and manufacturer guidance—use bond primers or polymer-modified mortars where needed and confirm cure and moisture limits before sealing or reopening to traffic. If multiple areas are present, plan repairs in stages to test compatibility and performance before committing to a full-overlay solution.
Spot repairs and thin-bonded patches
For localized scaling, spot repairs are your best bet. First, clean the area thoroughly as explained earlier.
Bonding agent is key here. Use a cement-based one for small spots, or a polymer-modified one for larger areas. Apply it, let it tack, then press in fresh concrete mix.
For thin-bonded patches, use the same process but apply a thin layer of bonding agent first, let it cure slightly, then apply your patch. This ensures a strong bond.
Mechanical removal and reprofiling (grinding, scarifying)
When scaling is extensive, you might need to grind or scarify. This exposes a sound substrate for repairs.
Use a diamond blade or scarifier to remove damaged concrete. Go slow, use plenty of water to control dust, and keep the surface clean as you work.
Grind until you see sound concrete. Then, vacuum and clean the area. You’re now ready for repairs.
Overlays, micro-toppings, and full replacement
For extensive damage, consider overlays or micro-toppings. These are thin layers of polymer or cementitious material that bond to the existing surface.
They’re quick and easy but have trade-offs. They can hide underlying issues and may not last as long as a full replacement. Use them when you need a fast fix, but remember to address any underlying problems first.
Full replacement is the most durable solution but also the most labor-intensive. It’s best for severe damage or when you’re doing major renovations anyway.
Sealing, Protection, and Preventive Strategies
Long-term protection combines selecting appropriate sealers or surface treatments, controlling moisture sources, and changing winter maintenance practices to reduce salt exposure. Sealers can slow ingress of salts and water but must be compatible with the repair materials and applied within the conditions specified by the manufacturer.
Consider alternative de-icing methods, pre-wetting, using lowest-risk products per product data sheets, and frequent mechanical snow removal to limit chemical use. Regular inspection and timely spot repairs will prevent small-scale scaling from becoming extensive damage that needs major intervention.
Choosing and applying sealers and penetrating treatments
Concrete sealers are your first line of defense against de-icer scaling. They form a protective barrier on the surface or penetrate deep into the concrete to prevent salt from causing damage.
Topical film-forming sealers create a physical barrier that stops salt from entering the concrete. Apply these when the surface is clean, dry, and free of any contaminants. Reapply every 2-3 years for optimal protection.
Penetrating silane/siloxane treatments react with the concrete to form a chemical bond, preventing moisture and salt from entering the pores. Apply these when the surface is clean and dry, and allow at least 7 days of cure time before exposure to de-icers.
Best practices for winter maintenance
Maintaining your concrete during winter is crucial to prevent scaling. Start by choosing the right de-icer. Sodium chloride (rock salt) is cheap but can cause severe damage. Consider alternatives like calcium magnesium acetate or sand for traction.
Apply de-icers sparingly. Too much can lead to oversaturation and increased scaling risk. Follow manufacturer guidelines for application rates. Sweep excess de-icer off the surface as soon as possible to minimize contact time with concrete.
Manage thaw-freeze cycles by keeping water from pooling on the surface. Ensure proper drainage, and consider using heated mats or strips in critical areas. Regularly inspect your concrete for any signs of damage during winter.
Design and mix considerations for new concrete
To minimize scaling risk, start with a well-designed concrete mix. Follow relevant standards like ASTM C150 or consult your local supplier for guidance.
Air entrainment is crucial in cold climates. It introduces tiny air bubbles into the concrete that help relieve internal pressure caused by freezing water. Aim for 6-8% air content in your mix.
Proper curing is vital to develop concrete’s strength and durability. Keep the surface moist and cool for at least 7 days after placement. Use curing compounds or wet burlap if necessary. Proper joint detailing, like saw-cutting control joints, also helps relieve tensile stress and prevent scaling.
Inspection Checklist, Standards to Reference, and When to Hire a Professional
Create a practical checklist that covers visual signs (scaling patterns, efflorescence), sounding, chloride testing, moisture readings, and a record of winter chemicals used and application rates. Keep copies or links to relevant standards, test methods, and product technical documents to confirm acceptable limits before repair.
Hire a specialist if damage is widespread, if chloride or moisture tests exceed limits noted in standards, or if structural reinforcement corrosion is suspected; a professional can perform lab testing, structural assessment, and provide a repair specification. When in doubt about test interpretation or scope, ask for references and written repair plans before work begins.
Practical inspection and documentation checklist
Use this checklist during your initial assessment to support repair decisions or future warranty claims.
- Photograph: All affected areas, including close-ups of cracks, delamination, and any visible reinforcement.
- Measure: The length, width, and depth of all cracks. Also, note the size of any delaminated areas.
- Record: The date of inspection, weather conditions, and any notable observations about the concrete’s condition.
- Check for: Any signs of reinforcement corrosion, such as rust stains or popped-out cover concrete.
- Note: The history of de-icing salt use on the surface and any previous repairs.
- Document: The location of all defects using a simple sketch or grid system for reference during repair planning.
- Test: The moisture content of the concrete using a non-destructive method like a moisture meter (if available).
- Record: Any relevant maintenance records, such as previous repairs or sealant applications.
- Check: ASTM C1202 for total chloride content to determine if salt penetration is an issue.
- Request: Petrographic analysis (ASTM C856) to assess the concrete’s internal structure and identify any hidden defects.
- Confirm: The concrete’s freeze-thaw resistance using ASTM C666 or EN 1342.
- Specify: The report scope, including a summary of findings, recommendations for repair methods, and any necessary mix design adjustments.
- Consider: Additional tests like ASTM C1585 for sulfate resistance if relevant to your location.
- Extensive delamination: If more than 10% of the surface area is delaminating, consider hiring a pro.
- Reinforcement corrosion: Visible rust stains or popped-out cover concrete may indicate reinforcement corrosion, which requires professional assessment and repair.
- Recurring failures: If you’ve made repairs in the past that keep failing, it’s time to consult a specialist.
- Unusual symptoms: Any unexpected signs, like sudden cracking or unexpected delamination, warrant professional evaluation.
- Complex structures: Concrete slabs on grade, tilt-up walls, or other complex structures may require a structural engineer’s input.
Quick rule: Thorough documentation is key to tracking progress and supporting any future claims.
Standards, test methods, and what to request from labs
Before starting repairs, ensure you’re aware of relevant standards and tests to confirm the extent of damage and guide your repair strategy.
Quick rule: Understanding these test results helps you choose the right repair method and prevent future issues.
Signs you need a structural or materials expert
Certain signs indicate that professional help is necessary to ensure your repairs are effective and safe.
Quick rule: When in doubt, it’s better to err on the side of caution and consult a professional.
Conclusion
Dealing with salt-damaged concrete is about safe handling, solid diagnosis, and choosing the right repair so the surface lasts. Stay disciplined about testing, cleaning, and sealing to protect people and the surface from future damage.
First, inspect the area for salt staining and scaling, verify moisture and surface hardness in a small test patch, gather the recommended tools and materials, clean and neutralize contamination, choose a patch or overlay approach that fits the damage, apply repairs in the right order, seal the surface, and set up ongoing protection and regular inspections to catch issues early.
Common mistakes include rushing a repair without testing first, skipping neutralization or a proper cleaner, and applying a seal or overlay when the substrate isn’t firm or clean enough. Follow the safety rules: work in a well-ventilated area, wear eye and skin protection, test a small area first, and don’t exceed recommended product use or dwell times. If anything looks uncertain, pause and reassess rather than pushing forward with a risky method.
Call a professional when there’s structural cracking, deep delamination, or uncertain substrate conditions, and use their guidance to decide between spot fixes, overlays, or full surface replacement. With careful steps and a measured pace, you can restore a durable, safer, and better-looking concrete surface.
FAQ
How can I tell if salt is the root cause of concrete scaling on my surface?
Look for flaking edges and rounded, hollow-sounding spots where the concrete feels soft. Compare areas near joints, stairs, or driveways where salt exposure is higher. If you’re unsure, check product labels or manufacturer guidance for salt-related damage indicators.
What should I do first before repairing a salt-damaged area?
Clean the surface to remove loose material and any residual salt. Neutralize or rinse away salts if recommended by the product instructions. Use a simple, non-acid cleaner and rinse thoroughly, then let the area dry before any repair.
Can I just patch small spots, or do I need full surface work?
Small, isolated spots can often be repaired with spot fixes, but wide scaling may need deeper repair or resurfacing. Follow the manufacturer’s repair instructions and consider the long-term wear pattern before choosing a method. If in doubt, plan for a more durable option that matches the surrounding area.
What about sealing or protecting the repaired surface?
Apply a sealant or protective coating only after the repair and the surface are fully dry. Use a product that’s compatible with the repair material and salt exposure. Always follow the label for re-application intervals and surface prep steps.