

Introduction
For small driveway projects, PCC is usually the better base for durability and load support, while blinding concrete is typically a thin, moisture-control layer used only in specific conditions.
You’ll learn how to assess site factors, decide which layer to use, and the practical steps for mixing, thickness, curing, and installation sequence.
The guide walks through real‑world rules of thumb so you can plan a solid, cost‑effective driveway base.
Related: Blinding Concrete vs PCC: Understanding and Solutions.
Key takeaways
- Blinding concrete provides a clean, level base, minimizing substrate intrusion and moisture.
- PCC base offers simple, cost-effective foundation for light-driveway loads.
- For heavy loads, ensure adequate reinforcement and compaction in PCC base.
- Blinding is not a substitute for subbase, drainage, or proper curing practice.
- Small projects benefit from clear forms and precise rebar positioning.
- Cost and timing: PCC often faster with fewer curing constraints on light loads.
Table of Contents
- Introduction
- Key takeaways
- Quick comparison overview
- What is blinding concrete?
- What is PCC (plain cement concrete) for bases?
- Structural performance and load-bearing considerations
- Installation process for small driveway projects
- Cost, time, and labor comparison
- Durability, maintenance, and long-term risks
- Material specs, standards, and testing for small projects
- Tools and materials checklist + DIY tips
- Decision guide and recommendations for small projects
- Conclusion
- FAQ
Quick comparison overview
Blinding concrete provides a smoother, dust-free base and better control over thickness, but it adds cost and requires careful placement. Plain cement concrete (PCC) is simpler and cheaper, but can be rougher and offers less moisture protection and precision without forming or overlays. For small driveways, blinding is useful as a base under a finished surface or when you need a level, moisture-resistant foundation.
DIY tip: focus on proper compaction, edge formwork, and curing for either option to avoid cracking and settlement. Takeaway: for most small driveways, PCC is the quicker, cheaper path, while blinding is worth it when you need a precise base or moisture control.
Decision framework for small projects (use this quick flow to decide between blinding and PCC):
- Assess soil and drainage: a firm, well-graded subgrade with good drainage favors a precise blinding base or a thin blinding under PCC; soft, waterlogged, or highly variable soils lean toward a thicker PCC with appropriate reinforcement and proper subbase preparation.
- Consider frost risk: in areas with heavy frost cycling, ensure moisture control and proper thickness; blinding can provide a clean, moisture-suppressing bed, but if frost heave is likely, a robust PCC base with joints and proper reinforcement may be more durable.
- Evaluate loads and vehicle use: light garden vehicles with infrequent heavier loads can work with blinding plus a reinforced top slab; regular car parking or heavier traffic warrants thicker PCC to spread loads and reduce deformation.
- Site access and equipment: if mixer access or space is limited, blinding can be quicker and easier to place; for larger drives or complex formwork, PCC with controlled compaction may be more practical.
- Moisture and curing: both options require curing. Plan for 3–7 days of moisture maintenance (keep surfaces damp or use curing compounds) and protect from rapid drying to minimize cracks.
Side-by-side at-a-glance
Blinding concrete is a thin, low-strength layer poured to create a clean, level bed before the structural slab or base goes down. Plain cement concrete (PCC) is thicker and designed to carry the load as a working base under the driveway. Think of blinding as protection and PCC as the actual subbase.
Typical thickness: blinding runs about 25–50mm; PCC is usually 75–150mm for small driveways depending on traffic. Cost follows that: blinding is cheaper per square metre, PCC costs more because of depth and strength. Performance: blinding controls contamination and gives a flat platform; PCC provides bearing capacity and distributes loads.
Quick rule: pick blinding when you need a clean platform over poor ground or loose hardcore. Pick PCC when the base itself must carry vehicles or where frost and weak soils demand a sturdier layer.
When choice matters most
Soil type makes a big difference. On firm, well-compacted subgrade you can often use blinding over compacted hardcore and then a thinner structural slab. On soft or waterlogged soils skip the blinding-only route and use thicker PCC or design a proper structural base to avoid settlement.
Consider load and use. If you have light garden cars and infrequent heavy loads, blinding plus a reinforced top slab can work. For regular car parking, driveways with turning loads, or heavier vehicles, go with adequate-thickness PCC to spread the load and resist deformation.
Budget and access also steer the choice. Blinding is cheaper and faster to place in tight sites. PCC costs more and needs more material and compaction time. If access for mixers is limited, blinding can be a practical interim solution, but don’t compromise structural needs to save a few pounds.
What is blinding concrete?
Blinding concrete is a thin, non-structural concrete layer poured over the subgrade to create a smooth, level surface. Its primary job is to level and protect the ground, and to help prevent contamination from the soil. It is not meant to bear loads like a structural floor.
In practice, blinding concrete is a lightweight mix of cement, sand, and fine aggregate poured shallowly over a compacted subgrade. This layer creates a clean, level surface for formwork and the next concrete pour, helping control moisture and reduce contamination of the base material.
Typical mix and thickness for small driveways
For a DIY small driveway blinding, use a lean concrete — roughly a 1:4 to 1:6 cement:sand mix with minimal coarse aggregate. Many tradesmen add a small 6–10mm pea gravel to improve workability, but keep the mix much leaner than slab concrete.
Thickness is shallow. Expect to place about 25–75mm of blinding concrete over the prepared subgrade. Around 50mm is common: enough to level and protect the base without turning the blinding into a structural layer.
Pros and limitations of using blinding
Blinding is cheap and quick. It gives you a clean, level surface to work on, protects the subgrade from contamination, and makes laying the structural base or formwork easier. For small jobs it saves time and reduces the risk of soft spots.
Don’t expect strength from it. Blinding is not a structural layer and can crack under loads or movement. It won’t replace a proper compacted base or reinforced slab and will need protection during construction to avoid damage.
What is PCC (plain cement concrete) for bases?
Plain cement concrete, or PCC, is a solid mix of cement, sand, and aggregate that hardens into a durable base. It differs from blinding by being much stronger and intended to bear loads, not just level and smooth the surface. It serves as a load-bearing base or sub-base layer for driveways.
For a DIY project, PCC offers a stable foundation that helps prevent settlement and cracking when it is properly mixed, poured, and compacted. Its strong base supports asphalt or surface finishes and makes future maintenance easier.
Typical mix, strength, and thickness guidelines
For small residential driveways builders usually use nominal PCC mixes in the range of M10 to M20. That corresponds roughly to cement:sand:aggregate ratios from about 1:3:6 up to 1:2:4 for the stronger end.
Target compressive strength of M10–M20 is enough for cars and light vans. Thickness is typically 75–100mm for a pedestrian or light-use base and 100–150mm for standard domestic driveways. If you expect heavier loads, step up the thickness to 150–200mm and consider a stronger mix.
Set the mix and thickness to the expected load and local ground conditions. A well-compacted subgrade and good consolidation are as important as the concrete mix itself.
Pros and limitations of PCC
PCC gives a solid, durable platform. It spreads wheel loads evenly, reduces settlement and rutting, and performs well in frost-prone areas when mixed and laid correctly. For a DIYer, it means fewer future repairs compared with loose stone sub-bases.
On the downside, PCC is more expensive than simple blinding or a stone base. It needs formwork, proper mixing, and time to cure. That means longer project time and some skill to avoid cracking or poor finish.
Plan for curing and joints and factor in cost and labour. If flexibility or quick reuse of the area matters, other sub-base options may suit better.
Structural performance and load-bearing considerations
Structural performance varies by material under typical driveway loads such as cars and occasional light trucks. Rigid surfaces tend to distribute point loads more evenly, while flexible surfaces can flex, settle, or shift over time.
Choosing the right pairing with flexible or rigid surfacing helps prevent heaving, cracking, and excessive maintenance. Understanding these differences helps plan base, edging, and installation steps to resist traffic-induced movement.
Bearing capacity and settlement risk
On light-duty driveways the big question is how much movement you can tolerate. A thin layer of blinding over compacted sub-base will take car loads fine if the sub-base is well compacted and the soil beneath is stable. But blinding alone won’t control long-term settlement if the subgrade is weak or wet.
PCC (plain cement concrete) base gives a rigid platform and reduces differential settlement. That means fewer dips and less need for frequent patching when occasional light trucks pass. For small jobs, use PCC where you suspect soft spots or where you want minimal future maintenance.
If you keep blinding, plan on a thicker, well-graded sub-base or simple soil stabilization (lime, cement or geotextile) under it. Do a quick probe or plate test if unsure. It’s cheaper to fix the base right at the start than to lift and reprofile later.
Compatibility with paving types (asphalt, pavers, concrete slabs)
Blinding pairs well with flexible finishes like asphalt and concrete pavers. The blinding-plus-compacted-aggregate approach allows some movement without cracking, and pavers tolerate small settlement if edge restraints are solid. Make sure the edges are restrained with concrete or heavy timber to stop lateral spread.
PCC works best under rigid finishes, including in-situ concrete slabs and permeable concrete units that need a firm base. A continuous PCC layer prevents reflective cracking from the base and keeps joints aligned. For pavers over PCC, use a sand bedding and cut joints carefully to avoid stress transfer from the slab.
Edge details and joints matter regardless of base. If you expect heavy turning loads, go rigid or use a thicker sub-base beneath blinding. In short: blinding for flexible systems and manageable soils; PCC for rigid surfacing or doubtful subgrades.
+
Subbase materials and thickness guidance:
– Common subbase options include crushed concrete or hardcore (recycled aggregates), stabilized or engineered graded aggregate, and geotextile-reinforced layers. For soils with good bearing capacity, a well-graded granular sub-base of 100–150 mm (4–6 in) may suffice under blinding; for PCC or heavier truck traffic, increase to 150–250 mm (6–10 in) with compaction in 25–50 mm (1–2 in) lifts.
– Geotextile fabric can be used between unsuitable subgrade and subbase to prevent mixing and improve drainage, especially under soft or variable soils.
– In poor or soft subgrades, consider stabilizing the subbase with lime or cement, or use a two-layer approach (geotextile between layers, then a thicker granular sub-base) to improve stiffness and reduce settlement.
– For rigid surfacing (PCC or slabs), designers often specify thicker sub-base (toward 200–300 mm or more in areas with soft soils) and sometimes a concrete sub-base layer prior to paving to minimize reflective cracking.
– Always perform a quick field test (plate load test or light drop-hammer test) after compaction to confirm bearing capacity before pouring blinding or PCC.
Installation process for small driveway projects
This section outlines the step-by-step process for installing blinding concrete or PCC on small driveways. It covers labor, equipment needs, and the sequence of tasks from site prep to finishing.
Following the workflow helps DIYers avoid common mistakes, stay on schedule, and keep costs predictable on tight sites. It explains how equipment choices and proper sequencing impact curing, strength, and durability for small projects.
Site prep common to both methods
Start by checking levels and lines. Excavate to the designed depth and verify the subgrade is stable and free of organic material. If you dug into soft spots, remove and replace with compactible granular fill.
Compact the subgrade in thin passes with a plate compactor or roller until you reach the specified density. Make sure falls and drainage routes are in place so water won’t pond under the slab.
Do a final visual check: uniform compaction, correct profile, no standing water, and edges trimmed. Stake or snap reference lines for setting screed rails or formwork before placing any concrete or blinding.
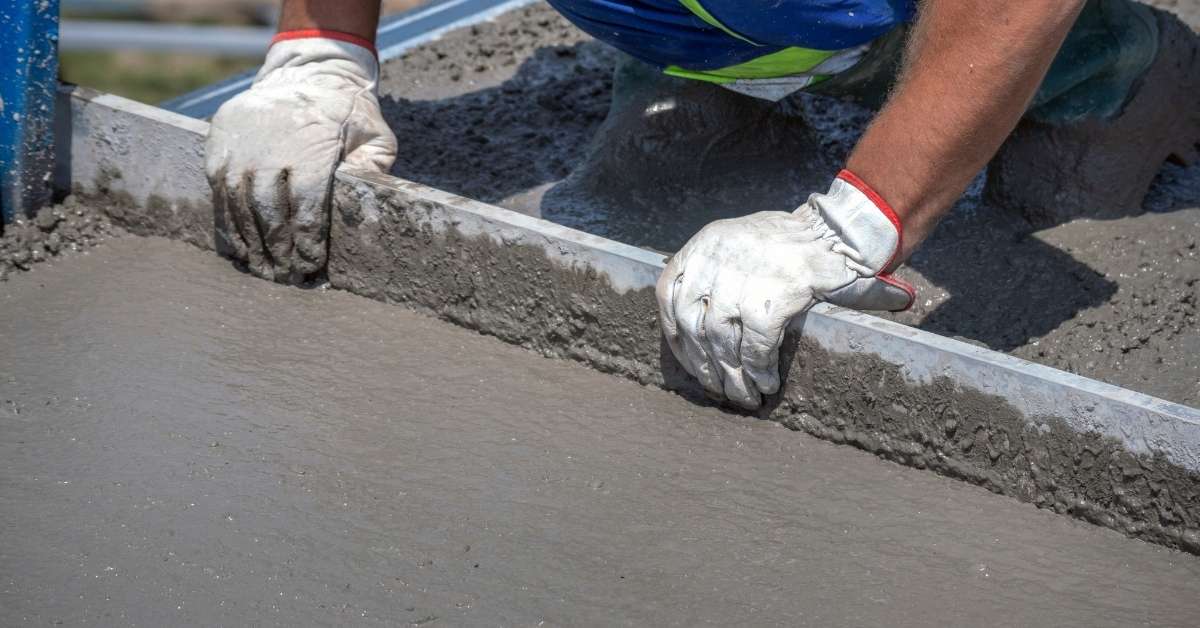
Placing and curing blinding vs PCC
For blinding concrete: place a thin, even layer (usually 25–50mm). Tamp or screed to a light, even finish — you don’t need a power float. Keep the surface damp and cover with polythene or wet hessian for 48 hours to avoid rapid drying.
For PCC (structural concrete): place in one go, consolidate with a vibrator to remove voids, and strike off to the required level. Use curing compound, wet coverings, or continuous damp curing for at least 7 days (longer in cold or windy conditions). Protect both materials from traffic and contamination while curing.
Temporary protection matters: keep boots, tools, and soil off fresh surfaces, and use timber walkways or boards for short access runs. Plan your crew and equipment so placement is continuous and protection is in place immediately after finishing.

Cost, time, and labor comparison
This section compares what you’ll spend on materials, the labor required, and how long blinding and PCC typically take on small driveways. That breakdown helps you budget and plan your schedule.
Understanding the time and labor helps you allocate crew or rental equipment and avoid delays. With clear cost ranges and steps, DIYers can anticipate which tasks to tackle first and how to pace the work.
Material and mixing options to save money
Material choice and how you mix it change both cost and outcome. Pick products that fit the small volume of a driveway and match the load they’ll carry.
- Buy premix bags Use premixed concrete for tiny pours under 0.5 m3. Look for 20–25 MPa (3000–3600 psi) strength ratings for driveways. Avoid low-grade bags—wrong mix leads to cracking and weak bond.
- Hand-mix small batches Good for patching or under 0.2 m3 pours. Aim for the right cement:sand:aggregate ratio (1:2:3 typical). Too much water or wrong sand causes staining and low strength.
- Batch on-site Mix several bags together if you have a wheelbarrow and mixer. Keep consistent water content and mix times. Inconsistent batches give cold joints and uneven curing.
- Additives and fibres Use plasticiser for workability or polypropylene fibres for micro-crack control. Choose dosage on the bag—don’t overdose. Wrong or excess admixture can weaken the finish or cause surface defects.
- Use clean aggregates Use washed sand and crushed stone free of organic matter. Look for well-graded 6–20 mm aggregate for driveways. Dirty aggregate causes poor bond and staining.
- Sealers and curing Apply a curing membrane or cover to retain moisture for 3–7 days. Select breathable curing products for outdoor concrete. Skipping curing invites shrinkage cracks and powdery surfaces.
- Edge and joint formers Use simple timber or plastic formers to get true edges and saw-cut control joints. Place joints at correct spacing (2–3 times slab depth in mm). No joints or bad formers cause random cracking.
Project timeline and critical path
Start by mapping the tasks that must finish before others can start. For small driveways the long poles are site prep, base compaction, and concrete curing. Those three usually set the schedule.
With a blinding layer you add a quick sand/cement screed that speeds up the pour stage. Blinding shortens the time between base prep and laying final surface, but you still need base compaction first. If you choose PCC (plain concrete), the critical path lengthens because you must place, consolidate and then wait for initial set before finishing and traffic.
Typical run: one day for strip-out and base prep, half to one day for forming and blinding or PCC placement, then 3–7 days of restricted access while the concrete cures to a practical strength. Full strength can take 28 days, but light use is possible sooner. Plan deliveries to arrive when the base is compacted—delays there push the whole job out.
Durability, maintenance, and long-term risks
A PCC driveway typically lasts longer and needs less ongoing maintenance than a shallow blinding layer when the base is properly prepared. The key is selecting the right surface and ensuring good drainage and compaction to minimize early failures.
Common failure modes to watch for include cracking, frost heave, and washout at edges. Regular sealing, crack repair, and proper jointing can extend life, but maintenance needs differ: blinding requires more frequent surface protection while PCC depends on joint layout and cure. For a DIY reader, understanding these risks helps plan base work, drainage, and timely repairs to avoid costly resets.
Inspection checklist and visual checkpoints
Look for telling signs right after installation and during the first year. Check for surface ponds, fresh cracks radiating from joints, and any soft or sunken spots when you walk across the driveway. Those are early indicators the base isn’t carrying load evenly.
During freeze-thaw cycles watch for heave near edges and low spots where water collects. If the pavement edges crumble or the surface shows long, hairline cracking that follows a pattern, the problem often traces back to the base layer rather than the top surface.
Also inspect drainage and slopes. Standing water, clogged channeling, or missing edge restraint means the base is likely being washed or weakened. Take photos and mark locations to monitor changes over weeks — quick visual records save guesswork later.
Repair and upgrade strategies
If you spot localized failure on a blinding base, start with targeted excavation to the failing area, remove contaminated material, and replace with compacted engineered fill or crushed stone. Compact in lifts and reconfirm drainage before repaving; that fixes most small-scale washout and settlement issues.
For widespread or recurring problems consider upgrading to a PCC structural base. It means removing the blinding layer, setting formwork, placing reinforcement where needed, and pouring an adequate thickness of plain or reinforced concrete. Tie new concrete into existing sections with dowels or keyed joints to reduce differential movement.
When budgets or access limit a full PCC upgrade you can also stabilize the blinding base by adding a well-graded crushed stone layer and geotextile separation, improving load distribution and frost resistance. For any major repair, address drainage and edge restraint first — they control long-term performance more than surface materials alone.
Material specs, standards, and testing for small projects
For small projects, follow relevant material standards and keep clear material specifications. Use simple field tests to verify suitability and durability. This helps ensure quality and compliance on a jobsite.
Understanding these basics helps DIYers avoid common failures, meet local codes, and reduce rework. Knowing what to test and verify saves time and money and improves safety. Applied consistently, it makes inspections smoother and projects more reliable.
Simple onsite tests and acceptance criteria
Walk the job with your eyes and hands first. Look for uniform color and texture in concrete and mortar, consistent aggregate distribution, and no large voids or segregation. For masonry, check joints for neat tooling and full mortar contact.
Do a quick slump check on fresh concrete: it shouldn’t be too wet or too dry for the mix you ordered. For compacted fills, a simple thumb or rod test can confirm surface firmness; properly compacted soil will feel dense and spring back slightly under impact.
For aggregate and soil, a visual sieve test helps spot too many fines or organic matter. If samples don’t match your specs, mark the area and stop further work until you verify the material—acceptance means it meets the job spec and feels right under basic field checks.
When to call a pro or get lab testing
If the job involves heavy loads, structural elements, or poor ground (soft spots, high clay, high moisture), bring in a geotech or materials lab. These situations affect bearing capacity, settlement, and long‑term performance beyond what simple checks can predict.
Use professional testing when materials deviate from spec, when you see abnormal cracking or movement, or when the cost of failure is high. Examples: footings for a new addition, retaining walls over 1m, driveways carrying heavy vehicles, or soils with swelling clays.
Calling a pro early saves money. A lab test or short site assessment gives clear pass/fail criteria so you can proceed with confidence instead of guessing on the jobsite.
Jointing and crack control specifics for small projects: plan regular control joints to manage shrinkage cracks in both blinding and PCC. Proper timing, depth, and spacing are essential to prevent random cracks and costly repairs later.
Recommended guidelines (adjust for climate, mix, and slab thickness):
- Joint spacing: for typical residential slabs, place control joints every 6–12 ft (1.8–3.6 m). For slightly thicker slabs (5–6 in / 125–150 mm), consider 8–15 ft (2.4–4.6 m) spacing. Do not exceed 15 ft (4.6 m) between joints unless you have a specific structural plan.
- Joint type: use control joints that are either formed during placement or saw-cut joints after the surface has stiffened. Depth should be at least 1/4 of slab thickness (e.g., 1 inch for a 4 in slab, 1.5 inches for a 6 in slab).
- Timing for saw-cut joints: typically 4–24 hours after pour, depending on ambient temperature, humidity, and mix. In hot weather or with rapid setting mixes, cut sooner within the first 6–12 hours if the surface can support the tooling without chipping. Avoid cutting too early (before the concrete has stiffened) or too late (when shrinkage cracks have already formed).
- Edge and penetrations: place joints at all terminations, around columns, posts, and transitions to other slabs or hardscape surfaces. Avoid continuous unbroken slabs across expansion-heavy zones (garage doors, drive approach transitions, etc.).
- Blinding vs PCC: for blinding layers under PCC, plan joints to align with the main slab joints when possible to reduce differential movement. Even so, the blinding layer itself benefits from edge relief joints near large boundary conditions to minimize cracking transfer.
- Sealing and maintenance: after curing, consider sealing control joints with a compatible polyurethane or silicone sealant to deter water ingress and freeze-thaw damage. Replace or reseal joints as they degrade over time to maintain crack control and appearance.
- Safety and cost: proper jointing reduces crack repair costs and maintenance calls. Ensure forms, joints, and saw-cut equipment are on-site and crew trained to avoid over-cutting or under-cutting joints, which can worsen damage or create tripping hazards.
Examples: footings for a new addition, retaining walls over 1m, driveways carrying heavy vehicles, or soils with swelling clays.
Calling a pro early saves money. A lab test or short site assessment gives clear pass/fail criteria so you can proceed with confidence instead of guessing on the jobsite.
Tools and materials checklist + DIY tips
Here is the practical checklist of tools, consumables, protective gear, and small-equipment rentals you’ll need for blinding or PCC on small driveways. It covers everything from mixing and leveling to surface prep so you can plan a smooth, efficient job.
Using the right gear reduces mistakes, speeds up curing, and keeps you safe. Rentals for vibrating tools, mixers, and plate compactors can cut costs for a one-off project. Having a clear list helps avoid last-minute shopping and project delays.
Step-by-step DIY tips to avoid common mistakes
Follow these steps to get consistent mix, good compaction, and a cure that lasts. Each step keeps problems small and fixable.
- Measure and mix by weight or volume. Consistent water and cement ratio controls strength. Quick check: mix should be workable but not soupy—holds shape on your shovel.
- Add water in small increments while mixing. Too much water weakens the concrete. Quick check: mix clings together and doesn’t drip off the shovel.
- Screed to the line immediately after placing. This removes excess and sets grade so water sheds properly. Quick check: surface follows screed with no low spots or large ridges.
- Use a hand tamper or vibrating plate for compaction. Proper compaction removes voids and prevents settling. Quick check: slab sounds solid and doesn’t settle when tapped.
- Float the surface once bleed water rises. Floating brings paste to the top and evens texture for finishing. Quick check: surface is smooth and bleed water is gone before final finish.
- Control joints while the concrete is firm but not hard. Joints reduce random cracking by directing shrinkage. Quick check: joint edges are clean and reach the proper depth—about one-quarter slab thickness.
- Cure with wet burlap, plastic, or a curing compound for at least 3–7 days. Proper curing keeps strength and reduces surface dusting. Quick check: concrete maintains a consistent color and resists light scratching after curing.
Safety and environmental considerations
Keep people and property safe. Concrete dust, wet mix and rinse water can harm skin, eyes and vegetation.
Wear PPE: gloves, goggles, long sleeves and a dust mask when cutting or mixing. Concrete burns are real; rinse exposed skin immediately and seek help for persistent irritation.
Prevent runoff to drains and landscaping. Collect washwater in a sealed container and let solids settle so you can dispose of the slurry with household waste or at a proper facility. Use berms or temporary ditches to keep flow on-site.
Handle leftover material and packaging responsibly. Return unused bags if unopened, and sweep dry spills instead of hosing them into storm drains. A clean site saves you fines and keeps neighbors happy.
Decision guide and recommendations for small projects
This decision guide helps you choose the right approach for small projects by asking key questions about soil, load, budget, and timeframe. It then points you to simple, clear recommendations you can act on.
For DIYers, following the flow makes planning faster, reduces rework, and helps communicate with helpers. It translates beginners’ questions into actionable steps and aligns scope with budget and schedule.
Typical scenarios and recommended approach
Gravel base on firm ground for a garden path: compacted crushed stone with a thin layer of blinding sand is usually enough for light foot traffic. No PCC required unless heavy loads are planned.
Soft clay subgrade under a shed or small garage: add geotextile and at least 150–200mm of crushed stone; consider a reinforced concrete (PCC) slab if point loads or moisture are issues. Stabilize first, then decide on concrete.
Light-use driveway over good granular soils: 100–150mm compacted base with blinding and edge restraints will work. For heavier vehicles or poor soils, upgrade to thicker base or a PCC apron at the gate.
Tight budget and short timeframe with unknown soils: use a proper excavation, compacted crushed base and blinding as the quick, economical choice. If tests later show settlement, plan for localized PCC patches rather than full slabs.
Final checklist before you start
Confirm permits and utility locates. Measure twice and mark levels and drains on site so there are no surprises when you dig. Order materials with a small buffer for waste and weather delays.
Check delivery access and storage on site, and arrange compaction equipment and helpers for the first workday. Have a clear drainage plan—surface falls and drainage outlets—so you don’t cure the slab only to flood it later. If any of these items aren’t ready, delay the pour.

Conclusion
For small driveway bases, pick the option that meets your load, durability, and budget, then follow the steps methodically to avoid costly fixes later. Safety, proper curing, and good compaction are the real make-or-break factors that determine how long the base lasts and how clean it looks.
Make your plan by talking through this flow in order: confirm your intended load and traffic, choose blinding concrete or PCC based on that load, prepare and level the subbase, lay forms and pour or place the material, compact thoroughly, cure correctly, and then inspect for cracks or washouts before you finish with any surface. Do a small test patch first if you’re unsure about slip, bleed, or curing in your climate, check materials against local standards, and keep checks simple: verify depth and compaction, then verify water drainage and edge stability.
Common mistakes to avoid are skipping subbase preparation, under- or over-watering during curing, and rushing the pour or cure without protection. Always wear proper PPE, follow manufacturer guidelines for curing times, and test a small area before committing to the full driveway. If you notice poor drainage, loose edges, or soft spots after initial set, stop and reassess rather than patching it up—these signs signal structural risk.
If your project is near the limits of a DIY approach—heavy loads, uncertain subgrade, or doubt about local standards—it makes sense to bring in a professional rather than gamble with costly failures. When in doubt, plan for a quick consult, get a second set of eyes on the plan, and keep your work area contained and safe. With clear steps and conservative decisions, you’ll end up with a driveway that looks good, lasts long, and you’re not afraid to use.
FAQ
What is blinding concrete and when should I use it on a driveway base?
Blinding is a thin, screeded layer poured over compacted subgrade. Use it to level and fill voids, keep the main base clean, and prevent fine material from mixing into the subsoil.
What is PCC for driveway bases and when is it the right choice?
PCC stands for plain cement concrete. It’s a solid, rigid base that can also be the finished surface for light traffic drives. If you want a simple, flat driveway with little movement, PCC works well with proper subbase and joints.
Which should I use for a small residential driveway project?
If your subgrade is decent, you can pour PCC as the base and surface. If the soil is poor, add a subbase and consider a blinding layer first to keep the PCC from pulling fines and sticking mud to the subgrade.
What common mistakes should I avoid on a small driveway base project?
Avoid skipping proper subbase prep. Don’t mix blinding and PCC in the wrong order, and don’t pour on frozen ground or when it’s too wet. Also, don’t skimp on joints and reinforcement where needed.