
Introduction
Choosing the right coating for metal roofs protects against corrosion, extends life, and reduces maintenance.
The guide explains what coatings work best, what to skip, and practical tips you can apply to evaluate products, compare longevity, and plan a coating project.
Key takeaways
- Inspect roof for loose panels and rust before choosing coating system.
- Clean metal thoroughly with non-corrosive detergent; remove debris and oils.
- Consider silicone or polyurethane coatings for longevity in humid climates.
- Do not skip priming on bare metal; inconsistency causes adhesion failure.
- Budget for surface prep, coatings, sealants, and potential professional assist.
- Avoid removing old paint if it’s stable; assess rust risk first.
Table of Contents
- Introduction
- Key takeaways
- Quick recommendation and how to use this guide
- Preparing your metal roof (cleaning, safety, and inspection)
- Removing old paint, rust treatment, and priming
- Choosing the right coating: types, pros/cons, and when to avoid them
- Application methods and common mistakes to avoid
- Sealants, flashing, fasteners, and detailing
- Cost, DIY vs. professional, and maintenance plan
- Not removing old paint
- Conclusion
- FAQ
Quick recommendation and how to use this guide
This quick guide gives you the top coating options you’ll likely use on metal roofs, with a blunt, practical read on corrugated steel, aluminum, and standing seam. You’ll see 2–3 recommended options per roof type, plus quick pros and cons, a rough cost sense, and how long you can expect them to last so you don’t overpromise to yourself or your budget.
Use the reading strategy to map roof type to product categories—etch/primer, sealant, and topcoat—and to navigate the rest of the article for your budget and climate. Watch for common pitfalls, like painting over rust without proper prep or assuming no prep is okay, and learn how to read labels for things like UV resistance, warranty terms, and recoat windows so you choose products that actually stick to metal.
Who this guide is for
This guide is tailored for DIY homeowners looking to extend the life of their metal roofs. Whether you have a corrugated steel, aluminum, or standing seam roof, we cover all types and conditions.
We assume your roof is in fair condition—no major leaks or structural issues—and that you’re willing to put in some elbow grease for long-term results. If your roof has significant rust, holes, or sagging panels, it’s best to consult a professional contractor who can assess the extent of repairs needed.
For homeowners with roofs under 10 years old and minimal wear, this guide will help you choose coatings that enhance durability without overcomplicating things. If your roof is older than 20 years or has extensive damage, consider a full inspection before applying any coating.
Summary buying table (what to buy, when to skip)
To make your decision easier, we’ve distilled the key factors into a simple framework. For example, if you have a corrugated steel roof in a coastal area with high UV exposure, look for coatings that offer excellent UV resistance. If your budget is tight and you’re not concerned about extreme weather conditions, cheaper options might suffice.
The decision table will help you identify which products to buy based on your specific needs. For instance, if you have an aluminum roof in a dry climate with minimal UV exposure, you can skip coatings that are overkill for UV protection but focus on those that offer good adhesion and durability.
Always check the product datasheets for exact specifications such as CUI resistance, recoat windows, and warranty terms. These details will guide your final selection to ensure long-term performance and cost-effectiveness.
Preparing your metal roof (cleaning, safety, and inspection)
This section covers getting the metal roof ready: safety setup, a visual inspection, and cleaning steps that help coating adhesion and a long-lasting finish. Start with PPE, fall protection if needed, and a clear weather window; set up ladders and access with a buddy watching your back. Then walk the roof and note rust, loose fasteners, lifted laps, and any leaks before you touch a tool.
Sticking to a solid prep plan protects the coating and saves you from rework. It also keeps you safer, reduces surprises on the coating day, and helps the product behave as intended when you follow the manufacturer’s guidance for compatibility and cure windows.
Safety and weather considerations
Use this checklist before you start any work on your metal roof to ensure safety and optimal conditions.
- PPE gear ready: Wear gloves, eye protection, non-slip footwear. Confirm all items are in good condition.
- Ladder secure: Place ladder at a safe angle (1:4 ratio). Check for stability before climbing.
- Fall arrest setup: Install safety harness and anchor points if working above 6 feet. Verify equipment is properly anchored.
- Weather window check: Avoid painting in extreme temperatures or high humidity. Confirm temperature between 50-90°F (10-32°C).
- No wind: Ensure no strong winds that could blow debris or cause slips and falls.
- Dry conditions: Check roof is dry to prevent moisture from affecting adhesion. Confirm no rain expected for at least 48 hours.
- Avoid winter: Do not paint in freezing temperatures as it can lead to poor coating application.
- No ice or snow: Clear any ice or snow before starting work to prevent falls and injuries.
Quick rule: Always prioritize safety first, then check weather conditions for optimal painting times.
Proper washing and surface cleaning
Use this checklist to ensure your metal roof is clean and free of contaminants before applying any coatings.
- Pressure washer: Use low-pressure setting (1500 psi max) to avoid damaging the metal. Confirm no water spots or streaks after washing.
- Detergent choice: Select a mild detergent for tough grime removal. Rinse thoroughly and confirm surface is free of residue.
- No oils present: Check roof for oil stains from machinery or birds. Clean with degreaser if necessary to prevent coating failure.
- Dry completely: Ensure the metal is fully dry before applying coatings. Confirm no moisture remains on surface.
- Loose material removed: Scrape off any loose paint, rust flakes, or debris. Verify surface is smooth and clean.
- No dirt left: Use a brush to scrub away stubborn dirt patches. Confirm all areas are free of contaminants.
- Check for wax: Look for signs of old wax coatings that can interfere with adhesion. Clean thoroughly if found.
Quick rule: A clean, dry surface is crucial for proper coating adhesion and longevity.
Inspection checklist and what to repair first
Use this checklist before applying any coatings to ensure your metal roof is in good condition and ready for painting.
- Rust patches: Identify all rust spots. Treat with rust converter or mechanical removal as needed.
- Loose fasteners: Check screws and bolts are tight. Replace any that are loose to prevent leaks.
- Damaged panels: Inspect for dents, holes, or other damage. Repair or replace damaged sections before coating.
- Lifted laps: Look for areas where metal edges have lifted. Seal these gaps with appropriate sealant to prevent water intrusion.
- Peeled coatings: Remove old paint that is flaking off. Confirm surface is clean and smooth after removal.
- Oil canning: Check for oil canning (wavy appearance). Flatten or replace affected panels if necessary.
- Seam integrity: Inspect seams for gaps or splits. Apply sealant to any compromised areas before coating.
Quick rule: Address all issues before applying coatings to ensure a long-lasting finish.
Removing old paint, rust treatment, and priming
Decide if you fully strip old paint or feather the edges by looking at how badly the coating is peeling, how rough the edges are, and whether corrosion has started underneath. For light flaking, feathering with thorough cleaning, sanding, and edge blending can be enough to preserve as much sound coating as possible; for extensive peeling or blistering, plan for full removal, patching, and repairing bare metal before any primer goes on. When it comes to rust, choose a treatment based on severity: rust converters can neutralize active rust spots and create a solid base, while encapsulators seal the rust and let you move ahead when the metal is relatively stable; always check the product label for curing times and compatibility with primers.
Surface prep is where most coatings fail, so clean all surfaces, degrease where needed, feather edges, inspect for hidden corrosion, and repair any pitted or loose metal before priming. Select primers that suit the chosen topcoat and roof metal: etching primers for bare metal, bonding primers for uneven or previously painted surfaces, zinc-rich primers for corrosion resistance, and rust-inhibitive options when you expect rust to reappear; match them to the coating system and follow the manufacturer’s guidance. Seal joints and seams, practice thorough coverage to avoid missed areas, and perform a simple adhesion check and moisture test after priming before applying the topcoat, while keeping disposal rules in mind and not mixing products beyond label directions.
When to remove old paint vs. scuff-and-prime
If the existing paint on your metal roof is peeling or failing, it’s time for a full strip-down. This ensures you’re starting with a clean slate and no residual adhesion issues down the line.
For sound coats that are just dirty or slightly weathered, give them a good scuffing to create some tooth for new paint to grab onto. Use a wire brush or sandpaper to rough up smooth surfaces without removing too much material.
The key is knowing when to strip versus feathering edges. If there’s any sign of rust or flaking under the old coat, go full removal. Otherwise, just prep and prime for best results.
Rust patch remediation
To tackle rust patches on your metal roof, start by removing loose rust with a wire brush or sandpaper. This mechanical abrasion is crucial to get down to bare metal and stop the spread.
Next, apply a rust converter according to the manufacturer’s instructions. Rust converters chemically convert iron oxide into a stable compound that won’t continue spreading under new paint.
Once the rust converter has cured (check the label for timing), patch any holes or thin spots with metal filler or putty. This ensures no weak points remain before priming and painting over.
Primer types and correct priming technique
Zinc-rich primers are a go-to for metal roofs due to their rust-inhibiting properties. They form a protective barrier against corrosion, extending the life of your roof.
Epoxy or etching primers also work well, especially on surfaces with existing paint that needs bonding. These create a strong base layer for topcoats to adhere to.
When applying primer, follow the recommended flash and dry times closely. This ensures each coat bonds properly without over-drying or under-coating issues. A thin, even application is key for good coverage and adhesion.
Choosing the right coating: types, pros/cons, and when to avoid them
Choosing the right coating means knowing the big players: acrylic elastomeric, silicone, polyurethane, silicone-modified, acrylic-latex, and metal-roof-specific enamel, and how they differ in flexibility, UV resistance, and moisture management so you can pick what sticks to your roof without cracking or peeling. Each family has its own vibe: some stay flexible to bridge minor movement, some shrug off UV and chalking longer, and others seal moisture differently, which changes how you prep, seal, and recoat. We’ll look at what they’re best at and where they struggle so you don’t guess and waste time or money.
This matters because the right choice hinges on your roof’s age, surface condition, and climate, plus how you plan to maintain it over time, including sealants and inspection cadence. Understanding the trade-offs helps you avoid common failure modes like poor surface prep, incompatible primers, and moisture entrapment, and it clarifies when a coating is unnecessary or counterproductive. If you’re DIYing, the payoff is steadier performance, fewer re-dos, and a clearer path for prep, primer compatibility, and proper maintenance intervals—plus practical cues for spotting red flags before they bite.
Cool roof and reflective coatings
IR-reflective coatings are a smart choice for metal roofs exposed to intense sunlight. They reduce heat absorption, lower cooling costs, and extend the life of your roofing material by minimizing thermal stress.
When choosing a cool roof coating, look for pigments that reflect infrared light without compromising UV resistance. Light colors like white or light gray are ideal, but modern coatings can also offer darker shades with reflective properties.
The energy benefits of these coatings are most noticeable in warm climates where the sun is intense and consistent throughout the year. In cooler regions, the impact might be less significant, so weigh the cost against potential savings.
Coatings to avoid for specific problems
Avoid these coatings if your roof has certain issues or conditions that could lead to premature failure:
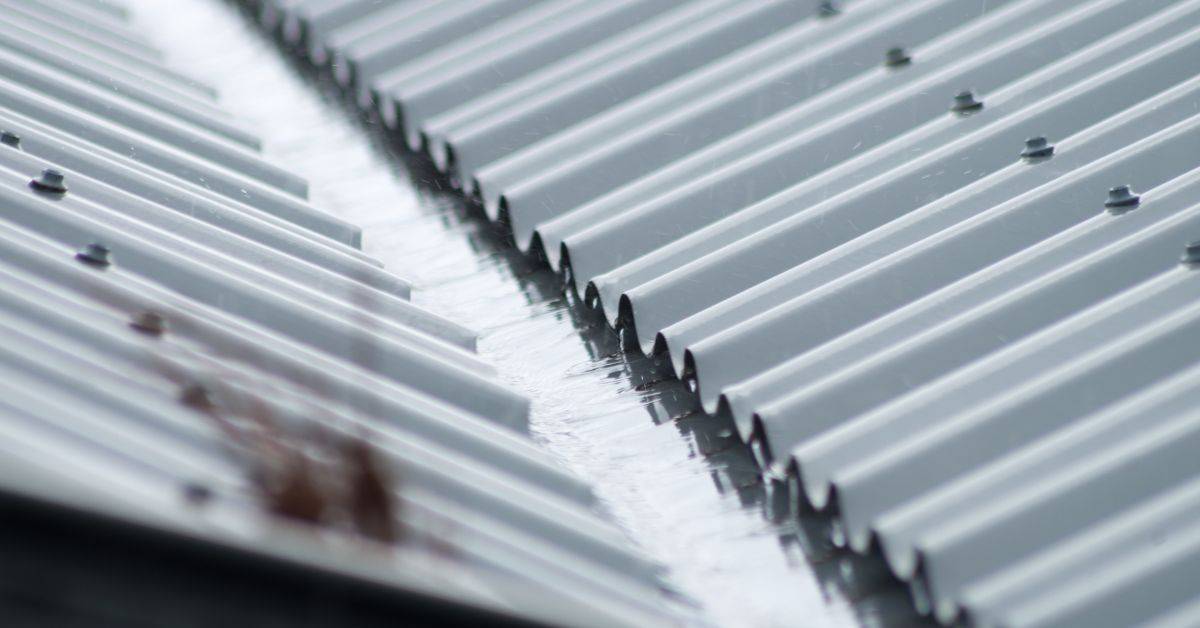
- Ponding water: Some coatings trap moisture, leading to blistering and delamination. Choose ones with high vapor permeability.
- Incompatible primers: Using the wrong primer can cause adhesion issues. Always check compatibility charts before applying.
- Rusty metal: Coatings that don’t bond well on rusty surfaces will peel off quickly, leaving your roof exposed to further corrosion.
- Poor surface prep: Skipping thorough cleaning and rust treatment can lead to coating failure. Take the time to prep properly.
By avoiding these pitfalls, you’ll ensure a longer-lasting, more effective coating on your metal roof.
How to read product labels and technical data sheets
Before buying any coating, review the Technical Data Sheet (TDS) and Material Safety Data Sheet (MSDS). These documents provide crucial information about performance and safety.
Look for adhesion test results that show how well the coating sticks to metal. Also check the VOC content, as high VOCs can affect indoor air quality and environmental impact.
The recommended mil thickness is important; too thin, and you won’t get full protection; too thick, and it may crack or peel off. Service temperature range should also match your climate to ensure durability.
Finally, read the warranty conditions carefully. A good coating will offer a clear warranty that covers defects in materials and workmanship for a specified period.
Application methods and common mistakes to avoid
This section covers when to spray, roll, or brush, and how to set up each method for even coverage. It explains recommended mil thickness per coat in general terms and how to overlap passes to avoid laps, sags, and runs, plus how to build multiple coats without texture buildup. Check the label or datasheet for exact numbers and wait times.
Why it matters: good prep and proper technique prevent costly mistakes and rework. You’ll learn how weather, temperature, and recoat windows affect your results, plus how to test patch adhesion and spot issues early, so you don’t seal in problems like unsealed rust or bare metal gaps.
Correct coating thickness and number of coats
The right wet-film thickness is key to a quality job. Too thin, and you won’t get the coverage needed for protection; too thick, and it can sag or peel off.
Most manufacturers specify wet-film thickness, which is what you measure before drying. This usually ranges from 10 to 25 mils per coat. Dry-film thickness will be less due to evaporation—aim for around 6 to 14 mils.
For most metal roofs, two coats are standard practice. However, if your roof has heavy rust or needs extra protection, a third coat might be necessary. Always follow the manufacturer’s guidelines on number of coats and thickness per coat.
Remember, consistency is key. Use a wet film gauge to measure each coat and ensure you’re applying it evenly across the surface.
Drying and recoat windows
The timing between coats can make or break your project. You need to wait long enough for the first coat to dry but not so long that it becomes difficult to blend.
For most coatings, a good rule of thumb is 4 to 12 hours drying time before recoating. This window depends on temperature and humidity—warmer days speed up drying, while cooler or humid conditions slow it down.
To test if the first coat is ready for another layer, use your finger to gently touch the surface. If there’s no stickiness but still some tackiness, you’re in the sweet spot for recoating.
Skipping this step can lead to poor adhesion and uneven coverage. Always check the manufacturer’s guidelines for specific drying times based on environmental conditions.
Visual checkpoints during application
As you apply each coat, regular checks help catch issues early. Here’s what to look out for:
- Uniform sheen: Check that the coating is evenly spread across the roof without streaks or thin spots.
- No pinholes: Look for any small holes where the metal shows through, which can lead to rusting over time.
- Coverage at seams and fasteners: Ensure all joints and screws are fully covered by the coating to prevent water intrusion.
- Smooth texture: The surface should feel smooth when you run your hand over it, indicating even application without lumps or sags.
- No runs or sags: Inspect for any drips or uneven areas that could weaken the coating’s integrity.
Quick rule: Regular checks save time and money by catching issues before they become major problems.
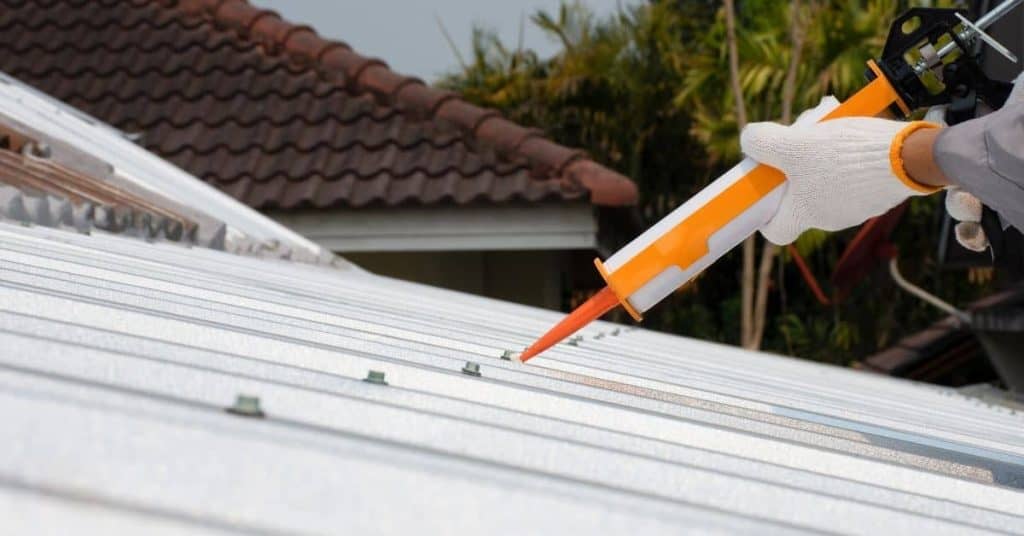
Sealants, flashing, fasteners, and detailing
Sealants must be compatible with your coating and installed correctly to protect seams, penetrations, and fasteners. Read the compatibility data sheets for silicone, polyurethane, or hybrid options and note cure times and VOC limits.
Doing seams, joints, and edge transitions right prevents leaks and coating failures down the line. Use proper flashing, corrosion-resistant fasteners, and sealant over fastener heads to get a uniform, watertight look. Skipping sealant, using the wrong material, or ignoring rust patches invites leaks and costly touch-ups.
Choosing compatible sealants and flashings
You gotta pick the right sealant to match your roof coating. Start by checking the compatibility data sheets from both products. Look for silicone, polyurethane, or hybrid options that play nice with your chosen coating.
For example, if you’re using a silicone-based coating, go for a silicone sealant. Polyurethane works well with acrylic coatings. Polysulfide is great for EPDM rubber roofs but might not be compatible with all metal roof coatings.
Also, pay attention to the cure time and VOC limits of your sealants. A fast-curing sealant can save you time but might not bond as well if it dries too quickly before setting in place.
Fastener and seam protection
When it comes to fasteners, go for corrosion-resistant ones like stainless steel or galvanized. Use washers that match your metal roof type to prevent rusting.
Before applying the coating over a fastener head, make sure to prime it properly. A good coat of primer will help the sealant stick better and protect against moisture.
To protect seams and joints from water intrusion, use backer rods where needed. Apply a bead of sealant along each seam, making sure it’s thick enough to fill gaps but not so much that it bulges out.
Penetration and edge detailing best practices
Around vents, skylights, and other penetrations, use a clocking method to ensure even sealant coverage. Start by cleaning the area thoroughly and applying primer if needed.
For edges like ridges and valleys, apply a bead of sealant along the edge before laying down your coating. This helps prevent water from seeping under the coating.
Don’t forget gutters and chimneys too. Make sure to seal around these areas properly to avoid leaks. Use flashing if necessary to create a watertight barrier where different materials meet.
Cost, DIY vs. professional, and maintenance plan
Costs boil down to materials and labor, with DIY costing less for simple jobs but more time and risk on your plate. Factors that drive price include roof size, coating type, prep needs, roof condition, and location. Decide if you can handle preparation, ladder setup, and safety, or if you should hire a pro for rust, damaged metal, or warranty-backed work.
After coating, stick to a simple maintenance routine: inspect for wear and rust, clean debris before it rots the surface, and address small touch-ups before they grow. Look for peeling, corrosion, or loss of sealant as signs to recoat or repair early, and don’t skip sealing or surface prep. These steps build longevity and save trouble later.
When to DIY and when to hire a pro
If your metal roof is relatively flat, not too large, and you’re comfortable with heights and ladder work, go ahead and do it yourself. But if the roof has steep slopes or complex angles, hiring a professional is safer and more effective.
DIY works best when there’s no structural damage to fix and you’re okay with spending several days on prep and application. For anything beyond that—like dealing with rust patches, removing old coatings, or needing warranty coverage—it’s better to hire pros who are insured and experienced in metal roof restoration.
Remember, safety first. If you’re unsure about your ladder setup or the condition of your roof, it’s best to leave it to the pros.
Long-term maintenance and inspection schedule
Keep an eye on your metal roof every six months for any signs of wear or damage. Here’s a quick checklist:
- Inspect seams: Look for gaps or rust; fix with sealant if needed.
- Clean debris: Clear leaves, branches, and other objects to prevent water pooling.
- Check fasteners: Ensure screws are tight and not loose. Loose fasteners can lead to leaks.
- Evaluate coating condition: Look for thin spots or cracking; touch up with primer and new coat if necessary.
- Inspect flashings: Check around chimneys, vents, and other penetrations for signs of wear. Replace damaged flashing as needed.
Quick rule: If you notice any issues early on, address them promptly to avoid bigger problems later.
Warranty, testing, and verifying contractor claims
Before hiring a pro, make sure they provide a warranty that covers the work done. Check for details like coverage period, conditions of use, and what’s included in case of defects.
To verify coating adhesion, you can do a simple test: take a coin or small weight and press it into the wet coat. If it sticks well without lifting off easily, that’s good adhesion. This is crucial for long-term performance.
Also, ask contractors to provide documentation like material data sheets, warranty certificates, and proof of insurance. These documents are your safety net if anything goes wrong down the line.
Not removing old paint
Not removing old paint can be acceptable when the existing coating is sound, well-adhered, and compatible with the new coating you plan to apply. Do a quick risk check by looking for peeling, chipping, rust, or signs of moisture entrapment and decide if skipping full removal is reasonable for your project. Use simple tests like a tape pull and a light scrape to gauge adhesion and condition, and document what you find so you know what prep and products you should use.
Then prep without full removal by cleaning to remove dirt and oil, degreasing where needed, and giving the surface a light mechanical abrade to create a key for the new coat, while avoiding aggressive sanding that can dust up or create uneven adhesion. Choose a coating system that is compatible with the existing paint and use a compatible primer or bonding agent when adhesion is uncertain; for rust or uncertain metal areas, consider a rust converter or an acrylic-based sealer as a base. For any rust patches, treat active areas and patch or lightly sand if needed, and plan a practical workflow: test area, clean, abrade, apply primer if needed, apply coating, observe cure time, and inspect, while keeping safety, weather, and temperature in mind for a DIY project.
How to test old paint for adhesion and safety before coating
To decide if you can skip removing old paint, start by assessing its condition. Use a simple tape pull or scrape test: peel off a small section of the existing coat with duct tape; if it comes up easily, it’s not ready for new paint. If it stays put, move on to checking adhesion strength.
For safety, always wear gloves and a mask when testing old coatings. Lead-based paints can be dangerous, so test for lead before proceeding—especially in older homes or buildings. A quick DIY kit from the hardware store will tell you if there’s lead present.
If your tests show good adhesion but some minor issues like small chips or flakes, it might still work to add a new coat over top. But if large areas are peeling or rust is showing through, don’t risk it—remove old paint first.
Safe methods for removing or prepping old paint on a metal roof
To prep the surface without full removal, start with cleaning to remove dirt and oils. Use a degreaser if needed—don’t skip this step as it can affect adhesion of new coatings.
Avoid harsh sanding that could release dust or create uneven spots. Instead, use light mechanical abrasion like wire brushing or a stiff-bristled brush to roughen the surface slightly. This creates a key for better bonding without damaging the metal underneath.
Wear proper safety gear when working with any chemicals or tools—gloves, mask, and eye protection are musts. Work in well-ventilated areas and follow disposal rules carefully for all waste materials.
Conclusion
Finish your metal roof with a coating you can trust, done safely and with a clear plan. The right choice and careful prep protect the roof structure, keep water out, and look good for years to come.
Start by confirming your plan: inspect and clean the surface, address rust and primer as needed, choose a coating type suited to your metal and climate, apply with proper technique, seal seams and fasteners, and set a maintenance check schedule. Do this in a steady sequence: clean and dry, treat rust and prime if required, apply the coating evenly, then seal and detail where water and weather meet every seam and edge. Test a small area first, follow product instructions, and work from top to bottom so runoff doesn’t ruin fresh work.
Common mistakes to avoid include skipping rust treatment or primer on bare metal, rushing the coating in damp or cold conditions, and applying too thick a layer or in direct sun when the surface is hot. Prioritize safety: wear eye and skin protection, use a stable ladder or scaffold, and never work on a wet or windy day. If you aren’t confident about sealing flashing or choosing the right coating for your climate, pause and reassess rather than pushing ahead.
If the roof is badly rusted, structurally compromised, or you’re unsure about wiring, sealants, flashing, or fasteners, it’s wise to call a professional. A trained pro can verify surface condition, handle edge detailing, and ensure a long-lasting, watertight result. Ready to get to work—detailed prep, steady hands, and a clear plan will deliver durable protection and peace of mind.
FAQ
What coating should I choose for a metal roof?
Go with a coating designed for metal roofs. Look for materials that resist rust, stay flexible, and hold up to sun and weather. Avoid coatings that don’t specify metal compatibility or guarantee adhesion.
Do I need primer before applying the coating?
In most cases, yes. A good primer helps prevent corrosion and makes the topcoat stick better. Skipping primer often leads to early peeling and hot spots.
How long will a coating last on a metal roof?
It depends on climate, maintenance, and quality. Expect several years if you do proper prep and follow the product directions. If you skip maintenance, it won’t last as long.
What common mistakes should I avoid?
Don’t skip surface prep. Don’t buy the cheapest option without checking compatibility. Don’t apply in bad weather or on a damp roof. These mistakes wreck adhesion and shorten life.