
Introduction
Identify the source of a new roof leak during heavy rain and apply fixes that endure.
You’ll learn quick tests to confirm leaks, practical steps for temporary control, and durable repair approaches that stand up to weather.
Key takeaways
- Identify leak paths by tracing water intrusion from ceiling or attic toward skylights.
- Test during light rainfall with bucket placement and visual drip tracing.
- Safety: avoid climbing in heavy rain; use stable ladders and harnesses.
- Apply temporary tarps or booted sheets to divert water from leaks.
- Check flashing laps, step flashing, and penetrations for improper sealant.
- Verify gutters slope properly; clear debris to prevent backflow and ponding.
Table of Contents
- Introduction
- Key takeaways
- Why New Roofs Leak During Heavy Rain
- Safety First: Inspecting During and After Heavy Rain
- Quick Tests to Pinpoint Leak Sources
- Emergency Temporary Repairs That Buy You Time
- Common Flashing and Penetration Failures — Diagnosis & Durable Fixes
- Gutters, Drainage, and Roof Geometry: Preventing Backups and Ponding
- Shingle and Roof-Covering Damage: Assessment and Lasting Repairs
- Costs, Warranties, and When to File Claims
- Conclusion
- FAQ
Why New Roofs Leak During Heavy Rain
Heavy rain exposes the weak points in a new roof, especially where flashing, underlayment, or shingles aren’t doing their job. Install mistakes, material defects, and weather stress each create predictable leak paths that only show up when a downpour hits hard. Light rain can mask these issues, but heavy rain pushes water into joints, penetrations, and seams you don’t notice on a calm day.
That matters because you can spot and address the predictable failure modes before they worsen: look for attic damp spots, daylight near hips or valleys, lifted shingles, or signs of water tracking along eave lines. Use those clues to prioritize quick fixes like sealing obvious gaps and clearing gutters, then plan permanent repairs for flashing, joints, and any failed roofing materials. If leaks persist or you see signs of structural compromise or uncertain sources, it’s time to call a pro and use their diagnostic tools to verify the problem.
Installation and workmanship failures
When a new roof leaks, the first place to look is at how it was put together. Improper flashing around chimneys, valleys, and skylights can let water seep in where it shouldn’t. Check for gaps or misalignment that might allow rain to sneak through.
Misplaced underlayment is another common issue. If the felt paper isn’t laid correctly, it won’t provide a proper barrier against moisture. Look for any exposed nail heads or areas where the shingles aren’t properly covering the underlayment.
Improper fastener placement can also lead to leaks. Shingles need to be nailed in specific patterns and at precise intervals. If they’re not, wind can lift them off, exposing the roof deck underneath. This is especially critical around edges and corners where water tends to accumulate.
Material defects and early-life failures
The quality of materials used in a new roof can make or break its performance, especially during heavy rain. Poorly manufactured shingles, flashing, and underlayment can all lead to leaks.
- Shingle cracking: Check for brittle material that breaks easily; look for warranty coverage on durability ratings.
- Flashing delamination: Inspect for warped or buckled metal pieces; ensure proper bonding and sealing techniques are used.
- Underlayment delaminating: Look for signs of moisture damage like bubbling or peeling layers; use high-quality, water-resistant underlayments.
Weather dynamics that expose vulnerabilities
Heavy rain and wind-driven precipitation can quickly reveal weaknesses in a new roof. Downpours test the integrity of flashing around chimneys, valleys, and skylights more rigorously than light showers.
Ponding water on flat or low-slope areas can also cause issues by saturating underlayment and shingles, leading to leaks where none were expected before. Wind-driven rain can force water into small gaps that might otherwise be sealed tight in calm conditions.
Understanding how roof geometry affects water migration is key. Water tends to follow the path of least resistance, often pooling at low points or finding its way through improperly flashed joints and penetrations. This makes it crucial to inspect these areas closely after heavy rain.

Safety First: Inspecting During and After Heavy Rain
Stay off the roof during and after heavy rain. Inspect from the ground or attic only, using binoculars or a flashlight to spot obvious damage. If you see wind‑driven debris, slippery surfaces, or signs of moisture entering, stop and reassess.
Electrical hazards are real—watch for live wires or water near electrical panels, and shut exterior power only if it is clearly safe. Wear gloves, non-slip footwear, and a helmet, and keep kids and pets away while you check. If the situation seems serious, stop, wait for dry conditions, and call a pro for a thorough assessment.
Safe attic checks and water-tracking techniques
Before you head up to the attic, make sure it’s dry enough to walk on without leaving footprints. Start by checking for any signs of moisture like stains or mold growth near vents, chimneys, and roof edges.
Use a flashlight to inspect the insulation for wet spots. If you find damp areas, trace back along the water path to pinpoint where it’s entering the attic. This could be at a vent cap, around a chimney, or under loose shingles.
If you spot any issues, take photos and make notes right away. Documenting these details will help when talking with contractors later on. Remember, safety first—don’t climb into areas that look unstable or unsafe.
Ground-level and exterior inspection tips
When it’s too wet to go up the roof, use binoculars from a safe distance on the ground. Check for obvious signs of damage like missing or loose shingles.
- Eaves: Look for water stains and gaps where rain can seep in.
- Gutters: Ensure they’re clear and securely attached; sagging gutters let water overflow.
- Valleys: Inspect valleys for debris buildup or missing shingles that could cause leaks.
- Flashings: Check around chimneys, vents, and skylights for gaps or rusted metal.
Quick rule: If you can’t see it clearly from the ground, don’t risk climbing up in wet conditions. Wait until the roof dries out before going up.
When to stop and hire a pro
If you spot major leaks or water damage that’s spreading fast, it’s time to call in the pros. Don’t risk your safety by trying DIY repairs on steep roofs or during bad weather.
Look out for compromised structural elements like sagging roof sheathing or broken rafters. These are serious issues that need immediate attention from a professional contractor.
If you’re unsure about any part of the inspection, especially if it involves heights or electrical hazards, err on the side of caution and get help. A pro can assess the situation safely and recommend the best course of action.
Quick Tests to Pinpoint Leak Sources
During a rain event and just after, use a simple, low-risk checklist to spot where water is entering. Look for new damp spots on ceilings and walls, note the rain intensity, and use attic scans with a flashlight and dry interior markers to trace likely trouble points like flashing laps, ridge lines, gutters, chimneys, and vent pipes without taking things apart.
This approach gives you a quick sense of whether leaks track to roof edges, flashing seams, or gutter outlets and whether the problem is weather-dependent or persistent. It helps you decide when to push further or call a professional, while keeping you safe: avoid wet shingles, skip climbing on a soaked roof, and document findings with color marks and time-stamped notes so you can compare after a dry spell.
Water-trace test in the attic
Start by setting up a controlled water trace from your attic. Use a garden hose to simulate rain on specific areas of your roof, focusing on suspected leak points like flashing and valleys.
Use a flashlight and mirror to inspect for any signs of moisture or water stains inside the attic. Mark these spots with colored tape or markers so you can track them over time. If you see consistent wet marks under the same spot during different rain events, it’s likely your leak source.
If you’re unsure about the results or if leaks persist despite your efforts, call in a professional to run a full-scale hose test and pinpoint exact areas of concern.
Exterior inspection under controlled water application
Use this method when you need more direct evidence on specific roof sections. It’s best to do it during a dry spell so you can clearly see the effects of your test.
- Start with hose: Begin by spraying water from ground level, focusing on areas like flashing and valleys for 5-10 minutes at a time.
- Check gutters: Look for any signs of water leakage or overflow. If you skip this step, you might miss crucial gutter blockages causing overflows.
- Inspect roof edges: Pay close attention to the roof’s edge and corners where leaks often occur. Missing shingles here can lead to major issues if ignored.
- Note water paths: Watch how water moves across your roof surface. If it pools or runs down in unexpected ways, you may have drainage problems.
Quick rule: Always maintain a safe distance from the wet roof and avoid climbing on slippery surfaces.
Visual checkpoints and thermal/moisture tools
Use these simple tools to confirm active leaks or lingering moisture. An infrared thermometer can help you spot temperature differences, while a moisture meter will show wet spots.
- IR Thermometer: Scan roof edges and valleys for cooler areas indicating water intrusion. Missing this step could mean undetected leaks persisting.
- Moi Meter Check: Test walls and ceilings with a moisture meter to see if there’s residual dampness from past leaks. This helps distinguish between old and new issues.
- Flashlight Inspection: Use a flashlight at night to spot any light shining through gaps in flashing or around chimneys, indicating water entry points.
Quick rule: Always document your findings with photos and notes for future reference.
Emergency Temporary Repairs That Buy You Time
During heavy rain, focus on quick, temporary fixes that keep water out and buying you time. Use heavy plastic or tarps over the obvious roof gaps, seal joints with contractor-grade sealant or roofing cement, and map the worst leaks for targeted attention. Remember these are stopgaps, not permanent repairs, and safety comes first when working on a wet roof.
Inside the house, protect ceilings and floors with plastic or drop cloths, move valuables away, and place buckets under active drips with liners. Document water patterns and leak spots to guide a professional later, and plan safe temporary steps before rain returns. If you escalate, have clear information ready for quotes or insurance: photos, a simple leak map, and notes on observed rainfall and timing.
Tarping and temporary roof seals
When you spot a leak, the first step is to cover it with heavy-duty plastic sheeting or tarps. Make sure the tarp covers not just the leaking area but also extends well beyond it on all sides. This prevents water from seeping around the edges.
To secure the tarp, use weights like bricks or sandbags for added stability in windy conditions. If you need to nail down the corners, do so carefully with roofing nails and avoid damaging the underlying shingles or flashing. Use a hammer with a rubber mallet head to minimize impact on your roof materials.
For temporary seals at joints where tarps meet, apply contractor-grade roofing cement or silicone sealant around all edges. This helps prevent water from getting under the tarp during heavy rain. Remember, these are stopgap measures and should be removed as soon as possible once a permanent fix is in place.
Interior mitigation (buckets, drop cloths, localized sealing)
Lay down plastic sheeting or drop cloths on the floor and ceiling around the leak source to protect your home’s interior. Move any furniture or valuables out of reach from dripping water. Place buckets with liners directly under active drips to catch water.
Use quick-drying sealants like painter’s caulk or roof sealant around pipes, chimneys, and other penetrations where leaks are occurring. These can help buy you time until a professional arrives. Ensure these seals are applied in thin layers for better adhesion.
Note the exact location of water patterns on your ceiling to identify larger breaches that might need more attention. Documenting this information will be crucial when discussing repairs with contractors or insurance adjusters later.
Temporary flashing and shingle patches
If you find damaged flashing, a quick fix is to apply sheet metal over the compromised area. Secure it tightly but avoid damaging existing materials further. For gaps or missing shingles, use heavy plastic or aluminum foil as a temporary patch.
Apply roofing cement around edges where new patches meet old ones for added security against water intrusion. Remember, these are emergency measures and should be replaced with proper flashing or shingle repairs by a professional at the earliest opportunity.
Avoid over-tightening screws or nails when applying patches to prevent further damage to your roof structure. Always use caution and wear appropriate safety gear like gloves and hard hats while working on your roof.
Common Flashing and Penetration Failures — Diagnosis & Durable Fixes
This section flags the main flashing failure points—chimneys, roof vents, skylights, and transitions to walls—and explains how each setup invites leaks if the installation details are off. You’ll learn diagnostic signs you can spot in the attic or ceiling, plus step-by-step permanent fixes that stand up to weather. We also call out common installation mistakes like missing counter-flashing, improper sealants, and poor integration with underlayment and shingles, so you can avoid repeating them.
This matters because small, wrong details now turn into big leaks later, especially where roofs meet walls or gutters. It gives you practical moves, guidance on when to repair vs replace, and clear cues for when a pro is the safer call for tough spots.
Chimney and Wall-Base Flashing Issues
When it comes to chimneys, the most common issue is failed counterflashing. This happens when water seeps behind the chimney’s masonry and leaks into your home. Look for gaps or cracks where the flashing meets the brick or stone. If you see tarry stains or moisture trails in the attic around the chimney area, it’s a clear sign of trouble.
Step flashing is another critical component that often fails due to improper installation. Gaps between shingles and step flashings can let water in. Check for these gaps by looking at the underside of your roof during heavy rain or use a garden hose to simulate rainfall. If you find significant damage, consider whether re-pointing, new flashing, or professional masonry work is needed.
Wall-base flashing issues are also common where walls meet the roofline. Missing nail flanges and improper slope can cause water to pool and seep into your home’s structure. Inspect these areas closely for signs of moisture damage like stains on the ceiling or musty odors in the attic space.
Vent, Pipe Boot, and Skylight Flashing Solutions
Vents and pipe boots are frequent sources of leaks due to improper sealing or material degradation. If you notice water stains around these areas during heavy rain, it’s time for a closer look. Often, resealing with the right materials can fix minor issues, but sometimes replacement is necessary.
For vent flashing, ensure that new boots are properly integrated with existing shingles and underlayment. Use metal flashing compatible with your roof material to avoid corrosion issues down the line. If you find extensive rust or damage, it’s best to replace the entire unit rather than patching it up temporarily.
Skylights require careful inspection as well. Look for gaps around seals and ensure that all fasteners are tight and secure. Use non-silicone sealants where applicable to avoid issues with adhesion over time. If you’re unsure about your ability to repair these components safely, calling a professional is the best course of action.
Valley and Step-Flashing Repairs
Improperly installed or undersized valley flashing can lead to significant leaks during heavy rain. Valleys are where two roof planes meet, creating a V-shaped channel for water runoff. If this area is not properly sealed, water can seep into your attic.
To repair valleys, start by inspecting the underside of the roof and checking for gaps or missing nails in the flashing. Use durable materials like galvanized steel to ensure longevity against weather elements. Reinforcing these areas with additional step flashings can also help prevent future leaks.
Step flashing repairs are similar but focus on ensuring that each shingle overlaps correctly over the flashing material. This prevents water from getting behind the shingles and causing damage. Regular inspections of these areas, especially after severe weather events, will catch issues early before they become major problems.
Gutters, Drainage, and Roof Geometry: Preventing Backups and Ponding
Clogged gutters, wrong downspouts, or a roof that doesn’t slope enough can push rainwater back up under shingles and flashing during heavy rain. That backing water wicks under roofing and can cause leaks, mold, or damage. We’ll cover how to inspect and quick fixes like cleaning gutters, reseating, extending downspouts, and checking slope.
Do a quick inspection of debris buildup, downspout extensions, fascia, and any ponding zones. These fixes buy time during a heavy rain, but plan a proper repair if leaks persist or you see obvious structural damage. When in doubt, consult a pro and follow manufacturer instructions.
Gutter inspection and emergency clearing
When heavy rain threatens, it’s crucial to clear gutters of debris. Here’s a quick checklist:
- Clean out leaves. Remove all visible debris from the gutters; missed leaves can cause water backups.
- Flush downspouts. Use a hose to spray water through each downspout, ensuring it drains freely without clogs.
- Check for splits. Inspect gutters and downspouts for cracks or splits; these need immediate repair to prevent leaks.
- Secure loose fasteners. Tighten any screws or brackets that are loose; sagging gutters can cause water to spill over the sides.
- Extend downspout. If possible, add extensions to direct runoff away from your foundation by at least 10 feet.
- Install splash guards. Place temporary barriers around downspouts to prevent soil erosion and protect landscaping.
- Clear roof valleys. Ensure debris is removed from valley areas where water converges; clogs here can cause major backups.
- Check for ice dams. In winter, look for icicles or ice buildup that may block gutters and downspouts.
Quick rule: Clear gutters before every heavy rain event to prevent water from backing up under shingles.
Addressing ponding and poor slope
Ponding occurs when water collects on a roof due to improper drainage or low spots. This can lead to leaks, especially during heavy rain.
To fix immediate issues, consider adding temporary scuppers or channels at low points to divert water away from the roof surface. If ponding persists despite these measures, it may indicate a more serious slope issue that requires re-roofing or structural correction.
For long-term solutions, ensure your roof has adequate pitch and drainage paths. Consult with a professional if you notice persistent pooling in specific areas, as this could signal underlying problems like inadequate flashing or improper installation.
Downspout routing and landscape drainage tips
Proper downspout placement is crucial to prevent water from pooling near your home’s foundation. Ensure that each downspout directs runoff at least 10 feet away from the building.
Use splash guards or flexible tubing to direct water flow safely across your lawn, avoiding erosion and protecting delicate plants. Redirecting roof runoff can significantly reduce the risk of interior water intrusion.
In areas where low roof intersections create drainage challenges, consider installing additional downspouts or scuppers to manage excess water. Proper landscape grading around your home’s perimeter is also essential for effective drainage.
Shingle and Roof-Covering Damage: Assessment and Lasting Repairs
From the ground, you can spot most shingle issues and decide when to bring in a pro. Learn to distinguish cosmetic wear from functional damage and weigh lasting repair options such as replacement versus resealing.
Gutters and drainage affect leaks, so clear clogs and fix drainage first. This guidance helps you plan durable repairs and know what a pro should check beyond surface signs. Understanding these factors saves time and reduces costly callbacks.
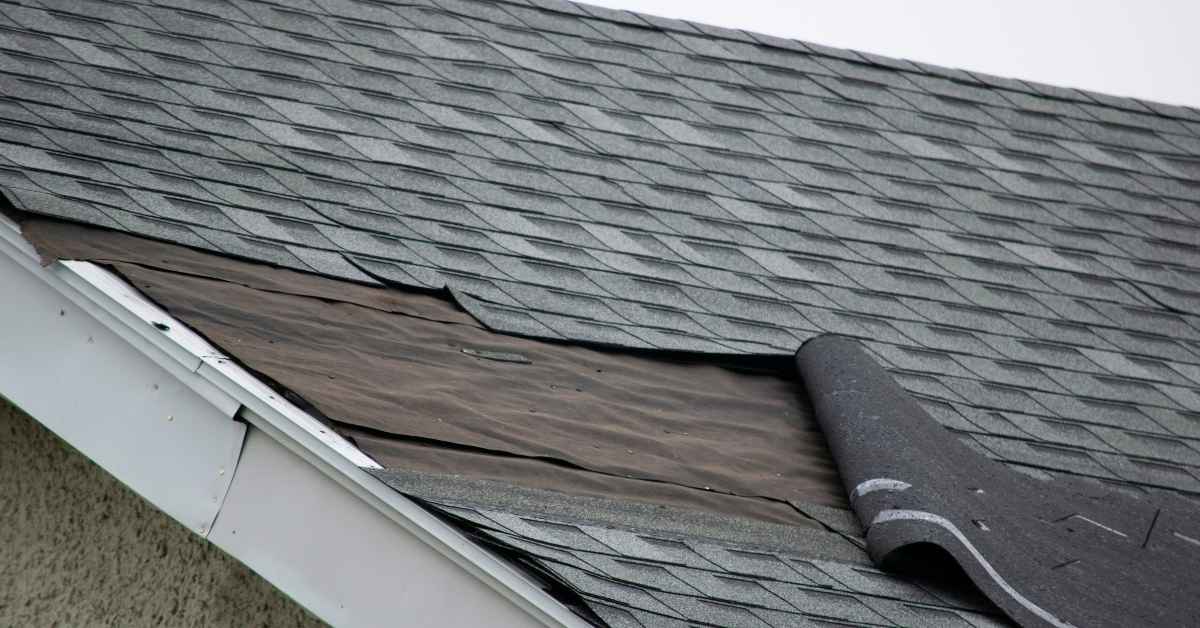
Identifying missing, cracked, or lifted shingles
From the ground, look for areas where shingles are visibly damaged. Missing shingles are obvious gaps in your roof’s coverage. Cracked tabs will show as broken pieces of the shingle, often along the edges or center.
Lifted edges can be harder to spot unless you’re up close. These occur when wind lifts the edge of a shingle from its nails. Use binoculars for better visibility and take photos for documentation. If damage is extensive, consider hiring a professional to assess whether it’s cosmetic or functional.
When assessing flashing around chimneys, vents, and skylights, check for missing granules or exposed metal edges. These areas are prone to water intrusion if not properly sealed. Document any issues with clear photos from multiple angles for warranty claims or insurance purposes.
Permanent shingle replacement and sealing methods
To replace a damaged shingle, start by removing the old one carefully to avoid damaging surrounding shingles. Use a utility knife if necessary but be cautious not to cut too deep.
Underlayment repair is crucial for lasting protection. If you find an area where water has seeped through, inspect and replace any damaged underlayment before installing new shingles. This prevents future leaks.
Nailing and sealing are critical steps in the replacement process. Use galvanized roofing nails to secure new shingles firmly. Apply a quality roof sealant around nail heads and along edges for added protection against water intrusion. Ensure proper overlap of shingles according to manufacturer guidelines.
Alternative roofing materials and patch compatibility
Different roofing materials require specific approaches when it comes to repairs. Tile, metal, and membrane roofs each have unique characteristics that dictate the type of repair needed.
- Tile roof: Use matching tiles for patches; look for durability ratings above 100 years; avoid using asphalt shingles as they will degrade faster than clay or concrete.
- Metal roof: Patch with compatible metal sheets; check for rust-resistant coatings; ensure proper overlap and sealing to prevent water intrusion.
- Membrane roofs: Use matching rubber or TPO patches; look for UV resistance ratings; avoid asphalt-based materials as they can crack under extreme temperatures.
Costs, Warranties, and When to File Claims
This section covers rough cost ranges for temporary versus permanent roof repairs, and what to look for when reading roofing warranties. You’ll learn about the two main warranty types, typical coverage windows, common exclusions, and whether a warranty can be transferred if you sell. It also covers what documentation you need and when to file a claim, with guidance to check labels or manufacturer instructions for exact figures.
For homeowners, this matters because it helps you budget and avoid missing deadlines or losing coverage. You’ll get a practical list of documents—photos or video, weather history, assessments, invoices, warranty numbers, roof age, and contractor notes—to keep ready. It also explains how to start a claim, the impact on premiums, and when to expect to use temporary fixes while you wait for a decision.
Documenting damage for warranty and insurance
To make a strong case for repairs under your roof’s warranty or with your insurance, you need to gather solid documentation. Start by taking dated photos of the leak areas from multiple angles, including close-ups showing any visible damage like water stains or missing shingles.
Keep detailed records of all communications and assessments related to the issue. This includes emails, letters, and reports from contractors who inspect your roof. If a professional recommends repairs, get an itemized invoice that clearly outlines what work was done and how much it cost.
Your warranty documentation is also crucial. Make sure you have copies of any installation records or manufacturer warranties that came with the roof. These documents should specify coverage details like duration, exclusions, and required maintenance tasks. Keep all this information organized in a folder or digital file for easy access when filing claims.
Evaluating repair quotes and avoiding common upsells
When you get multiple bids for roof repairs, it’s important to compare them carefully. Here are some tips to avoid being sold unnecessary work:
- Ask about alternatives. Sometimes a simple fix can solve the problem without major expenses. Don’t just accept the first solution offered.
- Check for hidden fees. Some contractors add extra costs like travel time or material handling that weren’t initially discussed.
- Verify qualifications. Ensure any contractor you hire is licensed and insured to do roof work in your area. This protects you from subpar repairs.
- Beware of upselling. Some contractors may try to sell you more expensive materials or extensive services that aren’t necessary for the job at hand.
In summary, always get multiple quotes and ask detailed questions before committing to any repair plan. This helps ensure you’re getting fair value and quality workmanship.
Deciding between repair and replacement
Determining whether to repair or replace your roof depends on several factors. If the damage is extensive, like widespread shingle loss or major structural issues, a full replacement might be necessary.
The age of your roof also plays a role. Most roofs last around 20-30 years depending on materials and maintenance history. If yours is nearing this lifespan, it may make more sense to replace rather than patching up old problems.
Consider the warranty status too. If your roof is still under manufacturer or installer coverage, repairs might be covered at no cost to you. However, if the warranty has expired or there are exclusions for certain types of damage, replacement could save money in the long run.
Lastly, recurring leaks despite multiple fixes can indicate deeper issues that won’t be resolved without a new roof system. Evaluate all these aspects before making your decision.
Conclusion
Safety first and durability go hand in hand, especially after a heavy rain. With the right checks and quick fixes, you can protect structure, appearance, and budget, and buy time until a solid repair is possible.
Start by checking the most likely entry points first—flashing around chimneys, vents, and valleys—then inspect gutters and downspouts for backups, test any obvious leaks from a safe area during dry conditions, and note areas with ponding or loose shingles. Do the quick tests you described in the guide to pinpoint the sources, apply only temporary repairs where needed to stop active leaks, and keep all work on dry, safe surfaces with proper fall protection.
Avoid common mistakes like pushing ahead on damaged flashing without a durable fix, sealing leaks with the wrong materials, or climbing on wet, steep roofs. Always work from a dry area first, limit where you step, and don’t pressure-test weak spots. If you see widespread roof damage, active leaks in multiple spots, or you’re uncertain about a safe repair, bring in a professional rather than risk a bigger problem or voiding warranties.
When in doubt, call a licensed roofer—especially if warranties or insurance claims are involved—and use this plan to guide the conversation and keep the project on track. With steady steps and smart choices, you’ll restore protection fast and avoid costly mistakes.
FAQ
How can I tell where a leak starts during heavy rain?
Check the attic with a bright light. Look for damp insulation, brown stains, or dripping from the ceiling and trace it back toward the roof line. The leak usually appears a bit inland from where the water enters the interior space.
Can I trust a water test with a hose to find leaks?
Yes, but be systematic. Start at the lowest point and work upward, spraying across shingles and flashing with steady pressure. If water shows up around flashing, valleys, or nails, that spot is the culprit.
What quick fixes work when it’s raining hard?
Tarp the affected area to keep water out while you plan repairs. Clear debris from gutters and roof edges, and apply roofing cement or sealant only on visibly loose spots as a temporary stopgap. Do not rely on cheap patches for long storms.
When should I call a pro?
If water keeps coming in after basic checks, or the roof is steep, hail-damaged, or the decking looks soft, call a pro. Don’t risk a fall or big structural damage chasing a DIY fix beyond your comfort level.