
Introduction
Veneer plaster repairs are the process of fixing damaged plaster by feathering new material into the old so the wall looks continuous and solid. This means assessing whether the existing veneer is well-bonded, cleaning and wetting the surface, and choosing a compatible patching mix and bonding method. I’ll focus on practical steps you can do with common tools and products while pointing out when to check manufacturer instructions or call a pro.
Start by knocking or tapping to find hollow spots and confirm the substrate will hold a repair, and remove any loose material before you apply patching compound. Work in thin layers, keep the base damp as needed for adhesion, and sand or blend only after the repair has cured per product directions so you don’t create new delamination.
Key takeaways
- Assess repairability of veneer plaster by inspecting substrate integrity and hollow spots.
- Clean and roughen surfaces; remove loose material before bonding or feathering.
- Use proper hydration and wetting of surfaces to improve adhesion.
- Bonding methods: choose compatible concrete repair adhesives and follow manufacturer instructions.
- Feathering techniques: feather edges gradually to minimize hollow spots and cracks.
- Plan, document cure checks and safety precautions during repairs.
Table of Contents
- Introduction
- Key takeaways
- Assessing Damage and Scope
- Tools, Materials, and Specs Explained
- Surface Preparation and Cleaning
- Feathering Techniques and Application Methods
- Adhesion Best Practices and Avoiding Hollow Spots
- Timing, Curing, and Testing Bond Strength
- Troubleshooting, Common Mistakes, and Corrections
- Planning, Cost Considerations, and Preventive Maintenance
- Conclusion
- FAQ
Assessing Damage and Scope
Walk each wall and ceiling with a methodical eye: mark hairline cracks, bulges, loose flakes, efflorescence, stains, and any spots that sound hollow when tapped. Document moisture stains and note where plaster has detached from the substrate so you can judge whether damage is localized or widespread.
Work back to cause before planning fixes: check for current or past leaks, movement in framing or lath, and signs the original skim coat was poorly keyed or mixed. Use those findings to set clear thresholds—for example, areas you can patch and feather versus sections that likely need full re-veneer—and map the repair sequence accordingly.
Identifying veneer plaster vs. substrate issues
When assessing damage, it’s crucial to figure out if the problem lies with your veneer plaster or the underlying drywall and framing. Here’s how to tell:
First off, look for cracks. If they’re hairline and only on the surface, chances are your plaster’s just cracked. But if they’re wide, running through seams, or following a pattern (like a ‘map’ of your walls), it might be a sign of movement in the substrate.
Next, feel around. Gently press on the wall with your hand. If it feels spongy or gives way, that’s a bad sign – could mean wet drywall or even rotting framing. But if it’s solid, you’re likely dealing with plaster issues.
Mapping damage and prioritizing repairs
First things first, grab your notepad, measuring tape, and camera. You’re gonna need ’em.
Start by walking through the affected areas. Mark each damaged spot with a number or letter, so you can keep track of them later. Use chalk, paint, or even sticky notes if you gotta.
Now, measure and record the size of each damaged area. Be specific – don’t just say ‘big’ or ‘small’. Write down the exact dimensions (length x width) in inches or feet. This’ll help you figure out how much material you need later on.
Next up, take clear photos of every marked spot. Get close-ups and wide shots. You want to be able to look back at these pics and know exactly what you’re dealing with. And while you’re at it, snap some pictures of the surrounding area too – it might help you figure out what caused the damage in the first place.
Once you’ve got your map and measurements, it’s time to prioritize repairs. Start with the areas that are most damaged or structurally important. If there’s a spot that’s gonna cause more harm if left untreated, tackle that one first. Safety first, buddy.
When to call a pro
Before you grab your tools and start DIY repairs, know when to step back. Some damage needs an expert eye.
If you see any of these signs, pick up the phone:
Structural cracks – Wide, diagonal or horizontal cracks in walls or foundations could mean serious structural issues. Don’t wait, call a pro immediately.
Moisture problems – Musty smells, peeling paint, or water stains can hide mold and rot. These need professional assessment to prevent further damage and health risks.
Even if you’re confident in your DIY skills, it’s better safe than sorry. Check with a local pro before starting any major repairs.
Tools, Materials, and Specs Explained
Gather a concise tools list: hawk, trowels, margin trowel, mixing bucket and paddle, sanding block, utility knife, vacuum, and clean rags; each item serves a specific job from applying thin coats to cleaning edges. Choose materials by role: bonding agent or primer, compatible veneer plaster or patch mix, fiberglass scrim or mesh for larger repairs, and finishing skim or filler compound.
Before you mix, check the product data sheet or manufacturer instructions for compatibility, pot life, recommended substrate prep, and drying conditions. Mix in small batches sized to the area you can work in one go, follow label guidance for consistency, and keep PPE, ventilation, and an order-of-operations workflow to avoid hollow spots and rework.
Material types and bonding agents
The right materials ensure a durable, attractive finish. Here’s what you need to know about veneer plaster compounds, setting vs. finishing plasters, and common bonding primers.
- Veneer Plaster Compounds (e.g., USG Level 5): Used for final coats, they provide a smooth, uniform finish. Look for high sand content for better coverage and low shrinkage to prevent cracking. Avoid if you’re not experienced; it’s unforgiving.
- Setting Plasters (e.g., Type N): Used for base coats, they provide strength and adhesion. Choose Type N or S based on your substrate – N is more flexible, S has higher bond strength. Cheap alternatives may cause cracking later.
- Finishing Plasters (e.g., Type C): Similar to setting plasters but with added polymers for better finish and flexibility. Use for final coats over basecoats. Not suitable as a standalone application.
- Bonding Primers (e.g., Zinsser B-I-N): Used before applying plaster, they improve adhesion and seal the surface. Choose one that’s compatible with your substrate and plaster type. Cheap primers may not work well on new or porous surfaces.
- Acrylic Additives: Can be added to plasters for improved flexibility, stain resistance, and better finish. Look for high solids content for better performance. Don’t overuse; it can make the plaster too hard and prone to cracking.
Pro tip: When buying materials, check product datasheets for compatibility with your substrate and other products you’re using. Always store plasters in a cool, dry place and mix only what you need to prevent waste and ensure quality.
Tools and consumables checklist
Before you start mixing or pouring concrete, make sure you have all the necessary tools and consumables. Use this checklist to ensure nothing gets overlooked.
- Trowels (hand trowel, margin trowel): Check they’re clean, undamaged, and the right size for your job. Bent or chipped trowels can cause imperfections in your finish.
- Hawk: Ensure it’s sturdy, with no cracks or warping that could affect stability when holding fresh concrete.
- Screeding tool (straight edge): Verify it’s straight and long enough to cover your pour area. A crooked screed can lead to uneven surfaces.
- Finishing broom: Check bristles are intact and stiff for a good texture. Soft or missing bristles won’t give the desired finish.
- Mixing bucket (optional): If using, ensure it’s clean, undamaged, and large enough to hold your mix. A damaged bucket can contaminate your concrete.
- Concrete mixer: Check it’s in good working order before starting. A faulty mixer can lead to inconsistent mixes.
- Keys (for joints): Make sure they’re clean and the right size for your joint width. Dirty or wrong-sized keys can cause poor bonding between slabs.
- Measuring tools (tape measure, level): Verify they’re accurate and in good condition. Inaccurate measurements can result in improper mix ratios or uneven surfaces.
Quick rule: Always check your tools before starting work to avoid costly mistakes and rework.
Safety gear and worksite setup
Before you start any plaster repair work, safety comes first. Here’s what you need to protect yourself and your workspace:
Personal Protective Equipment (PPE): Wear a hard hat to protect from falling debris, safety glasses or goggles for eye protection, and sturdy boots with good grip. For dust control, use a respirator or dust mask rated for plaster dust.
Dust control and ventilation: Plastering creates a lot of dust. Keep windows open for natural ventilation, or use fans to blow dust away from you. If using power tools, ensure they have proper dust extraction attached.
Ladders and scaffolds: For high walls or ceilings, use sturdy ladders with non-slip feet and secure them properly. If working at heights for extended periods, consider using a scaffold. Always check local rules and manufacturer instructions for safe setup and usage.
Surface Preparation and Cleaning
Start by removing loose plaster and contamination: scrape high spots, vacuum dust, and clean grease or dirt with a mild detergent then rinse and let the substrate dry. Inspect for delamination, mold, efflorescence, and dampness; mark areas that require moisture remediation before you proceed.
Mechanical scuffing or light abrasion on smooth surfaces creates the key veneer plaster needs—use a rasp, sanding block, or wire brush as appropriate and remove resulting dust. Install an appropriate primer or bonding slurry per the product label so the patch material will adhere to both existing plaster and the substrate.
Removing loose material and stabilizing edges
The condition of your existing plaster and substrate directly impacts the success of your veneer plaster repair. Removing loose material and creating stable edges are crucial steps.
- Remove delaminated plaster: Use a scraper or chisel to carefully remove any loose, flaking, or peeling plaster. Be gentle to avoid damaging the substrate.
- Create feather edges: Using a joint knife or trowel, scrape along the edge of the damaged area at a 45-degree angle to create a ‘feather’ effect. This blends the repair with the surrounding surface and prevents sharp lines.
- Install mechanical keys (if needed): For smooth surfaces like paint or glossy plaster, use a wire brush or sandpaper to abrade the area lightly. This creates tiny grooves that improve adhesion.
- Avoid using: Hard, sharp tools on soft plasters as they can gouge and damage the surface, leading to weak bonds and potential cracking.
- Tip: Wear safety glasses and gloves when removing loose material to protect yourself from debris.
Cleaning contaminants and treating stains
Contaminants like dust, grease, or mold can hinder the adhesion of your veneer plaster patch. Thorough cleaning is essential.
Dust: Use a soft brush to gently remove loose dust, then vacuum thoroughly. Be careful not to damage the substrate.
Oils and grease: Apply a mild detergent or degreaser, let it sit for 15-30 minutes, then scrub with a stiff-bristled brush. Rinse and allow to dry completely.
Mold: Use a mold killer solution, following the manufacturer’s instructions. Ensure the area is well-ventilated during application and drying.
If stains persist after cleaning, apply a stain-blocking primer before repairing to prevent bleeding through your patch.
Creating a proper substrate profile
A well-prepared substrate ensures optimal adhesion of your veneer plaster patch. Both mechanical and chemical preparation methods are used.
Mechanical preparation: For glossy or smooth surfaces, use sandpaper or a wire brush to lightly abrade the area. This creates tiny grooves that improve adhesion. Be careful not to damage the substrate.
Chemical preparation: Apply a primer or bonding agent compatible with your veneer plaster patch product. Follow the manufacturer’s instructions for application and drying times. Primers help seal the surface, promote adhesion, and prevent moisture intrusion.
Scratch coats: For large repairs or when leveling high spots, apply a thin layer of plaster mixed with sand or aggregate to create a rough, porous surface that enhances adhesion.
Choose the right preparation method based on your substrate’s condition and the recommendations of your veneer plaster patch product. Incompatible preparations can lead to weak bonds and repair failure.
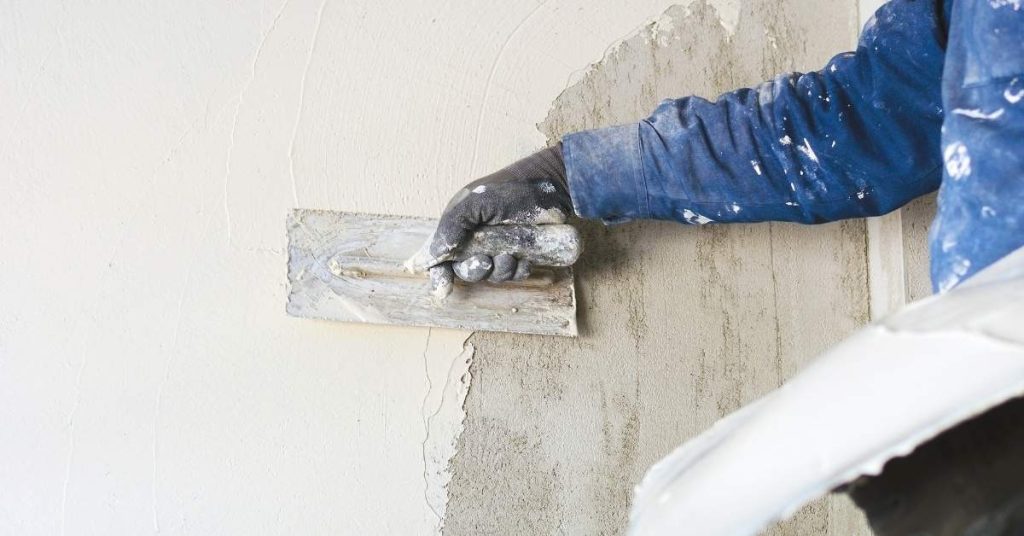
Feathering Techniques and Application Methods
Plan your feathering based on edge geometry and existing texture: determine how wide the taper must be to blend visually and structurally into surrounding plaster. Score or back-brush hard edges if needed to give the new material a progressive surface to wrap into.
Use flexible trowels and light, consistent passes to taper repair edges, working from thicker fill toward a near-zero edge; match the original finish technique—smooth, skip-trowel, or stipple—while the material is still workable. Allow proper cure between passes per the product instructions and check edges for hollowness or ridges before final sanding and finishing.
Tools and angles for clean feather edges
Choose the right tools to create smooth, seamless feathered transitions. Here’s what you need:
- 12″ or 14″ Trowel (stainless steel): Smooth edge, easy control for wide, thin layers.
- Flexible Hawk & Knife Set: For tight corners and detailed work. Use the 6″ or 8″ knife for feathering.
- Scraper (optional): Around $10-$20. Removes excess material, helps maintain edge thickness.
- Angle: 30-45 degrees: Start with a steeper angle for initial passes, then flatten as you near the final layer.
- Trowel pressure: Light to medium: Too much pressure creates ridges. Too little leaves gaps.
Layering strategy and compound selection
Applying multiple thin layers gives better results than one thick build-up. Here’s why:
Thin layers: Allow each layer to cure properly, reducing the risk of cracking or delamination.
Use setting compound for initial passes (2-3 layers). It provides structure and grabs onto existing plaster. Let it dry 15-30 minutes between coats.
For final passes (1-2 layers), use finishing compound. It smooths out the surface, providing a uniform finish. Allow 30-60 minutes drying time between these coats.
Matching texture and final finish
Replicating original texture is key to seamless repairs. Here’s how:
Stomp or Skip-Trowel Finish: Use a stomp trowel or skip-trowel to create the desired texture. Work in small sections, matching the existing pattern.
For smooth finishes, use a flexible trowel with light passes. Start from the top, working your way down to avoid visible transitions.
Before applying the final finish, ensure all feathered edges are smooth and even. Use a damp sponge or sandpaper (fine grit) to lightly smooth any ridges.
Adhesion Best Practices and Avoiding Hollow Spots
Diagnose hollow areas early by tapping and noting sound changes, then remove loose material back to solid plaster before patching; moisture readings and visible staining help identify problematic zones. Create a mechanical key on smooth or glazed surfaces by scuffing or scoring, and clean all dust or oils that interfere with bonding.
Select a primer or bonding agent recommended for plaster-to-plaster or plaster-to-substrate use and follow the label for open time and application method. Control patch thickness, feather edges to prevent islands, and manage curing conditions so the repair bonds uniformly rather than forming delaminated pockets.
Mechanical vs. Chemical Bonding
When it comes to bonding new veneer plaster to existing surfaces, you’ve got two main approaches: mechanical and chemical.
Mechanical: This involves physically keying or scratch coating the surface. It’s great for porous substrates like concrete or brick that can grip onto the new material. But on smooth surfaces like painted walls, it might not be enough.
Chemical: Bonding agents and primers create a chemical bridge between the old and new materials. They’re essential when dealing with non-porous surfaces or when you want an extra layer of security. Some plasters come with built-in bonding agents, but it’s always best to verify.
Preventing Voids and Ensuring Full Contact
Air pockets and voids are your enemies here. They weaken the bond and can lead to hollow spots. Here’s how to avoid them:
First, apply pressure. Use a trowel or float to press the plaster firmly onto the surface. The more contact, the better the bond.
Second, back-buttering. Apply a thin layer of plaster on the back of your trowel before you apply it to the wall. This ensures full coverage and helps eliminate voids.
Lastly, use keys. These are small grooves or ridges you create in the existing surface. They help lock the new plaster in place and prevent it from sliding off.
Visual Checkpoints to Catch Potential Hollows Early
Inspecting your work as you go is crucial. Here’s a quick checklist:
- Edges: Check adhesion at corners and edges. Poor contact here can lead to delamination.
- Material Continuity: Ensure the new plaster blends seamlessly with the old. Islands or gaps indicate poor application.
- Tactile Checks: Gently press on the surface. If it feels spongy or hollow, you’ve got a problem.
- Moisture Signs: Check for dampness or discoloration. These can indicate moisture issues that could lead to hollow spots.
- Cracking: Look for hairline cracks. They might not seem serious, but they can grow and cause bigger problems.
- Bubbles: Any bubbles under the surface are a sign of trapped air or moisture.
- Texture Match: Ensure the new plaster matches the texture of the old. Inconsistencies can indicate poor adhesion.
- Drying Time: Check that the plaster is drying evenly. Rapid drying can cause cracks and hollow spots.
Quick rule: If something feels or looks off, it probably is. Trust your instincts and investigate further.
Timing, Curing, and Testing Bond Strength
Sequence your work so each layer goes on only after the prior coat reaches the readiness described by the product instructions—look for tack-free cues and use light finger or thumb checks where the manufacturer permits. Leave sufficient time between scratch, brown, and finish coats according to the datasheet rather than guesswork.
Control temperature, humidity, and airflow to avoid rapid drying or surface skinning; protect repairs from drafts or cold that can interrupt curing. Verify bond with simple checks—tactile knock tests, cross-hatch, or a small pull test—and rework any area that does not demonstrate a uniform, solid connection.
Timing between coats and finishing steps
Let the first coat cure as per manufacturer’s instructions. Typically, it’s 24-72 hours before applying the next layer.
Sanding: Once tack-free (usually after 12-24 hours), lightly sand to remove any imperfections. Wipe off dust.
Topcoating: If manufacturer doesn’t specify, wait until surface is completely dry and no longer feels cool or warm to touch – usually 3-7 days.
Ideal curing conditions and environmental control
Temperature: Keep between 50°F (10°C) and 90°F (32°C). Too cold or hot slows cure, causes shrinkage.
Humidity: Maintain around 40-70% RH. Low humidity speeds drying but can cause cracking; high humidity delays curing.
Ventilation: Allow some air circulation to help cure evenly. Don’t let drafts blow directly onto the repair.
Practical bond and hollowness tests
Tap Test: Gently tap the surface with a hammer or knuckle. A solid sound indicates good bonding; a hollow sound warns of voids.
Visual Inspection: Look for any cracks, bubbles, or discoloration that might indicate hollowness or poor adhesion.
Adhesion Test: If doubts persist, perform a pull-off test using adhesive and a pull gauge. Acceptable failure should be cohesive (within the plaster) not adhesive (at the interface).
If tests fail, remove and redo the patch, ensuring proper surface preparation and application.
Troubleshooting, Common Mistakes, and Corrections
When repairs fail, trace back to the usual culprits: inadequate substrate prep, wrong product choice, overwork of the mix, or poor cure conditions. Use a diagnostic checklist—inspect adhesion, moisture, surface profile, and cure history—before deciding how much to remove and reapply.
For salvageable spots, re-establish a proper key, apply bonding slurry, and re-feather the edge with a compatible patch compound; for widespread delamination or structural issues, plan a larger re-veneer. Keep a compact kit of corrective materials and tools on hand and perform a sound and moisture check after rework to confirm the repair is solid.
Fixing hollow spots and delaminated patches
Hollow spots in veneer plaster are a common issue. To fix them, first identify the extent of the problem.
For small hollows: Use a hypodermic needle or syringe to inject adhesive directly into the void. This can be done without removing the existing patch.
For larger delaminated patches: Remove the loose section carefully, clean the surface, and apply a bonding agent before reapplying the patch. Ensure full contact with the substrate by using a notched trowel to press down firmly.
Correcting texture, color, and sanding problems
Repaired areas can sometimes stand out due to differences in texture or color. To blend them, start by addressing the texture.
For oversmoothed edges: Use a textured roller or brush to mimic the surrounding surface’s texture. For small areas, use a stiff-bristled brush and some joint compound.
For color discrepancies: Apply a thin layer of matching paint or stain to the repaired area. If necessary, lightly sand and wipe clean before applying.
Avoiding and repairing cracks from movement
Cracks due to movement are often inevitable but can be minimized. Here’s how:
- Use flexible fillers: For hairline cracks, use a flexible filler that can accommodate minor movements.
- Install control joints: Plan for expansion and contraction by installing control joints at regular intervals.
- Monitor temperature changes: Apply plasters during optimal temperatures to minimize cracking from thermal movement.
- Avoid rapid drying: Keep the repaired area moist (not wet) until fully cured to prevent cracks from rapid drying.
If a crack appears, assess its width and depth. For narrow cracks, use a flexible filler. Wider cracks may require removal of damaged plaster and reinstallation with proper expansion allowance.
Planning, Cost Considerations, and Preventive Maintenance
Lay out the project in phases: assessment, substrate remediation, patching and feathering, curing, and final finish work, then assign time blocks that allow for manufacturer-recommended drying. List required materials, tools, and PPE, and be realistic about waste, contingency, and potential need for specialty items if hidden damage appears.
Include a preventive plan to stop recurrence—address water sources, use appropriate sealers or vapor checks, and schedule periodic inspections for new movement or staining. Keep a simple repair log documenting products used, batch mixes, and cure conditions so future work matches the original repairs and problems are easier to diagnose.
Project planning and timeline checklist
Use this checklist to stage your work, order materials, and schedule drying/inspection times.
- Assess damage: Inspect the area thoroughly. Identify hollow spots, cracks, and moisture intrusion.
- Define scope: Clearly outline what needs repairing – feathering, patching, or full replacement.
- Gather materials: List needed plaster, bonding agents, primers, tools, and PPE. Order them in advance.
- Plan substrate prep: Consider if you need to remove old material, clean the surface, or apply a primer.
- Schedule work: Allocate time for each step – patch application, feathering, drying, and finishing.
- Account for weather: Plan around ideal climate conditions for plaster repairs. Avoid high humidity or extreme temperatures.
- Inspect after drying: Check repaired areas after initial drying to ensure no issues before final finishing.
- Revisit and touch up: Schedule a follow-up inspection after full curing to address any minor issues that may have arisen.
Quick rule: Always plan for contingencies – extra materials, time buffers, or unexpected repairs.
Cost drivers and when a pro is more cost-effective
Several factors influence the cost of veneer plaster repairs. Consider these when deciding between DIY and hiring a contractor.
The area to be repaired directly impacts material costs. Larger areas mean more plaster, bonding agents, and primers needed. Complex repairs may require specialized tools or techniques, adding to expenses.
Accessibility also plays a role. Hard-to-reach areas might need scaffolding or lifts, increasing labor costs if you hire a pro. Materials can be cheaper when bought in bulk by professionals due to their buying power.
Ask yourself: Can I safely access and repair the area? Do I have the right tools and skills? Is the job too complex for my comfort level? If the answer is no, consider hiring a professional. They can often complete jobs faster, reducing labor costs in the long run.
Long-term prevention and maintenance tips
Implement these strategies to reduce future damage and keep your veneer plaster in top shape:
Control moisture: Ensure proper drainage around your home. Seal any cracks or gaps that could let water in. Regularly inspect and maintain your roof, gutters, and downspouts.
Regular inspections: Conduct annual visual checks of your plaster walls. Look for signs of damage, such as cracks, peeling, or discoloration. Address any issues promptly to prevent them from worsening.
Address settlement or framing movement: Keep an eye on doors and windows. If they’re sticking or not closing properly, it might indicate a structural issue. Have this checked out by a professional immediately.
Cure-enhancing techniques: After repairs, apply a sealant to protect the area from moisture and dirt. This can help extend the life of your plaster repairs.
Conclusion
When you finish, you want a surface that looks right, sticks well, and stays intact. The right steps protect safety and give a lasting, professional look—not a patchy spot that telegraphs the repair.
First, assess and verify conditions, then clean, roughen where needed, mix per specs, and feather edges in the correct order. Check adhesion with a small test area, plan cure time, and test bond strength before moving on to larger repairs. Always protect surrounding surfaces and follow the material guidelines so you get a safe, durable finish that won’t hollow or delaminate.
Avoid these traps: skip surface prep and use weak-cleaners, over-thin or under-mix plaster, or rush curing. Always test in a small area first, work in clean, dry conditions, and keep you and others shaded from dust and falling debris. If the job requires more than you expect—from wide hollow spots to structural concerns—consider calling a professional; when in doubt, line up a plan, not a push to finish, and you’ll keep costs down and results solid.
FAQ
Can I determine if this veneer plaster repair is workable on my existing wall structure?
Inspect the substrate for soundness. If the surface is crumbling, loose patches, or has deep cracks, you’ll want to address those first or call in a pro. Check for moisture issues and delamination before you plan any repair work.
What is the best approach to surface preparation before patching a veneer plaster layer?
Clean thoroughly to remove dust, oils, and loose material. Duzz the surface with light scarification or scoring to give the patch something to grab, then rinse and let it dry. Keep the area clean and dry during the repair process.
Which bonding method should I use for a concrete or hardened plaster repair?
Use a bonding agent recommended by the patch material manufacturer or a compatible primer. Apply per label instructions and let it tack up before embedding the patch material. If in doubt, test a small area first and verify adhesion before proceeding larger.
How do I ensure proper hydration and wetting of surfaces for a durable repair?
Wetting the substrate helps with adhesion but don’t flood it. Lightly dampen the surface and avoid standing water. Follow the patch product instructions for when and how to moisture the surface during mixing and application.
What quality checks should I perform after finishing the repair?
Check for evenness, feathered edges, and a smooth finish that matches surrounding areas. Perform a light touch test to ensure the patch isn’t cracking or delaminating; observe for any hollow sounds when tapped. If something seems off, pause and re-evaluate before moving on to paint or finish.