
Introduction
Sulfate attack in concrete is deterioration caused when sulfates in water or soil react with cement compounds, leading to cracking and loss of strength.
Key takeaways
- Look for map cracking, efflorescence, or hollow-sounding concrete near exposed surfaces.
- Perform a simple finger indent test in non-reinforced areas to detect softness.
- Check movement under load is minor; report delamination or spalling zones quickly.
- Consult label directions on repair products and follow local code guidance.
- Prioritize repairs where structural elements show cracking progressing or water intrusion.
- Safety: use PPE, isolate damaged areas, and shut off access during repairs.
Table of Contents
- Introduction
- Key takeaways
- What Is Sulfate Attack?
- Symptoms and Visual Checkpoints
- Simple Checks and Field Diagnostics
- Assessing Structural Impact and Prioritization
- Repair Strategies — Materials and Methods
- Long-Term Prevention and Maintenance
- Safety, Permits, and Best Practices During Inspection and Repair
- Budgeting, Common Mistakes to Avoid, and Case Study Takeaways
- Conclusion
- FAQ
What Is Sulfate Attack?
Sulfate attack is when soils, groundwater, de-icing salts, or sewer and water sources introduce sulfates that interact with cement paste. External sources contrast with internal sources like sulfate-containing cement, aggregates, or certain supplementary cementitious materials.
Chemically, sulfates react with hydrated cement to form ettringite and thaumasite, which disrupts the C-S-H gel and leads to microcracking. This process weakens the concrete and accelerates deterioration in the right conditions.
Chemical mechanism and common sulfate sources
Sulfate attack happens when sulfates react with certain parts of concrete, causing expansion and damage. Here’s how it works:
The main reaction is between sulfates and the aluminate phases in cement. This produces expansive products like ettringite and thaumasite, which cause microcracking.
Common sulfate sources include:
External: Groundwater, soil, industrial effluents, deicing salts.
Internal: Contaminated aggregates or certain supplementary cementitious materials.
Types and classifications (external, internal, thaumasite)
Sulfate attack can come from outside or inside your concrete. Here’s how to tell them apart:
External sulfate attack happens when sulfates enter from the outside, like through groundwater or deicing salts. You’ll see damage at the surface first.
Internal sulfate generation occurs when sulfates are present in the concrete itself, often due to contaminated aggregates or certain cement types. Damage starts from within and may not be visible until later stages.
Then there’s thaumasite formation, which happens when carbonates (like those found in some aggregates) react with sulfates. This can cause severe damage and is more common in cold, wet climates.
Symptoms and Visual Checkpoints
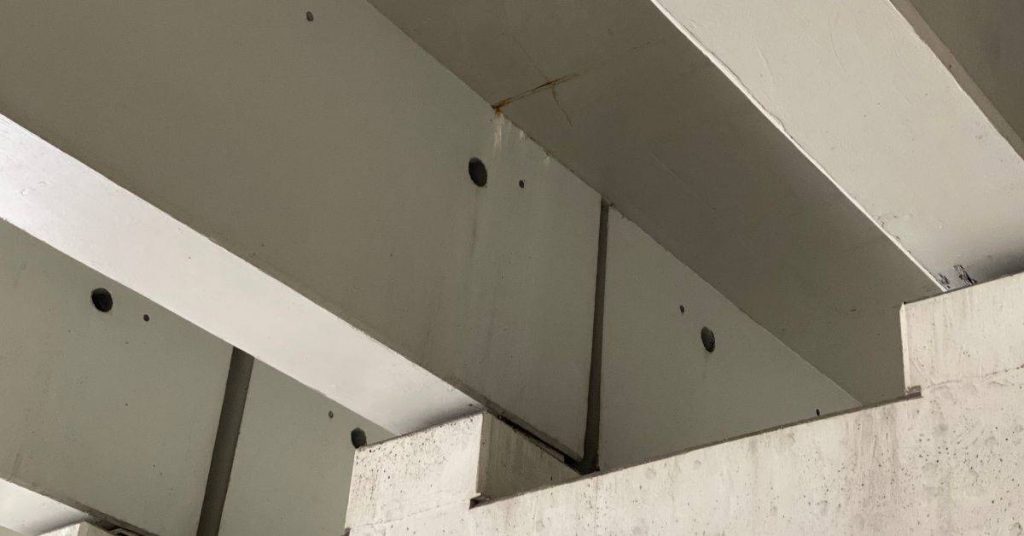
The symptom taxonomy includes map cracking, heaving cracks, surface spalling, and soft or crumbly concrete. Efflorescence and reinforcement deterioration, such as rust stains or exposed bars, are also common signals. Each symptom helps distinguish sulfate attack from other decay mechanisms.
On-site checks focus on crack depth, spalling extent, and moisture indicators, with photos and notes for mapping affected zones. Simple field tests like tapping for soundness and flatness checks aid quick assessments.
Visual inspection checklist (DIY)
Before you grab your tools, take a walk around the affected area. This quick survey helps pinpoint trouble spots and saves time later.
- Locate cracks: Look for map-like or heaving cracks. These are often wider at the surface than deep down.
- Check spall depth: Measure how far spalls go into the concrete. A ruler or tape measure works fine.
- Inspect surface texture: Feel for rough, crumbly spots. Soft concrete is a bad sign.
- Find water sources: Look nearby for standing water, leaks, or damp patches.
- Check efflorescence: White powdery deposits on the surface could be salt from sulfate attack.
- Reinforcement exposure: Exposed bars or rust stains mean trouble. They’re signs of deterioration.
Quick rule: If you find any of these issues, document them well. You’ll need good records for later repair planning.
Non-visual indicators (sound, hardness, staining)
Sometimes, problems aren’t obvious at first glance. Here’s how to check for them.
- Tap test: Gently tap the concrete with a hammer. Dead or hollow sounds mean trouble.
- Check hardness: Use a pocket hardness tester if you have one. Soft spots need attention.
- Look for stains: Rust stains around reinforcement could signal corrosion from sulfate attack.
- Progressive changes: If cracks are growing or spalls getting bigger, the problem is active and needs immediate action.
Quick rule: Don’t ignore these signs. They’re often early warnings of bigger problems to come.
Simple Checks and Field Diagnostics
Moisture mapping helps identify damp zones, historical leaks, and areas at risk of sulfate ingress. Look for persistent dampness and efflorescence patterns as early indicators.
Field indicators include consumer-grade sulfate tests and pH spot checks, kept consistent with proper labeling. Remember these tests have limitations and should not replace lab analysis when results are inconclusive.
Tools and materials checklist for field checks
Before you start, gather these tools to make your field checks efficient and accurate.
- Moisture meter: To measure surface moisture. Don’t skip this; high moisture hides sulfate attack.
- Magnifier: For close-up inspection of cracks and surfaces. Miss tiny clues, miss the problem.
- Hammer: Gently tap concrete to listen for hollow spots. A drum-like sound? That’s trouble.
- Scraper: Remove efflorescence to see underlying damage. Leave it on, lose vital info.
- Portable sulfate test kits: Semi-quantitative results. Not perfect, but better than nothing.
- Sample containers: Clean, airtight jars for paste samples. Contaminated samples = useless results.
- Camera: Document findings with photos. No record? No proof of progress.
- Notebook: Record test dates, locations, actions taken. No log? No maintenance history.
Quick rule: Always wear safety gear when sampling: gloves, goggles, dust mask.
When to use lab testing and what tests to request
Field checks give you a start. But for deeper insight, send samples to a lab.
Send samples when: field tests suggest sulfate attack, deterioration is visible, or you need confirmation before repairs.
Request these key analyses:
- Pore-water sulfate concentration: Measures sulfate in concrete’s pores. High levels? Sulfate attack likely.
- Soluble sulfate in concrete: Checks total soluble sulfates. Helps confirm sulfate attack.
- Petrographic examination of aggregates: Checks aggregates for reactive minerals. Bad aggregates cause problems.
- XRD for reaction products: Identifies sulfate reaction products. Proof of sulfate attack? You’ll see it here.
- Compressive strength testing: Measures concrete’s strength. Low strength? Sulfate attack may be the culprit.
Coordinate tests with an engineer. They know what else you might need to check.
Assessing Structural Impact and Prioritization
Develop a severity scale that combines visible cracking and spalling with reinforcement exposure or corrosion signs. Define thresholds for action versus continued monitoring.
Prioritize repairs by safety and load path importance, distinguishing between cosmetic and structural deterioration. Immediate action is warranted for progressive cracking or exposed reinforcement.
Simple triage for urgency
When you find sulfate damage, don’t panic. Use this quick guide to decide what’s urgent and what can wait.
Emergency: If there’s immediate risk to life or safety, like falling debris or severe structural compromise. Act fast!
High Priority: If you see extensive damage, progressive cracking, exposed reinforcement, or signs of corrosion. These need fixing ASAP.
Monitor/Maintenance: Minor cosmetic issues can be watched and addressed later. Keep an eye on them though, as they might worsen over time.
When to involve a structural engineer
Some sulfate damage is beyond the scope of DIY repairs. Here’s when to call in a pro:
If you spot significant section loss, it’s time for an engineer. They can assess if the structure’s integrity is compromised.
Exposed or corroding reinforcement? That’s a job for an engineer too. They’ll ensure safety and plan repairs properly.
Measurable deflection, like excessive movement or sagging, or when repairs might alter structural capacity, always consult an engineer first. It’s better to be safe than sorry!
Repair Strategies — Materials and Methods
Follow a repair hierarchy from targeted patching to deeper repairs, up to component replacement when needed. Use a decision tree that matches exposure, reinforcement condition, and loads.
Material compatibility is key: choose sulfate-resistant repair mortars or concretes that match the existing mix and address bonding, corrosion inhibitors, and protective barriers where appropriate.
Repair steps for common conditions (spalling, crumbling, cracking)
First, assess the damage. Look for spalling – where concrete flakes off, crumbling – where it breaks down into small pieces, and cracks.
Remove damaged material using a chisel or grinder. Go deep enough to reach sound concrete and expose any affected reinforcement.
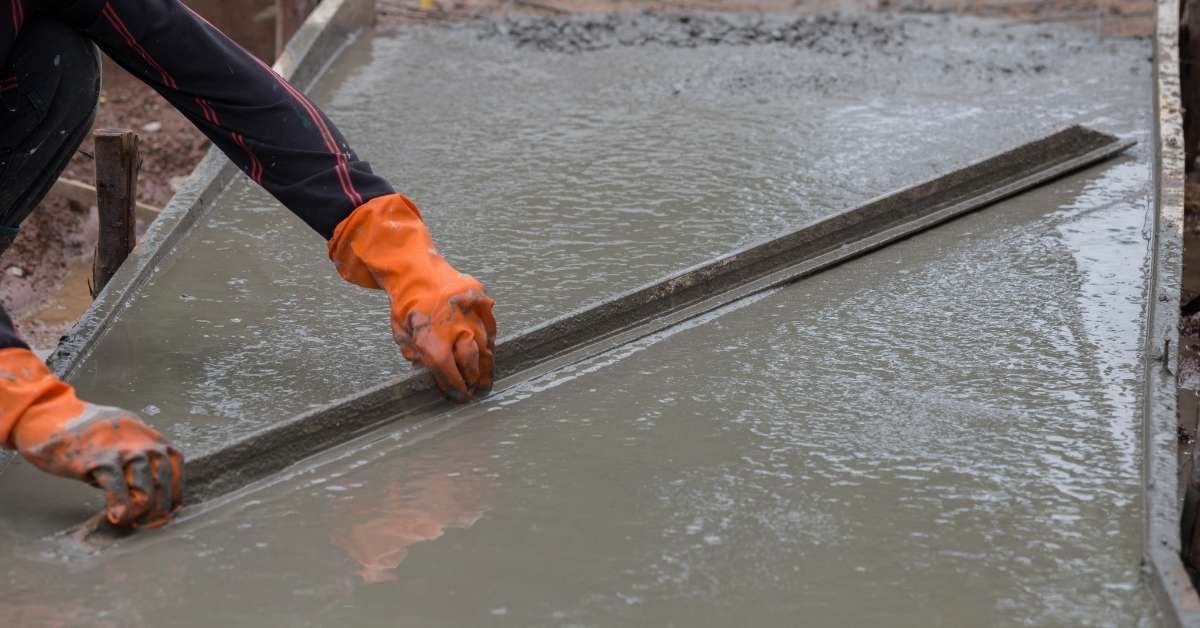
Prepare the surface. Clean it thoroughly, remove loose debris, and ensure it’s damp but not wet for better mortar adhesion.
Treat exposed reinforcement. Remove rust, clean, and apply a corrosion inhibitor or protective coating. Then, apply your repair mortar or concrete, smoothen the surface, and let it cure properly under suitable conditions. Monitor the repair periodically to ensure its integrity.
Material selection and specs explained
Choosing the right materials is crucial for a lasting repair. Sulfate-resistant binders, low-permeability mixes, and corrosion protection are key.
- Sulfate-Resistant Binders: Use Type V cement or blended cements with pozzolans or slag to resist sulfate attack. Look for ASTM C150/C1602 ratings.
- Low-Permeability Mixes: Reduce water-cement ratio and use supplementary cementitious materials (SCMs) like fly ash, silica fume, or slag to lower permeability. Check ASTM C39/C496 ratings.
- Corrosion Protection: Use corrosion inhibitors, galvanic anodes, or protective coatings. Consult ASTM G102/G175 for guidance.
- Compatibility: Ensure new materials match existing concrete’s C3/C4 compatibility and similar modulus of elasticity to prevent cracking due to differential shrinkage.
- Avoid High-Alkali Materials: These can cause expansion and deterioration in the long run. Check ASTM C289 for alkali-silica reaction (ASR) potential.
Long-Term Prevention and Maintenance
Preventive design should favor sulfate-resistant cement and compatible pozzolanic additives to reduce ingress. Control the water-cement ratio and supervise construction practices to minimize vulnerabilities.
Implement site measures such as proper drainage, moisture barriers, and protective coatings. Plan for routine inspections and timely resealing to keep sulfates in check.
Design and site measures to reduce exposure
First off, let’s talk about how we can minimize sulfate exposure right from the start. This means making smart choices during design and on-site.
Positive drainage: Ensure your site has proper grading and slope. Water should flow away from foundations, not towards them. Install French drains or other systems to help water move along quickly.
Membrane barriers: Use bituminous or synthetic membranes as moisture barriers in vulnerable areas like footings and slabs. These stop sulfate-rich water from seeping into your concrete.
Low-sulfate backfill: Choose backfill materials with low sulfate content. Ask for test results if you’re unsure. Proper compaction is also crucial to prevent voids that can trap sulfate-laden water.
Monitoring plan and maintenance checklist
Regular checks are key to catching any signs of sulfate attack early. Here’s a simple, repeatable schedule:
- Annual visual inspection: Check for cracks, spalling, or other signs of damage. Do this every year.
- Moisture control: Ensure your drainage systems are working properly. Clear any blockages and test sump pumps.
- Deicing salt use: Limit the use of deicing salts near foundations. They can increase sulfate levels in soil.
- Water source check: Make sure no contaminated water is being used for concrete mixing or around your foundation.
- Record keeping: Keep detailed records of all inspections, repairs, and maintenance work done.
- Professional review: Have a pro look things over every 3-5 years. They can spot issues you might miss.
- Timely remediation: If you see signs of sulfate attack, don’t wait. Fix it promptly to prevent further damage.
- Crack sealing: Seal any cracks as soon as they appear. This stops moisture and sulfates from getting in.
Quick rule: Regular checks and prompt action can extend the life of your repairs and keep sulfate attack at bay.
Safety, Permits, and Best Practices During Inspection and Repair
Establish PPE requirements, respiratory protection protocols, and fall-arrest plans as part of a formal safety program. Ensure dust control and proper decontamination procedures are in place.
Identify when permits apply, coordinate inspections, and verify contractor qualifications. Maintain secure site access and environmentally responsible disposal practices.
On-site safety checklist
Before you start any inspection or repair work, use this checklist to ensure a safe working environment.
- PPE: Hard hat, eye protection, gloves, hearing protection. Respirators as needed.
- Dust suppression: Wet down surfaces and use dust collection equipment to control silica exposure.
- Shoring/edge protection: Secure unstable structures and protect edges from collapse or fall hazards.
- Traffic control: Establish clear pedestrian detours and vehicle management plans.
- Electrical/isolation precautions: Isolate power sources, use lockout/tagout procedures, and test for live circuits before working on them.
- Confined space entry: Ventilate, monitor air quality, and have a rescue plan in place.
- Heat stress management: Provide shade, hydration, and rest breaks to prevent heat exhaustion.
- Chemical exposure: Use appropriate handling procedures for chemicals like acids or alkalis used in repairs.
- Fall arrest systems: Install and use fall arrest systems where required by height or risk of fall.
Quick rule: Never skip safety checks. It’s your life on the line, not just a checklist item.
Regulatory, permits, and testing documentation
Before starting any work, ensure you have all necessary approvals and documents in order to avoid delays or penalties.
- Permits: Check if building, demolition, or environmental permits are required. Contact local authorities for guidance.
- Approvals: Obtain necessary approvals from relevant bodies (e.g., structural engineer, building department).
- Inspections: Schedule inspections at key stages of repair work to ensure compliance with codes.
- Testing reports: Keep records of all test results (e.g., petrographic analysis, compressive strength tests) for future reference and verification.
- As-built repair records: Maintain detailed records of all repairs made, including materials used and methods employed.
- Local building codes: Follow local building codes to ensure your work is up to standard and safe.
- Environmental disposal rules: Follow local waste codes for disposing or recycling contaminated materials, slurry, and wash water.
- Licensing/contractor qualifications: Ensure any contractors hired are licensed and qualified to perform the required tasks.
Quick rule: Keep all documents up-to-date and easily accessible. It’s not just about compliance; it’s also about protecting your investment.
Budgeting, Common Mistakes to Avoid, and Case Study Takeaways
Use a lifecycle-cost approach to compare proposals, not just the upfront price. Consider long-term maintenance and replacement cycles in the evaluation.
When requesting quotes, demand itemized scopes, warranties, and clear qualifications. Learn from anonymized cases to avoid underestimating repair scope or missing hidden damage.
Budget planning and what to ask contractors
The first step in budgeting for sulfate attack repairs is knowing what to ask from your contractor. Here’s what you should include:
Scope of Work: Be clear about what needs to be done, including testing, removal of damaged concrete, and replacement with new materials.
Labor and Materials Costs: Ask for a detailed breakdown of labor and material costs. This helps you understand where your money is going and compare quotes accurately.
Warranties and Monitoring Plans: Request warranties that cover both materials and labor, and ask about their monitoring plans to ensure long-term performance.
Common diagnostic and repair mistakes to avoid
To prevent costly errors, steer clear of these common pitfalls:
- Misdiagnosis: Sulfate attack symptoms can mimic other issues. Ensure professional assessment to avoid wrongful attribution to freeze-thaw or alkali-silica reactions.
- Incomplete Removal: Partial removal of damaged concrete can lead to recurring problems. Always remove all affected areas.
- Wrong Repair Materials: Using inappropriate materials can exacerbate the problem. Consult with a professional before selecting repair materials.
- Skipping Professional Review: Structural issues may arise from sulfate attack. Always involve a structural engineer for safety and longevity.
These mistakes can lead to costly rework, so it’s crucial to get them right the first time.
Case studies and lessons learned (anonymized examples)
Learning from others’ experiences can help you make informed decisions. Here are some anonymized case studies:
Parking Slab Patch and Monitor: A non-structural parking slab was patched using a sulfate-resistant mix. Regular monitoring revealed minor cracks, leading to timely repairs and extended life.
Foundation Wall Barrier and Re-protection: A foundation wall exposed to sulfates was repaired and protected with a barrier system. Regular inspections ensured the barrier’s integrity, preventing further damage.
Bridge Element Partial Replacement: A bridge element severely damaged by sulfate attack required partial replacement. Early detection allowed for minimal disruption and cost-effective repair.
Conclusion
Addressing sulfate attack now protects safety, keeps the structure durable, and preserves the look of your project. You’ll gain confidence by following simple checks, deciding what to repair first, and sticking to proven repair and prevention steps.
First check for visible cracks, efflorescence, staining, and any hollow areas, then assess moisture exposure and PSC tolerance, move through basic field diagnostics to gauge extent, determine which parts carry structural load, and choose repair methods and long‑term maintenance actions in a practical, stepwise way.
Common mistakes to avoid include ignoring early signs, rushing repairs without proper material choice or surface prep, and skipping safety or permit steps. Safety first; always wear protective gear and keep the area contained, and test a small area first to verify fixes before wider application.
If you see widespread cracking, significant movement, or uncertainty about load paths, know when to call a professional instead of pushing on alone, and keep the project documented with notes and photos so you stay on plan and on budget. Stay steady, follow the plan, and you’ll protect the concrete for years to come.
FAQ
What are the common signs of sulfate attack in concrete I should look for?
You’ll see cracking that follows the structure, map cracking, and spalled or flaking surfaces where the concrete has lost its surface integrity. Efflorescence or a chalky white deposit can show on the surface, and sometimes the steel reinforcement starts to rust behind the concrete. If the concrete feels soft or crumbly in certain spots, plan for closer inspection.
What simple checks can I do to detect sulfate attack without special equipment?
Check exposed edges for honeycombing, rough, sandy patches, or an elevated surface texture. Tap suspicious areas with a hammer; dull, hollow sounds mean voids or weak spots. Look for moisture wicking or damp patches near joints, and inspect for rust stains on the surface indicating embedded steel is affected.
What repair options work best for sulfate-damaged concrete in DIY projects?
Pier and patch repairs work for localized damage: remove loose material, clean the area, and apply a patch material compatible with existing concrete. For larger areas, consider surface sealers or overlays that resist sulfate ingress, following the product label and manufacturer guidance. If steel is exposed or heavily corroded, consult a pro about potential underpinning or reinforcement replacement.
How does sulfate attack affect durability and safety, and where does it most often occur?
It reduces strength and spalls cover, which can compromise load paths and safety. Moisture and sulfates often attack foundation soils and concrete near pools, backfill, and high-moisture zones, but it can show up anywhere water can carry sulfates into the concrete. Check local conditions, soil tests, and the concrete’s exposure history to gauge risk.