
Introduction
Galvanic anodes in patch repairs are sacrificial metal pieces placed near the patch to protect embedded steel from corrosion. They work by attracting corrosion to themselves rather than the steel, helping prevent ring-anode spalls. Use this approach when you want durable repairs and want to minimize crumble around the patch.
Spalling is when concrete flakes or chunks pop off due to steel corrosion pushing outward beneath the surface. Causes include moisture, chlorides, and hidden cracks; unaddressed spalling can compromise strength and safety. For patch repairs, check manufacturer instructions and local rules, and follow safe steps to install sacrificial anodes and seal the patch.
Key takeaways
- Definition of spalling: concrete surface failure from internal moisture and corrosion.
- Explain ring-anode spalls: localized pops around patch edges from galvanic effects.
- Hazards of unaddressed spalling: trip risks, water intrusion, structural deterioration, and safety concerns.
- Repair methods overview: remove loose render, treat corrosion, patch, and seal.
- Galvanic protection basics: sacrificial anodes provide cathodic protection for patches.
- Hybrid anodes and system options: choose compatible with patch repairs and substrate.
- Design strategies: proper detailing prevents ring-anode spalls during patching.
Table of Contents
- Introduction
- Key takeaways
- What Is Spalling and What Specifically Are Ring-Anode Spalls?
- Root Causes of Spalling and the Corrosion Drivers to Address
- Methods for Repairing Spalled Concrete and Where Galvanic Protection Fits
- Overview of Galvanic Cathodic Protection and How Galvanic Anodes Work
- Fusion (Hybrid) Anodes and Other System Options
- Design Strategies to Prevent Ring-Anode Spalls in Patch Repairs
- Installation Best Practices, Tools and Materials Checklist
- Common Mistakes, Monitoring, Maintenance and Lifecycle Costs
- Conclusion
- FAQ
What Is Spalling and What Specifically Are Ring-Anode Spalls?
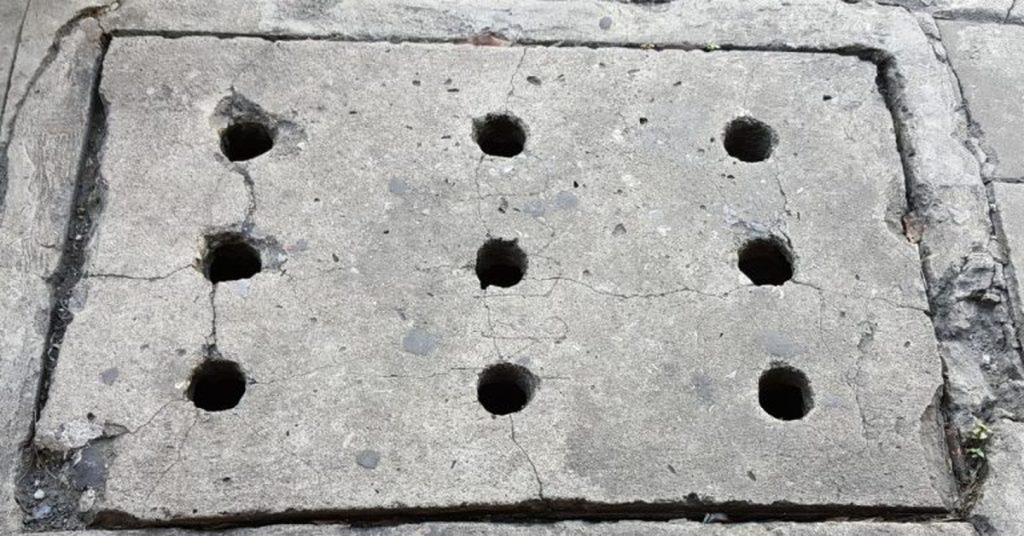
Spalling is the tendency of concrete to crack and crumble, exposing embedded steel and creating small, hollow surfaces as a result of internal stresses, moisture movement, and corrosion byproducts. Ring-anode spalls are a localized failure pattern that forms around patch edges or anode placements as a distinct circular or ring-like feature on the surface. The driving force is the electrochemical differential between repaired, protected zones and surrounding unrepaired areas, which concentrates material loss near the patch boundary.
On-site you’ll see circular or halo-shaped discoloration, powdery edges, and cracking that seems to bow away from the patch. These spalls are linked to patch practices, including the choice of patch material, the sequence of placement, curing, and how well the bonding interface conducts ions and currents. Early detection relies on moisture movement, damp patches, and visible rings around edges, and simple tests can help distinguish corrosion-driven spalling from other failure modes. Preventive measures start with proper anode placement relative to the patch, maintain patch-to-substrate continuity, and understand how galvanic protection compares with impressed-current methods in mitigating ring effects.
Definition of concrete spalling
Spalling in concrete is the flaking or peeling away of the surface, exposing underlying layers. It’s a sign of distress that needs attention.
Common signs include:
- Flaking or chipping of the top layer
- Exposed aggregate or reinforcement
- Cracks radiating from the affected area
What is a ring-anode spall (incipient-halo effect)?
A ring-anode spall, or incipient-halo effect, occurs when corrosion shifts from repaired to unrepaired zones due to potential differences.
The repair’s protection creates an electrochemical differential. Corrosion moves to adjacent reinforcement, causing delamination and spalling in a circular pattern around the patch edge or anode placement.
Visual checkpoints for identification
Inspect patches and anodes regularly to catch ring-anode spalls early. Use this checklist:
- Cracking patterns: Look for cracks radiating from the patch edge or anode site.
- Discoloration: Rust stains or changes in color may indicate corrosion.
- Moisture: Excessive moisture can lead to spalling and corrosion.
- Delamination sounds: Tapping the surface with a hammer; hollow sounds may indicate delamination.
- Patch edges: Check for flaking or chipping around patch edges.
- Anode sites: Inspect areas around anodes for signs of spalling.
- Crack propagation: Monitor cracks near anodes; if they grow, it may indicate corrosion-driven spalling.
- Comparative inspection: Compare repaired zones to unrepaired ones. Spalling in one but not the other could indicate a ring-anode spall.
Quick rule: If you notice any of these signs, don’t wait – investigate further and take action if necessary.
Root Causes of Spalling and the Corrosion Drivers to Address
The main corrosion drivers are embedded steel rebar corrosion, chloride-induced attack, carbonation lowering the concrete’s natural pH, freeze-thaw cycling, and alkali-silica reaction, each capable of initiating cracking and delamination in patches. These drivers often interact, with chlorides accelerating corrosion in carbonated zones and freeze-thaw amplifying existing crack networks around repairs. ASR can create internal pressures that compound repair weaknesses and worsen spalling risk in bonded interfaces.
In patch repairs, moisture trapping, altered diffusion paths under patches, and varying pH and electrical conditions near sacrificial anodes matter, as does possible galvanic coupling between patch materials and embedded steel. Recognize diagnostic cues such as rust stains, cohesive loss, and characteristic cracking to guide choices in galvanic anodes, patch mortars, and surface treatments. Planning checks should include pre-patch tests for surface conductivity, half-cell potential, and chloride content, plus ongoing monitoring to adapt repairs and protection strategy for longer-term durability.
Corrosion-driven expansion and electrochemical factors
The main driver of spalling is the corrosion of embedded steel rebar. When steel corrodes, it expands, putting pressure on the surrounding concrete. This expansion causes tensile stresses that can exceed the concrete’s strength, leading to cracking and delamination.
Local electrochemical contrasts also play a role. Chloride ions from de-icing salts or other sources migrate through concrete, creating chloride gradients. These gradients cause differential corrosion of the steel, further exacerbating the problem. Alkalinity differences can also create local cells, accelerating corrosion where the concrete is more alkaline.
Key takeaway: Corrosion-driven expansion and electrochemical factors are the primary causes of spalling in patches. Understanding these processes helps target repair strategies effectively.
Environmental and material causes (freeze-thaw, ASR, carbonation)
While corrosion is the primary driver, other factors can exacerbate spalling. Material choices and environmental conditions play a significant role.
- Freeze-thaw damage: Water absorption by concrete followed by freezing causes expansion, leading to cracking. Use air-entraining admixtures in concrete mixes to mitigate this effect.
- Alkali-silica reaction (ASR): Certain aggregates react with alkalis in cement, forming expansive gels that cause cracking. Avoid reactive aggregates and use low-alkali cements for patch repairs.
- Carbonation: Carbon dioxide from the atmosphere lowers concrete’s pH, making steel more susceptible to corrosion. Apply surface treatments like sealers or protective coatings to slow down carbonation.
Consequences of untreated spalling
Spalling is not just an aesthetic issue. It poses safety risks due to falling debris, which can cause injuries or property damage. Moreover, it accelerates structural deterioration by exposing reinforcement to more aggressive environments.
Serviceability: Spalling can lead to reduced service life of structures, requiring costly repairs and maintenance. It may also result in loss of functionality if the structure becomes unsafe for use.
Lifecycle consequences: Untreated spalling can lead to progressive deterioration, ultimately compromising the structural integrity of the entire system. This can result in expensive retrofits or even replacement of structures, impacting the overall lifecycle cost.
Methods for Repairing Spalled Concrete and Where Galvanic Protection Fits
The repair workflow begins with assessment of spall extent and reinforcement risk, then proceeds to removal of non-adherent material, surface preparation, and selection of a compatible repair mortar. Galvanic protection typically fits after excavation and before final finishing, when the patched area can be reliably bonded and the anode can be integrated with reinforcement. Always follow applicable codes and engage qualified professionals for critical repairs.
Preparation emphasizes cleaning, profiling, and ensuring energy-rich bonding with materials that won’t negate anodic protection, while ensuring proper anode placement and curing considerations to keep protection active throughout cure. Finishing and protection checks should include non-destructive tests and verification of ongoing galvanic action, with documentation aligned to project standards and approvals.
Repair material selection and compatibility
Choosing the right repair mortar is crucial for a successful patch job. The mortar should match the host concrete’s mechanical and chemical properties to ensure a strong, durable bond.
- Matching Alkalinity: Ensure the repair material has similar alkalinity (pH) as your existing concrete to prevent chemical incompatibility.
- Permeability Matching: The mortar should have similar permeability to the host concrete to avoid water trapping and potential cracking.
- Consult Datasheets: Always check material datasheets for specific recommendations on compatible repair mortars.
- Avoid Rapid Setting Mortars: These can lead to weak bonds and increased risk of cracking due to differential shrinkage.
- Consider Galvanic Compatibility: Ensure the repair mortar doesn’t interfere with the galvanic action of the anodes. Some cementitious systems may negate anodic protection.
Surface preparation and safety considerations
Proper surface preparation is key to a successful repair. It involves exposing corroded steel, removing deleterious material, and ensuring a clean, sound surface.
Safety first: Always wear appropriate PPE, including a respirator for dust protection. Contain the work area to prevent debris spread.
Use proper tools like chipping hammers or grinders to remove loose concrete and expose reinforcement. Be cautious around live electrical circuits if working on structures with embedded utilities.
If unsure about any aspect, consult a qualified contractor. They can assess the situation and perform necessary tasks safely and efficiently.
Visual and electrical acceptance checks after repair
After completing the repair, it’s essential to check that everything is in order before moving on. Visual checks are simple and effective for initial assessment.
Visual Checks: Look for signs of cracking, delamination, or other defects. Ensure the patch is level with the surrounding concrete and has a smooth finish.
Electrical checks can also be performed to confirm anode connectivity. Follow manufacturer guidance for specific methods, which may include continuity tests or potential measurements.
Document all checks and results for future reference and to ensure compliance with relevant codes and standards.
Overview of Galvanic Cathodic Protection and How Galvanic Anodes Work
The sacrificial principle relies on a more active metal corroding preferentially, supplying protective current to steel reinforcement embedded in concrete and thus reducing the steel’s corrosion rate without continual external power in many setups. This approach is contrasted with impressed-current systems, where galvanic anodes are favored in confined areas like ring-anode spalls for their passive, maintenance-light operation. Environment, including moisture, sulfate content, and chloride levels, governs effectiveness and choice of anode material.
Design and installation considerations for patches include sizing the anode, spacing, electrical connectivity through patch material, and insulating paths to prevent stray currents. Practical limits include localized consumption of the anode and potential current migration, which may warrant transitioning to or combining with other methods for durability. Readers should check expected life, maintenance needs, and inspection cues against project specifications and warranties.
Embedded versus surface-mounted anode systems
Anodes can be installed in two ways: embedded within the repair or mounted externally on the concrete surface. Both have their uses and installation methods.
Embedded anodes: These are placed inside the patch repair during application. They’re ideal for new construction, major repairs, or when aesthetics aren’t a concern. To install, simply embed the anode in the concrete mix before pouring or applying the repair material.
Surface-mounted anodes: These are attached to the exterior of the concrete after the repair is complete. They’re great for maintaining existing structures’ appearance and can be used when access to the interior is limited. To install, clean the surface, apply a suitable adhesive, press the anode onto it, and ensure good electrical contact.
Typical anode materials and what to check
Before selecting an anode, consider these factors to ensure you’re using the right material for your project. Here’s a quick checklist:
- Zinc anodes: Commonly used due to their low cost and wide availability. Check if they’re suitable for your environment (moisture level, sulfate content, chloride levels).
- Magnesium anodes: More active than zinc, offering greater protection but with a shorter lifespan. Verify they’re compatible with your steel reinforcement.
- Aluminum anodes: Less common due to their lower activity level. Ensure they’re suitable for your specific application and environment.
- Manufacturer’s recommendations: Always follow the manufacturer’s guidelines for installation, expected lifespan, and maintenance.
- Environmental suitability: Check if the anode material is compatible with your local climate and concrete conditions to maximize its effectiveness.
- Anode size: Ensure the anode is large enough to provide sufficient current to protect the steel reinforcement in your repair.
- Anode spacing: Verify that anodes are spaced appropriately to provide even protection across the entire repair area.
- Electrical connectivity: Confirm that the anode can make good electrical contact with the steel reinforcement through the patch material.
- Insulation: Ensure that the anode is properly insulated to prevent unwanted current paths and maintain its effectiveness.
Quick rule: Always check manufacturer recommendations and ensure the chosen anode material suits your specific project conditions for optimal performance.

Fusion (Hybrid) Anodes and Other System Options
Fusion or hybrid anodes combine galvanic elements with impressed-current capability, typically pairing galvanic blocks with a DC power source to deliver higher current where the patch area or layout demands it. Hybrids are advantageous in high-current scenarios, long runs, and retrofit projects where purely galvanic systems are impractical or insufficient. Engineering-led design determines the best fit, balancing structure type, exposure, and electrical resistivity.
Installation considerations include retrofitting into existing patches, routing power and conductors, and integrating with monitoring hardware, while maintenance focuses on corrosion potential targets and current output checks. Always weigh lifecycle costs, risk of stray currents, and compatibility with existing systems, and reference standards or guidelines when selecting a hybrid approach.
Benefits and limits of galvanic vs impressed-current systems
Galvanic anodes are simple, low-maintenance, and don’t require a power source. They’re great for small repairs with low current demands. Impressed-current systems, on the other hand, can deliver higher currents but need a power supply and regular maintenance.
Galvanic systems have a shorter service life due to anode consumption, while impressed-current systems last longer but require more upkeep. Galvanic systems are easier to control as they’re self-regulating, whereas impressed-current systems need constant monitoring and adjustment.
When to consider fusion/hybrid solutions
Hybrid anodes combine the best of both worlds – high current delivery from impressed-current with the simplicity and self-regulation of galvanic systems. They’re ideal for large structures or repairs with high corrosion risk, where a single system can’t meet demands.
Retrofit projects with variable currents are also suited to hybrids. Specialist engineering design is crucial here to ensure compatibility and optimal performance. Don’t attempt this without expert guidance.
Design Strategies to Prevent Ring-Anode Spalls in Patch Repairs
The incipient-halo risk zone around a patch repair should be defined by mapping diffusion, moisture pathways, and galvanic interaction to guide anode placement. Precise strategies include aligning sacrificial anodes to cover the patch perimeter, overlapping with existing anodes, and avoiding dead zones where current flow would be impaired. Compatibility of repair chemistry with galvanic protection is essential to prevent differential pH that accelerates ring growth.
Ensure electrical continuity across the interface with conductor paths or bridging designs so current reaches the boundary and surrounding concrete. All design choices must be diagnosis-based, relying on field data such as chloride load and moisture availability, and findings should be documented for future maintenance and proof of protection.
Defining the repair risk zone and diagnosing chlorides/alkalinity
Before you start patching, you need to know where the damage is coming from and how far it reaches. This is your repair’s risk zone.
Chloride profiling helps here. Drill small holes around the damaged area, take samples, then test for chloride content. You’re mapping out where the bad stuff is, so you can protect the whole area.
Also, check for carbonation depth. Carbonation eats away at concrete’s alkaline protection. Use a phenolphthalein indicator to see how deep it goes. And don’t forget a good old-fashioned visual inspection. Look for cracks, spalls, and other signs of trouble.
Anode placement principles and continuity across interfaces
Galvanic anodes protect by giving up their own metal to stop reinforcement corrosion. But they need to be placed right to work properly.
Protect the edge. Place anodes along the patch perimeter. They should overlap with existing anodes, creating a continuous protection zone. Avoid isolated protected islands. Anodes too far from each other leave unprotected concrete in between.
Consult manufacturer guidance for spacing. They’ve done the math. And if you’re unsure, ask a corrosion engineer. They can help you place anodes right, so your repair stays protected.
Matching electrochemical environment with repair materials
Repair materials matter. The wrong ones can cause more trouble than they fix.
- Neutral or slightly alkaline mortars: These keep steel passive, just like good concrete. Look for pH > 10. Avoid acid-forming ones.
- Compatible surface treatments: Sealers and coatings should match the electrochemical environment of your existing concrete. They shouldn’t create stark contrasts that cause corrosion cells.
- Avoid high-silica fume contents: Too much silica fume can make repairs too alkaline, causing alkali-silica reaction (ASR). Keep it below 15%.
- No chloride-based accelerators: Chlorides speed up concrete setting but cause corrosion later. Steer clear.
- Good bond strength: Repair materials should stick well to existing concrete. Weak bonds lead to cracking and spalling.
Installation Best Practices, Tools and Materials Checklist
Tight bonding, electrical continuity, and proper embedment depth are critical to prevent failure, so ensure a solid, low-resistance bond between the anode, host concrete, and embedded reinforcement. Route leads carefully, use corrosion-resistant clamps, and verify continuity to prevent open circuits. Plan for adequate concrete cover and proximity to rebar to achieve effective sacrificial protection without creating spall-prone zones.
Prep includes removing laitance and contaminants, controlling moisture during placement, and maintaining a clean work area. The tools and materials list should be contractor-ready and cover anodes, tie wires, bonding agents, cutting tools, non-metallic sleeves, electrical testers, epoxy or grout, gloves, and PPE, with quick pre/post placement checks to confirm readiness.
Tools and PPE
Before you start, ensure you have the right tools and personal protective equipment (PPE) to keep you safe and your work efficient.
- Hard hat: Protects against falling objects. Wear it at all times in repair areas.
- Safety glasses: Shields eyes from debris and chemicals. Always wear them during preparation and repair work.
- Gloves: Essential for handling materials, tools, and contaminated surfaces. Choose rubber or nitrile gloves to protect hands from cuts and chemicals.
- Ear protection: Reduces noise exposure from power tools. Use earplugs or earmuffs as needed.
- Respirator: Protects against dust, fumes, and harmful vapors. Wear a NIOSH-rated respirator when handling chemicals or working in confined spaces.
- Steel-toed boots: Safeguards feet from heavy objects and sharp tools. Always wear them on site.
- Tape measure: Ensures accurate dimensions for cutting, mixing, and placement of materials.
- Utility knife: Cuts through concrete, steel, and other materials with ease. Keep blades sharp and handle with care.
- Chisel and hammer: Used for removing damaged concrete, preparing surfaces, and creating anchor points.
- Angle grinder: Helps remove laitance, paint, and old mortar. Use with appropriate discs and safety guards.
- Power drill: Drills holes for anchors and mixes repair mortars. Choose a cordless model for convenience on site.
- Tie wire cutter/stripper: Cuts and strips tie wires for securing anodes to reinforcement. Keep blades sharp and clean.
Quick rule: Always inspect your tools before starting work to ensure they’re in good condition and safe to use.
Materials checklist and on-site checks
Before mixing and applying repair materials, verify the quality and suitability of your supplies to ensure a successful patch repair.
- Galvanic anodes: Check anode type (zinc, magnesium, or aluminum) matches your repair needs. Verify batch number and expiry date on packaging.
- Tie wires/clamps: Ensure they’re conductive and compatible with your reinforcement material (steel, stainless steel, or FRP).
- Bonding agent: Confirm it’s a conductive, cement-based grout or epoxy suitable for your repair. Check batch number and expiry date.
- Repair mortar/cement: Ensure it matches the existing concrete in composition and strength. Verify batch number and expiry date on packaging.
- Primer/sealer: Confirm it’s compatible with your repair materials and provides adequate protection against moisture and chlorides.
- Non-metallic sleeves: Check they’re long enough to protect anode leads from damage during embedment. Verify they’re flexible and durable for easy installation.
- Electrical tester: Ensure it’s a digital multimeter capable of measuring continuity, resistance, and voltage. Calibrate before use.
- Epoxy or grout: Confirm it’s compatible with your repair materials and provides adequate protection for embedded components. Check batch number and expiry date.
Quick rule: Always check materials on site to ensure they’re in good condition, suitable for the job, and within their shelf life.
Quality control and handover documentation
Proper documentation ensures future inspections, maintenance, and warranty claims go smoothly. Record key information before handing over the completed repair.
- Anode locations: Mark anode positions on as-built drawings or take photos for reference during future inspections.
- Serial numbers: Record anode serial numbers to track their performance and history.
- As-built drawings: Update drawings with repair details, including anode placements, concrete mix designs, and reinforcement modifications.
- Test records: Document electrical continuity tests, resistance measurements, and any other quality control checks performed during installation.
- Warranty information: Provide details on warranty coverage, claim procedures, and contact information for the manufacturer or installer.
- Safety instructions: Include any specific safety precautions related to the repair, such as avoiding electrical hazards around embedded anodes.
- Maintenance guidelines: Outline recommended maintenance tasks, frequencies, and responsible parties to keep the repair in good condition over time.
Quick rule: Always document your work thoroughly to support future inspections, maintenance, and warranty claims.
Common Mistakes, Monitoring, Maintenance and Lifecycle Costs
Common mistakes include inadequate surface preparation, choosing an incompatible anode alloy, insufficient edge protection, poor bonding, and neglecting moisture control before installation. A simple monitoring plan involves visual checks of anode condition and insulation, plus corrosion potential observations and a basic inspection schedule to catch drift in performance. Regular maintenance actions include repairing gaps, re-bonding or replacing failing anodes, cleaning exposed surfaces, and restoring seals.
Lifecycle cost considerations compare upfront sacrificial protection with future repair cycles, highlighting reduced ring-anode spall risk and lower downtime when protection is well maintained. Use a decision guide that weighs crack width, chloride exposure, and structural importance to decide whether to continue sacrificial protection or escalate to a different approach, with documentation to support decisions.
Typical errors that lead to ring-anode spalls
To prevent halo effects and ring-anode spalls, avoid these common mistakes:
- Isolating a cathodic repair island: This creates a small anode surrounded by large cathode areas, leading to accelerated corrosion. Ensure continuity with surrounding steel.
- Failing to protect adjacent steel: Unprotected steel near repairs can corrode faster due to polarization effects. Use edge protection to minimize this risk.
- Inadequate surface preparation: Poorly prepared surfaces lead to poor bonding and anode failure. Thoroughly clean, prime, and prepare the surface before installation.
- Neglecting moisture control: Moisture ingress can cause polarization drift and anode failure. Seal edges and ensure proper drainage.
Address these issues to maintain a healthy concrete structure and prevent costly repairs.
Long-term monitoring and maintenance recommendations
Maintaining your patch repair requires regular checks. Here’s what to do:
Visual inspections: Check anode condition, coating integrity, and insulation every 3-6 months or after heavy weather events.
Electrical checks: Measure corrosion potential annually to ensure the system is working correctly. Consult manufacturer guidelines for exact intervals.
Follow your product literature’s maintenance schedule, including fixing gaps, re-bonding anodes, cleaning surfaces, and restoring edge seals as needed.
Cost and lifecycle considerations
Sacrificial protection might seem expensive upfront, but it pays off in the long run:
Initial cost: Upfront material and installation costs can be higher than simple repairs. However, this investment extends service life.
Reduced future repairs: By protecting against corrosion, you’ll spend less on repeated patch repairs and downtime.
Request whole-life cost estimates from contractors to make informed decisions. Consider the long-term benefits of preventing ring-anode spalls and extending your concrete’s service life.
Conclusion
Protecting patch repairs with galvanic approaches is about predictable durability and avoiding costly spalls. Safety and proper sequencing keep against hidden failures while you build long-lasting concrete fixes.
Start with a small test patch to confirm the patch material and galvanic option behave as expected, inspect the existing ring-anode setup for compatibility, plan the repair and anode layout, gather the tools and materials, install according to the guidance, and then monitor the area after cure to catch any changes early.
Common mistakes to avoid include skipping surface prep or moisture control, using incompatible metals, and rushing installation without a clear plan. Always work with the power off and wear proper PPE, test a patch first, and verify moisture and temperature are within safe ranges before mixing materials or energizing any anodes. If in doubt about exposure, loads, or system compatibility, stop and reassess before proceeding.
In some cases, a pro is the right call—especially if you face complex rebar layouts, unknown moisture conditions, or need a code-compliant design. When you do push ahead, stay methodical, document what you changed, and keep safety and monitoring front and center. You can fix it, step by step, and keep the project on track.
FAQ
What exactly is concrete spalling, and what does “ring‑anode spalls” mean?
Spalling means the concrete surface flakes or pops off, exposing the rebar and deeper damage. Ring‑anode spalls refer to damage that forms a circular pattern around a sacrificial anode setup.
What causes spalling to happen, and why should I care if it’s left untreated?
It happens when moisture and corrosion react with reinforcement and the protective coating fails. If you ignore it, the steel can corrode faster and the surface can break away, creating hazards and more repair work later.
What are common DIY repair methods for spalled patches, and where does galvanic protection fit?
Common fixes include cleaning, filling the void, and resealing. Galvanic protection can help slow fresh corrosion at the patch, but you must follow product directions and local rules; it’s not a free pass for sloppy repairs.
What’s the difference between galvanic protection and impressed current systems, and when would I consider each?
Galvanic protection uses sacrificial anodes and works passively. Impressed current systems push current from a power source to protect larger areas. Check with the product label or manufacturer instructions to see what they recommend for patches and your setup, and follow local guidelines.