
Introduction
The process of applying stucco over insulated concrete form (ICF) walls involves several stages that require careful planning and timing. Understanding the timeline is crucial to ensure a successful outcome.
In this guide, we’ll break down the process into manageable steps, outlining how long each stage takes, so you can plan your project effectively.
For the full guide, see Stucco Over ICF Walls: Mesh, Fasteners, and Crack Control at Openings.
The Stucco Over ICF Walls Timeline: From Prep to Finish
The entire stucco application process over ICF walls typically takes around 7-10 days, depending on weather conditions and the complexity of the design. Here’s a detailed breakdown:
- Day 1-2: Preparation (24 hours) – Cleaning, profiling, and addressing any protrusions on the ICF surface.
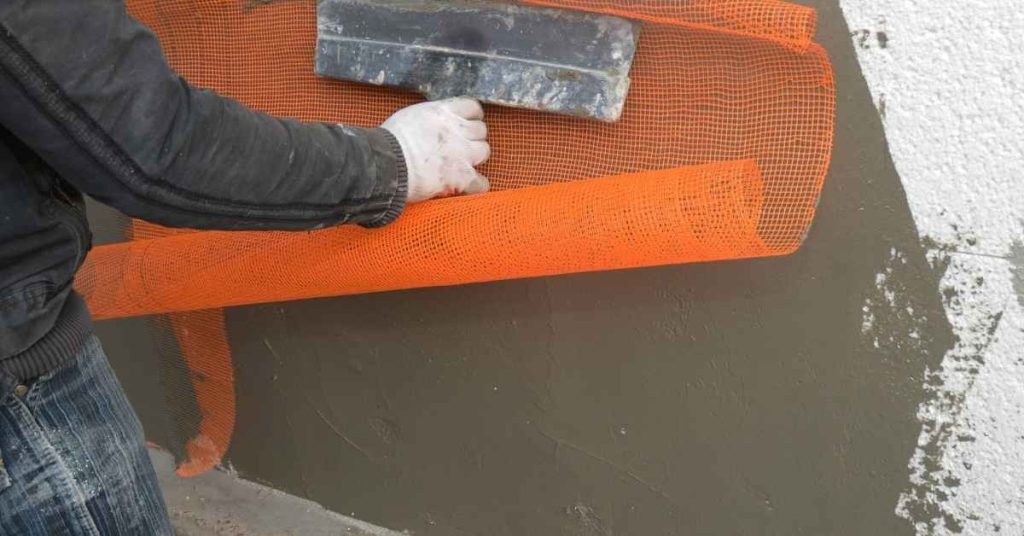
- Day 3: Mesh Installation (4-6 hours) – Installing wire mesh on openings with proper lath channels and edge clearance.
- Day 4: Fastener Installation (2-4 hours) – Securing fasteners per manufacturer instructions, avoiding overdriving near openings and edges.
- Day 5: Crack Control Details (2-4 hours) – Adding control joints and reinforced corner beads at openings.
- Day 6-7: Scratch Coat Application (8-10 hours per day) – Applying the scratch coat, ensuring it’s firm and level.
- Day 8-9: Brown Coat Application (8-10 hours per day) – Applying the brown coat, focusing on neat mesh overlaps and good edge treatment at openings.
- Day 10: Finishing Touches (4-6 hours) – Sealing, inspecting, and making any necessary adjustments to ensure a durable result.
Key takeaways
The preparation stage is critical as it sets the foundation for the entire stucco application process. Taking the time to clean and profile the ICF surface correctly will significantly impact the overall timeline and the final outcome of your project.
- Prepare ICF surfaces by cleaning, profiling, and addressing any protrusions before stucco.
- Install wire mesh on openings with proper lath channels and edge clearance.
- Secure fasteners per manufacturer instructions, avoiding overdriving near openings, and edges.
- Use crack control detail at openings: add control joints and reinforced corner beads.
- Protect ICF during weather; wear PPE and schedule pours with safety in mind.
- If unsure, verify labels, instructions, and local codes before proceeding.
Table of Contents
- Introduction
- Key takeaways
- Why Stucco over ICF Is Different — Benefits and Challenges
- Mesh Types Suitable for Stucco on ICF
- Fasteners and Attachment Methods for ICF Stucco Systems
- Crack Control Strategies at Openings (Windows, Doors, Penetrations)
- Step-by-Step Installation Workflow for Stucco over ICF
- Tools, Materials Checklist and Material Specs to Verify
- Cost Considerations and Budgeting Guidance
- Common Mistakes, Safety Precautions, and Seasonal Considerations
- Conclusion
- FAQ
Why Stucco over ICF Is Different — Benefits and Challenges
ICF-backed walls behave differently than masonry or framed backing because the insulated concrete form creates continuous insulation and a foam-bearing face rather than a rigid, porous block or wood sheathing. That changes how you manage thermal continuity, control thermal bridging, and handle moisture — all of which influence the stucco system you select and how you detail openings and joints.
Design and installation should target thermal continuity across the assembly, durable weather resistance against wind-driven rain and freeze–thaw exposure, and deliberate crack-control where movement concentrates around openings and transitions. Verify compatibility with both the ICF manufacturer’s instructions and the stucco system data before finalizing details and use a short on-site checklist to confirm required lath/mesh, fastener types and spacing, and planned control-joint locations.
How ICF Substrate Behaves Under Stucco
The main difference between ICF and traditional substrates is the foam core. It’s compressible, which can affect how you anchor and transfer shear forces.
First off, ICF foam compresses when you drive fasteners in. This means you need to use special fasteners designed for ICF or you’ll end up with loose stucco.
The foam also has a limited mechanical bite. It doesn’t grip the way concrete does, so you need more fasteners and proper spacing to keep your stucco secure. Think of it like trying to hang a heavy picture on a sponge – you need more nails and they’ve got to be closer together.
Lastly, shear transfer is different. ICF’s foam core doesn’t handle shear forces the same way concrete does. You’ll need to detail your openings and transitions carefully to control cracks.
Performance Goals for Stucco-on-ICF Assemblies
The main goal is to create a durable, weather-resistant wall that keeps the heat in and the cold out. Here’s how you do it:
First, you want thermal continuity. ICFs help with this by providing continuous insulation. But at openings – doors, windows, etc. – you’ve got to detail carefully to maintain that continuity.
Next, you need weather resistance. Stucco’s great at this, but it needs support from the ICF and proper detailing around openings to keep wind-driven rain out. You don’t want water getting in behind your stucco and causing problems.
Lastly, you’ve got to control cracks. ICFs move a bit with temperature changes and loads. So, you need to detail at openings and transitions to control where cracks can form and keep them from becoming bigger issues.
Mesh Types Suitable for Stucco on ICF
Choose mesh by balancing corrosion resistance, stiffness, and embedment needs: alkali-resistant fiberglass, woven or expanded metallic lath, and specialty non-metal meshes each have trade-offs in elongation, stiffness, and long-term durability. Match the mesh to the stucco layers you’ll embed it in and to the ICF surface so the mesh will tie the scratch and brown coats to the substrate without creating stress points.
Before buying, consult product data sheets and any applicable local code guidance to confirm suitability for your exposure and finish type; note corrosive environments or heavy wind-loading may push you toward higher-performance options. On the job, confirm recommended embedment depth, overlap, and fastener compatibility with the chosen mesh and the ICF substrate to avoid adhesion or cracking problems in thermal cycles and wet conditions.
Alkali-resistant fiberglass mesh
Fiberglass mesh is a popular choice for stucco over ICF walls due to its excellent corrosion resistance. It won’t rust like metal lath, making it ideal for both interior and exterior applications.
This mesh embeds easily into the scratch coat, providing a solid base for your stucco finish. It’s commonly used in stucco systems over foam-backed substrates because of its ability to adapt to minor movements in the wall.
Tip: Opt for alkali-resistant fiberglass mesh specifically designed for use with ICF walls to ensure long-lasting performance.
Metal lath and expanded metal options
Metal lath can be used on ICF walls, but it’s crucial to consider corrosion. Standard galvanized metal lath may not hold up well in exterior applications, especially in areas with high humidity or salt spray.
To mitigate corrosion, use stainless steel lath or apply a compatible coating to your galvanized lath. Ensure the coating is suitable for ICF walls and follows manufacturer guidelines.
Warning: Avoid using metal lath without proper protection in exterior applications, as it can lead to premature failure of your stucco system.
Specialty and self-furring meshes
Some meshes come with integrated furring or drainage capabilities, improving bond and drainage on ICF walls. These specialty meshes can help control moisture and reduce the risk of cracking.
Self-furring meshes have built-in barbs that penetrate the scratch coat, providing better adhesion and reducing the need for additional fasteners. They’re particularly useful in areas with high wind or where extra holding power is needed.
Note: Consult product datasheets to ensure these specialty meshes are compatible with your chosen stucco system and ICF wall type.
Fasteners and Attachment Methods for ICF Stucco Systems
Attachment choices split into mechanical anchors (pins, screws with washers, and purpose-made anchors) and adhesive systems; each has pros and cons for pull-out, adjustability, and long-term performance on foam-faced ICF. Which method works depends on foam thickness, whether there’s backup framing or masonry, and the stucco/ICF manufacturers’ guidance on allowable embedment and spacing.
Check local code and product instructions for required embedment depths and spacing before specifying fasteners, and plan details at windows, doors, and corners to control differential movement and cracking. Use corrosion-resistant materials where required, follow recommended installation sequences, and include on-site pull tests or inspections to confirm the attachment system holds under anticipated loads.
Mechanical Fastener Types and Best Practices
When it comes to securing stucco to ICF walls, mechanical fasteners are your mainstay. Here’s what you need to know:
Types of Mechanical Fasteners: You’ve got a few options – pins, screws with washers, and dedicated anchors.
Head and Washer Requirements: Use fasteners with large heads or washers to distribute stress evenly. This helps prevent pull-through and keeps your stucco secure.
Placement Principles: Fasten every 6-8 inches along the mesh, following a ‘staggered’ pattern for even support. Keep them at least 1 inch from edges and corners to avoid cracking.
Bonding and Adhesive Approaches
Adhesives can supplement mechanical fasteners, but they’re not a standalone solution on ICF. Here’s why:
Adhesives help improve bond strength, reducing the risk of delamination. But they won’t replace the structural support provided by mechanical fasteners.
When to Use Adhesives: Apply adhesives when you want extra insurance against peeling or cracking. They’re particularly useful at corners and openings where movement is common.
Limitations of Adhesive-Only Systems: Don’t rely solely on adhesives for support. ICF’s foam nature needs the structural reinforcement that mechanical fasteners provide.
Fastening to Different Backups
ICF walls can have various backup materials. Here’s how to handle each:
Wood Studs: Use screws with large heads or washers. Ensure they’re long enough to penetrate the stud fully, but not so long they protrude into the living space.
Metal Studs: Screws are your best bet here too. Corrosion-resistant screws are a must for longevity.
Concrete Backup: Use expansion anchors or concrete screws. Make sure they’re long enough to engage the concrete fully, following manufacturer guidelines and local codes.
Crack Control Strategies at Openings (Windows, Doors, Penetrations)
Openings concentrate movement from shrinkage, thermal cycling, and wind loads, so treat them with a prioritized set of details: continuous flashing, correct mesh termination, control joints aligned with framing, corner reinforcement, and flexible sealants. Expect cracks to form at head and sill junctions, corners, and any transition where stiff and flexible materials meet unless these items are coordinated.
Follow the flashing and sealant compatibility guidance provided by manufacturers and terminate mesh and drainage layers to integrate with those flashings. On site, inspect edge conditions, confirm control-joint placement and sealant movement ratings, and document installations so future maintenance or repairs are straightforward.
Detailing window and door reveals
The first line of defense against water intrusion at openings is proper detailing. Here’s how to do it:
Flashing: Install a continuous flashing membrane around windows and doors, lapping up the wall and under the head and sill. This creates a barrier that directs water out and away from the opening.
Mesh Termination: Stop mesh at least 2 inches back from the reveal edge to avoid stress concentration points. Use a rigid corner guard or metal angle to protect the mesh end and tie it into the ICF/stucco system.
Backdam/Reveal Construction: Build up a backdam behind the reveal using a thick, stiff mix of stucco. This helps distribute stress evenly across the opening and prevents cracking at the reveal edge.
Control joints, corner reinforcement, and terminations
Properly placed control joints, reinforced corners, and well-terminated mesh help manage movement and prevent cracking at openings.
Control Joints: Place control joints every 8 to 10 feet along wall lines and framing members. Use a backer rod and compatible sealant for best results. Align joints with framing to avoid unintended crack paths.
Corner Reinforcement: Reinforce corners with mesh or lath to accommodate movement. For 90-degree corners, use a rigid corner guard or metal angle. For irregular openings, deviate the mesh around the opening and reinforce with additional mesh or lath at the corner.
Mesh Termination: Terminate mesh at least 2 inches back from openings to avoid stress concentration points. Use a rigid corner guard or metal angle to protect the mesh end and tie it into the ICF/stucco system.
Step-by-Step Installation Workflow for Stucco over ICF
Start with a thorough inspection and substrate preparation: check ICF alignment, foam integrity, joint treatment, and that any membranes or WRB items are in place and tied into openings before you fasten or apply mesh. Sequence the work so flashing and moisture management at windows, doors, corners, and penetrations is completed and tested prior to anchors or coat applications.
Install anchors or furring, secure mesh per system instructions, then apply the scratch coat, brown coat, and finish coat in the order and thickness the manufacturer specifies, checking adhesion and embedment as you go. Build in quality checks — pull tests, adhesion checks, and inspection of joints and flashings — and confirm cure and inspection requirements from the product documentation before final acceptance.
Step-by-Step Installation Process
This sequence will guide you through applying stucco over Insulated Concrete Forms (ICF) from start to finish, ensuring a durable and attractive result.
- Prepare the ICF surface: Lightly sand any rough edges or high spots. Vacuum off dust. Why? Smooth surface promotes better adhesion. Check: Surface should feel smooth to touch.
- Apply base coat (scratch coat): Mix stucco according to manufacturer’s instructions. Apply a 1/4″ thick layer using a hawk and trowel. Why? Provides a solid foundation for the finish coat. Check: Consistent thickness across surface.
- Scratch the base coat: While still wet, use a scratch tool to create grooves. Why? Enhances bonding with the final coat. Check: Grooves are visible and consistent.
- Apply finish coat: Once base coat is dry (check manufacturer’s recommended time), apply a 3/16″ thick layer of finish stucco. Why? Gives the desired texture and color. Check: Even application, no missed spots.
- Float the surface: Use a float to smooth out any imperfections in the wet stucco. Why? Ensures a level, uniform appearance. Check: Surface is smooth and even.
- Let it cure: Allow the finish coat to dry according to manufacturer’s instructions (usually 24-72 hours). Why? Proper curing prevents cracking and peeling. Check: No visible moisture on surface.
- Inspect for defects: Look for any cracks, bubbles, or other issues. Why? Early detection allows for easy repair. Check: Surface is free of defects.
Common mistake: Rushing the curing process can lead to premature cracking and a shortened lifespan of your stucco finish.
Prep and substrate inspection checklist
Before you start applying stucco over your Insulated Concrete Forms (ICF), use this checklist to ensure a solid foundation for your work. Perform these checks after the ICF installation is complete, but before any waterproofing or lathing.
- Check ICF Grade/Type: Ensure you’re using the correct grade of ICF for your project. Check product labels or manufacturer instructions to confirm.
- Inspect for Damaged Blocks: Look for any cracks, chips, or other damage on the ICF blocks. Replace or repair as necessary.
- Verify Block Alignment: Make sure all blocks are level and aligned properly. Use a laser level or string line to check.
- Check Joint Spacing: Ensure joints between blocks are consistent and within the manufacturer’s recommended range (usually 1/8″ to 3/16″).
- Inspect Rebar Placement: Check that rebar is correctly placed within the ICF cores. Follow the engineer’s plans or manufacturer guidelines.
- Check Wall Height: Ensure all walls are at the correct height and level with each other. Use a laser level to confirm.
- Inspect Corners: Check that corners are square and plumb. Use a corner square or laser level to verify.
- Check for Voids/Gaps: Tap on the ICF walls to listen for any hollow spots, indicating voids or gaps. Fill as needed.
Quick rule: Always check and correct any issues before proceeding with waterproofing or lathing. Skipping these checks can lead to costly rework, poor stucco adhesion, and potential structural problems down the line.
Embedding mesh and applying stucco coats
Once you’ve prepped your ICF walls and applied the base coat (scratch/brown coat), it’s time to embed the mesh and apply your final stucco layers. Here’s how:
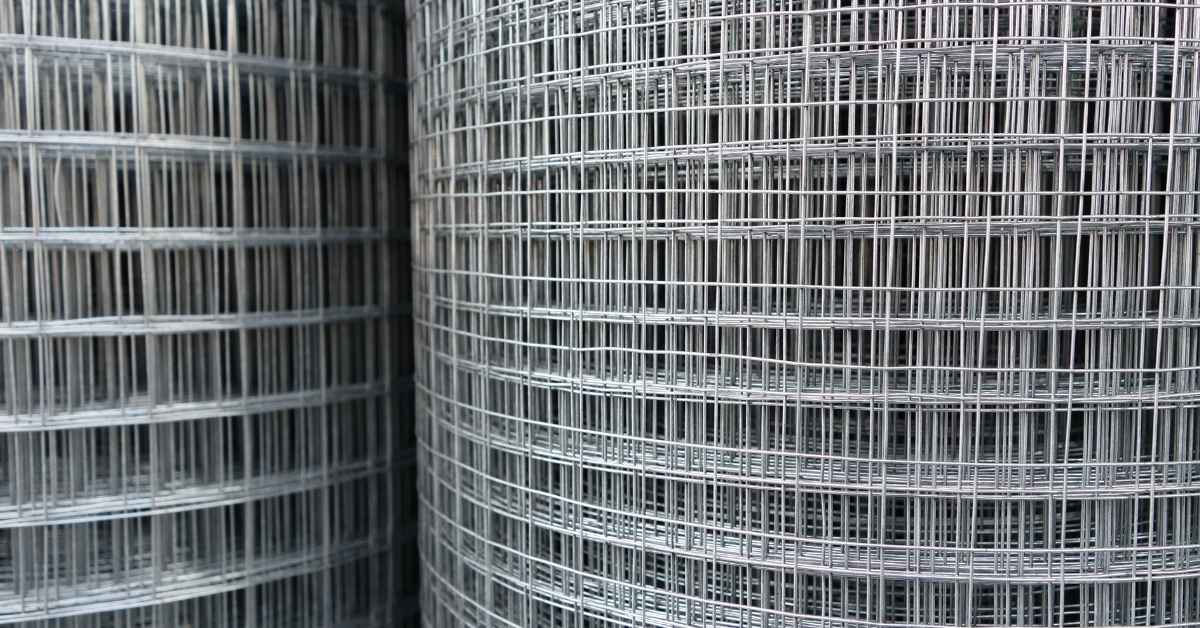
First, choose a flexible, alkali-resistant fiberglass or galvanized steel mesh. It should be at least 16-gauge with 2″ x 4″ openings.
Start by unrolling the mesh onto your ICF wall. Overlap each strip by about 3-4 inches. This ensures strength and prevents cracking. Now, embed the mesh into the scratch/brown coat using a darby or trowel. Make sure it’s fully embedded and no edges are sticking out.
Let the mesh soak in the base coat for at least 24 hours. This allows it to cure properly before you apply your first finish coat. Follow your product’s specific cure recommendations, as they may vary.
Final finishing, curing, and inspection checkpoints
Use this checklist once you’ve completed the final stucco application over your ICF walls. It’s time to ensure a quality finish and proper curing.
- Apply texture: Ensure the desired texture is achieved by using the appropriate tools (e.g., broom, comb, or trowel) while the stucco is still wet. Check that the texture is consistent across all surfaces.
- Check for rapid drying: Monitor the surface for signs of rapid drying, such as cracking or powdering. If noticed, mist the surface lightly with water to slow down the drying process.
- Avoid freezing during curing: Keep an eye on weather forecasts. If temperatures drop below 50°F (10°C), protect the stucco from freezing by covering it or applying heat as needed.
- Inspect adhesion: Gently tap the surface with a hammer to listen for a solid sound, indicating good adhesion. Any hollow sound may indicate delamination and needs further investigation.
- Check straightness: Use a level or straight edge to ensure walls and corners are straight. Address any deviations immediately to avoid costly rework later on.
- Inspect for hairline cracks: Look closely at the surface for any hairline cracks, especially around windows, doors, and control joints. If found, apply a flexible sealant or touch up with stucco as needed.
- Check for efflorescence: Inspect the surface for signs of white powdery deposits (efflorescence), which indicate moisture migration through the wall system. If present, address the underlying moisture issue promptly.
- Verify control joints: Ensure all control joints are properly tooled and filled with backer rod or sealant to prevent cracking due to settlement or movement.
Quick rule: Always follow the manufacturer’s recommendations for application, curing, and inspection. Local climate conditions may require additional precautions.
Tools, Materials Checklist and Material Specs to Verify
Gather the right hand tools and power equipment up front: trowels, hawk, margin trowels, a mixer with a paddle, drills with appropriate drivers, and safety gear for handling cementitious materials. Include consumables like specified mesh and lath, corrosion-rated fasteners, flashing, compatible sealants, and PPE; verify sizes and profiles on the product data sheets before purchase.
On the materials side, confirm mesh type and grade, fastener length and corrosion rating, and that your stucco mix is compatible with the chosen reinforcement and ICF substrate per manufacturers’ data. Create a one-page verification sheet to tick off datasheet reviews, code references, required overlaps/embeds, and testing regimes before you start applying the first coat.
Essential tools for DIY and pros
Before you start, ensure you have the right tools to get the job done efficiently. Here’s a checklist of essentials.
- Trowels: 12″ x 6″ and 18″ x 4″ for application; margin trowel for detailing.
- Hawk: To hold and transfer stucco mix to trowels.
- Mixer: Electric mixer with paddle attachment for consistent, lump-free mixes.
- Drill with paddle bit: For small batches or touch-ups.
- Mixing spoons: To ensure accurate water-to-material ratio.
- Cleanup gear: Sponge, bucket, and rags for easy clean-up.
- Level: To check and maintain proper surface plane.
- Tape measure: For accurate measurements and cuts.
Quick rule: Always inspect tools before starting. Worn-out trowels or mixers can lead to inconsistent results.
Material specs and standards to verify
Confirm these material specifications to ensure compatibility, durability, and performance.
- Stucco mix: Check type (cementitious, lime), aggregates, ASTM/ICC references, and water-to-material ratio.
- Mesh: Verify grade (galvanized or stainless), mesh count (16-20 gauge), and overlap requirements.
- Fasteners: Confirm type, corrosion rating, length, and driver compatibility.
- Flashing: Ensure compatible types for openings, control joints, and terminations.
- Sealants: Check compatibility with stucco and ICF membranes.
- Curing times: Review manufacturer’s recommended curing periods.
- Substrate prep needs: Confirm any required surface treatments or primings for ICF walls.
Quick rule: Always review manufacturer datasheets and local building codes to avoid compatibility issues and ensure compliance.
Cost Considerations and Budgeting Guidance
Main cost drivers include mesh and fastener grade, the complexity of detailing at openings, and whether you hire labor or do DIY work; higher-performance meshes and corrosion-resistant fasteners typically increase material costs. Factor in extra labor and waste for complex window or penetration details and include contingencies for field adjustments when ICF tolerances or unforeseen issues arise.
Obtain multiple material quotes and contractor bids with clear line items so you can compare like-for-like, and include lifecycle costs for maintenance, resealing, or repairs driven by crack-control performance. Document assumptions and get manufacturer confirmation for any specialty items that affect warranty or long-term performance before locking in the budget.
Comparing mesh and fastener cost factors
Mesh and fasteners are your first big cost decisions. Stainless steel mesh is pricier but won’t rust, lasting longer than cheaper galvanized options. Fiberglass mesh is lighter and easier to handle, but it’s more expensive.
Premium fasteners, like corrosion-resistant screws or powder-coated staples, add upfront cost but reduce long-term maintenance needs by preventing rust and delamination.
Balance your budget with these trade-offs. Cheaper materials might seem appealing now, but they could mean more repairs down the road.
Labor vs DIY trade-offs and lifecycle costs
Hiring pros can save you money in the long run. They’re faster, reducing schedule risks, and their workmanship often lasts longer, minimizing maintenance costs.
DIY is great for simple tasks like embedding mesh or applying coats. But complex detailing at openings, or working with tricky substrates, might warrant a pro’s touch to avoid costly mistakes.
Consider your skills and time. If you’re handy but short on time, hiring for certain tasks could be worth it. If you’ve got the time and willingness to learn, DIY can save you money upfront.
Common Mistakes, Safety Precautions, and Seasonal Considerations
Frequent mistakes on ICF-stucco jobs include insufficient anchoring, poor mesh embedment, and missing or incorrect flashing around openings — all of which lead to delamination and cracking. Address these by enforcing correct fastener patterns, confirming embedment depth, and verifying flashing and sealant compatibility with the stucco and ICF membranes.
Protect crews with appropriate PPE (eye protection, gloves, respirators for dust), fall protection for elevated work, and safe handling for bags and lath. Also adjust mixes, work tempo, and curing protection for temperature and humidity extremes and consult product instructions for acceptable application conditions and any required seasonal substitutions or protective measures.
Top installation errors and how to avoid them
Stucco over ICF walls can be a beautiful finish, but it’s prone to mistakes. Here are the top issues to watch out for.
- Inadequate anchoring/fastener spacing: Insufficient fasteners lead to delamination. Space them 6-8 inches apart, both horizontally and vertically.
- Improper mesh embedment and lath/mesh coverage: Mesh should be fully embedded in the base coat for strength. Ensure at least 1/2 inch of plaster covers it.
- Missing or poorly flashed openings: Water intrusion causes damage. Flash windows, doors, and other openings before stucco application.
- Insufficient crack-control detailing at openings: Armored control joints, caulking gaps, and proper joint placement prevent cracks near openings.
Regularly inspect your work to catch these issues early. A quick visual check can save you from major repairs later on.
Safety precautions and required PPE
Stucco work is physically demanding and comes with its own set of hazards. Here’s what you need to stay safe.
Eye/face protection: Wear safety glasses or goggles to protect from debris. For overhead work, use a face shield.
Gloves: Use gloves for handling materials and tools to prevent cuts and abrasions.
Respirators: When mixing or sanding stucco, wear a respirator to protect against dust and mist. Fall protection is crucial when working at heights. Always use ladders and scaffolds safely, following manufacturer guidelines. Electrical/hand-tool precautions are essential to prevent injuries. Lastly, lift bags of cement and lath carefully to avoid back strain.
Seasonal and climate effects on stucco application
Temperature, humidity, wind, and precipitation all impact stucco installation. Here’s how to adapt your schedule and materials for different conditions.
Hot weather: High temperatures speed up the curing process but can cause rapid drying, leading to cracks. Keep the surface moist during curing, using curing blankets or periodic misting. Follow manufacturer guidelines for hot-weather application.
Cold weather: Low temperatures slow down the curing process and can weaken bond strength. Use cold-weather additives in your mix and follow product guidance for low-temperature application. Protect freshly applied stucco from freezing with insulating blankets or heat sources.
Wind and precipitation can also affect application. Windy conditions may require additional support for lath, while rain can wash away fresh plaster. Plan your work around these conditions to ensure a strong, durable finish.
Conclusion
Protecting your walls and your wallet comes down to treating the system as a whole: verify mesh and fastener compatibility, follow the crack-control plan around openings, and respect seasonal limits so the stucco cures properly and looks right for years.
Before you start or when you’re ready to finish a section, run this check in order: confirm you have the right mesh type for ICF, confirm fasteners and attachment method meet the plan, double-check crack-control details around windows, doors, and penetrations, and confirm you have the weather and surface conditions to proceed. Test a small area first, then scale up in stages, document any changes, and stop if you see unexpected movement or adhesion issues.
Common mistakes to avoid include using the wrong mesh or fasteners, skipping crack-control measures at openings, and pushing on in cold or damp weather without curing time. Safety rules are simple: wear eye and skin protection, keep ladders, scaffolds, and edges secure, avoid over-tightening fasteners, and never apply new stucco over wet or contaminated surfaces. If you’re unsure about the opening details, or if conditions are marginal, don’t push; call a professional and get a quick review before proceeding. Stay steady, follow the plan, and you’ll end up with a durable, good‑looking finish that holds up to weather and time.
FAQ
Preparing ICF walls for stucco beyond what’s already covered?
Inspect the ICF surface for gouges, voids, or loose foam. Patch with approved patching material, and rinse or wipe the surface clean. Follow the stucco system manufacturer’s prep steps and primer requirements for best adhesion.
Installing wire mesh on ICF openings and around window/door frames?
Cut mesh to fit around openings, then wrap it so the mesh sits over the opening rough frame. Secure it with corrosion‑resistant fasteners or ties per the system instructions, keeping it flat and continuous around the opening edges. Use the manufacturer’s detailing for corner beads or edge reinforcement at the opening periphery.
How to secure fasteners correctly on ICF for stucco?
Use fasteners approved for ICF and the chosen stucco system. Install at the spacing shown by the product instructions and drive to the recommended depth. Don’t guess—check the label, datasheet, and any local requirements for fastener type and embedment.
What are reliable crack-control practices at window and door openings?
Integrate reinforcing mesh through the opening zone and use control joints or designed expansion joints away from openings as the system prescribes. Ensure proper flashing and sealant transitions around frames to reduce stress transfer into the stucco skin.
Costs and budgeting factors for stucco over ICF (materials vs. labor)
Costs vary with mesh type, fasteners, coats, and any required flashing or corner detailing. Plan for fiberglass or wire mesh, fasteners, and the stucco base and finish coats, plus labor time. Always verify material specs and get quotes based on the exact product you choose, not estimates. If in doubt, check manufacturer instructions and local rules for any required licenses or inspections.