

Introduction
Spalling concrete can be addressed with a careful DIY repair approach and proper safety measures.
The guide explains how to assess damage, prepare surfaces, and perform common repair methods while avoiding common mistakes.
You’ll learn practical tips, best practices, and simple rules of thumb to extend the life of concrete and prevent future spalling.
Key takeaways
- Identify spalling by hollow sounds and chipped edges after frost exposure.
- Assess moisture sources before repair to prevent recurrence and freeze-thaw damage.
- Wear PPE and isolate work area to reduce dust and fumes risk.
- Use compatible repair mortars and proper curing to restore bond strength.
- Plan repairs in daylight, weather window, and follow safety data sheets.
- Document repairs with photos and notes for future maintenance planning.
Table of Contents
- Introduction
- Key takeaways
- What is spalling concrete and why it matters
- Main causes of spalling concrete
- Planning your DIY repair: assessment and safety
- Tools, materials, and material specs explained
- Step-by-step DIY repair guide
- Common DIY mistakes and how to avoid them
- Preventive maintenance, cost considerations, and sustainable practices
- Case studies, troubleshooting guide and final checklist
- Conclusion
- FAQ
What is spalling concrete and why it matters
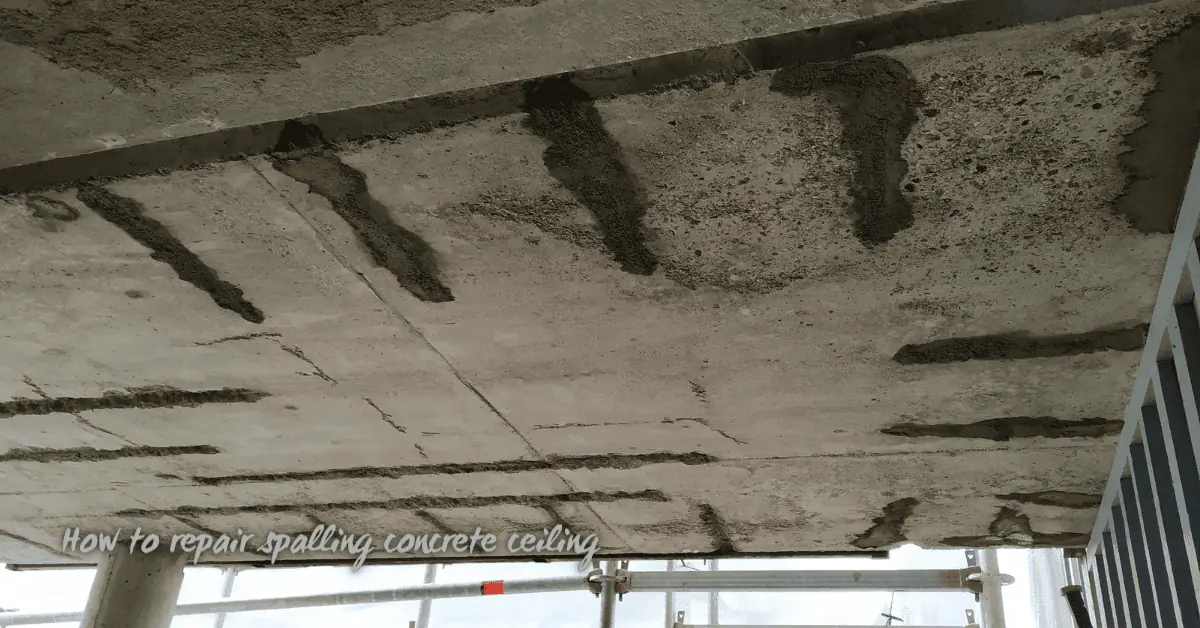
Spalling is when concrete loses material or flakes beyond the surface, exposing aggregate or breaking off in chunks. It’s not just a hairline crack or craze line. If you see chips that go deeper than the top coat, or exposed stones, that’s spalling, not a simple crack. Edge spall, surface delamination, and pop-outs are common visual forms to watch for on sidewalks, slabs, and walls.
Spalling can weaken load paths, create trip hazards, and invite more water that speeds deterioration, so catching it early saves work later. Look for edge chips, hollow sounds, rust staining, and areas where the surface delaminates or pops out; note where they occur and how deep they seem. If you’re unsure about depth or seriousness, check the label or datasheet for guidance and plan to have a professional confirm when repairs or replacement are needed.
Definition and common symptoms
Spalling concrete is when chunks of the surface break off, exposing aggregate underneath. It’s not just a simple crack; it’s material loss that can compromise structural integrity.
Common signs include flaking or peeling surfaces, rust stains around edges, exposed rebar, and hollow-sounding areas when tapped with a hammer. These symptoms often indicate deeper issues like corrosion of reinforcing steel or water penetration.
If you see these signs, especially if they’re widespread or accompanied by significant structural damage, it’s time to call in a professional for an assessment. For minor cases where the spalling is limited and not affecting load-bearing areas, DIY repairs might be feasible.
How spalling develops over time
Spalling doesn’t happen overnight; it’s a gradual process that starts with small delaminations and progresses to larger breakouts. The cycle begins when moisture seeps into the concrete, leading to freeze-thaw cycles that expand and contract the material.
This expansion can cause tiny cracks to form at the surface, allowing more water in. Over time, these cracks grow deeper, weakening the bond between the aggregate and cement paste. As corrosion of reinforcing steel sets in, it further exacerbates the problem by creating larger voids within the concrete structure.
The result is a cycle where each factor—moisture, freeze-thaw cycles, and corrosion—accelerates spalling, leading to more severe damage over time. Early detection and intervention are crucial to prevent this progression.
Main causes of spalling concrete
Spalling is almost always tied to a small set of culprits: freeze-thaw cycles, corrosion of reinforcement, poor concrete mix or insufficient cover, alkali-silica reaction, impact damage, and the aggressive action of de-icing salts. This intro focuses on how each cause shows up, where it shows up in the concrete, and what quick checks tell you which culprit is likely, so you can narrow down the root without a lab. You’ll get simple diagnostic cues for appearance, age, moisture, exposure, and what the material history might reveal, plus a basic flow you can use to steer your next steps toward remedial fixes.
The practical value for a DIY reader is immediate: knowing the likely cause guides you to targeted fixes, like drainage and coatings for freeze-thaw, deeper cover or inhibitors for rebar, or adjustments to mix and aggregate for ASR. It also helps you plan quick checks—visual survey, moisture context, cover depth verification, and selective tests for chlorides or carbonation—before you start costly or unnecessary work. Keep in mind that misattribution wastes time and money, so when in doubt check product labels, manufacturer instructions, and local rules, and consider professional testing if the root is unclear.
Reinforcement corrosion and rust pressure
Corrosion of embedded steel is a major cause of spalling. When the rebar starts to corrode, it expands, pushing against the surrounding concrete until it cracks and breaks away.
You’ll see signs like rust streaks running down from the surface or through cracks in the concrete. The edges around these areas will be pitted and rough, indicating where the rust has pushed out the concrete.
To diagnose this issue, look for exposed rebar that’s rusty or showing signs of corrosion. If you find it, there’s a good chance the surrounding concrete is spalling due to the pressure from expanding rust.
Material and workmanship factors
The quality of materials used and how they’re handled during construction can significantly impact the durability of your concrete. Poor mix ratios, inadequate cover for reinforcement, improper curing, and surface treatments all play a role.
- Poor mix ratio: Using too much water or cement can weaken the concrete. Ensure you follow recommended proportions to avoid cracking and spalling.
- Inadequate cover: Make sure rebar is properly encased in at least 1-2 inches of concrete to protect it from corrosion. Check local building codes for specific requirements.
- Improper curing: Concrete needs time to set and harden correctly. Use plastic sheeting or curing compounds to keep the surface moist during the first few days after pouring.
- Surface treatments: Some finishes can trap moisture, leading to spalling. Choose a finish that allows for proper drainage and evaporation. Avoid sealants that don’t allow concrete to breathe.
Planning your DIY repair: assessment and safety
Start by defining the repair scope: check how deep and wide the spalling is and whether the surface remains sound. Decide if this job is DIY-appropriate or if you should call a pro, using clear criteria from the assessment. Then map out safety first: identify hazards, pick PPE (hard hat, eye/face protection, respirator or dust mask, gloves, hearing protection, non-slip boots) and outline a basic job-site safety plan.
Look at load, traffic, and weather impacts that affect timing and curing. Locate and isolate utilities, arrange temporary shutoffs, and plan containment and safe access. Check local permit needs and codes, and keep a simple checklist for when to call a pro and what paperwork to keep.
When to DIY vs hire a professional
If the spalling is minor, like small cracks and surface damage without exposed rebar, you can likely handle it yourself. But if there’s significant depth or width—more than an inch deep or several inches wide—or if structural elements are compromised, it’s time to call in the pros.
Another red flag is when spalling affects overhead areas like balconies or walkways where falling concrete could be a safety hazard. Reinforcement exposure also signals a need for professional assessment and repair to prevent further damage.
Remember, structural integrity is key. If you’re unsure about the extent of the damage or how it might affect load-bearing capacity, err on the side of caution and consult an expert before proceeding with DIY repairs.
Safety and environmental precautions
Before you start any repair work, make sure to wear appropriate PPE. This includes a hard hat, eye protection, ear protection, gloves, and a respirator or dust mask. Non-slip boots are also essential for safety.
Control dust by using wet saws when cutting concrete and sweeping up debris regularly. Cover any nearby plants to protect them from dust and use drop cloths around the repair area to contain mess.
When disposing of old concrete or materials, follow local regulations carefully. Contaminated waste should be separated and disposed of properly to avoid environmental harm. Keep your work area clean and organized to prevent accidents during repairs.
Tools, materials, and material specs explained
Here’s a practical, do-it-yourself ready checklist: basic tools like a chisel and hammer, a grinder with a diamond cup wheel, a wire brush, a pressure washer, and trowels, plus optional gear for dust control and comfort. Also note compatible materials such as bonding agents, patch mortars, and epoxy for rebar, and always compare to product labels and datasheets for curing and bond requirements.
This matters because choosing the right combo and following proper prep makes the bond last and the repair hold up. Check manufacturer instructions for curing times, open time, mixing guidance, and surface prep, and plan for safe use, ventilation, and clean storage to avoid wasted material and weak patches.
Tools checklist and why each matters
Before you start your repair project, make sure you have everything on this list to avoid delays.
- Chisel/hammer: Essential for breaking up loose concrete. Check that it fits comfortably in your hand. Skipping this can lead to wasted effort and damage.
- Angle grinder with diamond cup wheel: For cutting out damaged areas. Ensure the wheel is sharp and securely attached. Not having this tool means more manual labor and less precision.
- Wire brush: Cleans rust and debris from rebar. Confirm it’s sturdy enough for the job. Missing this step can compromise your repair’s strength.
- Pressure washer: Removes dirt, oil, and loose material. Verify it has a high-pressure setting. Not cleaning thoroughly weakens the bond between new and old concrete.
- Trowels: For applying patch mortar evenly. Choose sizes based on repair area size. Using the wrong trowel can lead to uneven surfaces.
Quick rule: Always have the right tools for the job, or your project will take longer and cost more.
Choosing the right repair material and bonding agents
The type of material you choose can make or break your spalling repair. It’s crucial to match it with the extent of damage and environmental conditions.
- Patch mortar: Use for minor cracks and surface repairs. Look for high compressive strength ratings. Avoid using regular cement as it won’t bond well.
- Epoxy crack injection: For deep cracks and structural issues. Ensure the epoxy is rated for concrete repair. Using a weaker epoxy can result in further cracking.
- Bonding agent: Essential when repairing old or porous concrete. Check that it’s compatible with your existing material. Skipping this step leads to weak bonds and potential failure.
Making the wrong choice can lead to unsightly stains, poor durability, and structural issues down the line.

Step-by-step DIY repair guide
This section walks you through a step-by-step repair workflow from prep to curing, with clear entry and exit criteria for each stage. It covers both small repairs and large patches, showing how to choose appropriate mixes and realistic time expectations without guessing. You’ll see prep, surface prep, repair application, finishing, and curing, plus when to move to the next step.
You’ll get practical reasons for each step, including visual quality checkpoints and how environmental factors affect curing. The guidance helps you decide scope, avoid common mistakes like over-wetting or skipping priming, and keep the job moving safely and predictably while documenting progress and outcomes.
Step-by-Step Repair Process
This sequence guides you through preparing the site, repairing spalled concrete, and ensuring a neat finish.
- Clear debris from repair area. Ensure no loose material remains.
- Assess moisture levels using a hygrometer. Mix only when surface is dry.
- Clean the damaged area thoroughly with an etching solution. Avoid over-wetting.
- Select and mix repair mortar according to instructions. Check consistency before application.
- Apply bonding agent to ensure good adhesion between old and new concrete. Follow manufacturer’s drying time.
- Place patch material in layers, feathering edges for a seamless look. Smooth surface with a trowel.
- Cure the repair by covering it with plastic sheeting or curing compound. Maintain humidity and temperature as per instructions.
Surface Prep and Cutting Out Damaged Concrete
Start by removing any loose material from the spalled area. Use a chisel or hammer drill to create clean edges around the perimeter for better bonding.
Clean exposed rebar thoroughly with wire brushes or sandblasting equipment, then apply rust inhibitor if necessary. This prevents further corrosion and ensures a strong bond between new and old concrete.
Filling, Finishing and Curing
Mix the repair material to a consistency that is slightly wetter than peanut butter. Apply a bonding agent to the prepared surface before placing the patch material.
Use a trowel or float to place the patch in layers, feathering edges carefully for a seamless finish. Smooth out any imperfections immediately after placement to match surrounding texture and color.
Cover the repair with plastic sheeting or use curing compound as recommended by the manufacturer. Maintain proper humidity and temperature levels during the curing period to ensure optimal strength development.
Common DIY mistakes and how to avoid them
Common DIY mistakes include poor surface prep, using the wrong repair mix or wrong consistency, and rushing the cure. Correct them by cleaning the area, removing loose material, and making sure the surface is dry enough for bonding. Do simple tests like a quick finger‑test for consistency and a basic tap check to gauge soundness after working it in.
Proper bonding and reinforcement matter because they prevent future cracks and failures. Take the time to abrade or key the area, apply a bonding agent if recommended, and provide adequate cover for any rebar or mesh. If you’re unsure, check the product label or datasheet, manufacturer instructions, and any local rules to confirm cure, moisture control, and protection requirements.
Errors that cause repeat spalling
Avoid these common mistakes to ensure your repair lasts and doesn’t lead to further damage.
- Skip corrosion treatment: Leaving rust-prone rebar untreated can weaken the concrete over time. Apply a protective coating before pouring new material.
- Inadequate cover for rebar: Insufficient concrete cover around reinforcing bars exposes them to moisture and accelerates corrosion. Follow code requirements for proper spacing.
- Overwatering repair mixes: Too much water weakens the bond between old and new concrete, leading to spalling. Mix according to manufacturer instructions.
- Poor surface prep: Failing to clean and roughen the substrate prevents a strong bond. Use wire brushes or grinders to key the area properly before applying repair material.
Making these corrections will help your concrete repair last longer without recurring issues.
Finishing and aesthetic mistakes
Avoid these common finishing errors to ensure a professional look for your repaired concrete.
- Mismatched texture: Feathering edges too much can create weak spots. Use a bull float or trowel to match the existing surface texture.
- Inconsistent color: Using different batches of repair material can cause noticeable discoloration. Mix small amounts at a time and blend well with the surrounding concrete.
- Over-troweling: Excessive smoothing removes aggregate, weakening the surface. Trowel only when necessary to achieve a smooth finish without removing aggregates.
- Poor edge control: Inadequate finishing around edges can lead to delamination and cracking. Use edge tools or boards to maintain consistent thickness and shape.
These tips will help you achieve a seamless, durable repair that matches the surrounding concrete aesthetically.
Preventive maintenance, cost considerations, and sustainable practices
Preventive maintenance for concrete means staying on top of sealant reapplication, drainage fixes, crack monitoring, and seasonal checks. It also means planning around sealant types, coatings, and waste-conscious options so protection lasts without trapping moisture.
DIY costs depend on materials and scope; use a rough read from the label and get local quotes for accuracy. Favor recycled aggregate mixes and low-embodied-carbon patch materials, minimize waste with precise mixing, and dispose of old sealants and debris according to local rules. Keep a simple maintenance checklist, note ideal weather windows, safety gear, and record results to measure long-term ROI and environmental impact.
Routine inspection and quick fixes to prevent spalling
Use this checklist every six months, especially before winter when de-icing salts can damage concrete.
- Check for cracks: Look for hairline fractures or wider splits. Fill small cracks with epoxy or polyurethane sealant.
- Inspect joints: Ensure control and expansion joints are clean and free of debris. Clean out any dirt or leaves.
- Look at corners: Check where walls meet concrete for signs of water damage or spalling. Seal these areas with a penetrating sealer.
- Test drainage: Ensure water flows away from the foundation, not towards it. Fix any clogged gutters or downspouts.
- Check sealant: Look for old or worn-out sealants around doors and windows. Reapply as needed to prevent moisture entry.
- Maintain walkways: Keep paths clear of ice and snow, using sand instead of salt when possible. This prevents damage from de-icing chemicals.
- Inspect roof: Check for leaks or missing shingles that could cause water to seep into the concrete below.
- Look at edges: Examine where driveways and sidewalks meet. Fill any gaps with a flexible sealant to prevent water from entering.
Quick rule: Regular checks catch issues early, saving money on big repairs later.
Environmental and disposal considerations
When removing old concrete or disposing of waste materials, follow local regulations to minimize environmental impact. Use low-VOC products like recycled aggregate mixes for new projects.
Properly dispose of sealants and other chemicals by checking with your city’s hazardous waste collection program. This prevents harmful substances from entering waterways.
Reduce job site waste by carefully measuring materials needed, using reusable containers for mixing concrete, and recycling leftover aggregates or concrete debris when possible.
Case studies, troubleshooting guide and final checklist
This section breaks down two DIY‑friendly scenarios you’re likely to face on your project: a small sidewalk spall and a larger garage slab patch, each with clear before/after steps, materials used, and outcomes so you can judge results and plan your work. You’ll see how assessment, surface prep, substrate remediation, patch selection, application, leveling, curing, and final inspection come together in real life. You’ll also find a quick troubleshooting reference for common problems and a concise final checklist you can print or follow on site. The goal is to give you practical, step‑by‑step guidance you can actually use without guessing.
Why it matters: these examples mirror what you’ll encounter, helping you spot issues early and choose the right patching mortar or resurfacers, bonding agents, and curing approaches. You’ll learn how to avoid common DIY mistakes, plan around weather and substrate condition, and document progress so you’re confident in the finish. The section also ties together the workflow into a simple, repeatable process you can apply to future projects, with a printable checklist that covers key steps, timing, and quality checks for on‑site reference.
Two short DIY project examples
Use this checklist for small sidewalk spalls and larger garage slab patches to ensure a smooth repair process.
- Assess damage: Check extent of spalling; confirm with measurements. Skipping can lead to inadequate repairs.
- Surface prep: Clean area thoroughly; verify cleanliness by visual inspection. Neglecting this step causes poor bonding.
- Select material: Choose patching mortar based on depth and width; confirm type matches repair needs. Incorrect choice leads to weak patches.
- Cut out damaged concrete: Use chisel or grinder; check for clean edges. Inadequate cutting results in uneven repairs.
- Apply bonding agent: Ensure surface is primed before patching; confirm with visual inspection. Skipping this step causes poor adhesion.
- Patch and level: Fill area evenly, then smooth surface; verify flatness with straight edge. Uneven patches lead to tripping hazards.
- Cure properly: Cover patch with curing compound; confirm coverage by visual inspection. Inadequate curing results in weak repairs.
- Inspect final work: Check for cracks, uneven areas, or poor bonding; verify quality visually and physically. Neglecting this step risks future spalling.
Quick rule: Follow each step carefully to ensure a durable repair that lasts.
Final quick-reference checklist
Use this one-page checklist for all spalling repairs from assessment through final inspection.
- Assess damage: Measure extent of spalling; confirm with visual and physical checks. Skipping leads to inadequate repair materials.
- Select tools: Gather chisel, grinder, trowel, straight edge; verify availability before starting work. Missing tools delay repairs.
- Prepare surface: Clean area thoroughly; check cleanliness visually. Inadequate prep causes poor bonding.
- Cut out damage: Use chisel or grinder to remove damaged concrete; confirm clean edges by visual inspection. Skipping this step results in uneven patches.
- Select material: Choose patching mortar based on repair needs; verify type matches depth and width of spall. Incorrect choice weakens repairs.
- Apply bonding agent: Prime surface before patching; confirm with visual inspection. Skipping this step causes poor adhesion.
- Patch and level: Fill area evenly, then smooth surface; verify flatness with straight edge. Uneven patches lead to tripping hazards.
- Cure properly: Cover patch with curing compound; confirm coverage by visual inspection. Inadequate curing results in weak repairs.
- Inspect final work: Check for cracks, uneven areas, or poor bonding; verify quality visually and physically. Neglecting this step risks future spalling.
Quick rule: Follow each checklist item to ensure a durable repair that lasts.
Conclusion
Spalling concrete is a safety and durability issue you can address, but you must stay disciplined about planning, proper materials, and careful execution. When you do it right, you restore strength, improve appearance, and reduce future costs.
Check in this order: confirm the area and extent of damage, identify likely causes, don your PPE, gather the right tools and material specs, prepare and clean the surface, test a small patch, then follow the repair steps step by step and cure as directed. Work methodically, in dry conditions, and verify each stage before moving on.
Common mistakes to avoid include rushing the patch, using the wrong materials or mix ratios, and skipping surface prep or curing time. Always follow safety rules: wear eye protection and a respirator or mask as needed, keep power tools guarded, unplug or shut off power when working near utilities, and vent or pause if conditions are unsafe. Test a small area first and don’t push a repair beyond its limits.
If the damage is extensive, the concrete shows severe cracking, rebar is exposed or corroded, or you’re unsure about the structural load, call a professional. Sometimes a pro is the fastest path to a durable, code-compliant result. Stay steady, follow the steps, and you’ll keep the project moving with confidence.
FAQ
What causes spalling in concrete?
Spalling happens when moisture inside the concrete freezes and expands, or when the surface is damaged by heavy use and poor finishing. Poor mix or sealers can also let water get in and soak through. Keep it simple: water plus freeze or wear equals spalled edges.
Can I fix spalling myself, or should I hire a pro?
You can patch small spots, but big spalling means structural damage or hidden moisture. If you see deep chips, big flakes, or repeating spots, bring in a pro. Don’t waste time on a quick stab at it if it keeps coming back.
What tools and materials do I need for a DIY patch?
You’ll need a chisel, hammer, wire brush, shop vac, and a cement patch product rated for exterior use. A stiff broom and a level help too. Read the patch product instructions and follow safety gear on the label.
How can I prevent spalling in the future?
Seal the surface properly after cleaning, and fix cracks early. Keep water away from the area with good drainage and proper slope. Use a breathable patch or coating so moisture can escape, not trap.