
Introduction
Self-leveling overlay over concrete is a pourable cement-based or polymer-modified material that evens a slab, and the right primer and prep are what stop it from debonding. Before you mix anything, clean and mechanically profile the slab, repair cracks and holes, and read the overlay and primer instructions for recommended substrates and pot life.
Think of this as a short, hands-on job: proper bonding comes from solid prep, correct primer, and following the manufacturer’s mixing and application windows. If the overlay sags, cracks, or separates later, check adhesion, surface profile, primer coverage, moisture, and whether the mix was applied within the stated working time.
Key takeaways
- Define self-leveling concrete as a flowing, cement-based overlay that fills low spots.
- Assess substrate for moisture and bond surface before primer to prevent debonding.
- Choose primer per manufacturer directions; mismatched products risk curling, delamination.
- Prepare and clean concrete thoroughly; remove contaminants and fill cracks before mixing.
- Control moisture and cure conditions; follow safe ventilation and PPE during work.
- Expect possible troubleshooting: inadequate leveling, cracking, or debonding; inspect and repair promptly.
Table of Contents
- Introduction
- Key takeaways
- What a Self-Leveling Overlay Is and Where to Use It
- Assess the Existing Concrete Substrate Before Work
- Moisture Testing and Mitigation to Prevent Debonding
- Choosing the Right Primer and Overlay Product
- Surface Preparation and Priming — Step-by-Step
- Mixing, Pouring, and Finishing Best Practices
- Curing, Protection, and Timing for Subsequent Flooring
- Troubleshooting, Repairs, Cost Factors, and Safety
- Conclusion
- FAQ
What a Self-Leveling Overlay Is and Where to Use It
A self-leveling overlay is a cementitious or polymer-modified topping formulated to flow and flatten under its own weight, creating a smooth, level surface over existing concrete. Unlike traditional concrete, it is engineered for thin lifts and high flow; unlike self-leveling underlayments meant solely under floor coverings, overlays can be finish surfaces or base layers for toppings.
Common uses include bringing worn or slightly uneven slabs back to level, smoothing minor surface irregularities, and placing a thin overlay over sound, cured concrete. It is not the right fix for slabs with major structural damage, uncontrolled rising moisture, or substrates that cannot be made sound and clean; verify product depth limits and moisture compatibility on the product label or technical data sheet before proceeding.
How overlays differ from self-leveling concrete and mortars
Self-leveling overlays aren’t your typical concrete or mortar. They’re designed to flow, level, and harden on their own.
Composition: Overlays are made of cement, fine aggregates, and chemical additives for flow and set control. Traditional concrete has coarser aggregates, while mortars have a higher cement-to-sand ratio.
Flow properties: Overlays can spread out on their own due to their fluid consistency. Concrete and mortars require manual leveling or screeding.
Thickness: Overlays are typically applied in thin layers (1/4″ to 2″), unlike concrete which can be poured much thicker.
Typical uses and when not to use an overlay
Overlays shine in renovation projects where you want to level worn slabs or minor substrate irregularities. They’re also great for thin overlays over existing concrete.
Not suitable: Don’t use overlays on high-moisture substrates. They won’t bond well and could lead to debonding. Also, avoid using them for large structural repairs; they’re not designed to bear heavy loads or fix major issues.
Remember, overlays are a quick, easy solution for minor problems. If your concrete has serious cracks, is sinking, or has other major issues, you’ll need to address those first before applying an overlay.
Assess the Existing Concrete Substrate Before Work
Start with a methodical inspection: document cracks, spalls, prior repairs, displacement, scaling, efflorescence, and any signs of active moisture. Take photos, map highs and lows, and note locations of visible contaminants or coatings that could block adhesion.
Plan and record moisture tests appropriate for the slab and intended use, then evaluate surface profile and porosity to decide if grinding, shot blasting, or etching is needed. Determine structural soundness and outline repair steps (crack sealing, patching, edge prep) compatible with the overlay; keep a checklist and measurements to guide material selection and sequencing.
Visual inspection and surface condition checklist
Before you start any prep work, use this checklist to inspect your concrete slab visually. It’s quick and helps catch issues early.
- Cracks: Check for hairline cracks or wider ones. Cracks can compromise the overlay’s bond.
- Spalling: Look for flaking, peeling, or chipping. This indicates weak concrete that needs repair.
- Scaling/efflorescence: Check for white powdery deposits. These can affect adhesion.
- Moisture signs: Search for damp spots, water stains, or mold. Moisture ruins overlays.
- Prior repairs: Inspect any previous fixes. They might need reinforcing before overlaying.
- Displacement/movement joints: Check if they’re intact and functioning properly to prevent future cracking.
- Contamination (oil, dust): Look for anything that could hinder adhesion.
- Uneven surface: Note high/low spots. These might need leveling before overlaying.
Quick rule: If you skip this step, you risk debonding and premature failure of your overlay.
Structural and adhesive testing: pull-off and lab options
Sometimes, visual checks aren’t enough. Here’s when to perform further tests.
Pull-off adhesion test: This is a quick, on-site method to check the bond strength between your existing slab and the overlay. Do this if you suspect weak adhesion or have seen debonding issues elsewhere.
Here’s how: Attach a pull-off tool to the surface, apply force until it breaks off. The force required is your adhesion strength. Compare this with the manufacturer’s recommended values.
Laboratory analysis: If you’re unsure about moisture content or need detailed info on your concrete’s composition, send samples to a lab. They can perform tests like ASTM D4546 (moisture content) and ASTM C1382 (adhesion).
Results from these tests guide your prep work and material selection. If adhesion or moisture levels are too high/low, you might need to treat the surface or choose a different overlay.
Moisture Testing and Mitigation to Prevent Debonding
Moisture is a frequent cause of bond failures: excess vapor or liquid at the slab surface can prevent primers and overlays from adhering and can produce pinholes or delamination. Use the test method recommended by the overlay manufacturer and record results to compare against the product limits shown on the technical data sheet.
Accepted tests include in-situ relative-humidity probes, moisture-vapor-emission tests, and surface-sprint checks—choose the method that matches the product’s testing criteria and the slab conditions. If readings exceed limits, document mitigation steps such as extended drying, dehumidification, moisture-reducing primers or vapor-control coatings, and schedule re-testing after those measures; consult manufacturer instructions or tech support for approved remediation options.
Common moisture tests to use and what they tell you
Moisture testing is crucial before applying a self-leveling overlay. It helps prevent debonding by identifying potential issues early.
Relative Humidity (RH) Testing, like ASTM F2170, measures moisture content within the slab. It’s ideal for new or suspect slabs. It tells you if your slab is dry enough (< 75% RH).
Calcium Carbide/Marc Test checks moisture vapor emission rate at the surface. Use this when RH tests are inconclusive or if there’s a history of moisture issues. It helps decide if additional mitigation is needed.
Surface Moisture Tests, like calcium chloride or infrared scans, quickly check surface moisture. They’re useful for spot checks but shouldn’t replace in-depth testing.
Mitigation options: vapor control and membrane choices
If tests show high moisture, don’t panic. There are ways to mitigate it before overlaying.
Topical Membranes are roll-on or spray-on barriers that prevent moisture from reaching the overlay. They’re great for moderate moisture issues but may not handle heavy vapor loads alone.
Liquid-applied Barriers are similar to topical membranes, but they’re painted on. They provide a continuous barrier and can be used in conjunction with other mitigation strategies.
Vapor Mitigation Systems, like dehumidifiers or active moisture control systems, reduce moisture levels in the space itself. They’re ideal for high-moisture areas or when other methods aren’t enough. Always follow manufacturer guidelines and coordinate with tech support.
Choosing the Right Primer and Overlay Product
Primers serve as the interface between the concrete and the self-leveling material, promoting adhesion, controlling substrate moisture absorption, and protecting against outgassing that can cause bubbles. Match primer chemistry to overlay chemistry and to the concrete condition—porous, dusty, previously coated, or damp slabs may need different primer types.
Select based on overlay depth, expected traffic, and the slab’s moisture presentation, and confirm compatibility by checking product labels and compatibility charts. Plan application sequencing, ventilation and recoat windows per the manufacturer, and perform a small adhesion or pull-off test if unsure before full-field work.
Primer types and how they promote adhesion
Primers for self-leveling overlays typically fall into two categories: water-based and solvent-based. Each has its own bonding mechanism.
Water-based primers, also known as latex primers, create a bond through mechanical interlocking. They penetrate the substrate’s pores and create tiny hooks that the overlay can grip onto.
Solvent-based primers, on the other hand, form a chemical bond with the substrate. They dissolve into the surface, creating a strong adhesive layer for the overlay to stick to.
Selecting an overlay product for application and performance
When choosing an overlay product, consider its intended use and the conditions it will face. For thin overlays (less than 1/4 inch), you might opt for a fast-setting, easy-to-apply product. For thicker overlays, choose one designed to handle the depth without slumping or cracking.
Also, consider the curing profile. If your project requires a quick turnaround, select an overlay with a short cure time. But remember, faster cures often mean less time for the overlay to develop its full strength.
Lastly, check manufacturer compatibility data. Some overlays work best with specific primers or require certain application conditions (like temperature or humidity). Always follow the manufacturer’s guidelines to ensure a strong bond and successful installation.

Surface Preparation and Priming — Step-by-Step
A reliable overlay starts with a clean, stable slab: remove dust, laitance, oils, curing compounds, and any loose material, and confirm moisture is within the overlay product’s allowable range. Mechanical profiling (grinding, shot blasting, or scarifying) is usually required to achieve the surface texture needed for bonding.
Repair cracks, control joints, and spalls with compatible fillers or epoxies, and prepare edges so the overlay can feather or terminate cleanly. Apply the selected primer per its instructions—document ambient and substrate conditions, allow the recommended tack time, and do a final check for no standing water before pouring the overlay.
Step-by-Step Process
The following steps ensure your concrete slab is properly prepared and primed for a reliable self-leveling overlay pour.
- Assess the slab’s condition. It should be clean, stable with no loose material, and have verified moisture levels to prevent debonding.
- Clean the surface using a broom, vacuum, degreaser, and etching if required. Remove curing residues, dust, oils, sealers, and contaminants.
- Lightly profile or scarify high spots using mechanical tools. Vacuum up debris.
- Identify cracks and control joints. Repair with appropriate crack fillers or epoxy injections, widening any cracks for better adhesion if needed.
- Choose a compatible primer and apply evenly to damp or dry surfaces per guidelines. Allow the correct tack time before pouring.
- Perform a final wipe-down to remove any remaining debris or contaminants.
- Confirm no standing water remains on the surface.
- Check ambient conditions, ensuring they meet the self-leveling product’s specifications.
- Document all steps for traceability and future reference.
Mechanical preparation: grinding, shotblasting, and removal of contaminants
Mechanical profiling is preferred as it ensures a clean, textured surface that promotes better adhesion for the self-leveling overlay.
Why mechanical profiling? It removes weak layers, exposes fresh concrete, and creates micro-texture for better primer adhesion.
Your goal is to achieve a clean, textured surface free of contaminants. This can be done through grinding, shotblasting, or other mechanical methods that remove the top layer of concrete.
After profiling, vacuum up all debris. A clean, textured surface ready for priming will have a uniform appearance with no visible contaminants or loose material.
Primer application, dwell time, and visual checkpoints
Use this checklist to ensure proper primer spread, open time, and readiness for overlay placement.
- Spread evenly: Apply the primer using a roller or sprayer, ensuring even coverage across the entire surface.
- Check tackiness: After application, allow the primer to sit until it reaches the correct level of tackiness. This is when the surface feels slightly sticky but does not transfer material onto your gloved hand.
- Avoid over-application: Too much primer can lead to excessive absorption and poor adhesion. Follow product guidelines for application rates.
- Monitor drying time: Allow the primer to dry according to the manufacturer’s recommendations before applying the self-leveling overlay.
- Check humidity levels: Ensure relative humidity is within the specified range to prevent debonding and ensure proper curing of the overlay.
- Avoid direct sunlight: Excessive heat from direct sunlight can cause the primer to dry too quickly, leading to poor adhesion. Keep the area shaded if possible.
- Inspect for defects: Look for any missed spots, incomplete coverage, or other defects that could compromise adhesion.
- Confirm no standing water: Any remaining water can cause debonding and ruin your overlay pour.
- Check ambient temperature: Ensure the temperature is within the specified range for both primer application and overlay placement.
Quick rule: Always follow manufacturer guidelines for specific products, as they may have unique application requirements or recommendations.
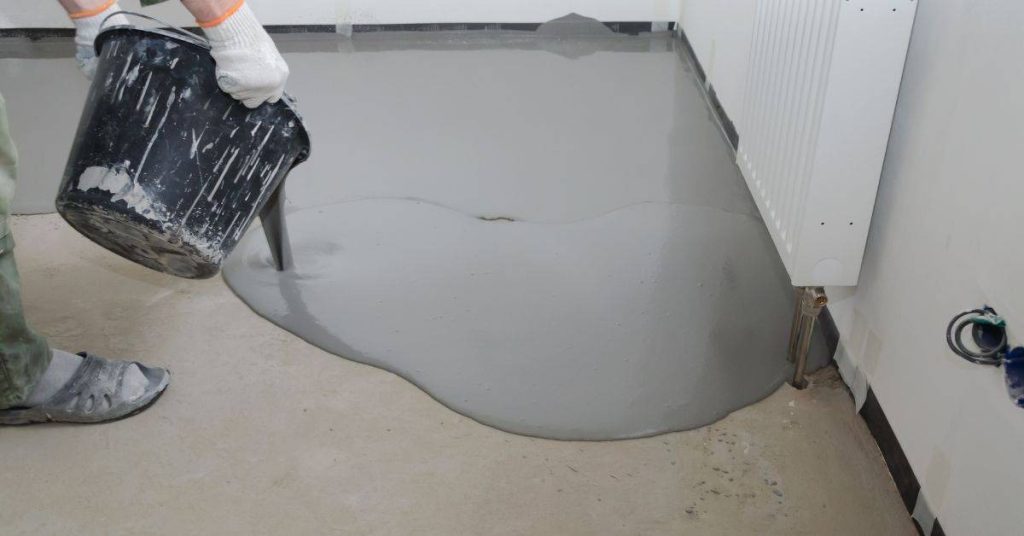
Mixing, Pouring, and Finishing Best Practices
Mix each batch to a uniform consistency using the mixer type recommended for the product and follow the manufacturer’s guidance for water or liquid ratio—avoid over-mixing and excessive speed to reduce entrained air. Work in planned batches to maintain continuous flow and minimize cold joints; know the product’s pot life and sequence pours so edges stay wet and bond together.
Pour gently and use squeegees, gauge rakes, or flow guides to move material; use low-speed mixing, gentle pouring, and optional rolling or vibration to release trapped air and prevent pinholes. Time any backrolling or light finishing to the product’s finishing window, and control curing conditions to avoid rapid moisture loss or temperature swings that can lead to cracking or debonding.
Mixing and equipment checklist
Before you start mixing, go through this checklist to ensure a smooth process and quality results.
- Check manufacturer’s instructions: Always follow the specific product guidelines for water-to-powder ratio and mixing duration. Ignoring these can lead to weak or poorly leveling overlay.
- Use right mixer: A drill with a paddle attachment works well for small batches, while dedicated forced-action mixers are ideal for larger jobs. Using the wrong tool can introduce air bubbles.
- Water temperature: Use warm water (around 70°F/21°C) to speed up hydration and improve consistency. Cold water can slow down setting time.
- Avoid lumps: Ensure all powder is fully incorporated before adding water. Lumps left unbroken can cause uneven leveling and weak spots.
- Batch size: Mix only what you can pour within the product’s work time to prevent waste and ensure consistent overlay quality.
- Mixing duration: Follow manufacturer’s guidelines, usually around 2-5 minutes. Overmixing can introduce air, while undermixing leaves lumps.
- Consistency check: The mixed product should have a smooth, pudding-like consistency. Too thick or thin can cause leveling issues and weak spots.
- Pot life timer: Set a timer for the product’s pot life to know when to start pouring. Working too slowly can result in setting material being poured, leading to poor results.
Quick rule: Always follow manufacturer’s instructions and keep your workspace clean to minimize contamination and ensure optimal performance.
Pouring technique and leveling strategy
Proper pouring techniques help achieve a smooth, even overlay without cold joints or edge collapse.
Control flow: Pour material from one corner of the area, using a controlled, steady stream. Pushing or dumping can cause air entrapment and uneven leveling.
Use gauge tools: Screed guides or edging help maintain a consistent depth and prevent edge collapse. Adjust as needed to ensure even leveling across the entire surface.
Maintain wet edge: Work in manageable sections, keeping the material wet at the edges to avoid cold joints. If you must stop, feather the edge of the last poured section to blend with the next pour.
Finishing, smoothing, and edge treatments
Proper finishing techniques ensure a smooth, even surface that’s ready for final curing and use.
Finishing passes: After pouring, use a trowel or backroller to remove excess material and smooth the surface. Make multiple passes, working from one end of the area to the other, to achieve an even finish without rolling or feathering marks.
Edge troweling: Use a straight edge trowel to level and smooth edges, ensuring they’re flush with the main surface. Be careful not to introduce air pockets at corners or edges.
Transitions: When pouring adjacent areas, feather the edge of the last poured section to blend it with the new pour. This helps prevent cold joints and ensures a seamless transition between surfaces.
Curing, Protection, and Timing for Subsequent Flooring
Follow the overlay manufacturer’s curing criteria—temperature, humidity, and time-to-traffic or time-to-cover—because these directly affect adhesion of adhesives and floor coverings. Protect the overlay from drafts, direct sun, or cold that can accelerate or slow drying unevenly; use temporary enclosures, sheeting, or controlled HVAC as needed.
Before installing adhesives or floorings, confirm moisture and temperature are within the flooring manufacturer’s required limits and keep test records. If conditions deviate, extend cure times, re-test per the specified method, or consult product tech data and document the clearance for flooring installation.
Protecting the fresh overlay during initial cure
The first few hours of curing are crucial for your self-leveling overlay. You need to protect it from rapid drying, drafts, and contamination.
Use plastic sheeting or towels to cover the area. Keep drafts out by closing windows and doors. If possible, create a temporary enclosure around the area with plastic sheets taped at the edges.
If you’re working indoors, control the environment as much as possible. Maintain a consistent temperature between 70-85°F (21-29°C) and keep humidity levels around 40-60%.
Do not expose the overlay to direct sunlight or extreme temperatures during this period.
When and how to install floor coverings after overlay
Before you install any floor covering, you need to ensure the overlay is fully cured and ready for adhesives or tile.
First, check with the manufacturer’s data sheet. It will specify the minimum cure time before installing floor coverings. This is typically 24-72 hours but can vary depending on the product.
Perform a moisture/vapor test using a calcium chloride test kit or a hygrometer. The overlay should not exceed the following moisture levels for common floor coverings:
- Ceramic tile: 3 lbs/1000 sq ft/24 hrs (ASTM F2170)
- Resilient flooring: 5 lbs/1000 sq ft/24 hrs (FCW-1)
If the overlay is within acceptable moisture levels, it’s ready for adhesives or floor coverings. If not, allow more time to cure and retest.
Troubleshooting, Repairs, Cost Factors, and Safety
Common failures include debonding from moisture migration, contamination, poor surface profile, or using the wrong primer—diagnose with moisture tests, surface profile checks, and adhesion tests. For repairs, plan mechanical abrasion or appropriate chemical prep, address cracks with suitable fillers, re-prime with a compatible system, and only reapply overlay when all tests are within limits.
Budget for primer, repair mortars, overlay material, tools or rentals, and contingency for moisture remediation or larger substrate repairs. Prioritize safety: wear appropriate PPE, control silica dust, ventilate the workspace, follow SDS guidance, and dispose of waste per local rules; bring in a pro for complex moisture, large structural repairs, or where warranties require certified installers.
Diagnosing debonding and repair options
Debonding and cracking can be surface or substrate failures. Look for signs like flaking, delamination, or wide cracks.
Surface failure: Often caused by improper priming or contamination. Remove affected areas, clean, and re-prime.
Substrate failure: Indicates deeper issues like moisture migration or structural problems. Consider localized removal, full replacement, or consulting a pro.
Cost drivers, labor planning, and scheduling tips
Major costs include prep work, materials, and labor. Complex prep increases cost. Skilled labor adds to the bill.
Scheduling: Plan for cure times and follow-up flooring installation. Check manufacturer guides for precise estimates.
Consider access issues – hard-to-reach areas may add to labor costs.
Jobsite safety, waste handling, and environmental considerations
Safety: Use PPE – respirators, gloves. Control silica dust. Ventilate work areas.
Properly dispose of wash water and unused materials according to local regulations. Don’t dump on-site or down drains.
Environmental impact: Reduce VOCs by choosing low-VOC primers and sealers. Reuse or recycle leftover materials where possible.
Conclusion
Getting this right protects your floor, your budget, and your safety. When you prep, test, and follow the right primer and overlay steps, you get a bond that lasts and a smooth surface that looks good for years.
First, check the substrate and moisture, choose compatible products, and then follow the surface prep and priming steps exactly as outlined. Decide on the mix, pour, and finish in a calm sequence, keep the work area clean, and protect the new layer during curing. Do moisture testing, use the right primer, mix and pour carefully, and plan the curing window before you install the next flooring.
Common mistakes to avoid are skipping the moisture test or using the wrong primer, rushing the pour or not keeping the area protected, and ignoring safety gear or manufacturer cure times. Stay disciplined: wear eye protection and gloves, ventilate as needed, and don’t work on a substrate that shows movement or cracks. If you’re uncertain about moisture readings, substrate damage, or proper product compatibility, pause and reassess rather than forcing a result.
If the substrate is complex, moisture is high, there are active cracks, or tests show poor adhesion potential, it makes sense to call a professional. Otherwise, follow the proven steps, respect the cure, and you’ll finish with a solid, durable floor. Stay focused and finish strong.
FAQ
What is self-leveling concrete and how does it differ from regular concrete?
Self-leveling concrete is a pourable mix designed to flatten out on its own. It spreads evenly across the surface, filling low spots without heavy troweling. It’s used to create a smooth base for floors over concrete slabs.
What preparation steps are essential before applying self-leveling overlay?
Clean the surface thoroughly and remove all debris, paint, and sealers. Check for moisture and repair large cracks or damaged edges. Follow the product label for substrate priming and any patching requirements.
How should I think about cost when planning this job?
Costs vary by product type, coverage area, and required prep work. Get a clear estimate that includes primer, overlay, and any moisture mitigation and curing measures. Always check the manufacturer instructions and local rules for what’s approved on your project.
What common problems should I watch for and how can I prevent them?
Inadequate leveling, cracking, or debonding can happen if moisture, temperature, or surface prep is off. Keep temperatures and humidity in the acceptable range for the product, and follow timing between prep, priming, and pouring. If you see curling or separation, stop and recheck the substrate and adhesion guidance from the product label.