

Introduction
Residential roofing building codes give the standards that ensure your roof is safe, legal, and long-lasting.
In this guide you’ll learn what the codes require, what to check during planning and installation, and common mistakes to avoid.
The discussion offers practical steps, real-world examples, and general guidelines for navigating permits, inspections, and contractor work.
Key takeaways
- Understand local codes govern roof materials, spans, fasteners, and vent placement.
- Obtain permits before work; inspections verify code compliance and safety.
- Pre-install planning prevents defects: ensure attic clearance, measurements, and load calculations.
- Correct underlayment, flashing, and drip edge are common code failure points.
- Proper ventilation and attic moisture control prevent condensation and rot risks.
- Documentation and timely inspections help avoid warranty and code disputes.
Table of Contents
- Introduction
- Key takeaways
- Why building codes matter for residential roofs
- Common local requirements and permit basics
- Pre-installation checks and planning (avoid these early mistakes)
- Installation elements that commonly fail code or void warranties
- Ventilation, attic interaction, and thermal/ moisture control
- Permitted exceptions, overlays, and structural capacity checks
- Permits, inspections, documentation, and avoiding common compliance mistakes
- Post-installation checks, maintenance, and long-term considerations
- Conclusion
- FAQ
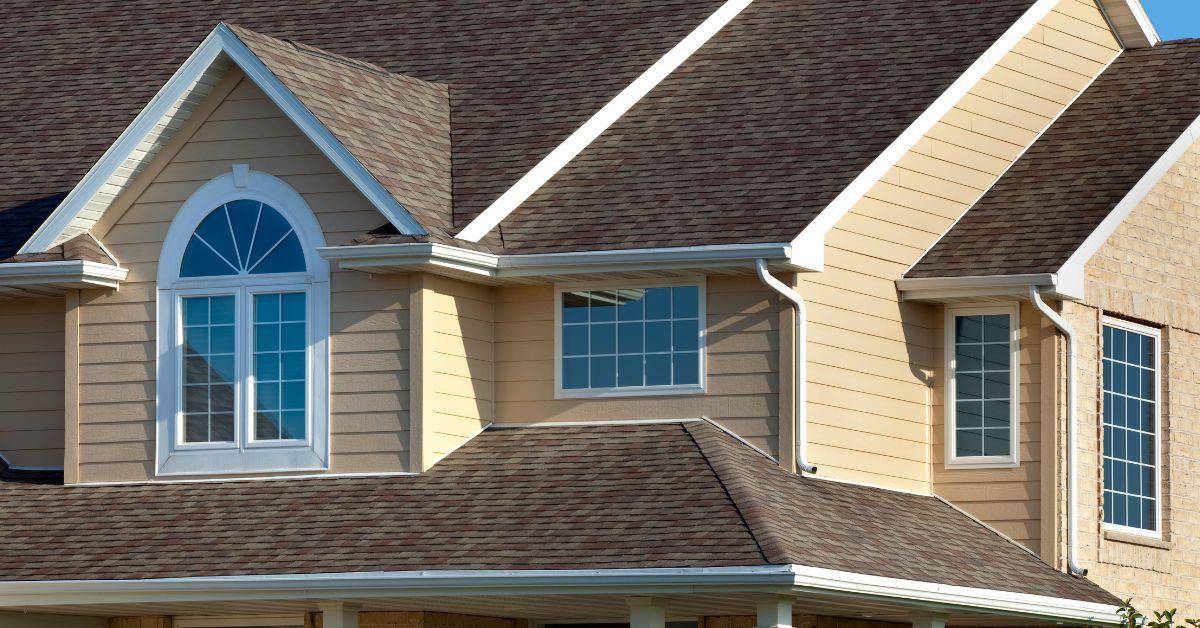
Why building codes matter for residential roofs
Building codes establish the safety baseline for a roof project. They address structural integrity, fire resistance, weather resistance, and predictable performance over time. Compliance also influences insurance coverage and warranties, so noncompliance can lead to serious consequences.
Codes guide roof design choices like slope, structural loads, attic ventilation, and insulation requirements. They set standards for underlayment, flashing details, fasteners, and nailing patterns to support manufacturer warranties. The path to compliance typically involves permits, inspections, and documented verification that the work meets current rules and local amendments.
Key Code Areas That Impact Roofs
Building codes have specific sections dedicated to roofing. Here are the key areas you should know about:
Structural Load: Codes dictate how much weight your roof can support, including snow and ice.
Wind Resistance: They specify wind speeds your roof must withstand, ensuring it stays put in storms.
Fire Classification: Roofing materials are rated for fire resistance. Codes tell you which classes are allowed in your area.
Flashing and Underlayment: Codes dictate how these crucial waterproofing elements must be installed to prevent leaks.
Ventilation: Proper attic ventilation is key to preventing moisture buildup. Codes outline required vent sizes and placement.
Snow/Ice Provisions: In cold climates, codes may require ice shields or other protections against snow and ice damage.
How Codes Interact With Manufacturer Instructions
Manufacturer guidelines are important, but they’re not the be-all-end-all. Here’s why:
Building codes set minimum standards for safety and performance. Following just the manufacturer’s instructions might not meet these standards.
For example: A manufacturer might suggest a certain nailing pattern, but your local code could require a more robust one to withstand wind speeds in your area.
That’s why it’s crucial to follow both. If you don’t, you risk failed inspections, voided warranties, and even unsafe roofs.
Always check with your local building department to ensure your chosen materials and installation methods comply with local codes.
Common local requirements and permit basics
Permits cover the roof project and may include related electrical or structural considerations. Tear-off versus roof-over decisions can trigger different permit needs and inspections. Variations exist between jurisdictions and HOA guidelines, so verify specifics with the local building department.
Determine when a permit is required versus simple maintenance, especially for scope changes like adding skylights or new ventilation. Follow the step by step process from pre-submittal to final approval, and keep documentation organized. Inspections occur at key milestones, and preparation helps avoid delays caused by missing items.
What inspectors look for on residential roofing jobs
When it comes to residential roofing, inspectors have a checklist to ensure your job meets code. Here’s what they’re looking for:
Underlayment: They’ll check if you’ve used the right type and if it’s properly installed.
Flashing details: Flashing around chimneys, vents, and skylights is crucial to prevent leaks. Inspectors will ensure yours is up to snuff.
Fastener type/spacing: They’ll make sure you’re using the right fasteners and that they’re spaced correctly according to code.
How to prepare permit-ready documentation
Before submitting your permit application, gather these documents:
Scope of work: A detailed description of what you plan to do. Include tear-off vs. roof-over, materials, and any added features.
Material specs: Provide details on the materials you’ll use, like shingle type, underlayment, etc.
Manufacturer instructions: If you’re using a specific product, include its installation guidelines to show compliance with codes.
Code sections cited: Look up and include the relevant code sections your project adheres to. This shows inspectors you’ve done your homework.
Pre-installation checks and planning (avoid these early mistakes)
Before ordering materials, assess the roof deck for rot, sagging, or delamination so you know what needs repair or replacement. Precise measurements and layout help confirm material quantities and fit. A clear plan reduces surprises during installation.
Evaluate attic ventilation, insulation, and access constraints that affect performance. Inspect flashing, underlayment, and drip edges to spot issues early. A professional inspection and written recommendation set a solid foundation for your project.
Accurate measurement and material takeoffs
Getting your measurements right is crucial for a successful roofing job. Incorrect quantities can lead to delays, waste, or even poor-quality work.
- Roof area: Measure length and width of each plane, then multiply. Divide by 100 for square footage (100 sq ft = 1 roofing ‘square’).
- Waste factor: Add 5-10% to your total for waste, cuts, and mistakes.
- Roofing material: Choose based on spec/ratings. Metal and tile are durable but heavy; asphalt shingles are lighter but less long-lasting.
- Underlayment: Use 15 lb felt or synthetic underlayment for added protection against moisture.
- Avoid over-ordering: It’s tempting to buy extra, but it can lead to waste and storage issues. Order what you need plus a little extra.
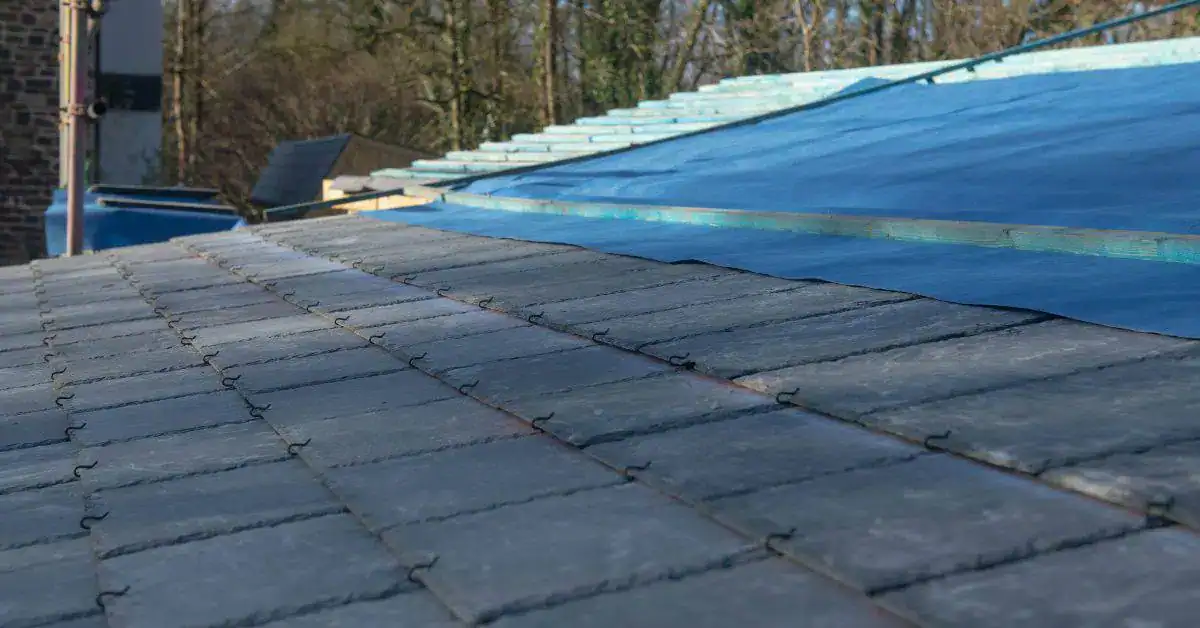
Weather, scheduling, and site logistics
Timing your roof installation right can save you from weather-related headaches. Here’s how to plan:
Choose your installation window: Avoid peak summer heat or winter cold. Check local forecasts for rain or snow.
Stagger deliveries: Have materials delivered just before they’re needed to prevent damage or theft. Coordinate with your supplier.
Protect the site: Cover landscaping, seal off vents and chimneys during work, and keep pets and children away from the work area for safety.
Installation elements that commonly fail code or void warranties
Critical assemblies like underlayment, ice and water shield, and flashing at vents or chimneys are frequent failure points. Proper alignment and connections at edges and transitions matter for weatherproofing. Addressing these areas helps protect warranty coverage and code compliance.
Fastening patterns and shingle exposure must meet protocol for wind resistance and water shedding. Ventilation details, drip edge installation, and fascia/soffit compatibility also impact performance. A quick field checklist helps installers and inspectors spot red flags before they become costly issues.
Underlayment and Ice/Water Protection Requirements
Listen up, DIYers. Underlayment and ice/water protection are your first line of defense against leaks. Here’s what you need to know:
Check product labels. Not all underlayments are created equal. Some are just felt paper, others are synthetic. Synthetics are usually better, but check the label for specifics on your roof design.
Now, ice/water protection. This goes on before your shingles, in critical areas like eaves, valleys, and hips. It’s a sticky membrane that seals those spots where water likes to hide. Here’s how:
Start at the eaves. Run it up the roof, overlapping each strip by at least 6 inches. In valleys, overlap both sides by 24 inches. On hips, stagger the laps and overlap by 18 inches. And remember, always follow manufacturer instructions. They know their stuff.
Flashing, Valleys, and Penetrations
Proper flashing is your roof’s first line of defense against leaks. Here’s how to get it right:
Step Flashing: Install step flashings along walls where the roof meets them. They should extend up behind the siding and be sealed with a compatible sealant. Each shingle course above the flashing should overlap the one below, creating a stair-step effect.
Chimney Counterflashing: Chimneys need special attention. Install counterflashings that wrap around the chimney and extend at least 2 inches above the roof surface. They should be sealed with a compatible sealant and secured with masonry nails or screws.
Valleys: Valleys are where two roof planes meet. You’ve got options here: open metal valleys, closed metal valleys, or shingled valleys. Whichever you choose, ensure they’re properly sealed at the bottom and sides to prevent leaks.
Penetrations: Plumbing stacks, skylights, and other penetrations need special detailing. Use flashing kits designed for each penetration type. Follow manufacturer instructions carefully, ensuring all flashings are properly seated, sealed, and secured.
Fasteners and incompatible materials
Using the right fasteners and compatible materials is crucial for a durable, long-lasting concrete job. The wrong choices can lead to corrosion, weak bonds, and even void warranties.
- Stainless Steel Fasteners – Used in reinforced concrete. Look for ASTM A447 or A582 ratings. Cheap homeowner drill is fine. Avoid galvanized fasteners as they can cause galvanic corrosion with steel reinforcement, leading to cracking and staining.
- Epoxy-Coated Rebar – Used in harsh environments like marine structures. Look for ASTM A934/A934M standards. Hire or rent an epoxy coating machine if you don’t own one. Protects rebar from corrosion, preventing cracking and structural damage.
- Type N Mortar – Used in most residential concrete work. Look for ASTM C270/C270M standards. Avoid Type S mortar unless specified as it’s too strong for most DIY jobs, causing excessive shrinkage and cracking.
- Expansion Joints – Used to control cracking due to concrete shrinkage and temperature changes. Look for ASTM C1362/C1362M standards. Cheap homeowner drill is fine. Improper installation can lead to premature failure, causing unsightly cracks.
- Waterproofing Membranes – Used in below-grade and water-retaining structures. Look for ASTM D4869/D4869M standards. Hire or rent application equipment if you don’t own one. Improper installation can lead to leaks, causing damage to the structure and its contents.
- Concrete Sealer – Used to protect concrete from moisture, stains, and freeze-thaw cycles. Look for ASTM D4946/D4946M standards. Cheap homeowner sprayer is fine. Improper application can lead to discoloration, peeling, and reduced protection.
Pro tip: Always check product labels and manufacturer instructions before buying or using any material. Store materials properly to maintain their quality and effectiveness. When mixing, follow the manufacturer’s guidelines for optimal results and safety.
Ventilation, attic interaction, and thermal/ moisture control
Codes outline attic ventilation requirements and the balance between intake and exhaust. These rules influence moisture control, comfort, and long term roof life. Proper ventilation is essential for preventing condensation and related problems.
Understand how insulation levels, vapor barriers, and air sealing interact with ventilation. Good ventilation reduces ice dam risk and protects underlayment and shingles. Look for practical signs that ventilation is functioning as intended and when to call a professional.
Common ventilation mistakes and how to spot them
Here are some common ventilation mistakes that homeowners should avoid. Spotting these issues early can prevent bigger problems down the line.
- Blocked soffit vents: Check if they’re clogged with dirt, insulation, or other debris. Use a flashlight to see through them and ensure airflow.
- Undersized vents: Measure your vent sizes. Too small? They won’t move enough air. Refer back to the sizing guidelines in the main section.
- Improper baffle installation: Baffles should be present and correctly installed to prevent insulation from blocking airflow. Inspect them visually.
- Inadequate ridge vents: Ensure they’re not covered by roofing material or other obstructions. They need clear space for exhaust.
Regular visual checks can help catch these mistakes before they cause bigger issues.
When ventilation affects code compliance and insurance
Proper ventilation is not just a good idea; it’s often required by building codes. Inadequate ventilation can lead to failed inspections, warranty issues, and even insurance claim denials.
Failed inspections: Inspectors check for proper ventilation. If they find insufficient or improperly installed vents, your roof may not pass inspection, leading to delays and additional costs.
Warranty issues: Many manufacturers require proper ventilation as a condition of their warranties. Inadequate ventilation can void these warranties, leaving you responsible for repair costs.
Insurance claim denials: Some insurance policies may deny claims due to water damage if they find that inadequate ventilation contributed to the problem. Always ensure your roof meets code and maintain proper ventilation to protect your investment.
Permitted exceptions, overlays, and structural capacity checks
Some areas allow roof overlays under specific limits, while others require full tear-offs. Local amendments or historic provisions can change what’s permitted. Always verify whether an overlay is allowed and under what conditions.
Structural checks become important when adding weight from overlays or heavier materials. A licensed engineer report may be needed to approve the plan. Documenting substrate condition, fastener compatibility, and retrofit guidelines helps ensure compliance.
When a Tear-Off is Required Versus Allowed Overlay
Before deciding on an overlay, check your local building codes. Most jurisdictions allow two layers of roofing, but some may permit three under specific conditions.
Required tear-off: If your existing roof has more than the allowed number of layers, a partial or full tear-off is needed. Also, if the substrate is damaged, wet, or delaminating, remove the old layers to prevent further damage and ensure proper adhesion of new materials.
Allowed overlay: If your current roof is in good condition and has fewer than the allowed number of layers, an overlay might be possible. However, consider long-term performance: overlays can trap moisture, reducing their lifespan compared to a complete replacement.
Structural Checks for Heavy Roofing Systems
When installing heavier roofing materials like metal or adding multiple layers, it’s crucial to ensure your structure can support the extra weight.
Consult local codes and manufacturer guidelines. If unsure, hire a licensed engineer or structural inspector to assess:
Rafter/deck span: Ensure rafters are adequately spaced and sized to support added load.
Fastener withdrawal capacity: Verify existing fasteners can hold the new weight without pulling through.
Permits, inspections, documentation, and avoiding common compliance mistakes
Follow a step by step workflow for permits and inspections, including photos and plan submissions. Scheduling inspections in a timely way helps keep the project on track. Clear records support smooth approvals down the line.
Keep organized documentation: site plans, roof specs, licenses, insurance, and disclosures. Watch for common administrative pitfalls like missing forms or incorrect project scope. A homeowner facing checklist and practical remedies can prevent delays.
How to document compliance for warranties and inspections
Keep a record of all documents related to your roofing project. This will help you maintain warranty coverage and pass future inspections.
- Product Data Sheets: Keep these to verify materials used meet code standards.
- Receipts: Hold onto these for proof of purchase and installation dates.
- Installer Certifications: These prove your contractor’s qualifications. Ask for copies.
- Permits: Keep a record of all permits issued for the project.
- Inspection Reports: Maintain reports from each inspection to track progress and any required corrections.
- Pre-Installation Photos: Take photos before work begins to document existing conditions.
- Post-Installation Photos: Take photos after completion to show final results.
- Warranty Registrations: Register all warranties with the manufacturer as soon as possible.
Quick rule: Keep digital copies for easy access and organization.
Common contractor mistakes that lead to failed inspections
Knowing common contractor errors can help you ensure your project passes inspections. Here’s what to look out for:
- No Permit: Ensure your contractor obtains all necessary permits before starting work.
- Wrong Fasteners: Check that fasteners used match those approved by the manufacturer and meet code standards.
- Missing Flashing: Verify that flashing is installed correctly around chimneys, vents, and other penetrations.
- Improper Nailing: Ensure nails are driven in straight and fully seated to prevent leaks and structural issues.
- Reused Damaged Materials: Inspect materials before installation to ensure they’re in good condition. Don’t use damaged or previously installed materials.
Quick rule: Regularly inspect your contractor’s work throughout the project to catch and correct any issues early.
Post-installation checks, maintenance, and long-term considerations
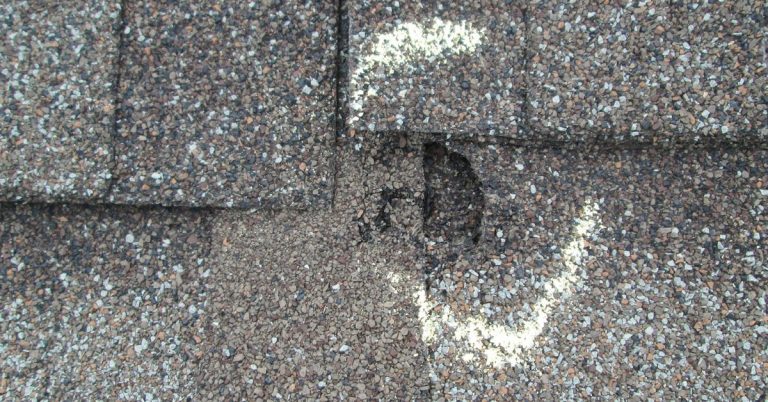
After installation, do a quick, thorough inspection. Check flashing joints, step and counter-flashing, roof-to-wall transitions, penetrations, nail pattern, underlayment exposure, and shingle alignment. Look for anything that clashes with installation guides or manufacturer specs.
Seasonal maintenance matters because it helps you meet manufacturer expectations and prevent problems before they start. Keep post-install photos, contractor notes, and a simple maintenance calendar, and schedule a licensed roofer or inspector if you see warning signs. Early signs like loose shingles, gaps at flashings, or moisture around penetrations should trigger a pro inspection.
Visual checkpoints homeowners can use
After installation, grab your binoculars or climb a safe ladder to spot any issues. Here’s a quick checklist.
- Shingle alignment: Check if shingles are straight and evenly spaced. Diagonal or misaligned shingles could indicate improper nailing or installation.
- Visible flashing: See if all flashings (around vents, chimneys) are visible and properly seated. Missing or damaged flashing can lead to water intrusion.
- Clean valleys: Ensure valleys are clean and free of debris. Clogged valleys can cause water backup and damage.
- Correct vents: Confirm all vents (soffit, gable, ridge) are present and unobstructed. Proper ventilation prevents moisture buildup and heat accumulation.
- Roofline integrity: Check for any irregularities, sags, or bumps. These could indicate structural issues or improper installation.
- Proper nailing pattern: Look at the nail/screw pattern from below. Inconsistencies may suggest poor workmanship and potential leaks.
- Underlayment exposure: Ensure underlayment is not exposed at edges or around penetrations. Exposed underlayment can lead to water damage.
- Gutter functionality: Check gutters are securely fastened, sloped correctly, and free of debris. Clogged or damaged gutters can cause water backup and damage.
Quick rule: If anything looks off, don’t hesitate to call your contractor or a licensed roofer for inspection.
Cost and liability implications of code mistakes
Ignoring codes can lead to costly repairs, void warranties, and even legal issues. Here’s what to avoid.
- Water damage: Ignoring moisture intrusion can lead to expensive structural repairs. Fix leaks promptly to prevent further damage.
- Warranty voidance: Many warranties require proper maintenance and code compliance. Neglecting codes may void coverage, leaving you with repair costs.
- Safety hazards: Code violations can create safety risks, like improperly secured gutters or missing guardrails. Address these issues immediately to prevent accidents.
- Legal issues: Severe code noncompliance may result in fines, penalties, or even legal action. Always ensure your roof meets local codes and standards.
Promptly addressing code issues saves you money in the long run. Regular inspections help catch problems early before they become costly liabilities.
Conclusion
Roof work that follows the codes protects safety, boosts durability, and keeps the appearance clean and professional. Do the checks now so you don’t pay later with leaks or voided warranties.
Start by confirming permits and local requirements, then review the structural and ventilation basics, map out your plan, gather the right materials, set a weather window, test a small area first, and document every step for inspections. Keep safety first, check the attic and moisture controls, and know who will sign off at each stage.
Common mistakes to avoid include skipping permits or inspections, ignoring ventilation and attic interaction, and rushing through fastenings or underlayment without following the exact code requirements. Always work with a clear safety plan, use fall protection when on the roof, and never cut corners on flashing, underlayment, or drainage details.
If you’re unsure about structural capacity, complex permit rules, or hidden damage, call a professional sooner rather than later. Stay disciplined, follow the plan, and you’ll finish with a roof that’s safe, durable, and compliant—and something you can stand on for years to come.
FAQ
What building codes apply to residential roofing?
Codes are set by your local jurisdiction. Check the current adopted code version and any amendments with the permit office. Ask what inspections will be required and when they happen.
What should I check before starting a roof project?
Get any needed permits first. Inspect the roof deck, attic ventilation, and flashing areas. Make sure the underlayment and drip edge meet local requirements.
What are common mistakes homeowners make with roofing codes?
Skipping permits or inspections. Ignoring ventilation and underlayment specs. Overlooking manufacturer guidelines and edge details during installation.
How can I avoid failing inspections?
Schedule a pre-inspection with the code official if possible. Keep all receipts, test results, and a tidy job site. Follow the code and manufacturer directions for every step.