

Introduction
Attic ventilation is the system that lets hot air escape and fresh air enter to keep an attic cool and dry. Soffit vents, ridge vents, and baffles are the key pieces that work together. For a DIY project, you’ll be checking that air can move freely from eave to peak and that nothing blocks the path.
What actually works depends on how you lay out intake and exhaust and what the ceiling and insulation allow. As you work, verify you’re not blocking any vent openings, and check local rules or manufacturer instructions for any limits on height, materials, or required clearance. If in doubt, focus on avoiding blockages and keeping an unobstructed air path from soffits to the ridge.
Key takeaways
- Ensure soffit vents align with rafters for unobstructed intake airflow.
- Check ridge vent continuity across peak to balance exhaust flow.
- Install baffles before insulation to maintain clear air channels throughout attic space.
- Design balanced intake and exhaust to prevent warm pockets and condensation.
- Seal attic hatches and pull-down stairs to minimize leakage air.
- Turn off power to attic areas before inspecting wiring or vents.
Table of Contents
- Introduction
- Key takeaways
- Why Attic Ventilation Matters
- Soffit Vents: Intake Fundamentals and Best Placement
- Ridge Vents: Exhaust Design and Performance
- Baffles (Rafter Vents): Protecting Air Channels
- Designing Balanced Ventilation: Intake Vs Exhaust and Layout
- Installation Best Practices and Common Mistakes to Avoid
- Troubleshooting and Inspection Checklist
- Climate, Seasonal Considerations, and Insulation Trade-Offs
- Conclusion
- FAQ
Why Attic Ventilation Matters
Attic ventilation helps move hot air out of the attic and brings in cooler air from outside. It also helps manage moisture so the roof and insulation stay drier. When ventilation works, you’re less likely to see ice dams, mold, or higher HVAC loads.
Always check the label or manufacturer instructions for your system to verify what the vents are designed to do. If in doubt, consult local rules or a qualified pro before making changes to your attic setup.
How ventilation actually moves air
The key to attic ventilation is moving hot, moist air out and drawing cool, dry air in. This happens through two main processes:
Stack effect: Hot air rises naturally, creating a pressure difference that pulls air up and out of your attic.
Wind-driven ventilation: Wind blowing across your roof creates positive and negative pressure zones, pushing air in and out.
To maximize this airflow, you want continuous intake at the lowest points (like soffits) and exhaust at the highest points (like ridges). This ensures a steady flow of air moving through your attic.
Risks of poor or unbalanced ventilation
Inadequate or poorly balanced attic ventilation can lead to a host of problems:
Condensation and moisture buildup: Without proper airflow, moisture from daily activities (like showering) can’t escape. This leads to condensation on cold surfaces, promoting mold growth.
Rot and structural damage: Prolonged exposure to moisture weakens roof structures, leading to rot and potential collapse.
Shingle damage: Heat buildup under your roof can cause shingles to warp or crack, reducing their lifespan and effectiveness.
Higher energy bills: A hot attic forces your HVAC system to work harder, driving up utility costs. Plus, heat can transfer into living spaces, making them uncomfortable.
Many of these issues stem from blocked intakes (like stuffed soffit vents) or unbalanced ventilation systems that don’t allow air to flow freely through the attic.
Soffit Vents: Intake Fundamentals and Best Placement
Soffit vents act as the primary intake for attic air. You’ll find several common types, including continuous and individual vents, and placement along the eaves directly influences airflow. Good intake placement keeps air moving in a steady path toward the exhausts.
Verify the vent type and spacing on the label or data sheet, and follow the manufacturer’s guidance for installation. Make sure soffit vents stay unobstructed by insulation or debris and match the intended attic air channel layout.
Continuous vs individual soffit vents
When it comes to soffit vents, you’ve got two main options: continuous strip vents and multiple smaller vents. Let’s break down the pros and cons of each.
Continuous Strip Vents: These are long, narrow vents that run along your eaves. They’re great for providing even airflow across the entire length. Aesthetically, they blend in nicely with your home’s design. Installation is straightforward too – just snap them into place.
Individual Soffit Vents: These are smaller vents spaced along your eaves. They offer flexibility in placement and can be easier to install if you’ve got obstructions like pipes or wires. However, they might not provide as even airflow as continuous vents.
Sizing and net free area considerations
To determine the right size for your soffit vents, you’ll need to calculate the net free area (NFA). This is the total open area of your vents. A common guideline is 1 square foot of NFA per 300 square feet of attic floor area.
Here’s how to do it: First, figure out the size of your attic. Then, divide that by 300 to find your needed NFA. For example, a 900 sq ft attic would need about 3 sq ft of NFA.
But remember, this is just a starting point. Always check manufacturer specs and local building codes before finalizing your vent size. It’s also a good idea to add a bit extra for safety – around 10% more than your calculation.
Ridge Vents: Exhaust Design and Performance
Ridge vents are often the most effective passive exhaust because they sit at the top of the roof and allow hot air to escape along a continuous line. They work best with a continuous vent run that spans the length of the roof. Roof geometry can affect how well they perform, especially around hips, dormers, or variations in slope.
Check the product instructions or installation guide to confirm compatibility with your roof shape and deck, and follow any required clearances. Consider surrounding attic space and potential snow or wind issues that might impact exhaust flow.
Ridge vents versus other exhaust options
When it comes to attic ventilation, ridge vents are often the most effective passive exhaust option. But they’re not always the best fit for every roof. Let’s compare them to other exhaust options:
Box Vents: These are cheaper and easier to install than continuous ridge vents. However, they require proper spacing and placement to work effectively. Too many or too few can lead to improper ventilation.
Turbine Vents: Also known as whirlybirds, these are great for areas with consistent wind. But they’re not as effective in still conditions and can be noisy when the wind picks up.
Powered Fans: These provide active ventilation but require electricity. They’re ideal for homes in hot climates or where passive ventilation isn’t enough. However, they add to your energy bills.
Installation and compatibility concerns
Before you install ridge vents, consider these key factors:
Roof Pitch: Ridge vents work best on roofs with a pitch of at least 4/12. On flatter roofs, they may not provide enough exhaust.
Ridge Sheathing: You’ll need to cut through the ridge sheathing to install ridge vents. Make sure you’re cutting straight and deep enough for the vent to fit properly.
Underlayment Interaction: Ridge vents should be installed over a solid underlayment to prevent leaks. If your roof has gaps or damaged underlayment, these need to be addressed before installing ridge vents.
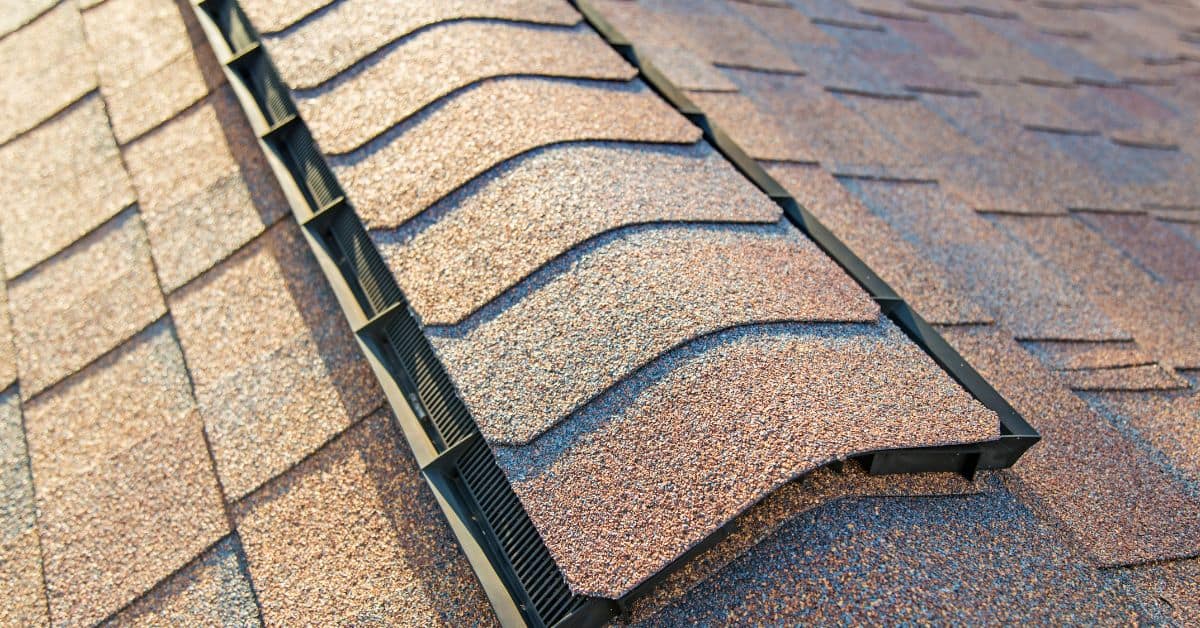
Baffles (Rafter Vents): Protecting Air Channels
Baffles, or rafter vents, keep the soffit-to-ridge air channel clear of blown or settled insulation. They also prevent cold spots at the roof deck by maintaining a dedicated path for air migration. Without them, insulation can block airflow and reduce effectiveness.
Verify that baffles are installed from soffit to ridge and spaced correctly according to the instructions. If you’ve got dense packing or blown insulation, double-check that airflow isn’t blocked at any bay or vent opening.
Placement and securement best practices
Baffles should be placed in every rafter bay, from the top of your ceiling to the underside of your roof deck. This ensures a clear path for air to flow from your soffit vents up to your ridge vent.
Never place baffles directly on top of insulation. They need space to create an air channel. Use screws or nails to secure them, but avoid compressing the insulation below.
Baffles should fit snugly against the rafters and span the entire width of the bay. This prevents insulation from blocking airflow and keeps it from shifting over time.
Baffle types and DIY installation tips
Baffles come in various materials: plastic, cardboard, or foam. Plastic is durable but can be more expensive. Cardboard is cheaper but less durable. Foam offers good insulation value but may not last as long.
When installing, never compress the insulation below. This blocks airflow and defeats the purpose of baffles. Use a straight edge to keep them level and secure with screws or nails every 12-16 inches.
For safety, wear gloves to protect your hands from sharp edges or staples in cardboard baffles. Always work with a partner when installing baffles to ensure someone is spotting you on the ladder.
Designing Balanced Ventilation: Intake Vs Exhaust and Layout
Balanced ventilation means matching intake capacity with exhaust capacity so air moves steadily through the attic. This helps avoid dead zones and keeps the attic from over-ventilating or under-ventilating. Common layouts aim to create a clear path from soffits to ridge or to a ridge alternative.
Verify any layout recommendations in the product data or building plans, and check local codes for acceptance of combinations. Consider the footprint of both intake and exhaust openings when planning the route for airflow.
Calculating vent area and matching intake/exhaust
To balance your attic ventilation, you need to match the net free area (NFA) of your intake vents with that of your exhaust vents. Here’s how:
1. Calculate NFA for each vent type using this formula: NFA = (Vent width x Vent height) / 12. Multiply by the number of vents to get total NFA.
2. Aim for a balance between intake and exhaust. A common starting point is a 50/50 split, but this can vary based on your climate and attic design. Check product NFVA and local codes for final guidance.
Layouts for different attic types
Attic ventilation layout depends on your roof type. Here are common layouts:
Vented Attics: Place intake vents along the soffit, with exhaust at the ridge or gable ends. This creates a natural airflow path.
Cathedral Ceilings: Use low-profile ridge vents for exhaust and place baffles between rafters to protect air channels. Intake can be through eave vents or foundation vents.
Hip Roofs & Gable-Ended Attics: For hip roofs, use a combination of soffit and gable end vents. For gable-ended attics, use both soffit and ridge vents. Consider supplemental exhaust for larger attics.
Installation Best Practices and Common Mistakes to Avoid
Install with unobstructed intake paths, continuous air channels, and proper sealing around penetrations to prevent air leaks. Avoid compressing insulation or creating gaps that disrupt airflow. Sealing should be thorough where vents pass through the roof or walls.
Review the most frequent DIY errors on the vent label or manufacturer guidance and fix any that apply. When in doubt, pause and recheck alignment, clearance, and connections before finishing the job.
Sealing, air barriers, and insulation interaction
Proper attic ventilation isn’t just about installing vents. It’s also about controlling moisture and energy loss through sealing, insulation, and air barriers.
Air sealing comes first. Seal gaps around pipes, ducts, and wiring to stop cold/hot air from leaking in or out. This reduces the need for extra ventilation.
Next, add insulation. It slows heat transfer but doesn’t block airflow. Insulate between rafters or on the attic floor, not over the vents. Good insulation keeps your home comfortable and reduces energy bills.
Finally, consider an air barrier, like a radiant barrier, to reflect heat away from the living space. It works best when combined with proper sealing and ventilation.
Avoiding obstructions and improper baffle/vent placement
Obstructions in your attic’s airflow path can ruin the effectiveness of your ventilation. Here are common mistakes to avoid:
- Insulation blocking soffits: Don’t let insulation cover or block soffit vents. It stops cold air from entering.
- Blocked baffles: Ensure rafter vents (baffles) aren’t clogged with insulation or debris. They create a continuous channel for airflow.
- Vent blockers: Keep anything from blocking ridge, gable, or other exhaust vents. This includes insulation, storage items, or even nails/screws.
- Improper vent placement: Place intake vents at the lowest point (soffits) and exhaust vents high up (ridge, gables). Don’t reverse this.
Regularly inspect your attic for these issues. Fixing them keeps air flowing freely, preventing moisture buildup and maintaining energy efficiency.
Troubleshooting and Inspection Checklist
Start with a visual and physical inspection for blocked intakes or insufficient exhaust. Look for dust or debris buildup, insulation intrusion, and signs of moisture or frost in the attic. Listen for unusual airflow sounds that may indicate restrictions.
Use simple diagnostics such as confirming airflow paths with a smoke test or temp differences near vents, and verify findings against labeled specs or local requirements. If results are unclear, consult a professional for a targeted assessment.
Visual checkpoints and what to look for
Before you start, grab a flashlight and head up into your attic. This checklist helps spot common ventilation issues.
- Soffit vents: Check if they’re clear of debris or insulation. Blocked intakes can’t bring in cool air.
- Baffles: Ensure they’re properly installed and not crushed by insulation. They keep airflow channels open.
- Ridge vent: Inspect if it’s free of obstructions like nails or roofing material. A blocked exhaust can’t push hot air out.
- Staining: Look for water stains on the underside of roof sheathing. They indicate moisture buildup.
- Mold: Check for mold growth, especially around vents and insulation. It thrives in damp conditions.
- Ice dams: Inspect your roof’s edge for ice buildup during winter. They form when heat from the attic melts snow.
- Sagging sheathing: Check if the roof deck is sagging. It could be due to trapped moisture weakening it.
- Frost: Look for frost on the underside of the roof during winter. It’s a sign of excessive moisture.
Quick rule: If you spot any of these issues, don’t ignore them. They could indicate serious ventilation problems.
Simple diagnostic tests and when to call a pro
Sometimes, you need more than just a visual check. Here are some simple tests to confirm your suspicions.
- Airflow check: On a windy day, hold a piece of lightweight fabric near the vents. If it billows in, airflow is good. If not, call a pro.
- Smoke/incense test: Light some incense or smoke a match and watch how the smoke moves. It should flow towards exhausts and out.
- Seasonal comparison: Compare your attic’s temperature with outdoor temps in summer and winter. They should be close, within 10-15°F.
- Moisture meter: Use one to check moisture levels in the roof sheathing. High readings indicate trapped moisture.
Quick rule: If these tests show problems or you’re unsure, don’t hesitate to call a qualified professional. They have tools and expertise to diagnose and fix issues safely and effectively.
Climate, Seasonal Considerations, and Insulation Trade-Offs
Local climate changes which ventilation priorities you should emphasize, like moisture control in humid areas or ice management in cold regions. Ventilation interacts with vapor control strategies and the overall insulation approach. Depending on climate, you may lean toward conditioned or unvented attic concepts.
Always verify guidance from reputable sources, including manufacturer instructions and local codes, when planning climate-specific setups. Use this to shape your insulation trade-offs and any adjustments to intake and exhaust strategies.
Cold-climate issues: ice dams and vapor control
In cold climates, ice dams are a common problem. They form when heat from the house melts snow on the roof, but that water can’t drain properly. Balanced ventilation helps prevent this by keeping your attic cool.
Air sealing is crucial too. It stops warm air from leaking into the attic and melting snow. Check local codes and roofing manufacturer requirements before starting any work.
Insulation also plays a role. Proper insulation keeps heat in the house, not up in the attic. Aim for an R-value of at least 49 in cold climates.
Hot-humid and mixed climates: moisture and HVAC impact
In hot, humid climates, attic moisture is a big concern. High outdoor humidity can lead to mold growth and structural damage if not managed properly.
Ventilation design in these areas often differs from colder climates. You might need vapor-permeable materials or even a conditioned attic space to control moisture effectively.
HVAC systems also play a role. They can introduce moisture into the attic if not properly sealed and insulated. Consider using a dedicated outdoor air system (DOAS) in hot, humid climates.
In mixed climates, you’ll need to balance both heating and cooling concerns. A well-designed ventilation system that accounts for seasonal changes is key.
Conclusion
Getting attic ventilation right protects the roof, stops ice dams and mold, and keeps the living space below comfortable. Do the work with a plan, and you’ll avoid costly fixes and messy damage down the line.
Start by checking that intake and exhaust paths are clear and balanced. Walk the attic with a flashlight, confirm soffit openings are unobstructed, verify ridge or roof vents aren’t blocked, and test air flow from a known intake toward the exhaust. Then map a simple layout: ensure air can move from soffits to ridge vents, use baffles where needed, and adjust for seasonal changes and insulation depth. Keep your checks small, repeatable, and safe, and don’t press beyond what you can see and reach without risking falls or damage.
Common mistakes to avoid include blocking soffit vents with insulation, relying on a single vent type for both intake and exhaust, and skimping on inspection after weather events. Safety rules are simple: never crawl on a wet or damaged roof, turn off power when working near attic hardware, and test airflow in a controlled area before broad changes. If you spot moisture, sagging insulation, or crushed ducts, stop and reassess before continuing.
If you’re unsure about the overall balance, or if the attic is unusually tight, steep, or has irregular framing, it’s wise to call a roofing or insulation professional. A quick review can prevent irreversible damage and save money in the long run. With a careful plan and steady steps, you can finish with a solid, durable ventilation setup that performs as intended.
FAQ
Can I rely on ridge vents alone for attic exhaust?
Ridge vents need enough air flow through properly spaced intake vents. If the soffits are blocked or missing, exhaust will be limited and can cause condensation or heat buildup. Check that both intake and exhaust paths are open and clear.
How do I know if my soffit vents are blocked or not providing enough intake?
Look for visible gaps and check under eaves for obstructions like insulation or debris. If air isn’t moving noticeably at the soffit near the peak, you may have restricted intake. Clear or adjust as needed per manufacturer instructions and local rules.
What signs tell me my attic ventilation isn’t balanced?
If you feel heat or humidity at the peak in summer, or see frost near the attic edges in winter, balance is off. Uneven temperature or moisture hints at poor intake or exhaust distribution. Reassess vent placement and consider adding or relocating vents if allowed by the structure and instructions.
What should I look for if I think I need baffles or an air channel upgrade?
Baffles keep airflow paths open from soffits to the ridge. If insulation is piling up and covering intake areas, or you see sagging to the bottom side of the roof, you may need baffles. Check product instructions and local guidance before proceeding.