
Introduction
Ice dams form when melted snow on the roof refreezes at the edges, creating a dam that can back up water. That backup can leak into the attic or ceiling and cause damage. You can reduce the risk by keeping insulation effective and ensuring vents aren’t blocked.
The fix that actually stops them starts by stopping heat from building up under the roof. Tactics include improving attic insulation, sealing air leaks, and making sure roof vents stay clear. If you need to remove existing snow, use a long roof rake from the ground and avoid climbing on the wet roof.
Key takeaways
- Inspect attic insulation, air leaks, and ventilation before sealing any ice dam issues.
- Air sealing and proper insulation target the root causes rather than temporary melt.
- Ventilation and insulation work together; avoid blocking soffit or ridge vents.
- Dry, clear access for inspections; disable ice dam risks with caution.
- Document contractor steps and get written warranties for long-term performance.
- Plan long-term maintenance: seasonal checks, moisture control, and yearly inspections.
Table of Contents
- Introduction
- Key takeaways
- What Is an Ice Dam?
- Primary Causes and Contributing Factors
- How to Inspect and Identify Ice Dam Problems
- The Fix That Actually Stops Ice Dams: Air Sealing + Insulation + Ventilation
- Secondary Measures, Limitations, and Temporary Fixes
- Tools, Materials Checklist, and Visual Guides for DIY and Pros
- When to Hire a Professional and How to Vet Contractors
- Costs, Insurance, and Long-Term Maintenance Plan
- Conclusion
- FAQ
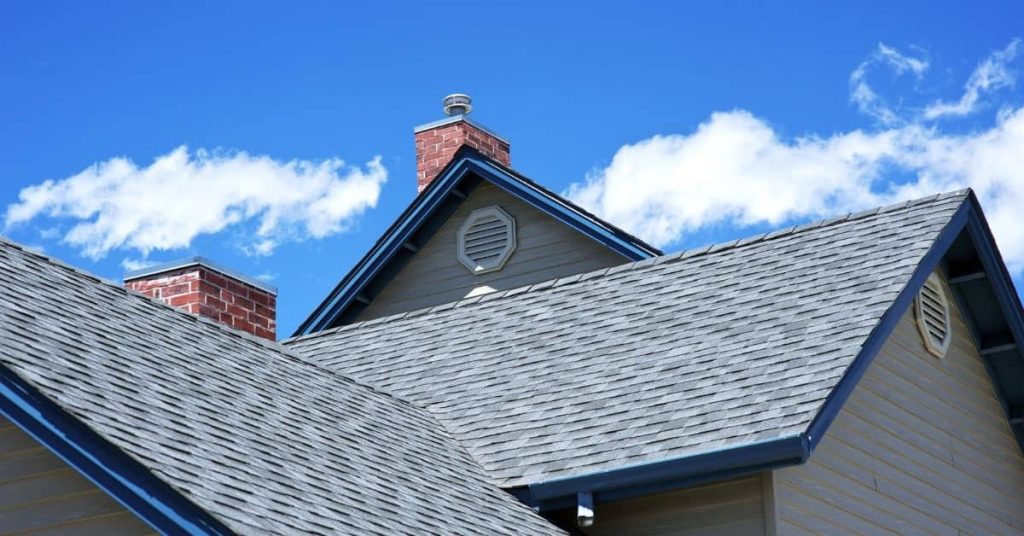
What Is an Ice Dam?
An ice dam is a formation at the edge of a roof where melting snow refreezes. It creates a barrier that slows or stops water from draining off the roof surface.
The key distinction is between ice on the roof surface and an ice dam that backs up water under shingles. This backup can lead to leaks and interior damage if not addressed.
Basic physics of formation
Ice dams form due to a simple cycle of melting and refreezing. Here’s how:
Heat from your home warms the roof surface, melting snow on top.
The melted water runs down the roof towards the eaves, which are usually colder due to overhanging edges and less insulation.
As it reaches the cold eaves, this water refreezes, forming a ridge of ice that grows from the edge of the roof up towards the peak. This is an ice dam.
Risks and damage from ice dams
Ice dams aren’t just unsightly; they can cause real damage to your home:
Roof leaks: As the dam grows, it forces water up under the shingles, leading to leaks in your roof.
Interior water damage: This trapped water can seep into your home, causing stains on ceilings and walls, and potentially damaging insulation and drywall.
Gutter/soffit damage: The weight of the ice dam can also bend or break gutters, and cause soffits to crack or warp.
Primary Causes and Contributing Factors
Root causes start with heat loss inside the home that travels up into the attic space. That heat melts roof snow from above the living area, especially near the eaves where airflow is restricted.
Roof geometry, weather conditions, and moisture intrusions all play a role, and multiple factors usually work together. Understanding which ones apply helps you target the right fixes.
Heat loss through the attic: air leaks and insulation gaps
Ice dams start with heat from your living space. Warm air rises, and if it’s not controlled, it’ll escape into your attic.
Air leaks around plumbing pipes, ducts, or gaps in insulation let this warm air reach your roof. Once there, it melts the snow above.
But here’s the catch – that melted snow can’t drain off because ice dams block the way. So, it refreezes at the edge of the roof, creating an ice dam.
Roof geometry and snow management factors
The shape of your roof plays a big role too. Eave overhangs, valleys, dormers – they all affect how snow accumulates and drains.
Snow tends to pile up in these areas. And when it melts due to heat from below, it has nowhere to go but back under the shingles, forming an ice dam.
Steep slopes might seem like a good thing, but they can also cause problems. Snow slides off too fast, not giving it time to melt and drip off gradually.
Climate and weather patterns that promote dams
The kind of snow you get matters. Heavy, wet snow is more likely to form ice dams than light, fluffy stuff.
Freeze-thaw cycles are another culprit. Snow melts a little during the day, then refreezes at night. This cycle helps build up ice dams over time.
Persistent cold snaps keep things frozen. But when it warms up even briefly, that’s when you’ll see melting and potential ice dam formation.
How to Inspect and Identify Ice Dam Problems
Start with a practical attic check: look for warm spots, missing insulation, and air leaks near the roof plane. Note any signs of moisture or staining on roof sheathing if accessible.
Then inspect the exterior roof and gutters for proper drainage, and check interior ceilings for signs of water intrusion. Always follow safety warnings and use fall protection when working near the roof edge.
Step-by-Step Process
The following steps guide you through inspecting and identifying ice dam problems safely and effectively.
- Preparation: Safety first! Wear non-slip boots, use a sturdy ladder, and never go onto the roof alone. Inspect your gear before starting.
- Attic inspection: Locate the access hatch, then use our attic checklist (next section) to find warm spots, daylight, uneven insulation, or moisture signs.
- Exterior visual check: Safely inspect from the ground or a ladder. Look for ice ridges, swollen gutters, icicle patterns, and snowmelt streaks. Use our exterior checklist (next section) to guide you.
- Main inspection: If necessary, carefully walk on the roof, following safety guidelines. Check for ice dams, icicles, and snow buildup. Inspect gutters and downspouts.
- Interior check: Inspect ceilings, walls, and insulation. Look for stains, peeling paint, or moldy insulation using our interior signs (next section).
- Final checks: Recheck your findings, take notes, and photos. If unsure about any issues, consult a professional.
Attic Inspection Checklist
Use this checklist when inspecting your attic for ice dam problems.
- Warm spots: Feel the roof sheathing. Warm spots indicate heat loss, which can cause ice dams.
- Daylight through roof sheathing: Check for daylight coming through gaps in the roof. This indicates a need for better insulation or sealing.
- Uneven insulation: Inspect your attic floor insulation. Uneven layers may indicate air leaks or insufficient insulation.
- Moisture signs: Look for water stains, mold, or dampness on the roof sheathing, rafters, or insulation.
- Ventilation issues: Ensure proper ventilation by checking for blocked or missing vents. Proper airflow prevents moisture buildup.
- Exhaust fans: Check if exhaust fans from bathrooms or kitchens are vented properly to the outside, not into the attic.
- Plumbing penetrations: Inspect where plumbing pipes penetrate the roof. These areas can be common sources of air leaks and heat loss.
- Electrical penetrations: Check around electrical boxes and wires that pass through the roof. These can also cause air leaks.
Quick rule: If you find any issues, address them promptly to prevent ice dams from forming or worsening.
Exterior Inspection and Visual Checkpoints
Use this checklist when visually inspecting your roof’s exterior for signs of ice dam problems.
- Ice ridges: Look for long, ridged icicles or ice buildup along the eaves. This is a clear sign of an ice dam.
- Swollen gutters: Check your gutters. If they’re filled with ice or snow, it could indicate an ice dam above.
- Icicle patterns: Observe icicle formation. Long, thick icicles hanging from the eaves can signal ice dams.
- Snowmelt streaks: Look for dark streaks running down the exterior walls. These could indicate melting snow and ice from above.
- Roof geometry: Inspect your roof’s design. Steep roofs, multiple levels, or complex designs can be more prone to ice dams.
- Snow buildup: Check for excessive snow accumulation on the roof. This can indicate poor ventilation or heat loss.
- Gutter function: Ensure gutters are functioning properly and not blocked by ice or debris.
- Downspout flow: Check that downspouts are clear and water can drain freely. Blockages can cause ice dams to form.
Quick rule: If you spot any issues, use our attic checklist (previous section) to find the source of the problem.
Interior Signs and Moisture Indicators
Inspect your home’s interior for clues that ice dams may be causing water infiltration.
Check ceilings for stains, discoloration, or peeling paint. These can indicate past or ongoing water damage from ice dams.
Examine walls, especially near the ceiling or around windows and doors. Cracking, peeling paint, or moisture stains could signal water intrusion.
Inspect your insulation. If it’s damp, moldy, or discolored, it may have been affected by water from ice dams.
The Fix That Actually Stops Ice Dams: Air Sealing + Insulation + Ventilation
Adopt a whole-roof approach that combines air sealing, insulation, and ventilation. Each piece works together to keep the roof cold at the edge and prevent melting at the eaves.
When checking specs or installation guidance, verify labels, instructions, and local building rules. If in doubt, compare manufacturer guidance and local codes before proceeding.
Air sealing the house envelope
Ice dams form when heat from your living space melts snow on your roof. To stop this, we need to keep that heat out of the attic. That’s where air sealing comes in.
Focus on these key areas:
- Top plates: Where walls meet the ceiling, heat can escape into the attic.
- Penetrations: Plumbing stacks, chimneys, and other openings need to be sealed tight.
- Knee walls: These are interior walls with sloped ceilings. Seal any gaps at the top.
- Attic hatch: This is a common culprit. Make sure it’s well-sealed.
After sealing, use a blower door test to find and fix any remaining leaks.
Insulation strategy and continuous thermal barrier
Proper insulation keeps heat in your living space, not in the attic. Here’s how to do it right:
First, ensure you have enough depth. The Department of Energy recommends R-49 for most climates, that’s about 16 inches of fiberglass batts.
Next, place insulation properly. It should cover the attic floor evenly, with no gaps. For cathedral ceilings, insulate between the rafters or joists.
Lastly, reduce thermal bypass. This means minimizing heat loss through gaps and cracks in your insulation. Consider dense-pack cellulose or foam for hard-to-reach areas.
Roof and attic ventilation principles
Ventilation keeps your roof cold, preventing ice dams. Here’s how:
You need a balanced system. Intake vents at the eaves bring in cool air, while exhaust vents at the ridge push out warm air.
Size and place your vents correctly. For every 150 square feet of attic floor, you need about 1 square foot of net free vent area. Place intake vents along the entire perimeter, and exhaust vents near the top of the roof.
This balanced system keeps your roof cold, preventing snow melt and ice dams.

Secondary Measures, Limitations, and Temporary Fixes
Temporary measures like exterior heat sources or localized repairs can reduce immediate risk, but they do not replace the permanent fix. Use them only as short-term stopgaps while planning full work.
Be aware of maintenance needs and limitations, such as energy use, safety, and potential for continued moisture migration. Always verify suitability with product labels and professional guidance when in doubt.
Ice and Water Shield and Flashing Repairs
When ice dams form, they can push water under your shingles. That’s where an ice and water shield comes in. It’s a self-adhesive membrane that goes on the bottom 3 feet of your roof, preventing water from seeping in.
Proper flashing at eaves and valleys is also crucial. Flashing directs water away from vulnerable areas. If it’s damaged or missing, water can leak into your home.
If you find gaps or tears in your ice and water shield, or if your flashing is rusted or bent, repair them immediately. For major issues, consider hiring a professional for reroofing or targeted repairs.
Heating Cables: Pros, Cons, and Correct Use
Heating cables can be a short-term solution to prevent ice dams. They warm the roof edges, melting snow before it can freeze. But they’re not a permanent fix – they won’t stop heat loss from your attic.
Pros: Easy to install, no maintenance needed. Cons: Expensive to run, don’t address the root cause of ice dams.
To use them correctly, install cables along the eaves and in valleys. Don’t overlap them – that can cause hot spots. And never install them under shingles or insulation – they need air circulation to work safely.
Safe Snow and Ice Removal Techniques
Removing snow can help prevent ice dams. Use a roof rake with wheels to pull snow off your roof from the ground. Keep it at least 3 feet away from the edge to avoid damaging shingles.
Never chip ice off your roof. It’s dangerous – you could damage your roof or fall. Plus, chipped ice can slide down and injure someone below.
If snow and ice buildup is heavy, consider hiring a professional removal crew. They have the right equipment and safety training to remove snow and ice safely and effectively.
Tools, Materials Checklist, and Visual Guides for DIY and Pros
Prepare a clear list separating basic DIY tools from professional-grade materials and protective equipment. Include items for insulation, sealing, and safe roof access.
Use visual checkpoints to verify work quality, such as seal tightness, insulation depth, and ventilation paths. Cross-check against project plans and manufacturer instructions as you go.
Air-sealing and insulation tools and materials
Use this checklist when preparing to air-seal and insulate your home to prevent ice dams.
- Caulk: For small gaps, like around plumbing pipes and electrical outlets. Skip it? Warm air escapes, encouraging ice dams.
- Foam sealant: For larger gaps and holes in walls, floors, and ceilings. Miss this? Drafts cause ice dams.
- Weatherstripping tape: For door and window frames. Neglect it? Air leaks lead to ice dams.
- Expansion foam: For bigger gaps and voids in walls and floors. Overlook it? Heat loss fuels ice dams.
- Backer rod: To fill large gaps before applying caulk or foam. Ignore it? Incomplete seals cause ice dams.
- Fiberglass batts: For filling wall cavities and attic floors. Skip it? Heat loss through uninsulated areas causes ice dams.
- Blown-in insulation: For hard-to-reach spaces and better coverage. Overlook it? Inconsistent insulation leads to ice dams.
- Insulation removal tools: Like a reciprocating saw for old insulation. Forget it? Contaminated insulation remains cause issues.
- Tape measure: To ensure accurate cuts and proper fit of materials. Miss this? Poor fits lead to air leaks, causing ice dams.
- Utility knife: For cutting foam sealant, backer rod, and insulation. Forget it? Inefficient cuts waste materials and time.
- Hammer or nail gun: To secure weatherstripping tape and other materials. Overlook it? Loose materials fall off, causing air leaks.
Quick rule: Always check manufacturer instructions for specific application details.
Roofing materials and membrane specifications to ask about
Use this checklist when discussing roofing materials with your roofer to prevent ice dams.
- Membrane placement: Ask for proper placement, starting at the eaves. Incorrect placement causes ice dams.
- Overlap technique: Ensure membranes overlap correctly from bottom to top. Wrong overlaps lead to ice dams.
- Adhesion method: Check if adhesive or mechanical fasteners are used. Poor adhesion allows membranes to lift, causing ice dams.
- Flashing details: Make sure flashings are installed around chimneys, vents, and skylights. Missing flashings cause leaks and ice dams.
- Ice and water shield: Ask for proper placement at eaves and in valleys. Skip it? Water intrusion leads to ice dams.
- Drip edge installation: Ensure drip edges are installed at the roof’s edge. Missing them causes water backup, leading to ice dams.
- Ventilation: Discuss proper attic ventilation to prevent heat buildup. Inadequate ventilation causes ice dams.
- Shingle underlayment: Check if a suitable underlayment is used. Wrong underlayment allows water intrusion, causing ice dams.
Quick rule: Always consult manufacturer instructions and local building officials for specific requirements.
Safety equipment and visual checkpoints
Use this checklist when working on your roof or in the attic to ensure safety and proper job completion.
- Harness: Wear a full-body harness for fall protection. No harness? Risk serious injury from falls.
- Lanyard and anchor points: Use a lanyard with secure anchor points. Missing them? Falls can occur.
- Hard hat: Protect your head from falling debris. Skip it? Head injuries can result.
- Safety glasses: Wear eye protection to prevent debris from entering eyes. Overlook it? Eye injury risk increases.
- Stepladder or extension ladder: Use a sturdy, secure ladder for access. Wrong ladder? Falls and instability can occur.
- Attic view (completed job): Check for even insulation coverage with no gaps. Incomplete insulation? Heat loss causes ice dams.
- Roof edge view (completed job): Ensure proper membrane placement, overlaps, and secure fasteners. Wrong installation? Ice dams can form.
- Soffit view (completed job): Verify proper ventilation grilles or fans are installed. Inadequate ventilation? Heat buildup causes ice dams.
Quick rule: Always inspect your work from multiple angles to ensure a complete, safe job.
When to Hire a Professional and How to Vet Contractors
Call in a pro for complex roof geometry, reroofing, or extensive air sealing where mistakes are costly. If you are unsure about the scope, it is safer to get a second opinion before starting.
Use a vetting checklist that covers qualifications, references, insurance, and written estimates. Confirm they follow local rules and provide detailed project plans before any work begins.
Interview questions and contract scope items
When hiring a professional to tackle your ice dam problem, it’s crucial to ask the right questions. Here are some targeted queries to help you understand their approach:
Scope of Work: Ask for a detailed breakdown of what they plan to do. This should include air sealing, insulation, ventilation, and any additional services like installing ice and water shield or heating cables.
Materials: Inquire about the materials they’ll use. For instance, ask about the type of insulation, roofing membrane specifications, and any other relevant products. Refer back to our Tools, Materials Checklist for guidance.
Ventilation Strategy: Ask how they plan to improve your attic’s ventilation. They should explain their strategy using principles from the Roof and Attic Ventilation Principles section.
Verification Testing: Finally, ask about any testing or inspections they’ll perform to confirm their work. This could include blower door tests or attic temperature checks, as mentioned in our Air Sealing + Insulation + Ventilation fix.
Permits, warranties, and post-job verification
Before any work begins, ensure your contractor handles these essential aspects:
Permits: Depending on your location and the scope of work, permits may be required. Your contractor should obtain these to avoid any legal issues.
Warranties: Ask about warranties for both labor and materials. A reputable contractor will offer warranties that cover their workmanship and the products they use.
After the job is done, insist on post-job verification to ensure everything was completed correctly:
Inspections/Testing: Have your contractor perform final inspections or tests, such as blower door tests or attic temperature checks. These will help confirm that their work has effectively improved your home’s air sealing and insulation.
Safety and liability considerations
Protecting both you and the contractor is vital during this process. Here’s how:
Insurance Checks: Ensure your contractor has adequate liability insurance to cover any damages that may occur during the work.
Workers Compensation: Ask about workers’ compensation coverage. This protects both you and the workers in case of on-the-job injuries.
Documenting pre- and post-work conditions is also crucial for protecting your interests:
Pre-Job Documentation: Take photos or videos of the problem areas before work begins. This can help resolve any disputes that may arise later.
Post-Job Walkthrough: Conduct a thorough walkthrough with your contractor after the job is complete. This gives you the chance to inspect their work and address any issues promptly.
Costs, Insurance, and Long-Term Maintenance Plan
Approach budgeting by getting multiple local quotes and prioritizing permanent fixes first. Track work items and any changes in insurance requirements as the project evolves.
Include a seasonal maintenance schedule to prevent recurrence, and document inspections and repairs for future claims. Always verify coverage details with your insurer and follow up on recommended maintenance tasks.
Working with insurance and documenting damage
First things first, safety. Make sure everyone’s safe before you start snapping pics.
Next, document the damage. Take clear photos of everything – icicles, ice dams, water stains, leaks. The more evidence, the better your case.
Keep receipts. Every repair, every prevention measure, keep those receipts. They’re gold when it comes to insurance claims.
Get contractor estimates too. Insurers often require them. It’s also a good way to compare quotes and find the best deal.
Annual and seasonal maintenance checklist
Prevention’s key here, folks. This checklist helps you stay on top of things year-round.
- Spring: Attic Check – Look for water stains, mold, or damaged insulation. If it’s damp up there, you’ve got a problem.
- Summer: Insulation Spot Check – Make sure your insulation’s in good shape. It should be dry and fluffy, not compressed or wet.
- Fall: Gutter Cleaning – Clogged gutters lead to ice dams. Keep ’em clean.
- Post-Storm Inspection – After big storms, check your roof for damage. Better safe than sorry.
Quick rule: Make this a habit. Once a season, check these spots. It’s quick, easy, and could save you a world of trouble.
Monitoring long-term performance
You’ve fixed the problem, great! But how do you know it’s really gone? Monitor, that’s how.
Start with attic temperature logs. If your attic’s too hot in winter or too cold in summer, something’s not right.
After big storms, do a visual check. Look for leaks, water stains, anything out of the ordinary.
Every few years, consider a blower-door or thermal scan. These tests find air leaks and insulation gaps. They’re not cheap, but they’re worth it if you suspect a problem.
Conclusion
Staying safe while fixing ice dam problems is non negotiable, and a proper fix will protect your roof, attic, and living space from recurring damage. The core approach is clear: address the air leaks, bring up insulation where it matters, and ensure there is a clear path for warm air and moisture to vent safely out of the attic.
Take the next steps in plain terms: start with a quick attic check for obvious air leaks and insulation gaps near the ceiling plane, then seal and insulate in a logical order from the attic floor upward, add sensible ventilation where needed, and test a small section first to confirm the approach before a full rollout. If you’re unsure, verify that you’re using the right materials for your climate and roof type, and document a simple maintenance cadence to keep problems from sneaking back in.
Avoid common missteps, such as rushing to patch without addressing the root causes, choosing sealants or insulation that don’t match your attic conditions, or skipping safety checks like turning off power and using careful ladder practices. Always test in a small area first, wear proper eye and respiratory protection when working in the attic, and never seal over active leaks or moisture sources without a plan for ventilation and drainage.
If the project grows beyond a straightforward sealing and insulation job, or you’re unsure about the roof, structure, or insulation levels, it makes sense to call a professional and vet contractors using the checklist you prepared from the Visual Guides. With a measured plan and sensible expectations, you can finish with a durable, weather-tight attic and a long-term maintenance routine you can trust. You’ve got this.
FAQ
How do I know if my attic ventilation is working?
Check for a steady flow of warm air at the ridge vent or peak and cooler air near soffits. Look for air leaks or condensation on the underside of the roof deck. If you’re unsure, have a professional verify airflow and dampers.
Can upgrading insulation help prevent ice dams?
Yes. Adequate insulation keeps warm attic air from melting snow near the roofline. Check the label on insulation for R-value recommendations and ensure the entire attic floor is well covered without gaps.
Is patching an ice dam a good long-term fix?
Patching the dam might stop water from backing up temporarily, but it won’t solve the underlying heat loss. Expect it to fail again if attic and roof conditions aren’t addressed. Use it only as a short-term stopgap while you work on sealing and insulation.
What steps should I take this season to prevent ice dams?
Seal air leaks around penetrations and along the attic rim. Improve insulation on the attic floor where it’s thin, and ensure proper venting from eave to peak. If you’re unsure about the balance, get a quick assessment from a pro before the first freeze.