
Introduction
Waterproofing a concrete balcony means protecting it from water intrusion by addressing slope, cracks, and edge details. Think of it as building a tiny water barrier that lasts through daily use. Check local rules and manufacturer instructions to choose the right materials and methods.
For slope correction, ensure the balcony has a gentle outward incline toward the drainage area and use materials suitable for surface leveling. Crack bridging involves spanning joints with compatible sealants or membranes. Edge metal details help direct water away from the rim and protect edging; follow manufacturer guidance for installation and compatible flashing.
Key takeaways
- Please select your country or your language to tailor guidelines.
- North America-focused guidance for typical balcony waterproofing products and installations.
- What this product is made from and general material compatibility guidance.
- What this product does and how to install it for drainage.
- Edge metal flashing, slope considerations, and crack-bridging interfaces to prevent leaks.
- Safety warning: follow manufacturer instructions and local codes during prep and application.
Table of Contents
- Introduction
- Key takeaways
- Please Select Your Country or Your Language.
- General Product Information and Performance Goals
- Surface Preparation and Diagnostic Checklist
- Slope Correction and Drainage Strategy
- Crack Assessment and Crack-Bridging Methods
- Edge Metal Flashing, Terminations, and Interface Details
- Waterproofing Systems, Compatibility, and Material Standards
- Tools, Materials Checklist, Safety, and Budget Planning
- Conclusion
- FAQ
Please Select Your Country or Your Language.
Selecting your country or language sets the regional rules that apply to code references, product availability, and warranty terms. This choice directly influences installation practices and what you can legally use in your area. Make this selection before you start the project so you see region-specific guidance.
After you choose, look for region-specific code references, product data sheets, and local retailer resources. The flow typically guides you to the applicable standards, compatible materials, and supplier support. Be aware of regional variances in slope, crack-bridging expectations, edge detailing, and substrate prep requirements, which can differ from place to place.
North America
The United States and Canada have specific standards for balcony waterproofing. In North America, you’ll typically find:
Common Standards: ASTM International standards are widely used here. Check ASTM’s website for relevant standards like E1745 (Waterproofing) and D6083 (Crack Bridging).
Contractor Licensing: Many states and provinces require contractors to be licensed. Check local regulations before hiring.
Climate Stresses: North America’s varied climates mean you’ll need systems that can handle freeze-thaw cycles, UV exposure, and high heat in some regions.
Why region matters
The climate, freeze-thaw cycles, and local codes significantly impact balcony waterproofing. Here’s why:
Climate: Hotter regions may require different materials than colder ones. For instance, some membranes might not perform well in extreme heat or cold.
Freeze-Thaw Cycles: In areas with freezing temperatures, waterproofing systems must withstand freeze-thaw cycles without degrading.
Local Codes: Building codes vary by region. For example, some areas may require specific slope requirements or crack-bridging standards. Always check local regulations before starting.
General Product Information and Performance Goals
A balcony waterproofing system is designed to prevent water ingress, manage drainage, and accommodate building movement without cracking or failures. It should create a continuous barrier while allowing for seasonal movement and drainage paths. The goal is durable performance across the balcony assembly.
Define performance goals and metrics you can verify on a label or data sheet, such as long-term integrity, vapor balance, and compatibility with slope correction and crack-bridging components. Also map the key interfaces and details like substrate prep, drainage outlets, and edge junctions to ensure a coherent system from substrate to interior finishes.
Function and key performance outcomes
A balcony waterproofing system’s primary goal is to keep water out. It should manage drainage efficiently, allowing water to flow off quickly. It also needs to accommodate building movement without cracking or failing.
Continuous waterproofing means no gaps or holes where water can seep in. Crack accommodation ensures the system can handle minor cracks without leaking. Positive drainage means water should flow off easily, not pond on the surface.
The system should also be durable and long-lasting. It should maintain its integrity over time, even with exposure to weathering and foot traffic.
What these products are made from
Balcony waterproofing systems come in various materials. Liquid membranes are applied like paint, forming a seamless barrier. They’re often used for their flexibility and ability to bridge small cracks.
Sheet membranes are rolled out and adhered or mechanically fastened. They’re robust and easy to install but can be less flexible than liquid systems.
Cementitious systems are made from cement-based materials that harden into a waterproof layer. They’re often used for their durability and ability to withstand heavy traffic.
Metal flashings are used at edges, corners, and penetrations. They direct water away from these vulnerable areas and prevent intrusion.
Maintenance & care overview
Regular maintenance is key to preserving your balcony’s waterproofing system. Inspect it annually for any signs of damage or wear, like cracks, peeling, or standing water.
Clean the surface regularly to remove dirt and debris that could clog drains or damage the membrane. If you notice any issues, address them promptly to prevent small problems from becoming big ones.
Maintaining your system also preserves warranties. Many manufacturers require regular maintenance as a condition of their warranty. Check your specific product’s requirements.
In general, a little care goes a long way in extending the life of your balcony waterproofing system and keeping it performing at its best.
Surface Preparation and Diagnostic Checklist
Start with an initial surface survey, noting spalling, delamination, movement, or loose edge metal. Photograph and record findings to track changes over time. This helps you plan remediation and coating choices with confidence.
Next, perform moisture diagnostics and slope checks to confirm drainage toward the waterproofing system. Document crack locations and plan bridging or sealing steps where cracks are present or active. Include safety notes and permits as part of your recordkeeping.
Visual and instrument inspection (visual checkpoints)
Before you start waterproofing, use this checklist to inspect your balcony’s surface. It helps catch issues early.
- Spalling: Look for flaking or peeling concrete. Tap with a hammer; if it sounds hollow, there might be a void behind.
- Delamination: Check for loose or peeling layers. Use a screwdriver to gently probe the surface.
- Ponding water: Inspect for standing water. This indicates poor drainage and could lead to further damage.
- Efflorescence: White, powdery deposits mean moisture is present. Remove with a wire brush or acid solution.
- Rusting rebar: Check for rust stains or red-brown discoloration. This indicates exposed or corroding reinforcement.
- Loose edge metal: Tighten any loose railings, coping, or other metal components to prevent water intrusion.
- Cracks: Inspect for hairline to wide cracks. Measure widths and note locations for later repair.
- Moisture test: Use an in-situ probe or calcium chloride test to confirm moisture content. High readings warrant further investigation.
Quick rule: Don’t skip this step. Early detection saves time and money later on.
Substrate repairs and remediation
Before waterproofing, fix any issues found during the visual inspection. Here’s a checklist to guide you.
- Concrete patching: Repair spalls and other damaged areas using a cement-based patching compound. Ensure proper bonding and trowel finish.
- Rebar treatment: If exposed, treat rusted rebar with an anti-corrosion primer or inhibitor before waterproofing.
- Leveling: Address any low spots or high areas to ensure proper drainage and even application of the waterproofing system.
- Structural issues: If you find significant cracks, delamination, or other signs of structural damage, consult a structural engineer before proceeding.
Quick rule: Fix what you can. For complex issues, don’t hesitate to call in a pro.
Slope Correction and Drainage Strategy
Correct slope and drainage are essential to reduce hydrostatic pressure and prevent ponding that can damage membranes. A consistent slope toward the drain helps the waterproofing system perform as intended. Always verify local code requirements and climate considerations when planning slope.
Outline concrete correction options like grinding, self-leveling compounds, or replacing the substrate with an intentional pre-formed slope. Consider drainage hardware and routing, edge transitions, and how the slope interacts with edge metal to maintain continuous drainage away from occupied zones.
How to achieve proper slope
Creating or restoring a proper slope on your concrete balcony is crucial for effective waterproofing. Here’s how:
Check manufacturer guidelines and local codes for minimum slope requirements. A common target is about 1/4 inch per foot towards the drain.
To achieve this, use screeding during concrete placement or apply tapered mortar beds or leveling mortars after installation. Ensure your chosen method is compatible with your waterproofing system.
Drainage details, scuppers, and outlets
Proper drainage is key to preventing ponding and protecting your waterproofing membrane. Here’s how to detail it:
Plan for a primary balcony drain aligned with the slope. If needed, integrate edge drains or scuppers into your design. Ensure they’re flashed properly to prevent water ingress.
Provide a clear path for water to flow away from occupied zones. Consider local codes and climate when planning overflow provisions. Regularly inspect and maintain these outlets to prevent clogging.

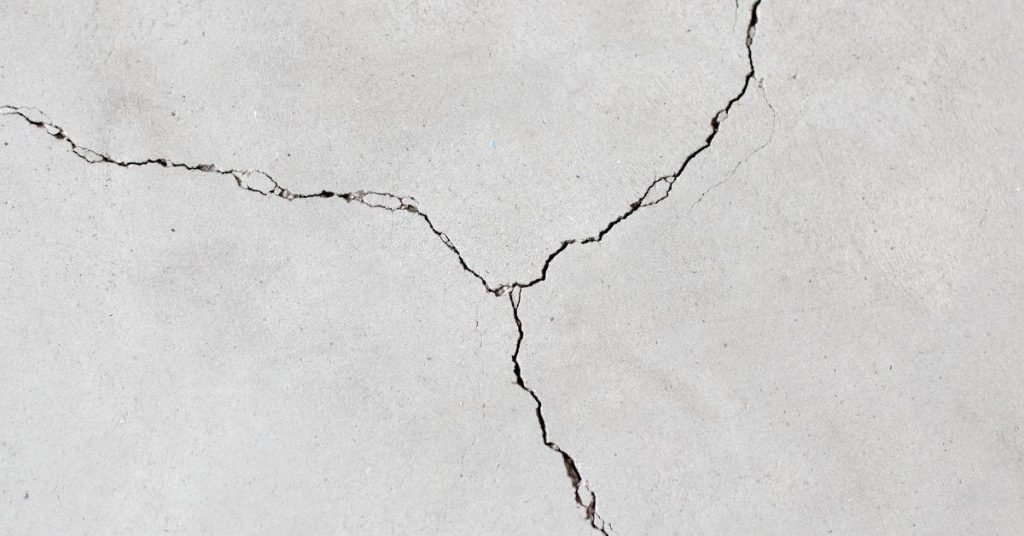
Crack Assessment and Crack-Bridging Methods
Differentiate crack types by width, movement, and cause such as settlement or thermal movement. Active movement requires different treatment than dormant cracks. Document crack locations and monitor signs of leaks during rain events for a complete view.
Plan to bridge active or wide cracks with flexible, waterproof bridging products, while reserving structural repairs for cracks indicating serious concerns. Choose compatible membranes and primers, and follow an orderly sequence from dry-out to final coating before testing for moisture resistance.
Identifying crack types and risk level
Cracks in your concrete balcony can vary greatly. Knowing which ones to repair immediately and which ones you can monitor is crucial.
Hairline cracks (less than 1/8 inch) are usually harmless, caused by minor shrinkage or temperature changes. They don’t need immediate attention but keep an eye on them.
Movement cracks (up to 1/4 inch) widen and close with temperature changes or structural movement. These should be bridged with flexible materials to prevent water intrusion.
Structural cracks (over 1/4 inch, especially wide or diagonal) indicate serious issues like settlement or structural damage. These need immediate attention from a professional. Always err on the side of caution with these.
Crack-bridging materials and application techniques
Choosing the right material for bridging cracks is vital. It affects how well your balcony resists water intrusion and maintains its appearance.
- Flexible Sealants (e.g., polyurethane, silicone): These stretch and compress with temperature changes and structural movement. Look for products rated for outdoor use and high UV resistance. Tip: Apply in a ‘V’ shape to improve adhesion and prevent washout.
- Embedded Fabric in Liquid Membranes: A fabric embedded in a liquid membrane provides extra strength and flexibility. This system is great for wide cracks but requires careful surface preparation to ensure proper bonding.
- Flexible Cementitious Systems (e.g., polymer-modified cement): These systems provide a strong, flexible repair that can withstand some movement. They’re easy to apply but may not be suitable for very wide or active cracks. Tip: Use a bond-breaker like a plastic sheet to prevent the repair from bonding too strongly with the existing concrete.
- Epoxy Injections: While not strictly a ‘bridging’ method, epoxy injections can be used for wider cracks where structural integrity is compromised. They require specialized equipment and knowledge but provide a strong, permanent repair.
Edge Metal Flashing, Terminations, and Interface Details
Detail edge flashing systems and their integration with the membrane at balcony perimeters to prevent water intrusion. Include drip edges, counters-flashing, and appropriate fasteners to withstand environmental exposure. Ensure materials work with the chosen waterproofing system and substrate.
Define termination strategies at transitions and openings, including sealants and proper overlaps to maintain continuous water-tightness. Plan installation sequencing, securement methods, and drainage continuity across edge details, then outline inspection and maintenance steps to catch failures early.
Edge Metal Details and Securement
The balcony’s edge is where water first hits, so it needs robust protection. Here’s how to detail your edge metal flashings:
Metal coping caps the edge, preventing water from seeping in. Use aluminum, stainless steel, or copper for durability and compatibility with your chosen membrane.
Secure coping with stainless steel screws every 12-16 inches. Seal screw heads with a compatible sealant to prevent water intrusion. Ensure coping maintains the balcony’s slope for proper drainage.
Transitions to Walls, Doors, and Balustrades
Balconies meet other building elements at various points. Here’s how to ensure continuous waterproofing:
Step flashing is crucial where the balcony meets walls. Install it in an open ‘L’ shape, lapping shingles and siding. Seal with a compatible sealant.
At door openings, use reglets – metal strips that fit into grooves cut into the door frame. Backflash them to direct water back onto the balcony. Seal with a membrane-compatible sealant.
For balustrades, use backflashing. Install coping first, then flash over it, lapping up and under the balustrade. Seal with a compatible sealant, ensuring no gaps for water intrusion.
Waterproofing Systems, Compatibility, and Material Standards
Provide a concise taxonomy of balcony waterproofing system types, with quick pros and cons, ideal substrates, and typical use cases for concrete slabs with toppings or pavers. Choose systems based on exposure, movement, and traffic, and ensure the chosen option fits your balcony setup. Verify that the system matches your substrate and edge detailing plan.
Discuss compatibility across the substrate stack, including primers, adhesives, and fasteners, and how edge details affect performance. Compare performance attributes and standards, map applicable test methods, and outline installation prerequisites such as surface prep and cure times. Include QA steps and documentation expectations for code compliance and warranties.
Choosing the right system for the balcony use
The first step in waterproofing your concrete balcony is selecting the right system. Here’s a quick guide to help you decide:
Liquid-applied membranes: Ideal for balconies with heavy pedestrian traffic and exposure to weather. They’re flexible, seamless, and can be applied directly over concrete slabs or toppings.
Sheet membranes: Suitable for areas with light to moderate traffic. They come in rolls and are easy to install but may require additional seam tape for added protection.
Cementitious coatings: Great for balconies with ceramic pavers or toppings. They provide a durable, hard-wearing surface that can withstand foot traffic and exposure.
Under-tile membranes: Perfect for balconies where tiles will be installed. They protect against moisture from below and prevent tile debonding.
Material specs, compatibility, and standards explained
Understanding material specifications, compatibility, and industry standards is crucial for a successful waterproofing job. Here’s what you need to consider:
- Elongation: Look for systems with high elongation (stretchability) to accommodate substrate movement. This prevents cracking under stress.
- Tear resistance: Check the system’s tear strength to ensure it can withstand foot traffic and exposure without damage.
- Water absorption & vapor transmission: Low water absorption and vapor transmission rates prevent moisture from penetrating or being trapped beneath the membrane, which could lead to delamination or mold growth.
- Slip resistance: For safety, choose a system with good slip resistance, especially for exposed balconies.
- Temperature tolerance: Ensure the system can withstand the balcony’s expected temperature range to prevent degradation over time.
- Compatibility: Check manufacturer guidelines for compatibility with existing coatings, primers, and adhesives. Incompatible materials can lead to weak bonds or delamination.
- Edge detailing: Consider how the system will be terminated at edges, walls, and drains. Incorrect termination can allow water ingress and compromise performance.
- Industry standards: Verify that the chosen system meets relevant ASTM/ISO test methods and project specifications for quality assurance.
Tools, Materials Checklist, Safety, and Budget Planning
Provide a practical list of hand and power tools for prep, application, and cleanup, plus PPE and safety considerations. Include a realistic workflow that minimizes interruptions and rework. Keep notes on tool handles and maintenance where relevant to a DIY project.
Outline materials with primers, crack bridging products, the chosen membrane, edge metal details, and drainage components. Add safety reminders, permit considerations, and budgeting guidelines to help you plan purchases and prevent surprise costs. End with a simple documentation habit to track materials, dates, and inspections.
Tools and materials checklist (DIY-friendly)
Before you start, use this checklist to ensure you have all the essentials for a successful DIY waterproofing job.
- Grinders: For surface prep. Check they’re in good working order.
- Primers: To prepare the substrate. Ensure compatibility with your chosen membrane.
- Trowels & squeegees: For applying membranes and smoothing surfaces.
- Margin trowel: For accurate application of materials near edges.
- Crack bridging products: To seal hairline cracks. Check they match your membrane type.
- Waterproofing membrane: Choose a DIY-friendly, peel-and-stick system for ease of use.
- Edge metal details: Flashings and trim to protect edges from water intrusion.
- Sealants & fasteners: For securing edge metals and sealing penetrations.
- Testing equipment: Moisture meters to check substrate dryness before application.
Quick rule: Always double-check compatibility of materials with your chosen waterproofing system.
Safety measures, permits, and site access
Prioritize safety and compliance to ensure a smooth project.
- Fall protection: Install guardrails or use harnesses for high balconies. Check local regulations.
- Scaffold/ladder safety: Ensure they’re stable, secure, and in good condition before use.
- Eye/face protection: Wear safety glasses or goggles to protect from debris.
- Respirators/dust masks: Use when grinding or sanding to prevent inhalation of harmful particles.
- Gloves & footwear: Wear appropriate gloves and sturdy, non-slip shoes for safety.
- Local permits: Check if you need a permit. Non-compliance may result in fines or project halt.
- Licensed trades: Hire professionals for complex tasks like electrical work or structural repairs.
- Job-site safety: Keep the area clean and clear of tripping hazards.
Quick rule: Never compromise on safety. Always prioritize it over speed or convenience.
Cost considerations and budgeting tips
Understand the factors influencing cost to create a realistic budget.
- Prep extent: More extensive prep work means higher labor costs. Estimate accurately.
- System chosen: DIY-friendly systems are often cheaper but may lack pro-grade performance.
- Drain work: Repairs or modifications to drainage can add significant cost.
- Labor: If hiring help, factor in their rates and any additional material costs.
- Contingency: Allocate 10-15% of your budget for unexpected expenses.
- Quotes: Obtain multiple quotes from suppliers to compare prices.
- Tool rental/purchase: Consider if it’s cheaper to rent or buy tools based on frequency of use.
Quick rule: Always overestimate your budget for unexpected costs. It’s better to have extra than fall short.
Conclusion
The balcony stays dry and safe when you finish with a correct slope, solid crack bridging, and tight edge details. Getting the drainage right and keeping the surface well sealed protects the concrete and your ledger and furniture from costly damage.
Do this: verify the slope toward the drain and confirm any cracks are sized up and bridged, then install the flashing and termination details as planned, followed by a compatible waterproofing system. Clean and prime the surface as specified, apply in fair weather, run test sections first, and seal all joints and terminations carefully. Use the materials and tools you checked off, and follow the manufacturer guidelines for cure and protection time.
Common mistakes to avoid: rushing the surface prep or skipping a diagnostic check, which leads to bonding failures or hidden leaks; over-applying or under- applying waterproofing, which creates thin spots or voids; and failing to extend edge metal details past the edge to protect against water infiltration. Safety rules to follow are simple: work in sections, don’t compromise linings or joints, wear eye and skin protection, test a small area before full application, and never mix incompatible products in the field.
If the project demands unusual detailing, big spans, or you encounter uncertain substrates, consider bringing in a professional. When in doubt, pause, reassess, and plan a controlled scope before proceeding. Stay focused, finish in stages, and you’ll have a durable, low-maintenance balcony that looks good and performs well for years to come.
FAQ
What are practical slope correction options for a balcony that doesn’t drain properly?
Start with a measured slope check to confirm drainage direction. Use a compatible leveling compound or self-levelling cement defined by the product label and local rules, then verify the finish height to ensure water sheds away from edges. Always follow manufacturer instructions for cure times and surface prep.
What are reliable crack-bridging methods for balcony joints?
Identify active cracks and clean them. Use a crack-bridging membrane or compatible reinforcing material per the product datasheet, and install according to the manufacturer’s guidance. If in doubt, check label details and ensure compatibility with your chosen waterproof system.
What edge metal details help prevent leaks at balcony perimeters?
Install edge flashing that overlaps the waterproofing membrane and turns up at the edge. Seal terminations and overlaps per the flashing manufacturer and keep the interface clean and dry during installation. Refer to product instructions for compatible substrates and joint treatment.
What are common causes of water leaks in concrete balconies, and how can I spot them?
Leaks usually trace to failed edge details, cracks, or improper slope/drainage. Look for damp spots, staining, or spalling near edges and joints. For fixes, follow the waterproofing system’s guidelines and check labels for compatibility with your concrete surface.