
Introduction
Polymer-modified overlays are thin concrete toppings that use polymer additives to improve adhesion and durability. Mix according to the product label and manufacturer instructions; mix until uniform. Apply in an even coat to the prepared surface, checking that the mixture stays workable.
The right thickness and proper curing are key to long‑lasting results. Follow the label for recommended thickness and always respect natural drying times based on your climate; protect from sun, wind, and moisture as needed. For planning, check the batch yield on the bag and estimate coverage per mix so you don’t run short.
Key takeaways
- Follow manufacturer guidelines for mixing ratios and thorough dispersion of polymers.
- Estimate thickness per area from product data and avoid over-application.
- Verify coverage per bag or batch using labeled square footage guidance.
- Curing time varies by conditions; ensure proper ventilation and temperature.
- On-site timing: schedule application, tack coats, and cure windows carefully.
- Wear PPE; monitor VOCs and environmental restrictions during mixing and curing.
Table of Contents
- Introduction
- Key takeaways
- What Polymer-Modified Overlays Are and Why They Matter
- Mixing: Ratios, Batch Sizing, and Equipment
- Thickness, Coverage, and Estimating Material Needs
- Pot Life, Curing Schedule, and Strength Development
- Application Steps, Timing, and on-Site Best Practices
- Safety, Vocs, and Environmental Considerations
- Storage, Handling, and Warranty Information
- Troubleshooting, Common Mistakes, and Cost/Scope Planning
- Conclusion
- FAQ
What Polymer-Modified Overlays Are and Why They Matter
Polymer-modified overlays are cementitious surfaces that include polymer additives to improve performance. They mix cement or cementitious base with polymers and other modifiers to change how the mix flows, bonds, and cures, giving them more flexibility than plain cement overlays. They differ from plain overlays by their tack, bond potential, and resistance characteristics, which come from the polymer components. In simple terms, they create a smoother, more controllable layer that can bridge minor surface gaps and feather joints without sacrificing stiffness. Typical materials add polymers and sometimes latex or acrylic components to the cement matrix, but check the label for specifics.
They matter because they help you repair, level, and wear surfaces in one shot, with better flow, better adhesion to substrates, and fewer open cracks as they cure. The result is a more durable surface that resists abrasion and impact better than unmodified mixes, with reduced shrinkage cracking in many conditions. For DIY work, you’ll want to verify substrate compatibility, understand recommended curing methods, and follow mix design guidance from the product label or datasheet, because exact ratios and practices vary. Always perform substrate prep, check slump or flow targets, avoid contamination, and plan curing or sealing steps for the chosen environment.
Composition and types
Polymer-modified overlays are a mix of cement, water, and polymer admixtures. The polymers change the properties of the overlay, making it more flexible, adhesive, and water-resistant.
The type of polymer used determines these changes:
- Epoxy: Enhances adhesion and resistance to chemicals and moisture.
- Polyester: Increases flexibility and impact resistance.
- Acrylic: Improves bond strength and water resistance.
Performance benefits and common uses
Polymer-modified overlays offer several advantages over plain cementitious overlays:
- Improved bond: Polymers enhance the overlay’s ability to stick to substrates, reducing delamination.
- Reduced cracking: The increased flexibility of polymer-modified overlays helps minimize shrinkage-related cracks.
They’re commonly used for:
- Repairing and leveling concrete surfaces with irregularities or feathered joints.
- Creating thin, smooth substrates for further toppings or coatings.
- Improving the durability of interior floors, ramps, and other high-traffic areas.
Mixing: Ratios, Batch Sizing, and Equipment
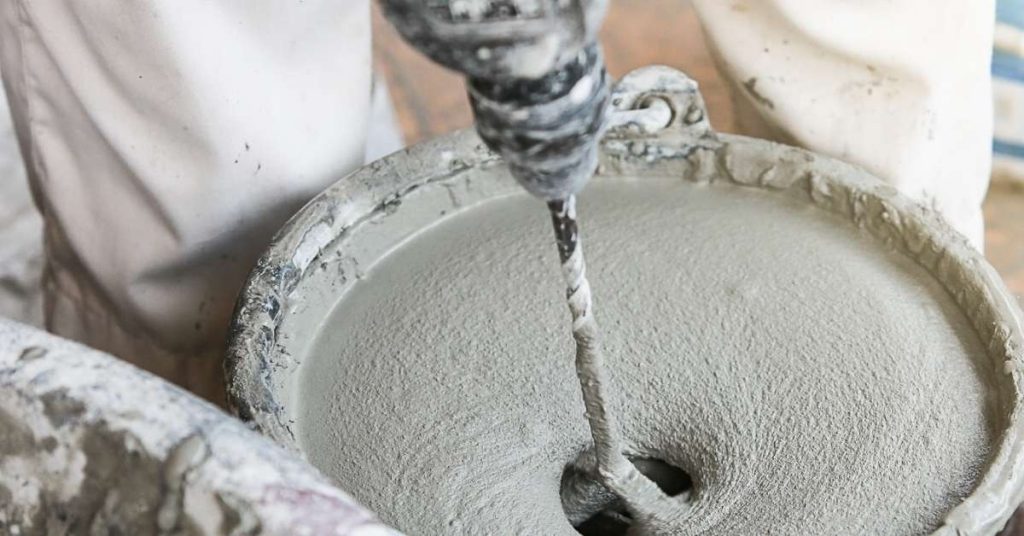
Mixing starts with getting the water-to-powder ratio right for the product you’re using. Follow the manufacturer’s instructions and adjust for aggregate size, temperature, and desired open time. Use clean equipment and batch in consistent sizes to keep pours uniform.
Choose a setup that minimizes segregation and scorching, like a drill with a paddle or a plaster/mortar mixer, and follow a simple sequence: add powder, add water gradually, mix until uniform color and smooth without lumps. Batch in planned sizes, stick to the same batch volume, and note pot life and cure window on the label. If anything seems off—streaky color, gritty texture, or quick stiffening—stop and check the label or datasheet before continuing.
Typical mixing ratios and how to verify them
Manufacturers provide exact water-to-powder ratios for polymer-modified overlays. Stick to these for best results.
Verify on datasheet: Check the product’s datasheet or technical data sheet (TDS) for precise ratios. Some may specify by volume, others by weight – follow as instructed.
Re-tempering limits: Be aware of re-tempering limits. Overworking the mix can degrade performance. If you need to remix, do so within the manufacturer’s guidelines.
Mixing tools and equipment checklist
Before you start mixing, ensure you have all necessary tools and equipment. This ensures a smooth process and consistent results.
- Forced-action mixer: Use one to ensure thorough, even mixing.
- Buckets: Use clean, food-grade buckets for measuring and mixing.
- Measuring devices: Accurate measurement is key. Use a scale or measuring cup as specified by the manufacturer.
- Trowels: For spreading the mixed overlay.
- Mixers with paddle: Can be used for smaller batches, but ensure they’re powerful enough to mix thoroughly.
- Clean work surface: Ensure your mixing station is clean and flat to prevent contamination or spills.
- Protective gear: Safety first. Wear gloves, safety glasses, and a dust mask as needed.
Quick rule: Always follow manufacturer’s instructions for specific tools and equipment.
Small-batch and large-batch techniques
Whether you’re mixing a small batch or a large one, consistency is key. Here’s how to maintain it.
Scaling mixes: For larger batches, scale up the mix proportionally. If the datasheet says 1:2 for a small batch, use 3:6 for a larger one, and so on.
Avoid overmixing: Overmixing can introduce too much air into the slurry, weakening its strength. Mix just until uniform – no more than 5 minutes with most overlays.
Air entrapment: To avoid air pockets, mix slowly at first to wet all dry ingredients, then increase speed gradually. Always check for air bubbles before application.
Thickness, Coverage, and Estimating Material Needs
Different jobs need different thickness ranges, from featheredge and thin overlays to mid-thickness skim coats and thicker build-ups. The choice drives durability, drying time, and the final surface feel, and it hinges on how porous or prepared the substrate is. You should keep tolerances in check to avoid cracking or delamination; when in doubt, verify with the product label or datasheet.
This matters because thickness interacts with curing conditions and moisture. Use plain measurement methods and re-check as you work, since coverage and waste depend on the chosen thickness. Remember that thicker mixes cover less area per application and drying depends on ambient and humidity control, so plan timing and technique to avoid rapid evaporation or curling; keep a quick-reference plan for leveling, feathering, or a durable high-traffic surface in mind and follow the label for exact guidance.
How to calculate coverage per bag and batch
To estimate how many bags of polymer-modified overlay you need, first figure out the coverage per bag. Most products list this on their packaging or in technical data sheets.
Here’s a simple calculation:
Coverage (sq ft/bag) = Density (lb/gal) x Desired Thickness (inches) / 16
Layering, feathering, and achieving uniform thickness
For a durable, even finish, apply polymer-modified overlay in multiple thin lifts instead of one thick layer.
To feather edges:
Use a trowel to spread the mix outwards from the center, reducing the thickness as you reach the edge. This prevents abrupt transitions that could crack or delaminate.
Pot Life, Curing Schedule, and Strength Development
Pot life is the clock you have after mixing until the mix starts to stiffen; working time is the period you can actually place and finish it while it’s workable. In PM overlays, batch size and mixing ratios squeeze or stretch that window, and factors like ambient temperature, mixer speed, aggregate size, and polymer content all push the clock one way or the other. Plan your steps to mix, transfer, and trowel within that window so you don’t create cold joints or skim coats.
Curing starts after placement and moves from initial set to full cure, with temperature swings and humidity affecting the rate and early strength gain. Too-fast drying can lead to cracks or bond failures, while proper damp or sealed curing helps durability; follow product guidance on cure methods such as misting, blankets, or curing compounds. Monitor strength development and look for signs of inadequate cure like soft spots or delamination so you adjust the schedule or methods accordingly.
Pot life and working time management
The pot life of a polymer-modified overlay (PMO) mix is the time it takes for the mixture to become too thick or hard to use. Working time, on the other hand, is the time you have from mixing until the PMO starts to set.
Understand that these windows are short – often just 30 minutes to an hour. To manage them:
- Keep it cool: Lower temps extend workable time. Keep your mix and workspace as cool as possible.
- Mix small batches: Smaller batches mean less material to handle before it sets.
- Discard if unsure: If you’re not sure about the mix’s age, discard it. It’s better than risking cold joints or skim coats.
Curing stages and expected strength gains
Curing is when the PMO gains its final strength and durability. It happens in three main stages:
- Initial set: This starts immediately after placement, as the mix begins to harden.
- Walkable stage: After 24-48 hours, you can walk on it lightly without damaging the surface. But avoid heavy traffic.
- Traffic-ready stage: Full strength takes around 7 days in ideal conditions (70°F/21°C and high humidity). Check manufacturer data for specific milestones and test standards.
Temperature swings can slow down or speed up the curing process. Keep an eye on it, and if you see signs of inadequate cure like soft spots or discoloration, take action to correct it before bonding or delamination failures occur.
Application Steps, Timing, and on-Site Best Practices
This section walks you through a practical, step-by-step flow from pulling a clean substrate to the final finish, with careful attention to when each action should happen and how environmental conditions can make or break bond and durability. Start with substrate readiness, then move into mixing and batch control, surface prep, primer or bonding if needed, proper sequencing of passes, and the essential timing between steps to avoid cold joints, delamination, or weak edges.
Understanding these steps helps you plan ahead, anticipate what to check on site, and keep your project in the acceptable temperature and humidity window so cure times are predictable and you don’t trap moisture. By sticking to the order, controlling thinning and additions per the label, and shielding the work from wind or sun when needed, you reduce waste, improve consistency, and make finishing and curing safer for you and the surface. This is about reliability and long-term performance, not quick shortcuts.
Surface preparation and priming
Before applying the polymer-modified overlay, ensure your concrete surface is clean and sound. Remove any loose material, dirt, or contaminants using a wire brush or power washer.
Moisture testing is crucial. Use a calcium chloride test to confirm moisture levels are below 4 lbs per 1000 sq ft in 24 hours. If not, address the issue before proceeding.
Proper surface profiling creates mechanical bond. Shotblast or grind the surface to expose fresh aggregate and create a profile of at least 3 mils (0.003 inches).
Apply a bonding agent or primer immediately after profiling. This promotes adhesion between the old concrete and new overlay. Follow manufacturer’s guidelines for application rates and drying times.
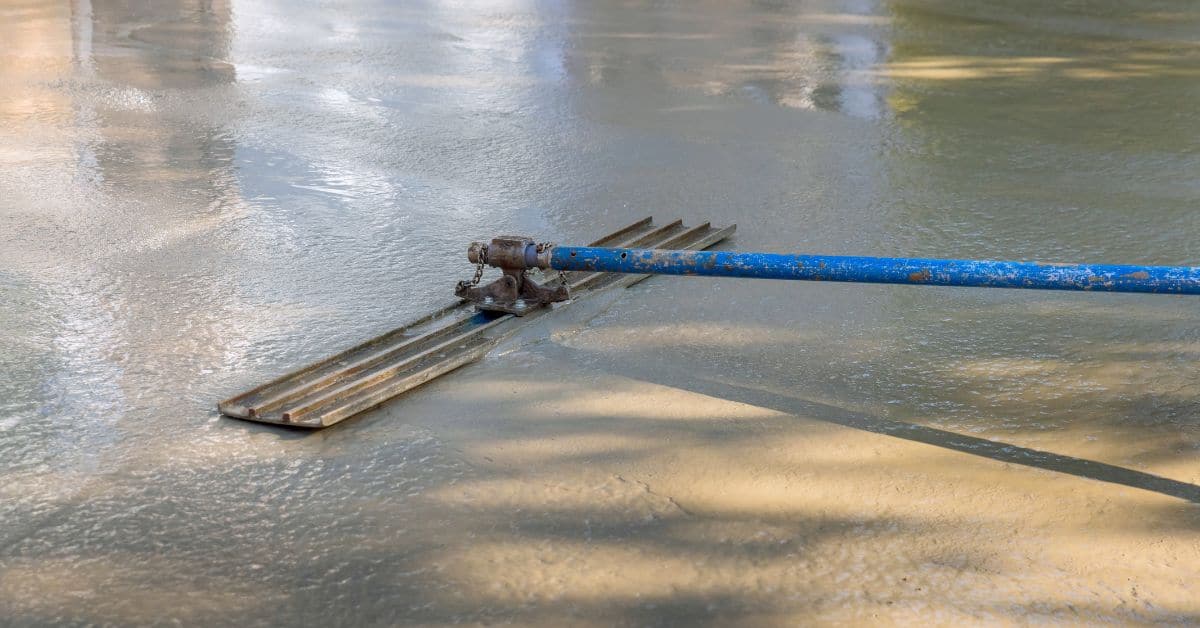
Troweling, smoothing, and finishing techniques
Start troweling the overlay from one corner of the area, working in small sections. Use a square-notched trowel to spread the material evenly, maintaining your desired thickness.
For a smooth finish, use a straight edge or screed to level the surface as you go. Work quickly but carefully to avoid creating ridges or trowel marks.
Float the overlay using a bullfloat or magnesium float to remove excess water and embed aggregate. This step helps achieve a consistent, smooth finish.
After floating, use a steel trowel to final-finish the surface. Work in small sections, holding the trowel at a 45-degree angle to the surface. This helps create a smooth, uniform texture without leaving marks.
Timing for installing floor coverings and opening to traffic
The timing of installing floor coverings or opening the area to traffic depends on overlay thickness, ambient conditions, and manufacturer recommendations. Generally, allow 7 days minimum for the overlay to cure before installing resilient flooring.
For thicker overlays (over 1/4 inch), consider allowing more time – up to 28 days. Always follow the manufacturer’s guidelines specific to your product and conditions.
Before opening the area to pedestrian or vehicular traffic, ensure the overlay is fully cured. Perform a cure check by applying a light coat of sealant or paint. If it dries evenly without blistering or lifting, the overlay is ready for use.
In cold weather, extend curing times to allow for proper strength development. Always protect the curing overlay from rain and excessive moisture.
Safety, Vocs, and Environmental Considerations
PPE, ventilation, and VOC awareness go hand in hand when mixing and applying polymer-modified overlays. Wear gloves, eye/face protection, and a respirator or appropriate breathing protection as needed, plus sturdy clothing and footwear. Set up a dedicated mixing area with clear exits and keep hazards specific to resins in mind.
Ventilation should control exposure without just blasting air into the room—use local exhaust where possible and monitor air if you have to. Learn to read VOC labels on modifiers and bonding agents, and choose lower-VOC options when you can. Plan for spill containment, proper disposal, and cleanup methods that minimize emissions, water runoff, and waste, and always store leftover mix and rags safely according to the label and local guidance.
Personal protection and on-site controls
Safety starts with the right gear. Wear these:
Gloves: Protect your hands from chemicals and rough surfaces.
Eye/face protection: Goggles or a face shield keeps your eyes safe from splashes and dust.
Respirator: Use one if you’re mixing or working with high VOC concentrations. Follow manufacturer’s instructions for fit testing and maintenance.
VOCs, disposal, and sustainable options
Understand your products’ VOC content:
Check labels. Look for ‘VOC Content’ or ‘Volatile Organic Compounds’. Lower numbers mean lower emissions.
Dispose of leftovers safely:
Follow local regulations. Generally, mix with sand or other inert materials before disposal to reduce leaching and emissions.
Go green:
Look for products with low VOCs, certifications like GREENGUARD, or third-party environmental claims. Consider using enzyme-based cleaners instead of solvents.
Storage, Handling, and Warranty Information
Store unopened bags in a dry, shaded area away from moisture and direct sunlight. Keep bags off the ground, stacked with ventilation, and never pile them where they’re hard to access. Read the label for shelf life indicators and discard signs, and follow the manufacturer’s storage directions.
Handle unopened bags during transport with care, rotate stock using FIFO, and inspect each bag at receipt for punctures or weak seams. Once you mix material, the usable pot life is limited, so plan your work and keep unused mix in a protected container as directed. For warranty and claims, preserve batch numbers, dates, and site conditions, and follow the product guidelines when filing with the manufacturer.
Storage conditions and shelf life best practices
Store your polymer-modified overlay materials in a cool, dry place. The ideal temperature range is between 50°F to 80°F (10°C to 27°C). Keep them away from moisture and direct sunlight.
Stack bags neatly, leaving space for ventilation. Never store them directly on the ground to prevent moisture absorption. If you need to open a bag mid-project, seal it tightly with plastic wrap or a bag clip to maintain freshness.
Check each bag before use. If you see any signs of moisture damage, such as discoloration or a change in consistency, discard it immediately. Unopened bags have a shelf life of about 12 months from the manufacturing date, so always check the batch and expiration dates before using.
Packaging, transport considerations, and warranties
Polymer-modified overlays typically come in 40-80 lb (18-36 kg) paper or plastic-lined bags. When transporting, be careful not to puncture the bags. Use a dolly or hand truck for heavy bags.
Upon delivery, inspect each bag for any signs of damage. Check for punctures, tears, or moisture. If you find any issues, contact your supplier immediately.
Warranties vary by manufacturer but typically cover defects in materials and workmanship under proper storage, handling, and application conditions. To make a claim, you’ll need to provide proof of purchase, batch numbers, dates, and site conditions. Always keep these documents on hand. Read the warranty terms carefully before starting your project.
Troubleshooting, Common Mistakes, and Cost/Scope Planning
Identify the most common application errors with polymer-modified overlays—especially improper surface prep, incorrect mixing, premature sealing, and weak cure protection—and build clear prevention checklists. Emphasize essential prep steps like scuff/etch, moisture tests, bond coat needs, and porosity checks before any mix runs. Keep the focus on what you must verify on the job to avoid costly fixes.
Provide practical troubleshooting paths for delamination, debonding, pinholes, color or texture issues, and curing cracks, with repair timelines and when to escalate. Include thickness and layering guidelines tied to substrate type and traffic, plus when to reinforce or add toppings. Add a straight budgeting framework: material, labor, equipment, testing, and contingency—and use simple, rule-of-thumb guidance to help you decide project scope without guessing.
Common mistakes and how to avoid or fix them
Knowing these common pitfalls can save you time, money, and headaches. Here’s what to watch out for:
- Incorrect mixing ratios: Wrong proportions of polymer, cement, and water lead to weak overlays. Always follow the manufacturer’s guidelines.
- Inadequate surface prep: Skipping scuffing, etching, or applying a bond coat results in poor adhesion. Prep surfaces as detailed earlier.
- Premature sealing: Sealing too soon traps moisture and prevents curing. Wait for the recommended time before sealing.
- Insufficient cure protection: Overlays left exposed to harsh conditions may crack or delaminate. Protect with plastic sheets, burlap, or other methods during curing.
Catch these issues early and you’ll have a durable, long-lasting overlay.
Visual checkpoints and quality-control tests
Before opening to traffic or installing floor coverings, use this checklist to ensure your overlay is ready:
- Surface appearance: Check for pinholes, voids, or inconsistent texture. Repair any defects before proceeding.
- Color consistency: Ensure the overlay’s color is even throughout. Address any variations now to avoid costly rework later.
- Bond pull test: Perform a simple bond pull test to confirm adhesion. If it fails, address the issue before proceeding.
- Hardness test: Check the overlay’s hardness with a suitable tool. Soft spots may indicate incomplete curing or poor mixing.
- Moisture testing: Ensure the substrate and overlay are dry. Moisture can compromise adhesion and strength.
- Slump test: Check the overlay’s consistency to ensure it meets specifications. Incorrect slump may indicate wrong mixing ratios or poor materials.
- Skid resistance: Test for adequate slip resistance. Insufficient skid resistance can lead to safety hazards.
- Curing-related cracks: Inspect for any cracks due to curing. Repair as needed before proceeding.
Quick rule: Regular visual checks and simple tests help catch issues early, saving you time and money in the long run.
Cost comparison and project planning tips
Accurate cost estimation involves more than just material prices. Consider these factors:
Material yield: Estimate how many square feet each bag of overlay mix will cover. This helps you buy the right amount.
Labor time: Allocate sufficient hours for mixing, application, and curing. Rushing can lead to mistakes and rework.
Curing delays: Account for downtime during curing stages. Delays can impact your project timeline and budget.
Additionally, include ancillary products like primers, sealers, and testing equipment in your cost comparison. These items are crucial but often overlooked.
Conclusion
Polymer-modified overlays pay off with durable, good-looking surfaces when you follow the plan, test ideas on a small area, and respect curing and safety rules. The payoff is a smoother, tougher floor or substrate that stands up to traffic, chemicals, and weather.
Move from theory to action with a simple flow: confirm your chosen mix ratios and batch size, gather and check all equipment, verify the base is clean and ready, determine the thickness and coverage, estimate material needs with a margin for waste, note the pot life, schedule the curing window, and set up proper ventilation and safety gear before you start applying. Keep your work area organized, measure and recheck as you go, and document any changes for the next batch.
Two or three common missteps to avoid are mixing too large a batch beyond the pot life, skipping surface prep or moisture tests, and opening the door to moisture or temperature swings during curing. Stay safe by wearing PPE, ventilating well, and keeping the environment consistent. If you see film cracking, delamination, or uncontrolled shrinkage, pause, reassess your mix and curing plan, and don’t push through.
If the project exceeds your comfort zone—large areas, complex substrates, high moisture, or tight deadlines—consider hiring a pro and get a written curing and warranty plan. Otherwise, stay deliberate, test first, and act with clear, simple steps. You’ve got this: plan carefully, work cleanly, and finish strong.
FAQ
How should I mix polymer-modified overlays for best results?
Follow the manufacturer’s instructions on the bag or datasheet. Mix in clean water and mix thoroughly until there are no dry pockets. Check that you have a uniform consistency that’s workable but not too loose or too stiff.
What thickness can I reasonably expect to apply in one pass?
Stick to the thickness range recommended by the product. If you need more, do multiple, thinner lifts rather than one thick layer. Check the label for max per-coat guidance and plan your passes accordingly.
How much material does a bag or batch cover?
Coverage depends on mix design and surface condition. Use the product’s coverage guide, but be prepared for variations on rough substrates. If in doubt, estimate conservatively and plan extra material.
What are typical curing times and conditions I should respect?
Respect the manufacturer’s cure times for initial set and full strength. Temperature, humidity, and airflow affect curing—hot or windy days speed it up, cool damp days slow it down. If you’re unsure, check the instructions and local job-site conditions before proceeding.