
Introduction
Laminate floor cleaning means removing dust, grime, and spills without soaking the panels. You’ll use a simple routine of dry sweeping, light damp mopping, and quick spot care. Keep moisture low and avoid soaking seams; check the floor maker’s guidance for any cautions.
This article walks you through practical steps and the moments to stop. If a spill happens, blot it up right away and use a mild cleaner only as directed on the label. Know when to pause cleaning if you notice lifting, warping, or dulling, and consult the manufacturer or a pro.
Key takeaways
- Inspect floor for damage before cleaning; note loose planks and seams.
- Dust and dry sweep to prevent grit from scratching surfaces.
- Use only manufacturer-approved cleaners; avoid ammonia, wax buildup, or steam mops.
- Protect edges with a barrier and clean in small sections to avoid streaks.
- Stop cleaning if floor feels tacky or you notice increased slipperiness.
- Regular maintenance: sweep daily, mop with minimal moisture, reseal gaps as needed.
Table of Contents
- Introduction
- Key takeaways
- Quick Overview and Safety Considerations
- Tools and Materials Checklist
- Prep: Inspection, Dusting, and Barrier Setup
- Step-by-Step DIY Cleaning Process
- Stop Points: When to Pause or Stop Cleaning
- Stain, Scratch, and Spill Troubleshooting
- Preventative Care and Maintenance Schedule
- Visual Checkpoints and When to Call a Pro
- Conclusion
- FAQ
Quick Overview and Safety Considerations
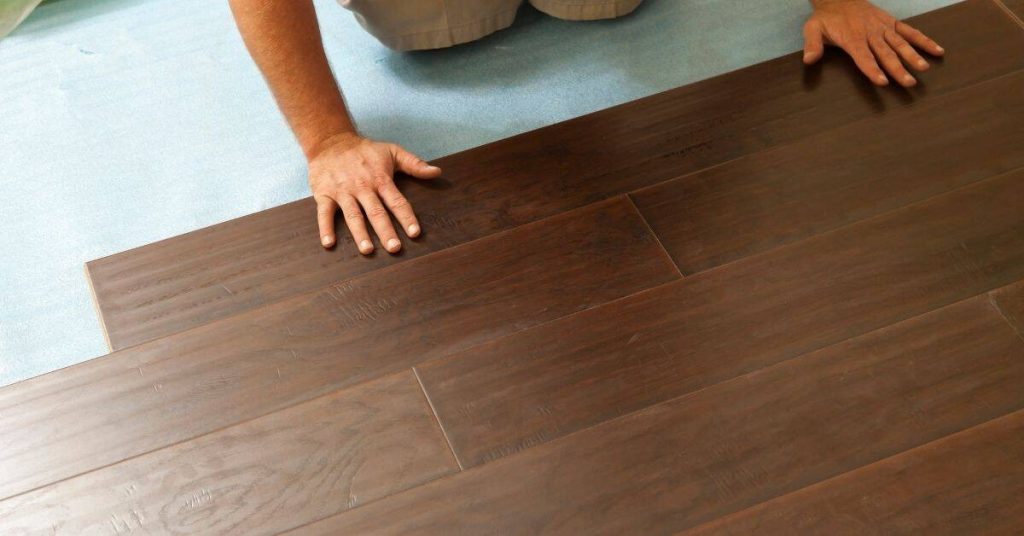
Laminate floors typically consist of a photographic surface layer bonded to a core substrate with a protective layer. They come in various finishes, and construction details affect cleaning needs. Start by understanding your floor’s specific instructions and safety notes from the manufacturer.
Moisture control and pH-neutral cleaners are important to prevent swelling or dulling of the surface. Always check the floor manufacturer’s instructions before you begin and verify any recommendations on cleaners or water exposure to avoid damage.
What laminate is and why it matters
Laminate flooring is a multi-layered product, typically consisting of a wear layer, core, and backing. The wear layer protects the floor from scratches and stains, while the core provides stability and support. Seams between planks can be vulnerable to moisture and dirt buildup.
Understanding this construction helps you choose the right cleaning methods. For instance, avoid using excessive water or harsh chemicals that could damage the wear layer or seep into the core.
The finish type also matters. Glossy finishes are easier to clean but show every speck of dust. Matte and textured finishes hide dirt better but can be harder to clean.
Safety and surface protection
Wear appropriate footwear. Shoes with smooth soles help prevent scratches. Avoid high heels, which can dent the floor.
Ventilate when using cleaners. Some cleaning products have strong fumes that can be harmful if inhaled in enclosed spaces. Open windows and use fans to ensure proper ventilation.
Protect adjacent surfaces. Place a damp cloth or towel along baseboards and cabinets to protect them from any cleaner overspray or drips.
Always test cleaners on a small, hidden area first to ensure they don’t damage the floor’s finish. Follow manufacturer instructions for specific cleaning guidelines.
Tools and Materials Checklist
Gather a damp mop, a dry microfiber mop, and a gentle cleaner labeled for laminate or a pH-neutral floor cleaner. Have a bucket, clean towels, and a helper tool for scraping away grit or dried spills. Keep door mats and felt pads handy to reduce tracked-in dirt and scratches.
Avoid using abrasive pads, waxes, steamers, or harsh chemicals. If you’re unsure about a product, verify compatibility with your floor via the floor label, product data sheet, or manufacturer instructions and choose a compatible option.
Essential tools
Before you start cleaning, make sure you have these basics on hand.
- Soft broom: To sweep away dirt and debris before mopping.
- Microfiber mop: Gentle on laminate, traps dust and dirt.
- Bucket: For water and cleaner solution. Use a bucket with a wringer to control moisture.
- Steam mop (optional): Can be used for deep cleaning, but be cautious with heat settings.
Quick rule: Never use a regular string mop or one with a spin head. They push water around and can damage your floor.
Cleaners and homemade solutions
Choose the right cleaner to keep your laminate looking its best.
- pH-neutral commercial cleaners: These are safe for most laminates. Check product labels to be sure.
- Homemade solution (1): Mix 1 cup of white vinegar with 1 gallon of warm water. Vinegar is a mild acid that cuts through dirt and grime.
- Homemade solution (2): For tougher messes, try a mix of 1 teaspoon dish soap, 1 cup white vinegar, and 1 gallon warm water.
Quick rule: Always test cleaners on a small, hidden area first to ensure they don’t damage or discolor your floor.
Prep: Inspection, Dusting, and Barrier Setup
Do a visual inspection for loose edges, raised seams, or damaged seals before cleaning. Remove loose grit and debris with a dry dusting method to prevent scratches. Set up door mats and rugs at entry points to reduce dirt and moisture intrusion.
Seal any obvious gaps carefully and note problem areas. If you suspect moisture could reach the subfloor, make a plan to dry the area promptly and avoid a wet cleaning in that spot.
Inspect seams, edges, and damaged areas
Before you start cleaning, it’s crucial to inspect your laminate floor for any damage or wear. This step helps prevent further damage during the cleaning process.
- Check for gaps: Gaps between planks can let in dirt and moisture, causing more damage over time.
- Look for lifting planks: Planks that lift indicate a problem with the subfloor or installation. They need to be addressed before cleaning.
- Inspect swollen edges: Swollen edges can be a sign of water intrusion, which needs to be fixed before proceeding.
- Examine damaged seals: Damaged sealant can let in dirt and moisture, leading to further damage if not repaired.
- Check for cupping or crowning: These are signs of moisture issues that need to be addressed before cleaning.
- Feel for squeaks: Squeaks indicate loose planks or subfloor issues that should be fixed.
- Look for warping: Warped planks may need replacement before cleaning.
- Check for discoloration: Discolored areas can indicate water damage or dirt buildup that needs to be addressed.
Quick rule: If you find any of these issues, address them before proceeding with the clean. Skipping this step could lead to further damage and costly repairs.
Remove grit and debris
Before you wet clean your laminate floor, it’s important to remove all loose dirt and debris. This helps prevent scratches during the cleaning process.
- Use a broom: Start by sweeping the entire area with a soft-bristled broom to remove large debris.
- Vacuum with a soft floor setting: Use a vacuum cleaner on its softest setting to remove any remaining dirt and dust. Be sure not to use a beater bar attachment as it can scratch the surface.
- Use a dry microfiber mop: A dry microfiber mop can help pick up fine dust and debris that a broom or vacuum might miss.
- Avoid using a wet/dry vacuum: While tempting, these can leave behind moisture which can damage your laminate floor.
Quick rule: Always remove all loose dirt before wetting the floor. Failing to do so can cause scratches and other damage that’s difficult to repair.
Protect adjoining areas
To prevent water from damaging adjacent rooms or areas, it’s important to set up temporary barriers before you start cleaning.
- Use towels under doors: Place towels at the base of exterior doors to prevent water from tracking in from outside.
- Lay down rugs in high-traffic zones: Rugs can help absorb moisture and prevent water from being tracked onto other floors.
- Tape plastic sheeting over vents: This prevents moisture from entering the ventilation system and causing mold or mildew growth.
- Remove area rugs: If possible, remove any area rugs that could absorb water and become a tripping hazard when wet.
Quick rule: Always protect adjoining areas before you start cleaning. Failing to do so can lead to water damage in other parts of your home.
Step-by-Step DIY Cleaning Process
Dilute and wring out the mop so it is damp, not dripping wet. Wipe in small sections with even, light passes to avoid pooling. Rinse or switch cloths as needed to keep residue from spreading.
For deeper cleans, use a manufacturer-approved cleaner following the label directions and work in a consistent pattern. Allow the floor to dry fully and perform a quick inspection to catch missed spots.
Step-by-Step Cleaning Process
The following steps guide you through a thorough cleaning process for your laminate floors, ensuring safety and effectiveness.
- Inspect the floor: Check seams, edges, and damaged areas as mentioned earlier. Remove any grit or debris using a soft-bristled broom or vacuum.
- Prepare your cleaner: Use a pH-neutral cleaner suitable for laminate floors. Follow the instructions on the label to mix it with water.
- Wet mop application: Dip your mop into the cleaning solution, wring it out until it’s damp but not soaking wet. Start from one corner of the room and work backwards in straight lines.
- Spot check: After a few passes, check if any areas are becoming too wet. If so, reduce the amount of cleaner on your mop or increase drying time.
- Final inspection: Once you’ve finished cleaning, inspect the floor again for any missed spots. Allow it to dry completely before replacing furniture or walking on it with shoes.
Mixing and applying cleaner
Preparing your cleaning solution correctly is crucial for maintaining the longevity of your laminate floors. Always follow the manufacturer’s instructions on the cleaner label.
Before applying, test a small amount of the solution in an inconspicuous area to ensure it doesn’t cause discoloration or damage. If it passes the test, proceed with cleaning.
Dip your mop into the solution, then wring it out thoroughly until it’s damp but not dripping wet. Apply the cleaner evenly across the floor using straight, overlapping strokes, working backwards from one corner of the room.
Rinsing and drying technique
Changing your cleaning water regularly is essential to prevent spreading dirt back onto the floor. If the water becomes dirty, replace it with clean water.
Drying quickly is crucial for laminate floors to prevent excess moisture from seeping into the seams or damaging the core. Use a dry, microfiber cloth or mop to absorb any remaining moisture as soon as possible.
If necessary, use fans to help speed up the drying process. Ensure the room is well-ventilated and avoid walking on the floor until it’s completely dry to prevent damage.
Quick daily versus deep-clean routine
Daily cleaning involves quick touch-ups to maintain your laminate floors’ appearance between deeper cleans. Use a dry or slightly damp mop to remove dirt and debris daily.
For deeper cleans, follow the step-by-step process mentioned above. Perform this routine every 3-6 months, depending on foot traffic and usage.
Choose a quick touch-up when you want to maintain cleanliness between deep cleans. Opt for a deeper clean if there’s visible dirt, grime, or stains, or if it’s been several months since the last thorough cleaning.
Stop Points: When to Pause or Stop Cleaning
If you notice swelling, lifted edges, or discoloration, pause cleaning and dry the area immediately. Persistent residue that won’t lift with a damp cloth is a signal to rinse and recheck your cleaner compatibility. Stop if you see any signs of moisture getting into seams or backing.
If there’s any unpleasant chemical reaction, rinse with plain water and dry thoroughly. When in doubt, contact the floor manufacturer or a professional before proceeding further to prevent irreversible damage.
Signs of moisture damage or swelling
While cleaning, keep an eye out for signs of moisture damage. This could be your laminate flooring‘s way of saying ‘stop!’.
Here are some visual cues to look out for:
Raised seams: If you notice any seams lifting or separating, that’s a clear sign that moisture has gotten underneath and is causing the planks to swell.
Buckling or cupping: This happens when the entire plank lifts off the subfloor. It might look like a small hill or valley in your floor.
Soft spots: If you step on an area and it feels spongy, that’s a sure sign of moisture damage.
If you spot any of these signs, stop cleaning immediately. Dry the affected area thoroughly. You might need to use fans or a dehumidifier to speed up the process.
Chemical reaction or streaking
Sometimes, cleaning products can react with your laminate flooring in unexpected ways. If you notice any of these issues while cleaning, stop and take action.
Streaking: If you see streaks or residue left behind after rinsing, it’s a sign that the cleaner isn’t being fully rinsed off or is reacting with the floor’s finish.
Discoloration: If areas of your floor start to change color, it could be a reaction to the cleaner. This is more likely if you’re using homemade cleaners with unknown ingredients.
If you notice any of these issues, stop cleaning immediately. Rinse the affected area thoroughly with plain water. If streaking persists, try switching to a different cleaner or consult your floor’s manufacturer for advice.
Loose planks and structural issues
While cleaning, you might notice that some of your laminate planks seem loose. This isn’t something to ignore – it could indicate a bigger problem.
Separating seams: If the seams between planks are widening or gaps are appearing, it’s a sign that the floor is no longer securely attached to the subfloor.
Shifting planks: If you can move or slide planks with your hands, that’s a sure sign of structural issues. This could be due to moisture damage or improper installation.
If you notice any of these issues, stop cleaning immediately. Do not attempt to force the planks back into place. Instead, contact a professional flooring installer for advice and repair guidance.
Stain, Scratch, and Spill Troubleshooting
Address spills promptly with a damp, clean cloth and blot rather than scrub. For light surface stains, a non-abrasive, laminate-safe cleaner can help without dulling the finish. Avoid harsh scrubbing that can scratch the surface.
For shallow scratches, consider cosmetic options recommended by the manufacturer and avoid aggressive methods. Reserve stronger remedies for where the manufacturer approves and seek professional guidance if unsure.
Removing Spills and Pet Stains
First, blot the spill with a clean, dry cloth. Don’t rub; it’ll spread the stain.
Mix a solution of equal parts white vinegar and warm water. Dip a soft cloth in, wring it out, then gently clean the area. Work from the outer edge towards the center to avoid spreading.
For pet stains, tackle the odor too. Sprinkle baking soda over the area, let it sit for 15 minutes, then vacuum. If the smell persists, use an enzymatic cleaner designed for pet odors.
Remember, avoid oversaturation. Too much liquid can seep between planks and cause damage.
Scuffs and Surface Marks
For light scuffs, use a gentle eraser. The kind you’d use on whiteboards works well. Just rub it gently over the mark.
If that doesn’t work, try a microfiber cloth dampened with warm water and a few drops of mild dish soap. Gently scrub in small circular motions.
For deeper scuffs or marks, use a finish-safe polish designed for your floor’s specific type. Follow the manufacturer’s instructions carefully.
If you’re not seeing results after a couple of tries, stop. Scrubbing too hard can damage the finish.
Deeper Scratches or Edge Damage
For shallow scratches, try a touch-up marker designed for your floor’s color. You can find these at hardware stores.
For deeper scratches or edge damage, you might need to use a filler. Sand the area lightly first, then apply the filler according to the manufacturer’s instructions. Let it dry, sand again, then wipe clean.
If the scratch is really deep, or if there’s structural damage at the edges, it’s time to call in a professional. They have tools and techniques to repair these issues without damaging your floor further.
Remember, cosmetic repairs are just that. They might not be perfect, but they’ll help blend the damaged area with the rest of your floor.
Preventative Care and Maintenance Schedule
Create a simple daily habit: quick dusting or dry sweeping to remove grit and reduce wear. Weekly routines can include a damp wipe of high-traffic areas with a compatible cleaner. Seasonal checks help catch issues before they become bigger problems.
Avoid heavy moisture exposure and follow do-not-do rules from the manufacturer. Use furniture protection, humidity control, and door mats to extend life and minimize cleaning needs.
Routine Maintenance Habits
Laminate floors need regular attention to keep them looking their best. Here’s a simple daily and weekly routine:
Daily: Quickly remove dust with a soft-bristled broom or microfiber mop. Don’t let dirt build up as it can act like sandpaper, scratching the surface.
Weekly: Use a damp (not wet) mop to clean the floor. Avoid over-wetting; too much water can seep between planks and cause damage. Always follow up with a dry mop or towel to remove any remaining moisture.
And remember, immediate spill cleanup is key. Don’t let liquids sit on your laminate floor. And always use protective pads under heavy furniture to prevent scratches.
Humidity and Environmental Control
Laminate floors are sensitive to humidity changes. Too much or too little can cause issues:
Too humid: Excess moisture can cause planks to swell, buckle, or even delaminate (separate at the layers). Keep indoor humidity between 35-65% as recommended by most manufacturers.
Too dry: Low humidity can cause gaps between planks due to shrinkage. Use a humidifier in winter months to maintain proper moisture levels.
Always check your manufacturer’s guidelines for specific care instructions. They know their product best and can provide tailored advice.
Long-Term Protective Measures
Preventative measures go a long way in protecting your laminate floor:
Mats: Place mats at entryways to trap dirt and moisture before it reaches your floor. Use non-slip backing to keep them in place.
No-Shoe Policy: Consider implementing a no-shoes policy in your home. Shoes bring in grit that can scratch the surface over time.
Furniture Glides: Protect your floor and furniture by using felt or plastic glides on the legs of heavy furniture. This prevents scratches when moving furniture around.
Visual Checkpoints and When to Call a Pro
Look for bubbling, peeling, or loose seams as signs of underlying problems. Check for uneven surfaces and edges that may indicate subfloor movement. Document issues with photos to support any warranty or service calls.
Decide between DIY fixes and professional service based on the severity and scope. When in doubt, consult the floor manufacturer or a licensed contractor for guidance before proceeding with invasive repairs.
How to perform a rapid floor health check
Before you start cleaning, use this quick checklist to assess your laminate floor’s condition.
- Shine: Check for dull or discolored areas. This could indicate wear or damage.
- Seams: Inspect seams for gaps or spaces. Tight seams ensure a stable floor.
- Plank stability: Tap planks with your knuckles. A hollow sound indicates swelling or moisture damage.
- Buckling: Look for raised or warped planks. This is a sign of serious trouble.
- Scratches: Check for deep scratches that go beyond the surface layer.
- Edge damage: Inspect edges and corners for chipping or cracking.
- Pet stains: Look for dark spots or odors. These can cause discoloration and damage.
- Structural issues: Check for loose planks, squeaks, or unevenness. This could indicate a problem with the subfloor.
Quick rule: If you find any of these issues, address them promptly to prevent further damage.
When to call a flooring professional
Some problems are beyond the scope of DIY repairs. Use this checklist to know when to call in the pros.
- Persistent buckling: If planks continue to warp after drying, it’s time for expert help.
- Widespread swelling: More than a few swollen planks could indicate a moisture problem that needs professional diagnosis.
- Warranty questions: If you’re unsure about your warranty coverage, consult the manufacturer or a pro.
- Loose planks: If multiple planks are loose, it’s best to have them reattached by a professional.
- Structural issues: Problems with the subfloor should be addressed by a structural expert.
- Chemical reaction or streaking: If cleaning products cause damage, stop and call a pro.
- Deep scratches or edge damage: Severe damage may require professional repair or replacement.
Quick rule: When in doubt, it’s better to err on the side of caution and consult a professional.
Documenting issues for warranty or repair
Before you call for service, document the problem with photos and notes. This will help your case with manufacturers and contractors.
- Photos: Take clear, well-lit pictures of the issue from multiple angles.
- Notes: Jot down details about when the problem started, what caused it (if known), and any attempts at repair.
- Manufacturer info: Locate your warranty information and have it ready for consultation or claims.
- Contractor info: If you had professional installation, note down the contractor’s details.
- Date of purchase: Keep records of when you bought the flooring.
Quick rule: The more information you have, the better your chances of a successful repair or replacement under warranty.
Conclusion
Protecting the finish and the investment in your floors matters. Do the work with care, follow the plan, and you’ll keep laminate looking good and lasting longer.
Start with a quick mental checklist: confirm you’ve got the approved tools and cleaners, inspect for damage, dust and barrier where needed, follow the step-by-step process, pause at any stop points, test cleaners in a small area, dry thoroughly, and stick to the preventative care schedule. Keep it simple, work methodically, and move on only when each step is complete.
Avoid the usual traps: never soak the floor or use steam, never scrub with harsh pads or abrasive cleaners, and never skip the spot test before applying anything new. If you notice loose boards, warping, or seams opening, stop and call a pro rather than pressing on—these signs mean you’re past DIY scope. When in doubt, trust the team approach: test first, protect edges, dry well, and finish with a clear plan for maintenance. You’ve got this—take one clean, careful pass and you’ll stay on track.
FAQ
What cleaning products should I avoid on laminate floors?
Stick to products labeled safe for laminate or sealed floors. Avoid abrasive cleaners, wax, or steam cleaners unless the manufacturer says they’re okay. If unsure, check the product label or the floor manufacturer’s instructions.
Can I use a wet mop or soaking pad on laminate floors?
Use a damp, not soaking, mop or cloth. Excess water can seep into seams and cause warping. If water sits, wipe it up and let the floor dry fully before walking on it again.
What should I do if I spill something heavy or sticky?
Wipe it up quickly with a dry cloth, then clean the area with a mild cleaner suitable for laminate. Rinse and dry the spot to prevent residue that could dull the finish.
How often should I recheck the floor after cleaning?
Do a quick visual check after cleaning for moisture, dull spots, or streaks. If you see issues, re-dry the area and reassess before resuming use.