
Introduction
Mixing small batches without weak spots means getting a uniform, well-worked mix every time; choose the method that matches your batch size, material, and access to tools. A bucket with a paddle is simple and cheap for very small pours, a portable mixer gives more consistent agitation for larger small batches, and a drill-mounted paddle is a middle ground when power and space are limited.
Each method has trade-offs: buckets can leave unmixed pockets unless you scrape and rework, mixers reduce cold joints but need cleaning and stable footing, and paddles can over- or under-mix if you don’t control speed and time. Watch for common problems—dry streaks, soupy mixes, air pockets—and follow product label and manufacturer instructions for water ratio, mixing time, and compatibility with admixtures to avoid weak spots.
Key takeaways
- Bucket mixing is simple for tiny batches but watch for inconsistent hydration.
- Drill mixer speeds up small batches yet risks air pockets if not slowed.
- Paddle mixing offers thorough, uniform blend but needs longer run times and cleanup.
- For weak spots, maintain steady tempo and scrape sides during mixing to reblend.
- Choose method by material stickiness and lump risk; test small test batches first.
- Safety: wear eye protection, secure mixer, and unplug before adjustments.
Table of Contents
- Introduction
- Key takeaways
- Quick Comparison — Bucket Mixer, Drill Mixer, and Paddle Mixing at a Glance
- Why Weak Spots Form and How Mixing Technique Prevents Them
- Tools and Materials Checklist for Each Method
- Step-by-Step Mixing Procedures Tailored for Small Batches
- Common Problems and Troubleshooting by Method
- Which Method Is Best for Different Materials and Applications
- Cost, Durability, and Return on Investment
- Safety, Prep, and Best Practices to Avoid Mistakes
- Conclusion
- FAQ
Quick Comparison — Bucket Mixer, Drill Mixer, and Paddle Mixing at a Glance
This section gives a short, practical read on how each mixing method moves material and what that motion usually produces on small batches. Think of the bucket mixer as a back-and-forth mass mover, the drill mixer as a high-speed, point-agitation tool, and the paddle as a low-speed shear device—each has different power, typical run behavior, and air-entrapment tendencies.
Use cases line up with those mechanics: bucket mixers work well for short runs of repair mortar, drill mixers suit thin coatings and quick patches if you control speed, and paddle mixing fits low-volume plaster or trowelable mixes. Before you pick a method, check product label or technical data sheet for recommended mixing method, test a small sample, and use a simple if-then rule: pick the method that matches your batch size, material viscosity, and tool availability.
How each method works
The bucket mixer is a simple, static tool that rotates back and forth to mix concrete. It’s powered by an electric drill or a dedicated motor, running at around 200-400 RPM for about 1-5 minutes per batch.
A drill mixer attaches directly to your power drill, spinning at higher speeds (up to 800 RPM) and mixing faster but risking air pockets. It’s great for small batches and quick jobs.
Paddle mixing is done manually or with a stand mixer using a paddle attachment. Speeds are lower (around 150-300 RPM), and it’s ideal for small batches, surface coatings, and repair mortars.
Fast pros and cons comparison
Here’s a quick rundown of each method’s strengths and weaknesses:
Pros
- Bucket mixer: consistent mixing, easy to use, no air pockets.
- Drill mixer: fast mixing, portable, versatile.
- Paddle mixing: gentle mixing, ideal for small batches and surface coatings, low risk of over-mixing.
Cons
- Bucket mixer: slower mixing time, requires more space.
- Drill mixer: prone to air pockets, can be messy, requires a power drill.
- Paddle mixing: labor-intensive, slower mixing time, risk of inconsistent results with large batches.
Choose based on your project size, available tools, and required cure time.
Why Weak Spots Form and How Mixing Technique Prevents Them
Weak spots come from three easy-to-spot problems: materials that aren’t dispersed, heavy solids that settle or cling to the bottom, and pockets of trapped air. Good mixing motion breaks up clumps, keeps heavy aggregate suspended, and uses lift-and-release or gentle tilting to let trapped air escape.
Each method can be tuned to address those causes: start slow to wet all powder, ramp up to a steady shear for dispersion, and scrape the bottom and sides during pauses. If you still see streaks, settled solids after a quick stir, or inconsistent sheen, check the manufacturer instructions and rework with the proper motion and timing until uniform.
Mixing action matters: shear, circulation, and scraping
The way you mix concrete affects how well it’s homogenized. Here’s what each mixing action does:
Shear force – Breaks up clumps of cement and aggregates. It’s created by rotating the mixer or paddle at a steady speed.
Vertical circulation – Lifts material from the bottom, mixes it with top layers, then lets it settle back down. This action helps distribute water and chemicals evenly. Tilt your bucket or use a vertical mixer to achieve this.
Scraping – Removes concrete stuck to the sides and bottom of your container. It prevents unmixed pockets from forming. Use a paddle mixer or a trowel to scrape the sides of your bucket.
Visual and tactile signs of under-mixed material
The type of concrete you’re mixing affects how it looks and feels. Here are some quick checks to ensure your mix is homogeneous:
- Color streaks – Uneven color indicates unmixed pigment or aggregates. Stir well, ensuring all materials are fully incorporated.
- Lumps – Small clumps of dry cement or aggregates mean you need to mix longer or add more water.
- Texture changes – A gritty feel suggests unmixed aggregates. Keep mixing until the texture is smooth and consistent.
- Settled solids – Heavy materials settling at the bottom indicate incomplete dispersion. Stir well, ensuring you reach the bottom of your container.
- Inconsistent sheen – Uneven glossiness suggests unmixed water or chemicals. Mix longer and check for any dry spots.
Tools and Materials Checklist for Each Method
This checklist separates what you need for a bucket mixer kit, a drill-mounted mixer, and paddle/manual setups so you can lay out gear before you start. Include the mixing unit, appropriate attachment or paddle, one or more clean containers sized to your batch, measuring tools, and basic PPE for each method.
Also prepare consumables and setup items: measured water source, cement/aggregate supplies, planned admixtures, drop cloths, and spill containment; verify container compatibility and tool ratings on the product label. Do a quick compatibility dry-fit—confirm mixer shaft length, cord reach, container depth, and that the chosen bucket or pail is clean and structurally sound.
Bucket mixer setup essentials
Before you start mixing concrete in your bucket mixer, go through this checklist to ensure a smooth and efficient process.
- Check mount stability: Ensure the mixer is securely mounted on a stable surface. Tighten any loose bolts or clamps.
- Bucket size and shape: Use a bucket that fits snugly in your mixer’s drum to prevent concrete from spilling over during mixing. Check manufacturer guidelines for recommended bucket sizes.
- Power source: Verify the power cord is properly connected and the outlet is functioning. If using an extension cord, ensure it’s heavy-duty enough to handle the mixer’s load.
- Paddle or scraper attachment: Install the correct paddle or scraper for your concrete mix. A single paddle is usually sufficient for small batches, while larger mixes may require a double paddle or a scraper to ensure thorough mixing and prevent buildup on the bucket’s sides.
- Drum rotation direction: Ensure the drum rotates in the correct direction – clockwise for right-handed mixers, counterclockwise for left-handed. Check your mixer’s manual if unsure.
- Speed settings: Familiarize yourself with the speed settings on your mixer. Generally, start at a lower speed to combine dry ingredients, then increase speed once water is added.
- Grounding and safety: Ensure the mixer is properly grounded to prevent electrical shocks. Inspect the power cord for any damage or frays before each use.
- Concrete mix consistency: Before adding concrete, test your water-to-cement ratio by mixing a small batch. The ideal consistency should hold its shape when squeezed but crumble easily when poked with a trowel. Adjust water and cement as needed.
Quick rule: Always double-check the power cord, mount stability, and paddle attachment before starting your mixer to prevent accidents or damaged concrete.
Drill mixer and paddle tool checklist
Use this checklist before starting to ensure you have the right tools and they’re in good working order. This will help prevent mix quality issues and equipment damage.
- Check drill torque: Ensure your drill can handle the load. Most drills are rated for 50-150Nm. Check your model’s spec. Too low, and you won’t mix efficiently; too high, and you risk burning out the motor.
- Verify drill speed: Drill speeds between 200-400 RPM are ideal for concrete mixing. Check your drill’s settings to ensure it falls within this range.
- Inspect paddle tool: Ensure the paddle is designed for concrete (not all paddles are). Check for any cracks or damage that could cause it to break during use.
- Check paddle type: Use a flat, wide paddle for better mixing efficiency. Avoid narrow, pointed paddles meant for drilling holes.
- Measure shaft length: The shaft should be long enough to reach the bottom of your bucket but not so long that it hits the drill’s chuck. Typically, 12-18 inches is sufficient.
- Tighten paddle securely: Ensure the paddle is tightly secured to the drill. A loose paddle can cause mixing issues and may fly off, posing a safety hazard.
- Check for proper attachment: The paddle should fit snugly onto your drill’s chuck. If it wobbles or feels loose, adjust or replace it.
- Inspect power cord (if electric): Check for any fraying, cuts, or damage that could cause a short circuit or electrocution hazard.
Quick rule: Always prioritize safety. If you’re unsure about any tool’s condition or suitability, err on the side of caution and replace or repair it before proceeding.
Step-by-Step Mixing Procedures Tailored for Small Batches
Each workflow follows the same practical arc: pre-check materials, pre-wet or pre-blend where required, sequence dry-then-wet additions, and finish with inspection tests. For a bucket mix do small measured batches, wet the powder first then mix until uniform; for a compact electric mixer follow the machine startup sequence and avoid running dry; for paddle/manual mix use repeated lift-and-fold actions and frequent bottom scraping.
Always run a quick slump or flow check and a surface finish inspection before committing the batch to application, and consult product instructions for any special timing or pot-life limits. If the sample shows segregation, visible lumps, or trapped air, remix following the prescribed motion, adjust water or admixture as allowed, and retest before proceeding.
Step-by-Step Process
Follow these practical steps to achieve consistent, small-batch concrete mixes with minimal waste.
- Preparation: Gather tools and materials. Calibrate measuring tools.
- Safety Checks: Ensure proper PPE, secure work area, and check weather conditions.
- Main Work: Follow your chosen method’s procedure – bucket mixing, compact electric mixer, or manual paddle/wooden stick.
- Final Checks: Perform slump test, surface finish check, and surface moisture control. Adjust as needed.
- Cleanup: Dispose of waste safely, sanitize tools between batches to avoid cross-contamination.
Procedure for a dedicated bucket mixer
Safety first: Ensure the bucket mixer is properly grounded and all parts are secure before starting. Begin with the dry ingredients – cement, aggregates, and admixtures.
Add water gradually, maintaining a consistent mix ratio. Use the bucket’s handle to rotate it in a circular motion, ensuring all materials are well incorporated.
After mixing for about 2-3 minutes, pause briefly to check consistency. Resume mixing until you reach your desired slump (usually around 4-6 inches).
Before pouring, perform a final slump test and adjust as needed. If the mix is too stiff or weak, add water or dry materials accordingly.
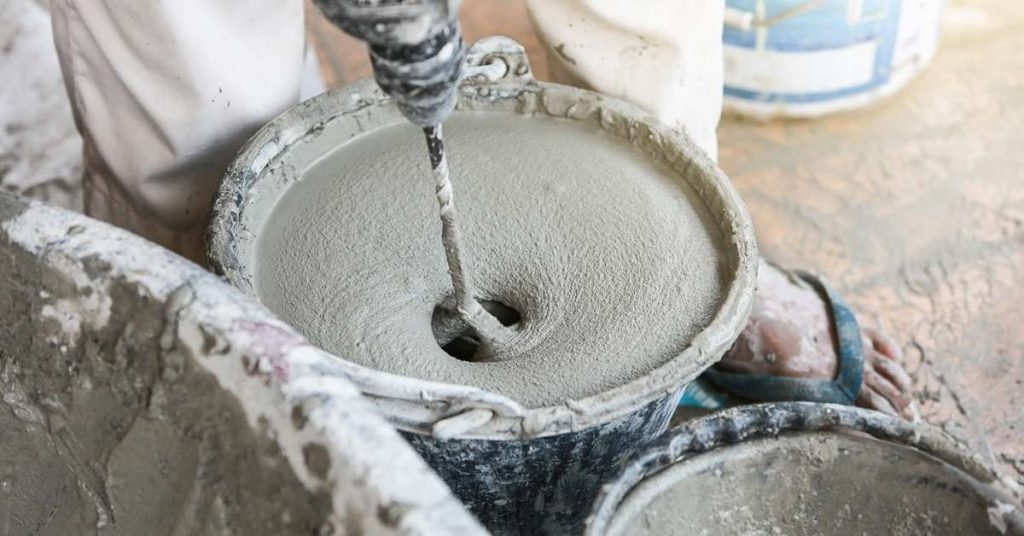
Procedure for a drill-mounted mixer
Start by securing your drill to the mixing paddle and setting it to a medium speed (around 200-300 RPM). Begin with dry ingredients, ensuring they’re evenly distributed in the mix.
Slowly add water while keeping the drill at an angle of about 45 degrees. Maintain this angle throughout the mixing process to avoid incorporating too much air into your mix.
Mix intermittently, pausing every minute or so to scrape the bottom and sides of the container. This helps ensure a homogeneous mixture with minimal segregation.
After about 2-3 minutes, perform a slump test. Adjust water content if necessary, then mix for another minute before pouring.
Procedure for hand paddle mixing
Hand mixing is best suited for small batches – typically up to 5 gallons. Begin with dry ingredients, ensuring they’re evenly distributed in the mix.
Gradually add water while using a circular motion with your paddle. Work from the bottom of the container upwards to ensure all materials are incorporated.
Mix thoroughly, scraping the bottom and sides every 30 seconds or so. This helps prevent dry pockets and ensures a consistent mix.
After about 2-3 minutes, perform a slump test. If needed, adjust water content and continue mixing until you reach your desired consistency. Be prepared to stop and inspect your mix regularly to avoid over-mixing or under-mixing.

Common Problems and Troubleshooting by Method
This section lists the typical failure modes you’ll see with each method and gives direct, on-site diagnostics to find the root cause. Expect bucket mixes to show wall buildup and air pockets, drill/stand mixers to show uneven rotation or motor strain if overloaded, and hand/paddle mixes to show dry pockets or slump loss if not thoroughly folded.
Troubleshoot by confirming mix specs, checking aggregate moisture, scraping and remixing, and testing consistency with a quick slump or sheen check. If issues persist, follow targeted fixes like incremental water adjustment, staged remixing, pre-wetting aggregates, or replacing worn blades—consult equipment instructions if the tool shows stress.
Issues with bucket mixers and fixes
Bucket mixers are handy for small batches, but they’re not without their issues. Here’s how to tackle common problems:
Clogged Paddles: This happens when aggregates are too large or the mixture is too thick. Pre-wet your aggregates and adjust your water-to-powder ratio to prevent this.
Inconsistent RPM under load: As you add more material, the mixer’s speed may drop. To fix this, reduce the load by mixing in stages or use a larger bucket mixer with higher torque.
Adjusting paddle geometry or speed can also help. If your mixer has adjustable paddles, experiment with different settings to find what works best for your mix.
Issues with drill mixers and fixes
Drill mixers are versatile but can overheat if used incorrectly. Here’s how to keep yours running smoothly:
Burning Drill Motors: This is usually due to mixing too long or at too high a speed. To prevent this, set a timer and stick to it. Also, give your drill a break between mixes.
Speed Drop under Load: As you add more material, the drill’s speed may drop. To maintain consistent blending, start with a lower speed setting and gradually increase as the mix becomes easier to turn.
Always ensure your drill is properly secured to prevent it from moving around or tipping over during use.
Issues with manual paddle mixing and fixes
Manual mixing can be tiring, but here’s how to ensure a thorough mix:
Fatigue-related Inconsistency: As you tire, your mixing action may become less vigorous. To combat this, take breaks when needed or switch hands to share the workload.
Missed Bottom Material: It’s easy to miss material at the bottom of the bucket. To ensure everything gets mixed, scrape the sides and bottom of the bucket regularly with your paddle.
Also, consider using a longer paddle that reaches closer to the bottom of the bucket for better coverage.
Which Method Is Best for Different Materials and Applications
This mapping helps match materials—epoxies, cement compounds, plasters, grouts, and specialty coatings—to the mixing motion that best limits segregation and trapped air. Heavier, coarse-aggregate mixes usually need a higher-torque, lower-speed motion to keep solids suspended; low-viscosity coatings often do better with controlled high-speed agitation but require degassing measures.
Before you mix, review the product data sheet for pot life, recommended mixing method, and any additive guidance; adjust your method choice based on batch size, desired finish, and application type. If you hit common issues like air bubbles or separation, the guidance gives quick field corrections—remix, adjust sequence, or change attachment—while keeping cleanup and cross-contamination prevention in mind.
Epoxies and Catalyst-Sensitive Coatings
For epoxies and other catalyst-sensitive coatings, the key to preventing weak spots is even distribution of the catalyst. Here’s what works best:
Bucket Mixing: Use a clean bucket with a tight-fitting lid. Pour in your base material, then add the catalyst slowly while stirring gently. This method helps avoid over-mixing and air pockets.
Mixer or Paddle: These tools can help distribute the catalyst evenly, but be careful not to over-mix. Use a low speed setting and mix only until the catalyst is fully incorporated. Over-mixing can introduce air and weaken your coating.
Cementitious, Mortars, and Aggregated Mixes
For heavier mixes like cement-based compounds, plasters, and grouts, agitation is crucial to prevent separation. Here’s how:
Bucket Mixing: Use a sturdy bucket and mix thoroughly with a strong, stiff blade. Ensure your blade reaches the bottom of the bucket to break up any settled material.
Mixer or Paddle: These tools can help maintain workability by keeping aggregates suspended in the mix. Use a slow speed setting to avoid throwing aggregate out of the mix and causing inconsistent texture.
Plasters, Textured Coatings, and Paints
For decorative and textured materials like plasters and specialty paints, the mixing method can affect air entrainment and finish quality. Here’s what to consider:
Bucket Mixing: This method is suitable for small batches where a consistent texture is crucial. Use a clean bucket and mix thoroughly but gently to avoid introducing too much air.
Mixer or Paddle: These tools can help maintain a smooth, even consistency. However, be mindful of the speed setting to prevent over-mixing and air pockets. For textured materials, ensure your tool is compatible with the product’s aggregate size.
Cost, Durability, and Return on Investment
Compare immediate purchase needs, ongoing maintenance, and likely lifespan for each mixing option to decide whether to buy, rent, or upgrade. Consider upfront tool cost, accessory needs, power requirements, and expected maintenance like cleaning and occasional part replacement when estimating your per-use expense.
Match the decision to your project cadence: for infrequent small jobs rental may be best; for recurring work buying a durable unit may pay back in saved time and fewer reworks. Check manufacturer information for service life and warranty details, and run simple break-even math based on how many sessions you expect to determine the most economical path.
Initial investment vs long-term benefits
Buying a quality mixer might seem expensive at first, but it’s an investment that pays off over time. Reliable equipment means consistent mix quality and fewer callbacks.
With a good mixer, you’ll spend less time troubleshooting weak spots or redoing work. That saves labor costs and gets your projects finished faster.
Think of it this way: A higher initial cost can be offset by reduced waste, quicker project completion, and improved reputation among clients.
Rentals might seem cheaper upfront, but if you’re doing multiple projects a year, those costs add up. Plus, you’ll have to schedule around rental availability.
Maintenance, parts, and what to watch for
Regular maintenance keeps your mixer running smoothly and extends its lifespan. Here’s what to keep an eye on:
Wear items: Mixing paddles, blades, and gears are the parts that’ll wear out over time. Replace them when they show signs of excessive wear.
Lubrication: Keep your mixer’s moving parts well-lubricated to reduce friction and heat buildup. Check your owner’s manual for recommended lubricants and schedules.
Signs of trouble: Unusual noises, excessive vibration, or a decrease in mixing efficiency could indicate a problem. Address these issues promptly to prevent major breakdowns.
Regular cleaning also helps maintain your mixer’s performance. Remove dried concrete from paddles and other parts after each use to prevent buildup.
Safety, Prep, and Best Practices to Avoid Mistakes
Prioritize PPE, stable setup, and contamination controls before you mix: eye protection, gloves, dust control or respirator when handling dry materials, and sturdy footwear are basics for every method. Prepare the site with level ground, clear work area, ventilation, spill containment, and a plan for runoff or slurry disposal to avoid hazards and material waste.
Use consistent batching procedures—measure materials, add water gradually, and stick to recommended mixing durations and speeds—to reduce weak spots and retempering risks. Clean tools between batches, check electrical safety for powered tools, and follow curing coverage advice to protect the finished work from rapid drying or contamination.
PPE and safe handling of reactive or dusty materials
Choosing the right personal protective equipment (PPE) is crucial when mixing concrete, especially with chemical additives or dusty aggregates.
- Respirator: Protects from harmful dust particles. Use a half-face respirator with P100 filters for most applications.
- Gloves: Essential to protect hands from cement burns and chemical reactions. Choose durable, water-resistant gloves.
- Eye Protection: Safety glasses or goggles shield eyes from debris and splashes. Consider using a face shield for added protection.
- Ventilation: Ensure adequate ventilation when mixing dusty materials to prevent accumulation in the lungs.
Pre-mix planning and visual checkpoints
Before you start mixing, follow this checklist to ensure a homogeneous batch with no weak spots.
- Measure materials: Accurate measurements prevent weak spots. Use a scale for cement and aggregates, and measure water in liters or gallons.
- Additives first: If using additives, mix them with the water before adding other materials to ensure even distribution.
- Test pour: Pour a small amount of the mixture onto a flat surface. It should spread evenly without lumps or separation.
- Visual check: Inspect the batch for any unmixed dry materials, clumps, or inconsistent texture.
Quick rule: Always inspect your mix visually before application to avoid weak spots and defects.
Common user mistakes and how to avoid them
Even with the right equipment, common mistakes can lead to poor results. Here’s how to avoid them:
- Wrong speed: Mixing too fast or slow can cause weak spots or overmixing. Follow your mixer’s instructions for optimal speed.
- Wrong container: Using the wrong container can lead to uneven mixing and weak spots. Always use a clean, suitable container.
- Skipping bottom scrape: Failing to scrape the bottom of the container can leave unmixed materials, leading to weak spots in your final product.
Regularly review these common mistakes and adjust your mixing habits accordingly for consistent results.
Conclusion
Choose your mixing method based on your batch size and material, but stay focused on safety, durability, and a clean finish. The right technique minimizes weak spots and saves you costly repair work down the line.
Check quickly in plain terms: confirm you have the right mixer or paddle for the material, verify the batch size fits the tool’s capability, prepare the workspace and PPE, mix in the recommended order and times, test a small area first, and adjust if you see uneven color, texture, or temperature. Start with a conservative amount, measure by feel and consistency, and document any tweaks for next time.
Common mistakes to avoid are rushing the mix, skipping rest periods or proper agitation, and adding water or additives out of sequence. Safety rules to follow: wear eye protection and gloves, keep cords and hoses out of the moving parts, never overload the tool, and unplug before inspecting or changing accessories. If you’re unsure about material compatibility, or the project margin is critical, pause and confirm with a pro before proceeding.
If the job involves unfamiliar or high-stress materials, or you’re seeing persistent separation or binding even after following the steps, it’s wise to bring in a professional. Stay deliberate, test small, and push forward with confidence—you’ll finish stronger and with a reliable, long-lasting result.
FAQ
Which method gives the most consistent mix for small batches?
All three can work, but consistency depends on control. Paddles give steady motion, drill mixers add speed but can whip air in; bucket mixing is simple but easier to miss spots. Check the material’s label and follow manufacturer instructions for best results.
What materials are suitable for each method?
Most patching mortars, concretes, and grouts can be mixed with a paddle, drill mixer, or bucket mixer. Some products specify a preferred method on the label or datasheet. Always verify compatibility with the product you’re using and conform to local rules.
What are common problems and how do I fix them?
Common issues are dry pockets, lumps, and inconsistent thickness. Scrape the sides and remix if you see lumps or dry spots. If pockets persist, adjust mixing time or method and follow the product’s instructions for additives or water, keeping within safe ranges.
What about cost and setup needs?
Manual bucket mixing is cheaper upfront but slower. Drill mixers and paddle attachments cost more initially but save time on repeated small batches. Always use the proper safety gear and read the equipment manual for setup steps and limits.