

Introduction
Hairline cracking after cure is often normal shrinkage, not necessarily a sign of real damage.
The article helps you learn how to distinguish shrinkage from a problem and what practical steps to take to assess cracks.
You’ll discover simple observations, timing cues, and when professional evaluation is warranted.
Key takeaways
- Hairline cracks under paint often reflect curing shrinkage, not structural failure.
- Visual checkpoints: crack width, pattern, and whether it widens with moisture or temperature.
- Concrete vs epoxy vs paint: curing behavior differs, tailor inspection criteria accordingly.
- Normal shrinkage cracks usually small, straight, evenly spaced, and disappear or stop growing soon.
- Prevent by controlling cure temps, surface moisture, and using proper sealers or primers.
- For repairs, clean edges, inject or fill per material, and match flex with substrate.
- Seek lab analysis when cracks exceed specified width or show progression over weeks.
Table of Contents
- Introduction
- Key takeaways
- What is hairline cracking and why it matters
- Causes of hairline cracking after cure
- Visual checkpoints to assess severity
- Material-specific considerations (paint, epoxy, concrete, resin)
- When hairline cracking is “normal” and acceptable
- How to prevent hairline cracking during curing
- Repair and remediation options
- Testing, standards, and when to seek lab analysis
- Conclusion
- FAQ
What is hairline cracking and why it matters
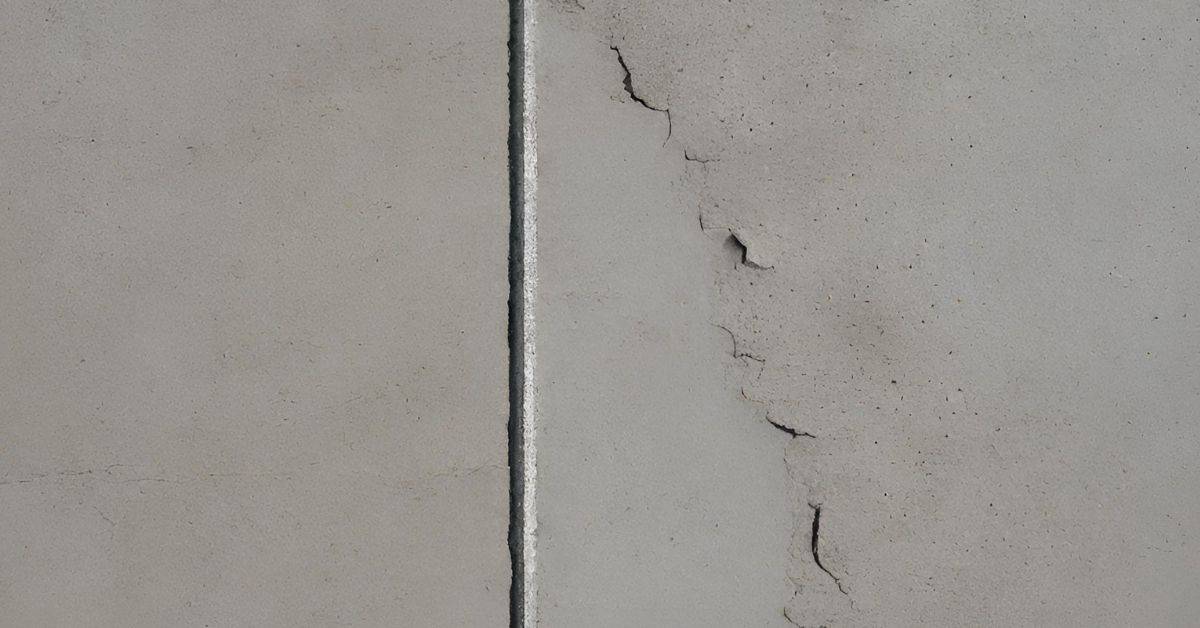
Hairline cracks are ultra-fine lines that run along the surface of cured materials. They are narrower than typical structural cracks and can be hard to see at first glance. These lines appear in paint, concrete, epoxy, and adhesives after the cure is finished.
Even when they seem tiny, these cracks can affect aesthetics and potentially trap moisture or contaminants. They can influence how a finish wears over time and may signal underlying movement or shrinkage in the substrate.
Types of hairline cracks
Hairline cracks come in a few types. Let’s take a look at each.
Surface crazing is like tiny, interconnected lines on the surface. It’s usually harmless and happens when paint or other materials dry too fast.
Shrinkage cracks happen as concrete or epoxy dries and shrinks. They’re normal in small amounts but can grow if not managed.
Micro-fractures are tiny, deep cracks caused by sudden stress. They can be a sign of underlying issues. Stress-induced lines are similar, caused by ongoing pressure.
How hairline cracks differ from structural failures
Hairline cracks and big, bad cracks look different. Here’s how to tell them apart.
Hairlines are thin, usually less than 1/8 inch wide. They’re also shallow, not breaking through the surface much. And they don’t spread or grow quickly.
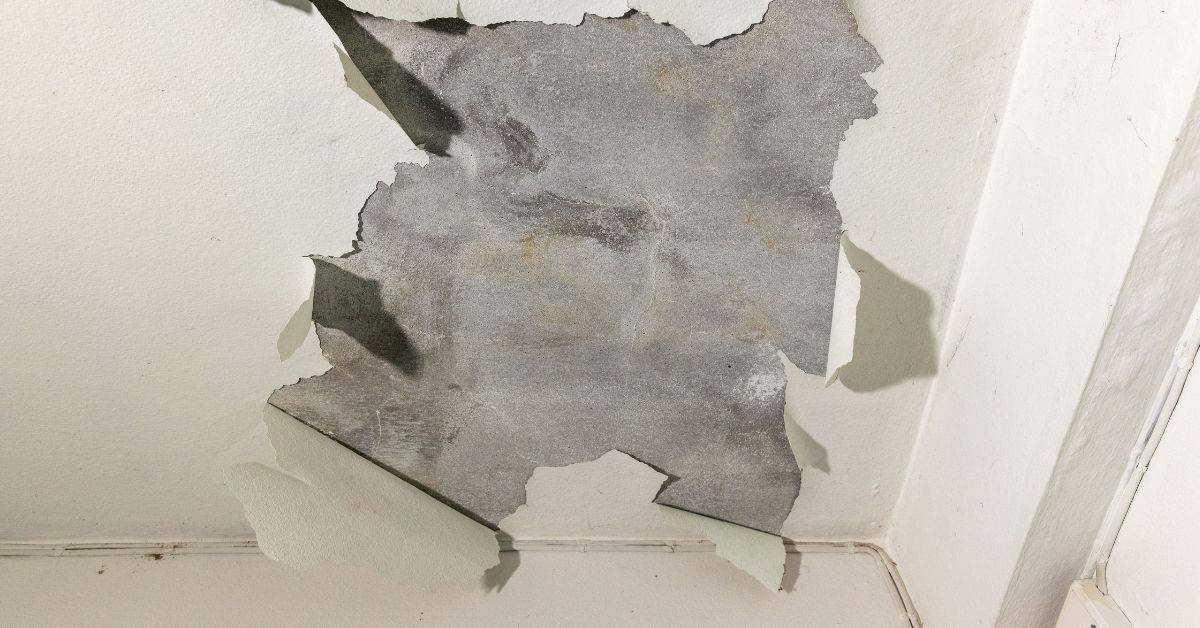
Structural failures, on the other hand, are wide and deep. They can run through the whole thickness of a material. They often have irregular patterns and grow over time, suggesting underlying problems with the substrate or adhesion.
Causes of hairline cracking after cure
The most common culprits are shrinkage from solvent evaporation or polymerization. As a coating or resin cures, volume loss can create fine lines. Temperature changes can also cause the material to contract slightly.
Moisture loss, substrate movement, and improper mixing or formulation can contribute as well. Check product labels, data sheets, and manufacturer guidance to confirm the expected behavior in your specific mix and conditions.
Normal shrinkage processes
Curing concrete is a chemical process involving crosslinking and solvent loss. This inevitably causes some dimensional change, resulting in fine surface lines.
These cracks are usually hairline, barely visible, and don’t compromise the concrete’s strength or structural integrity. They’re most noticeable on the surface due to sunlight and shadows.
Key conditions for normal shrinkage cracking include: proper mixing, adequate curing time, and suitable environmental conditions (temperature and humidity).
Problematic causes to watch for
While some hairline cracks are normal, others can indicate problems. Here’s what to look out for:
Contamination during mixing or placement can hinder the curing process and lead to cracking.
Wrong cure schedule – too fast drying can cause excessive shrinkage and cracking. Too slow can lead to improper curing and weakness.
Inadequate substrate prep, over-thinning, or mismatched expansion coefficients between concrete and adjacent materials can also result in problematic cracking.
Visual checkpoints to assess severity
Look for the width and length of the lines, plus whether they deepen with time. Note where they appear—edges, corners, or across flat surfaces. Pattern and timing help indicate if the crack is cosmetic or a sign of a bigger issue.
Also observe if the cracks change with temperature or humidity. If you notice widening after rain or heat, that suggests movement or moisture-related causes. Use these cues to decide if a fix is needed now or later.
Measuring and documenting cracks
Use this checklist to measure and document hairline cracks as soon as you spot them. This helps track progression over time.
- Width: Use a ruler or your phone’s macro mode to measure the widest point. If it’s less than 0.1 inches, it’s likely normal shrinkage.
- Length: Mark both ends of the crack with a pencil and use a tape measure to find out how long it is. Longer cracks may indicate a bigger issue.
- Depth: Try pressing a coin or a small object into the crack. If it goes in, the crack might be too deep for DIY repair.
- Pattern: Note if the crack is straight, diagonal, or follows an unusual pattern. Irregular patterns could signal a problem.
- Location: Make note of where the crack is – on a wall, floor, or ceiling. Cracks in certain areas might need immediate attention.
- Timing: Jot down when you first noticed the crack. If it’s appearing soon after pouring, it could be due to normal shrinkage processes.
- Document: Take photos of the cracks from different angles. Use a measuring tape in the shot for scale.
- Recheck: Make sure to recheck the crack every few weeks to see if it’s getting worse or staying the same.
Quick rule: Regular measurement and documentation help you stay on top of hairline cracks. If they’re getting wider, longer, or deeper over time, it might be a real problem.
When to perform simple tests (tactile, adhesion)
Use these quick checks once you’ve measured and documented your hairline cracks. They help determine if the crack is superficial or a sign of bigger issues.
- Scratch test: Gently scratch the surface around the crack with a coin or key. If it’s easy to scratch, the concrete might be weak.
- Tape test: Stick a piece of duct tape over the crack and pull it off quickly. If some concrete comes off with it, you’ve got adhesion failure.
- Bend test: Try to bend or flex the concrete near the crack. If it’s easy to move, there might be a bigger problem beneath the surface.
- Solvent spot test: Apply a small amount of acetone or denatured alcohol to the crack. If it darkens or changes color, it could indicate moisture issues.
- Sound test: Tap around the crack with a hammer. A hollow sound might mean there’s a void beneath the surface.
Quick rule: These simple tests help you understand if hairline cracks are just cosmetic or signs of bigger problems that need professional attention.
Material-specific considerations (paint, epoxy, concrete, resin)
Paint and coatings often show fine shrinkage lines after curing, mainly on flat panels or joints. Epoxies can reveal hairlines where solvent curing or exotherm affected surface tension. Concrete tends to crack along curing pockets or stress points.
Resins may display lines where layers cured at different rates. Always compare against the material’s data sheet and installation guide to understand expected finish and recommended touch-ups for each product.
Paint and coatings
Hairline cracks in paint and coatings often result from issues during application or drying. Flash drying, where the surface dries too quickly, can cause stress that leads to cracking. Similarly, skinning – when the top layer dries before the underlying layers – can create tension and lead to hairline cracks.
Incompatible layers of paint can also result in hairline cracks. Using different types or brands of paint without proper priming or preparation can cause this issue. Film thickness is another factor; applying paint too thickly can cause it to dry unevenly, leading to cracking.
To prevent these issues, ensure your surface is properly prepared and primed before painting. Apply paint in even coats, allowing sufficient drying time between each layer. Using compatible paints and following manufacturer guidelines for film thickness will also help minimize hairline cracks.
Epoxy and casting resins
In epoxy and casting resins, hairline cracks often result from issues during the curing process. Exotherm – the heat generated as the resin cures – can cause uneven shrinkage and lead to cracking if not managed properly. Similarly, a too-fast cure rate can create stress that results in hairline cracks.
Including fillers in your epoxy or resin mix can also cause issues. If not mixed thoroughly or if the filler is incompatible with the resin, it can create weak points that crack under stress. Temperature and mold issues – such as using a mold that’s too cold or not properly prepared – can also lead to hairline cracks.
To prevent these issues, ensure your workspace is at the recommended temperature for curing. Mix your epoxy or resin thoroughly before adding fillers, and use compatible fillers according to manufacturer guidelines. Monitor the cure rate closely, and consider using a slow-cure product if necessary to minimize stress during curing.
Concrete and cementitious materials
The choice of materials in concrete – from the type of cement to the aggregate used – can significantly affect its tendency to crack. For instance, using a low-quality cement or an inappropriate aggregate can lead to excessive shrinkage and hairline cracking.
- Plastic Shrinkage: This occurs as water evaporates from freshly placed concrete. To minimize this, use evaporation retarders, keep the concrete moist during curing, and avoid placing concrete on hot days.
- Drying Shrinkage: This happens after the concrete has hardened. It’s inevitable but can be minimized by using appropriate admixtures and proper curing regimes.
- Curing Regimes: Inadequate curing can lead to excessive shrinkage and cracking. Ensure concrete is kept moist for at least 7 days after placement, following a suitable curing regime.
- Reinforcement Factors: Insufficient or poorly placed reinforcement can cause concrete to crack under stress. Use appropriate reinforcement ratios and place reinforcement properly to prevent this.
- Cement Type: Using the wrong type of cement – such as rapid-hardening cement in hot weather – can lead to excessive shrinkage and cracking. Always use the right type of cement for your conditions.
When hairline cracking is “normal” and acceptable
Fine lines can be considered normal in many cosmetic-only scenarios where the surface remains sealed and functional. These tiny cracks often don’t compromise strength or adhesion.
Check the project’s standards and the product’s tolerance guidance to decide if cosmetic repairs are necessary. When in doubt, verify the acceptable limits with the manufacturer instructions or local codes.
Factors that make shrinkage acceptable
Shrinkage cracks aren’t always a bad thing. Here’s when they’re normal:
Width matters. If it’s less than 0.2mm, it’s usually fine.
Location counts. Non-load bearing surfaces can handle more cracking.
Cure-related crazing on thin films is normal and doesn’t affect performance.
Communicating acceptable defects to clients or stakeholders
When explaining hairline cracking, be clear and specific:
Use simple language. Say ‘hairline cracks’, not ‘microfissures’.
Set thresholds. E.g., ‘cracks less than 0.2mm wide are normal’.
Explain why it’s acceptable. Relate it to the factors above, like location or width.
How to prevent hairline cracking during curing
Prep the substrate well and follow correct mix ratios. Clean, dry, and sound surfaces help prevent adhesion issues that lead to cracking. Avoid introducing solvents or components that dramatically draw moisture during cure.
Control temperature and humidity, apply in proper layers, and adhere to cure schedules recommended by the product label. If conditions are borderline, pause and adjust rather than forcing cure.
Step-by-Step Process
The following steps will guide you through preventing hairline cracking during concrete curing, ensuring a strong and durable finish.
- Check weather forecast: Ensure temperature is between 50°F – 90°F (10°C – 32°C) for at least three days. Why? Extreme temperatures can cause rapid curing, leading to cracks. Check: Look up the local weather forecast.
- Moisten subgrade: Before pouring, lightly moisten the prepared base. Why? A moist subgrade helps prevent concrete from drawing moisture out of itself too quickly. Check: Feel the base; it should be damp but not wet.
- Use proper mix design: Follow manufacturer’s instructions for your chosen concrete mix. Why? The right mix ensures optimal strength and durability. Check: Review product label or manufacturer guidelines.
- Properly place and finish: Pour, spread, and level the concrete as per best practices. Why? Proper placement reduces stress points that can lead to cracks. Check: Inspect surface for any voids or imperfections.
- Cover and cure: After finishing, cover with plastic sheeting to retain moisture. Keep the concrete damp for at least 7 days. Why? Slow, consistent curing prevents rapid drying and cracking. Check: Ensure no dry spots on surface after 24 hours.
- Maintain temperature: If temperatures drop below 50°F (10°C), use heat blankets or other warming methods. Why? Low temperatures can slow curing and cause cracks. Check: Monitor local weather conditions.
- Avoid heavy traffic: Keep vehicles and equipment off the slab until fully cured (at least 28 days). Why? Heavy loads can stress the concrete, causing hairline cracks. Check: Ensure no unnecessary weight is placed on the slab.
- Perform final inspection: After 28 days, inspect for any signs of cracking or other defects. Why? Early detection allows for timely repairs. Check: Walk the surface, looking for any cracks or issues.
Pro tip: Consider using integral waterproofing admixtures in your concrete mix to further protect against hairline cracking and moisture penetration.
Environmental and equipment controls
Curing concrete is a delicate process, and environmental factors play a big role in preventing hairline cracks.
Temperature: Keep it between 50°F to 70°F (10°C to 21°C) for best results. Check your product datasheets for exact ranges. Too cold, and you risk delayed setting; too hot, and you might get rapid drying and cracking.
Humidity: Maintain a relative humidity of around 75% to 85%. This helps keep the concrete moist during curing. Again, check your product datasheets for specific recommendations.
Ventilation: Good airflow is crucial. Don’t seal off your pour too tightly; let it breathe. But avoid drafts, as they can cause temperature fluctuations and uneven curing.
If you’re working in colder climates or need to speed up curing, consider using heat sinks or slow cure ovens. But remember, these are tools, not excuses for neglecting proper environmental controls.
Application and formulation tips
Listen up, DIYer. Thinning your concrete mix too much is like making a weak cup of coffee – it ain’t gonna set right. So, keep your water-cement ratio around 0.45 to 0.6 max. Check the product label if you’re unsure.
Now, fillers. You want ’em fine and uniform. Sand’s usually best, but check local rules. Don’t go cheap with coarse stuff; it’ll crack like a bad diet. Aim for fine aggregate to cement ratio around 4-6. Again, check your product specs.
Layer thickness matters too. Slap on too much at once and you’re asking for trouble. Keep layers under 4 inches thick, tops. And don’t forget to check base compaction before you pour. You want a solid foundation, not a crack waiting to happen.
Lastly, mix it right. Don’t half-ass it like some rookies. Agitate that mix until it’s uniform and smooth. And don’t forget to check your manufacturer’s mixing instructions. They know their stuff better than you do at this point.
Repair and remediation options
For superficial cracks, cleanliness and a light, compatible filler or recoat can restore uniform appearance. Use a method that matches the material’s properties to avoid trapping moisture or creating new stresses.
For deeper issues, assess whether the crack indicates substrate movement or bond failure. Consider sanding and refinishing, or more substantial repairs per the product instructions and, if needed, structural evaluation.
DIY Cosmetic Fixes
For superficial hairline cracks that haven’t compromised the surface’s integrity, DIY fixes can restore appearance. Start by lightly sanding the area with fine-grit sandpaper to remove any loose material and improve filler adhesion.
Use a compatible filler—like a concrete patch or epoxy putty—for your surface material. Apply it according to the manufacturer’s instructions, ensuring you fill the crack completely. Allow it to cure as directed.
Once cured, lightly sand the area again to remove any excess filler and create a smooth surface. Wipe clean with a damp cloth. Now, apply a touch-up coat of your original finish, following the same application and formulation tips discussed earlier.
When to Remove and Reapply or Call a Professional
If cracks are progressing, it’s time for more than just a quick fix. Inspect the area for adhesion failure—if paint or coating is peeling off, you’ve got a bigger problem.
Check for substrate damage too. If the underlying surface is compromised, full removal and resurfacing might be necessary. This could involve stripping off old material, preparing the substrate, and reapplying a new finish.
Caution: If you find extensive damage or suspect structural issues, stop. Call in a professional. They have the tools and expertise to assess and address serious problems safely and effectively.
Testing, standards, and when to seek lab analysis
Familiarize yourself with tests that check adhesion, tensile strength, or surface integrity as appropriate for the material. Standards documents can guide acceptable performance and inspection criteria.
If defects are unclear or the application is safety-critical, plan for sampling and professional analysis. Use product labels, manufacturer data, and local authority guidance to decide when to escalate testing.
Simple in-field tests vs lab tests
Before you start any concrete work, understand the difference between quick field checks and lab tests. Both have their places, but they serve different purposes.
In-field tests are your first line of defense. They’re quick, easy, and can help you catch issues early:
- Knife test: Check surface hardness by trying to scratch the concrete with a sharp knife.
- Tape test: Apply and remove adhesive tape to see if any concrete sticks, indicating weak bonding.
- Moisture meter: Measure moisture content in slabs before installing floor coverings.
However, these tests have limitations. They’re subjective, rely on human judgment, and might not catch all issues. That’s where lab tests come in:
Lab tests provide objective data but take time and cost more. They’re ideal for quality control, troubleshooting problems, or when in-field tests aren’t conclusive:
- SEM (Scanning Electron Microscopy): Analyze concrete’s microstructure to check for defects.
- FTIR (Fourier Transform Infrared Spectroscopy): Identify chemical compounds in concrete, like excessive air voids or improper curing.
- Mechanical testing: Measure strength, flexural toughness, or other physical properties.
Always check local rules and manufacturer instructions to decide which tests you need. Don’t rely solely on in-field tests; use them to guide when lab tests are necessary.
What information to gather before consulting a lab or pro
Before you pick up the phone to call in the big guns, make sure you’ve got your ducks in a row. Gathering the right info upfront speeds up diagnostics and saves you time (and money). Here’s what you need:
First off, document your timeline. When did you pour that slab? When did it start cracking? The lab needs to know if it’s a fresh pour or an old problem.
Check base compaction, and note down the results. If you didn’t do it yourself, find out who did and get their records. A poor base can cause all sorts of issues later on.
Snap some photos. Pictures tell a thousand words, so grab your camera (or phone) and capture the problem from different angles. Include any nearby structures or features that might be relevant.
Grab those material batch numbers. You’ll find them on the concrete mix tickets or bags. The lab needs to know what went into your mix to figure out if it’s causing issues.
Note down cure conditions. How much sun did that slab see? Was it covered with plastic? Did you use curing compounds? All this affects how the concrete set and can cause problems later on.
Lastly, describe your substrate prep. What was underneath your concrete? Was it clean, dry, and properly prepared? If not, that could be causing your issues.

Conclusion
Hairline cracks after cure matter for safety, durability, and appearance. When you handle them right, you keep structure sound and finishes looking steady rather than runny or flawed.
Walk the project through a simple check: assess visible cracks in order of severity, note the material involved (paint, epoxy, concrete, or resin), test a small, inconspicuous area, compare with your normal cure expectations, and decide on repair steps before moving forward. Safety first and test in a small area before committing to full repairs; follow the material guidelines and standards you’re working with, and document what you find so you don’t miss a warning sign.
Common mistakes to avoid are pushing through a repair without identifying the cause, using the wrong product for your material, or skipping cure-time testing. Never mix new material into a compromised area or sand aggressively without knowing the underlying issue, and always wear proper PPE and ventilation during any remediation or testing. Take it slow, verify with a small trial, and watch the cure before returning to full use.
If cracks look deep, pinhole, or keep growing, or you’re unsure about the material system, call a qualified pro rather than guessing. When in doubt, seek lab analysis or professional testing to confirm the cause and the right fix. With careful checks and measured steps, you can restore strength and finish while avoiding costly damage.
FAQ
What is normal shrinkage or hairline cracking after cure?
Small cracks and tiny gaps can form as concrete dries. This is common in many mixes and finishes. If the cracks stay hairline and don’t grow across the surface, it’s usually not a structural problem.
How can I tell if a crack is a real problem?
Look for wide cracks, cracks that keep growing, or ones that open when you move the area. If water leaks through, or the crack runs through a thick slab, stop and ask a pro. Cracks with movement suggest deeper issues.
What should I do first if I see cracks after cure?
Measure the width with a crack gauge or a simple coin test. Note if the crack changes with temperature or moisture. For hairline cracks, reseal or fill with a compatible product to stop moisture intrusion.
When should I call a professional?
Call if cracks are wider than a hairline, show movement, or appear in load-bearing areas. If you see rust stains, damp spots, or the surface delaminates, bring in a pro. A quick inspection can save you from bigger fixes later.