

Introduction
Grout joint sizing is choosing the gap between tile edges, and 1/16 inch is a common target. This article gives a practical, hands-on look at what that size means for your install. Always check manufacturer guidelines and local rules if you’re unsure about what works with your tiles and substrate.
Tile size and type influence how a 1/16-inch joint looks and behaves, so plan around your specific tiles and grout product. Aesthetic preferences, from modern to traditional, will also steer how tight or airy the joints feel. Consider room use—kitchens, bathrooms, and living areas all wear grout differently, and a 1/16-inch line can offer benefits like a cleaner look and easier maintenance if installed correctly.
Key takeaways
- 1/16″ grout lines look sleek but demand precise tile edges.
- Tile size and format determine grout width; large formats often require wider joints.
- 1/16″ is safe with consistent tile edges and properly rated materials.
- Bathrooms and kitchens require moisture-conscious planning; wear PPE during grouting.
- Avoid overworking grout; wipe excess promptly to prevent staining and hazing.
- Maintenance and lifecycle costs: frequent cleaning for 1/16″ joints affects upkeep.
- Practical decision checklist: inspect edge finish, room moisture, and method before choosing.
Table of Contents
- Introduction
- Key takeaways
- Quick Comparison: 1/16″ Vs 1/8″ Grout Lines
- How Tile Size and Format Determine Grout Width
- Tile Material and Edge Consistency: When 1/16″ Is Safe
- Room Type, Moisture, Safety, and Functional Considerations
- Installation Techniques and Common Mistakes with 1/16″ Joints
- Maintenance, Cleaning, and Lifecycle Cost Implications
- Practical Decision Checklist and Planning for DIY or Pro Installations
- Conclusion
- FAQ
Quick Comparison: 1/16″ Vs 1/8″ Grout Lines
1/16″ grout lines create a crisp, tight appearance that highlights tile edges, especially with small tiles. They can blend with lighter shades or make shadows less noticeable on precise layouts. In contrast, 1/8″ lines are more forgiving and tend to show grout more prominently, which can soften edge definitions with larger tiles.
Functionally, the narrower joints suit tight layouts and high-precision work, while standard spaces and wet areas often benefit from the extra tolerance of a wider joint. Maintenance tends to be easier with wider joints in dusty or busy environments, though sealing remains important for both. Installation differs in spacer strategy, substrate flatness, and cure depth, influencing how each width performs over time.
Visual impact and design outcomes
The width of grout lines significantly impacts the overall look of your tile installation. Here’s how:
1/16″ Grout Lines: These narrow lines create a seamless, modern appearance. They’re perfect for small tiles or tight layouts. The thin line minimizes grout visibility and allows tiles to blend together.
1/8″ Grout Lines: Wider lines create more defined patterning. They’re great for larger tiles, as they help distinguish each tile and add visual interest. However, they can make small tiles look busy.
Durability and performance trade-offs
Grout line width affects durability and tolerance for movement:
1/16″ Grout Lines: Narrow lines are less tolerant to substrate movement. They’re best suited for flat, stable surfaces. Cracks can be more visible in narrow lines.
1/8″ Grout Lines: Wider lines offer more tolerance for movement. They’re ideal for areas with some flex or vibration, like floors over concrete slabs. Cracks are less noticeable in wider lines.
Maintenance and cleaning expectations
Grout line width impacts maintenance:
1/16″ Grout Lines: Narrow lines accumulate less dirt but can show stains more. Cleaning requires careful attention to avoid damaging the thin grout.
1/8″ Grout Lines: Wider lines collect more dirt, requiring more frequent cleaning. However, they’re easier to clean and hide stains better than narrow lines.

How Tile Size and Format Determine Grout Width
Tile size categories affect whether 1/16″ is appropriate, with mosaics sometimes tolerating smaller lines and large-format tiles needing more edge variability accounted for. Manufacturing variances can shift acceptable widths, so check tile data sheets and manufacturer guidance. Site conditions can push you away from tiny gaps if edges aren’t flat.
Installation factors like bed thickness, lippage risk, and edge flatness interact with grout width. The guidance varies by format: mosaics may tolerate tighter lines, while large-format tiles often require wider lines to accommodate edge irregularities. Consider where the space is used and whether edge consistency is critical for color or texture uniformity.
Small-format and mosaic tiles
For tiny tiles like mosaics, a 1/16″ grout line is usually your best bet. It helps maintain the pattern’s continuity and prevents wider joints from overwhelming the small tile size.
Remember, smaller tiles have less tolerance for variation. So, even though they can handle narrower grout lines, ensure your mortar bed is consistent and tiles are laid flat to minimize lippage.
Pro tip: Use a notched trowel with a 1/8″ or 3/32″ notch for these tiny tiles. It’ll give you a thin, even mortar bed that supports the narrow grout line.
Large-format tiles and rectified edges
With large-format tiles, especially those with rectified edges, a 1/16″ grout line can create a sleek, seamless look. It minimizes the visibility of joints and emphasizes the tile’s size.
However, be cautious. Large tiles have more edge variability due to manufacturing tolerances. A wider joint, like 3/32″ or even 1/8″, might be safer to accommodate these variations and prevent lippage.
Before you decide, check your tiles for flatness and consistency. If they’re within tolerance, go ahead with the 1/16″. But if there’s variation, opt for a wider joint.
Long planks and wood-look tiles
For wood-look planks, grout width can affect the realism of your ‘floor’. A 1/8″ joint is often preferable as it mimics the natural spacing between real wood planks.
A 1/16″ joint might look too uniform and artificial. But if you’re going for a modern, minimalist look, it could work.
Remember, these tiles can be long. So, ensure your mortar bed is consistent throughout the length to prevent lippage. And consider using a wider grout line (like 1/8″ or even 3/16″) in high-traffic areas for easier cleaning and maintenance.
Tile Material and Edge Consistency: When 1/16″ Is Safe
Tile material type influences grout joint feasibility at 1/16″, with porosity and wear expectations playing a role. Edge tolerances matter too, since rough or chipped edges may demand wider gaps to avoid contact issues. Rectified edges generally allow closer joints, but actual performance depends on the tile batch and conditions.
Testing for lippage and flatness is essential, using straightedges and feeler gauges as needed. Substrate prep, adhesive setting, and potential grout shrinkage can widen joints over time. If 1/16″ isn’t feasible, options include adjusted tile size, wider grout, or choosing a different tile with more consistent edges.
Manufactured tiles (porcelain, ceramic)
Factory-pressed porcelain and ceramic tiles are great for 1/16″ grout lines. They’re uniform, with straight edges made in molds.
Porosity is low, so they don’t suck up water from the grout. Edge tolerances are tight, keeping lippage at bay. Expect good wear too.
Rectified edges make 1/16″ even safer. They’re precision-cut after firing, ensuring flatness and consistency. But check for production tolerances – some brands might have wider ones.
Natural stone and uneven edges
Natural stones like travertine or slate can be beautiful but tricky with narrow grout. They’re cut from nature, not made in factories.
Edges might vary, causing lippage issues at 1/16″. Wider joints hide size variations better. Plus, stone’s porosity means it needs wider joints to let moisture escape.
Unrectified edges can be wavy or uneven. Even rectified ones might have slight variations. Always check with a straightedge and feeler gauge before committing to 1/16″.
Special surfaces (glass, handmade, glazed)
Glass, handmade, or heavily-glazed tiles might not play nice with 1/16″ grout. Here’s why:
Glass can warp slightly during firing. Handmade tiles have natural variations. Glaze can be fragile. All these make consistent narrow joints tough.
Test first! Use straightedges and feeler gauges to ensure surfaces are flat enough for 1/16″. If not, consider wider grout or adjusting tile size.
Room Type, Moisture, Safety, and Functional Considerations
Room type shapes grout choice through anticipated moisture exposure and cleaning routines. Dry spaces may tolerate tighter lines, while wet or grout-prone areas often benefit from wider joints for better movement tolerance. Consider how the room’s use influences long-term maintenance and appearance.
Moisture, sealing needs, and surface texture all affect performance. Slip resistance and cleaning practicality vary with texture and width, so evaluate both tile feel and how dirt hides in narrower gaps. A simple safety-minded approach helps avoid common mis-sizing and installation gaps later on.
Wet areas: showers, kitchens, and pool surrounds
In wet areas like showers, kitchens, or pool surrounds, wider grout lines are usually safer. Why?
Moisture management: Wider joints allow for better water drainage and evaporation. This helps prevent moisture buildup that could lead to mold growth or tile damage.
Wider joints also accommodate movement better. Tiles can expand and contract with temperature changes, especially in exterior settings like pool surrounds. A wider joint gives them room to move without cracking the grout.
High-traffic floors vs vertical applications
Floors and walls have different demands when it comes to grout lines. Here’s why:
Floors: In high-traffic areas like entryways or kitchens, wider joints are more forgiving. They can handle the extra foot traffic without cracking as easily as narrower joints.
Wider joints also hide dirt better. In busy areas, a little bit of dirt won’t show up as much in wider grout lines.
Walls and backsplashes: Vertical surfaces don’t see the same kind of wear and tear. Narrower grout lines can be used here without worrying about cracking or showing dirt.
Safety and slip-resistance implications
The width and texture of your grout lines can affect safety, especially in wet zones. Here’s how:
Grout width: Narrower grout lines provide a smoother surface, which can be less slippery when dry. However, they can become very slippery when wet.
Wider grout lines offer better traction in wet conditions because water can sit in the grooves, providing some grip underfoot.
Grout texture: Textured grouts can also improve slip resistance. They provide tiny grooves for your feet to grip onto, even when wet.
Installation Techniques and Common Mistakes with 1/16″ Joints
Precision in layout and measurement is essential to maintain true 1/16″ gaps across all joints. Plan reference points and verify flatness early to reduce face-fitting issues. Substrate preparation should include lippage control and edge clean-up before grout goes in.
Tools and methods matter for consistent gaps, including spacers and guides chosen for small joints. Grout mixing, back-buttering, and careful placement prevent voids and edge smear. Common mistakes like improper cure or over-aggressive cleaning can undermine joint integrity.
Substrate prep, tile layout, and alignment tips
Start with a flat substrate. Check for levelness using a straight edge and level. Fill any low spots with thinset before tiling.
Use 1/16″ spacers consistently to maintain even gaps. Place them at each corner of the tile, not just diagonally, for better accuracy.
For layout checks, use a straight edge or level across multiple tiles. Ensure they’re aligned and spaced evenly. Use reference points like walls or fixed objects to keep layout consistent.
Thinset handling and keeping joints clean during setting
After applying thinset, remove excess from joint lines using a damp sponge or grout float. Be careful not to disturb the spacers.
Use a small, stiff-bristled brush to scrub away any remaining thinset from the joints once the thinset has started to set but is still workable. This helps maintain clean, clear 1/16″ gaps.
Consider using joint reinforcement tape, especially for wider tiles or areas with movement potential. Apply it before setting the tiles and remove it after the thinset has set.
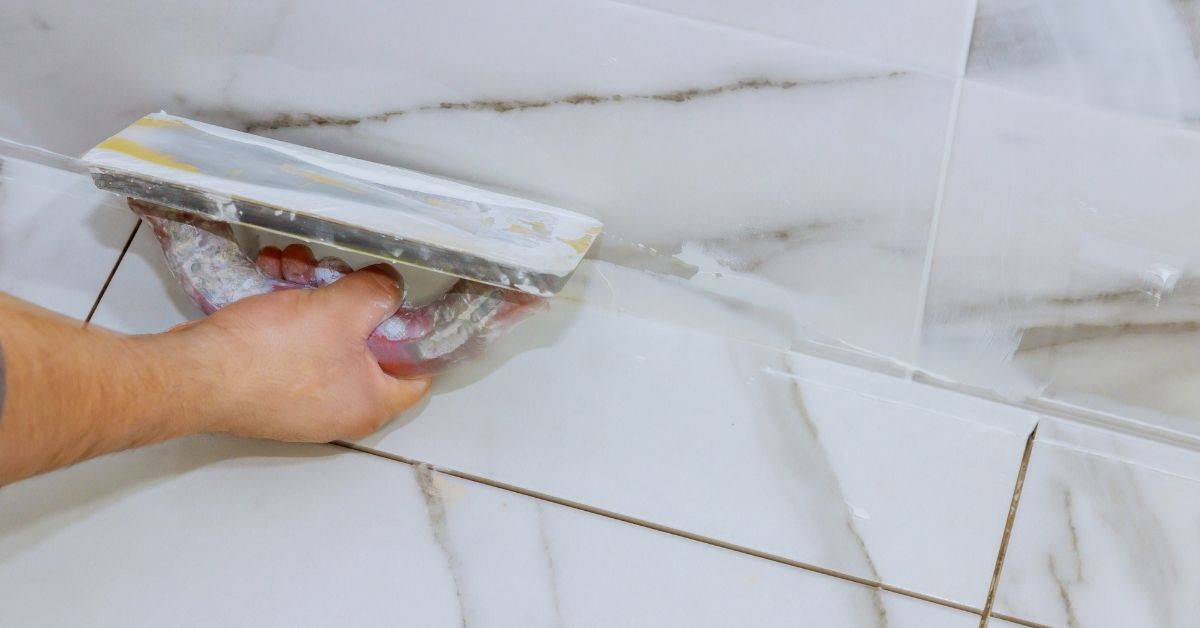
Grouting technique and tooling for narrow joints
For 1/16″ joints, use an unsanded grout. Sanded grout is too coarse and can clog up the small gaps.
- Grout float: Use a rubber-bladed float for narrow joints. It’s less likely to gouge the grout compared to a rigid float.
- Back-buttering: Apply grout to the back of the float, then press it firmly into the joint at a 45-degree angle. This helps fill the joint completely.
- Grout removal tool: Use a small, flexible blade or squeegee to remove excess grout from the surface after filling the joints. Be careful not to disturb the grout in the joints.
- Sponge: Use a damp sponge to wipe away any remaining grout haze from the tile surface. Rinse and wring out the sponge frequently to avoid spreading grout back onto the tiles.
- Grout sealer: Apply a grout sealer after the grout has cured to protect it from moisture and stains. This is especially important for wet areas like showers or kitchens.
Maintenance, Cleaning, and Lifecycle Cost Implications
Maintenance differences between 1/16″ and wider joints show up in cleaning frequency and potential issues like staining or mold. Sealing strategies and timing should be aligned with the chosen width. Understand how each option affects long-term tile performance and appearance.
Lifecycle costs cover initial installation, ongoing maintenance labor, sealant lifespans, and possible regrouting needs. Joint width influences remediation effort and replacement cycles in high-use or moisture-rich environments. Build a practical plan with checks along the way.
Routine cleaning and stain prevention strategies
With 1/16″ grout lines, routine cleaning is crucial to prevent stains. Weekly cleaning with a mild detergent solution should suffice.
Never use abrasive tools or harsh acids on narrow grout. They can damage the surface and cause discoloration.
Seal your grout immediately after installation. This protects it from moisture and stains. Reapply sealant every 2-3 years for best results.
Repair, regrouting, and longevity considerations
Narrow grout lines show wear faster. Expect to regrout every 5-7 years, compared to wider joints that last 10+ years.
Repairs are trickier with narrow joints. You’ll need a steady hand and patience to fill small cracks without damaging surrounding tiles.
Inspect your grout regularly for hairline cracks or discoloration. Early detection helps prevent major repairs.
Consider using sanded grout for 1/16″ joints. It’s more flexible and resistant to cracking than unsanded grout.
Cost trade-offs: installation time, labor skill, and maintenance expenses
1/16″ grout requires skilled installers. They’ll need more time for precise layout and careful tooling.
Expect to pay more upfront for professional installation. But, with proper care, narrow grout can last longer than wider joints, reducing long-term maintenance costs.
Ask your installer about projected maintenance costs. Regular cleaning and occasional touch-ups are minimal but necessary expenses.
In high-traffic areas or wet environments, the extra durability of 1/16″ grout might justify higher installation costs.
Practical Decision Checklist and Planning for DIY or Pro Installations
Clarify project goals and decide why 1/16″ is being considered, outlining criteria like tile size, room function, and movement expectations. A clear objective helps you compare options without second-guessing during the job. Use this as a guiding frame from the start.
Consider aesthetics, substrate stability, and tool readiness to map DIY capability to required precision. A step-by-step decision worksheet can save time and prevent mid-project changes. Include color and maintenance considerations when finalizing grout choices.
Tools and materials checklist
Before you start, ensure you have the right tools and materials to handle 1/16″ joints successfully.
- Tape measure: Accurate measurement is crucial for precise spacing. Inaccurate measuring leads to inconsistent joint widths.
- Tile spacers (1/16″): Use these to maintain consistent grout lines. Skipping this can result in varying joint sizes.
- Grout float: A soft rubber float is ideal for narrow joints. Using the wrong float can cause grout to sag or not fill properly.
- Sponge: Essential for cleaning excess grout. Not using a sponge can leave haze and make tiles look dull.
- Grout sealer: Protects grout from moisture and stains. Skipping this can lead to discoloration or damage over time.
- Epoxy grout (optional): For high-traffic areas, consider using epoxy for durability. Not using the right grout type can result in premature wear or staining.
- Protective gear: Safety glasses, gloves, and knee pads are essential. Skipping safety gear can lead to injuries.
- Grout mixer: To ensure consistent grout mixture. Inconsistent mixing can cause grout to set improperly or not fill joints evenly.
Quick rule: Always double-check your tools and materials before starting to avoid mid-project delays.
Visual checkpoints and measurement tolerances
Before grouting, visually inspect your tile work for any issues. Here’s what to look out for:
- Lippage: Check for tiles that are higher or lower than others. Lippage can cause tripping hazards and uneven grout lines.
- Grout line consistency: Ensure all joints are 1/16″. Inconsistent joint widths can look unprofessional.
- Tile alignment: Check that tiles are straight and level. Misaligned tiles can cause grout to sag or not fill properly.
- Substrate flatness: Ensure the surface is even. An uneven substrate can cause lippage and inconsistent grout lines.
Quick rule: If you find any issues, address them before grouting to avoid costly repairs later on.
When to hire a professional and what to ask them
While DIY is great, there are times when hiring a pro is best. Here’s when and what to ask:
- Complex layouts: If your layout involves complex cuts or patterns, consider hiring a pro.
- Large areas: Installing tile over large areas can be physically demanding. A pro can handle this efficiently.
- Wet areas: Bathrooms and kitchens require specific installation techniques to prevent water damage. Ask about their experience with wet area installations.
- Experience with narrow joints: Ask if they’ve worked with 1/16″ joints before. Experience matters for consistent results.
- Warranty and insurance: Ensure they’re licensed, insured, and offer a warranty on their work.
Quick rule: Always ask for references and examples of their work with narrow grout lines before hiring.

Conclusion
Choosing a 1/16″ grout joint is about balance—it can look sharp and be easier to work, but it must fit the tile edges, room moisture, and how you use the space to stay durable and cleanable.
Start by confirming tile size and edge finish, test a small sample in the actual room to see if 1/16″ stays uniform, check for grout float compatibility, mix and apply per product instructions, and seal or clean after cure to evaluate moisture exposure and long-term wear in real conditions.
A few mistakes cost time and money: using the wrong width for large or irregular edges, rushing the install and leaving gaps or smears, and skipping a test area or proper cleaning and sealing. Safety rules matter too—wear eye protection and a dust mask, maintain good ventilation, and don’t mix or apply products in a way that could harm surrounding substrates or cause moisture traps.
If the space is a shower, tub surround, or heavy-traffic floor, or if tile edges aren’t cleanly finished, consider a pro install instead of pushing through alone. When in doubt, pause, recheck the tile layout, and plan a small, controlled test first—the move that protects your investment and keeps the look straight. You’ve got this—make the next step deliberate, not rushed.
FAQ
What tile sizes and edge types work best with a 1/16″ grout line?
1/16″ grout helps with uniform joints on tiles that have consistent edges. If your edge is irregular or chipped, the line can look uneven. Check tile manufacturer guidance to see recommended grout widths for your exact tile type and edge finish.
Does a 1/16″ grout line fit modern or traditional looks better, and where does it shine?
It leans modern and clean when you have uniform edges and small-format tiles. It can also highlight color and texture if you keep the grout tight and the tiles well aligned. If you want a more traditional or rustic feel, wider joints may suit that style better.
In kitchens, bathrooms, and living spaces, what are the practical pros and cons of 1/16″ joints?
Pros: easier to clean seams on flat tiles; less area for grime to accumulate on large flat surfaces. Cons: any edge variation shows more; misalignment or lippage is more noticeable. Always verify with tile and grout product instructions and match to room use and moisture exposure.
What should I check before sticking with a 1/16″ joint for durability and maintenance?
Read the grout product label for recommended joint widths for your tile and setting type. Check that the tile edges are consistent and the substrate is flat. If you’re unsure, ask the supplier or a pro for the acceptable range and maintenance steps.