
Introduction
Tile on shower ceilings requires proper sag prevention and careful thinset choice. In plain terms, you want the substrate to stay flat and the tile to bond well from day one. Check the thinset instructions for substrate compatibility and follow the manufacturer’s guidance or local rules to avoid surprises.
Start by inspecting the ceiling for sag risk and addressing any soft spots or structural issues. Use a thinset that matches your substrate and climate, and test a small area before full application. Let the setting step follow the label for cure time and conditions, and monitor adhesion as you go.
Key takeaways
- Verify substrate is rigid, clean, and properly supported before tiling a shower ceiling.
- Use appropriate thinset and follow open time guidance to prevent sag; wear PPE.
- Back-butter large tiles and stagger joints to reduce weight-driven sag.
- Install ventilation and vapor control to manage condensation and curing conditions.
- Plan layout with gravity in mind; start at highest point and check for sag early.
- Inspect and test waterproofing at seams and corners; address leaks before tile.
Table of Contents
- Introduction
- Key takeaways
- Why Tiling a Shower Ceiling Is Different
- Substrate Selection and Preparation
- Thinset Types and How to Choose the Right One
- Mix, Open Time, and Application Techniques to Prevent Sag
- Tile Selection and Layout Considerations for Ceilings
- Waterproofing, Vapor Control, and Ventilation Interplay
- Inspection, Testing, and Quality Checkpoints
- Repair, Remediation, and Preventative Maintenance
- Conclusion
- FAQ
Why Tiling a Shower Ceiling Is Different
Tilling a ceiling presents gravity and moisture challenges that walls don’t. The orientation can cause tiles and thinset to behave differently under load. Common failure modes to watch for include sagging, delamination, and grout cracking.
Think about how movement, temperature changes, and water splash affect a ceiling assembly. Do not assume the same rules as vertical surfaces apply; verify with manufacturer instructions or local code guidance if unsure. Stay mindful of the role of substrate stiffness and support in preventing movement-related failures.
Common causes of ceiling tile sag
Shower ceiling tiles can sag for several reasons. First off, if the substrate – that’s your base material like plywood or concrete – isn’t solid and strong enough, it won’t support the weight of the tiles.
Improper thinset mix or not giving it enough time to set before applying tiles can also lead to sagging. Thinset is what sticks your tiles up there, so if it’s mixed wrong or doesn’t have a chance to cure properly, it won’t hold.
Heavy tiles, especially large format ones, put more stress on the substrate and thinset. If they’re not supported well enough, they’ll sag over time. Insufficient support, like missing or weak blocking behind the tiles, can cause this too.
Prolonged moisture exposure is another culprit. Water can weaken substrates and thinset, leading to sagging. It’s a shower ceiling, so some moisture is inevitable, but excessive amounts can cause problems.
Performance expectations and lifespan
A properly installed shower ceiling tile should last for many years – think 10 to 20 or more. But that’s only if you’ve done everything right: solid substrate, proper thinset mix, adequate support, and good installation techniques.
Signs of premature failure include tiles starting to sag or pop off, grout cracking, or water stains on the ceiling. These could indicate problems with the installation or moisture issues that need addressing.
Regularly inspect your shower ceiling for any signs of trouble. Catching issues early can prevent bigger problems down the road and extend the lifespan of your tiles.
Remember, even with proper care, shower ceilings will eventually show some wear and tear. But if you’ve done everything right, you should get many years of good service from your tile ceiling.
Substrate Selection and Preparation
Start with a solid, flat substrate and secure framing. Not all backer materials behave the same under a ceiling load. Check for flatness tolerances and proper fastening before laying any thinset.
Choose appropriate substrates like cement board, glass-miber gypsum varieties, or mortar beds per their instructions. If using exterior-grade plywood in rare cases, confirm suitability and compatibility with the tile system and moisture exposure. Always follow the product label and local rules for substrate prep requirements.
Framing, Deflection, and Support Requirements
The first step to a solid shower ceiling is proper framing. You need joists spaced no more than 16″ centers for best rigidity.
Deflection matters too. Your joists should have a deflection limit of L/360 under load. This means if your joist span is 8 feet, it shouldn’t deflect more than 1/4 inch under weight. For longer spans, go with L/720 for extra strength.
Blocking and furring strips are crucial. Blocking fills the gaps between joists, preventing tile movement. Furring strips provide a flat surface to attach your substrate, keeping it from sagging over time. Remember, these steps ensure your ceiling stays flat and strong, preventing tiles from sagging.
Surface Prep and Waterproofing Strategies
Start with a clean surface. Remove any dust or debris that could compromise adhesion. Then, prime the substrate to seal it and improve thinset bond.
Waterproof membranes are next. You can use sheet membranes like Kerdi or liquid-applied membranes like Redgard. Both work well, but ensure you follow manufacturer’s instructions for proper installation. Don’t forget to treat seams with tape and thinset, and flash at transitions to prevent water intrusion.
Proper surface prep and waterproofing is key to preventing moisture damage behind your tiles. It keeps your ceiling looking good and performing well over time.
Thinset Types and How to Choose the Right One
Understand the basic options: standard Portland cement thinsets, polymer-modified thinsets, and large-and-heavy-tile mortars. Each has different bond strength, shrinkage, and open time characteristics. Match the product to tile weight and ceiling application as directed by the manufacturer.
Tile type and weight, plus the ceiling environment, drive the choice. If you’re unsure, consult the data sheet or contact the adhesive supplier for guidance. Verify compatibility with the substrate and moisture conditions on your project.
Polymer-modified vs unmodified thinset for ceilings
When it comes to hanging tiles on ceilings, you’ve got two main types of thinset mortar to choose from: polymer-modified and unmodified. Let’s keep it simple.
Use polymer-modified thinset for most ceiling jobs. Why? It’s got better bond strength, flexibility, and water resistance. This means it can handle the weight of tiles and any movement in your ceiling. Plus, it sets slower so you’ve got more time to work with it.
But here’s where it gets picky. If you’re using certain setting materials like cement-based products or some types of membranes, you must use unmodified thinset. Check your tile manufacturer’s instructions and any membrane guidelines to be sure. Don’t mix them up, as polymer-modified can mess with the setting process.
Mortar for large or heavy tiles
For thick tiles (over 1/4″) and heavy formats, you’ll need a mortar that can handle the weight. I recommend “large-and-heavy-tile” or medium-bed mortars.
These mortars are formulated to prevent slump on ceilings, so they won’t sag under the weight of your tiles. It’s crucial to choose one that matches your tile type and size.
Check the manufacturer’s instructions for your specific tile. They’ll guide you on the right mortar to use. Don’t guess; it’s not worth risking a failed installation.
Mix, Open Time, and Application Techniques to Prevent Sag
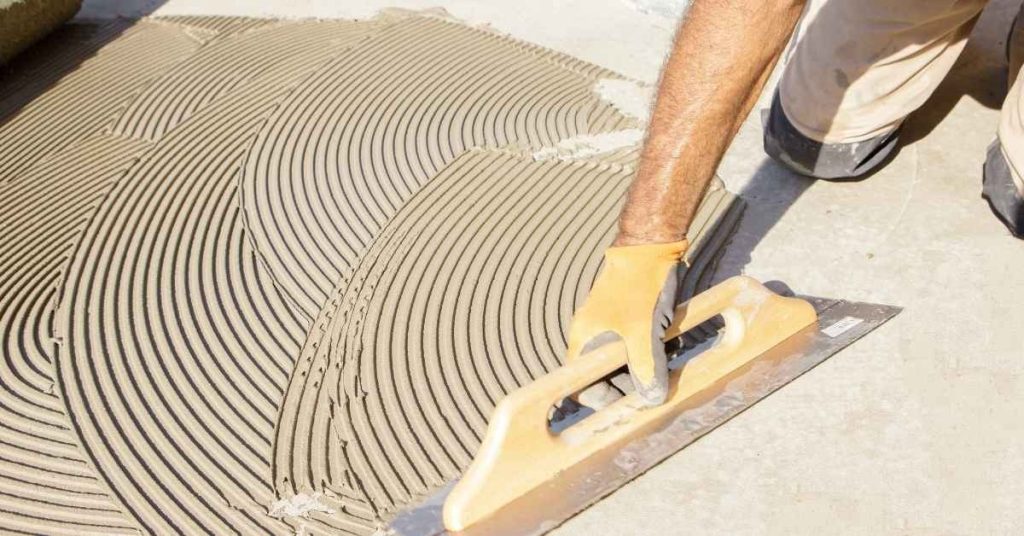
Aim for a consistent mix with the right slump for ceiling work. Pot life and open time vary by product, so follow the label for your batch. Butter the back of the tile and use proper combing methods to maximize contact.
Keep the thinset at a workable consistency to avoid slump during placement. Work in small sections to maintain control and prevent sag. If in doubt, reference the manufacturer instructions and verify with the product data sheet for your specific mix.
Right mortar consistency and pot life
The key to preventing sag is starting with the right thinset mix. Here’s how:
Scoop out a handful of your mixed mortar. It should hold its shape when squeezed, but crumble easily when pressed gently. Too runny? Add more sand. Too stiff? Add water.
Temperature and humidity affect working time (pot life). Warmer temps and higher humidity speed up setting. In hot weather, mix smaller batches or work faster. In cold, consider using a fast-setting mortar.
Mechanical support while setting
Ceiling tiles need extra support until they set. Here’s how to do it:
Use temporary supports like blocking, braces, or toggles to hold tiles in place. Attach these to the framing before you start tiling.
For small tiles (under 6″ square), use spacers or shims. Place them between the tile and support, ensuring even spacing and levelness. Remove them once the mortar sets.

Tile Selection and Layout Considerations for Ceilings
Choose smaller, lighter tiles to reduce load and sag risk. Look for tiles with appropriate thickness and edge profiles that suit ceiling use. Plan patterns that minimize long spans and weight concentration.
Check weight limits set by the substrate and framing, and consider alternatives like mosaics if needed. Always confirm tile weight and compatibility with your substrate from the tile manufacturer or distributor. Verify layout tolerances before setting any tile.
Calculating tile weight and adhesive coverage
Estimating tile weight per square foot is crucial for choosing the right support system. Here’s how:
1. Measure tile dimensions.
2. Calculate area (length x width) and multiply by thickness to find volume.
3. Divide volume by 144 (inches in a square foot) and multiply by tile weight per cubic inch (usually around 0.15).
For adhesive coverage, aim for at least 85-90% contact area to prevent sagging.
Cutting and back-buttering ceramic, porcelain, and natural stone
Back-buttering ensures even adhesive distribution. Here’s how:
Ceramic & Porcelain: Apply thinset to the tile back using a notched trowel, ensuring full coverage.
Natural Stone: Seal backs first with a stone sealer to prevent suction and ensure even adhesive spread. Then, apply thinset as above.
For edges, use a smaller trowel or your finger to apply extra mortar, ensuring they’re well-supported.
Waterproofing, Vapor Control, and Ventilation Interplay
Integrate waterproof membranes with the tile adhesive as directed by the product instructions. Ensure a continuous barrier where ceiling joints and transitions occur. Ventilation helps control moisture load on the ceiling assembly.
Control vapor by selecting appropriate membranes and sealants, and by maintaining bathroom ventilation during and after installation. If unsure, check the membrane’s data sheet and local building requirements. Verify compatibility with your chosen thinset and substrate before proceeding.
Membrane compatibility with thinset and tile
When integrating waterproof membranes into your shower ceiling project, it’s crucial to understand their compatibility with both thinset mortar and the tiles you’re using. Some membranes require unmodified thinset for proper adhesion, while others can be used with modified thinset.
Always check the product datasheets to ensure you’re using the right combination. Using incompatible materials can lead to bond failures and water leaks over time.
For instance, Kerdi membrane from Schluter Systems requires unmodified thinset for installation, while RedGard from MAPEI is compatible with both modified and unmodified thinset.
Additionally, ensure your chosen tile is suitable for use on shower ceilings. Most ceramic and porcelain tiles are fine, but some natural stones may not be recommended due to their porous nature or weight.
Venting and drying to prevent long-term deterioration
Proper ventilation is key to preventing moisture buildup in your shower ceiling assembly. Excessive moisture can weaken bonds, leading to tile delamination and potential water damage.
Install a bathroom fan that meets or exceeds ASHRAE 62.2 standards for ventilation rates. For a typical bathroom with a shower, this is usually around 50 cubic feet per minute (CFM). Run the fan during and after showering to remove excess moisture.
The fan should run continuously for at least 15-30 minutes after the shower ends to ensure thorough drying. Installing a timer or humidity sensor can help automate this process.
Additionally, assess your bathroom’s condensation risk. If you live in a humid climate or have poor insulation, consider installing an exhaust fan with a higher CFM rating or running it for longer periods.
Inspection, Testing, and Quality Checkpoints
Perform pre-tile checks for flatness, plumb, and secure framing. Visual and tactile adhesion checks matter after setting too. Simple adhesion tests can help confirm bond before full grouting.
Post-tile inspections should verify straightness, alignment, and coverage. Look for gaps, lippage, and inconsistent grout lines with the eye and a level. When in doubt, rely on the product data sheet and local guidance for testing methods.
Visual and tactile adhesion checks
Before grouting or applying final finishes, use this checklist to ensure proper tile adhesion. It’s crucial to catch any issues early to avoid costly rework.
- Check mortar coverage behind tiles: Ensure at least 80-90% of the back of each tile is covered in mortar. Inadequate coverage can lead to tiles falling off over time.
- Tap test for voids: Gently tap each tile with a rubber mallet or your knuckles. A hollow sound indicates a void, which needs immediate attention as it could cause the tile to pop off.
- Inspect corners and edges: Ensure mortar coverage is adequate around edges and corners. These areas are prone to cracking if not properly supported.
- Check for proper embedment of mesh or lath: For walls with mesh or lath, ensure it’s fully embedded in the mortar and not visible through the tile surface.
- Inspect ceiling tiles: Check ceiling tiles for proper adhesion. Due to gravity, they require a minimum 95% mortar coverage for safety.
- Check for leveling: Ensure tiles are level and not sagging or bulging. This can indicate improperly mixed mortar or insufficient support.
- Inspect tile cuts: Check that cut edges are fully supported with mortar to prevent them from breaking off over time.
- Check for proper spacing: Ensure tiles are properly spaced (usually 1/8″ – 1/4″) to allow for expansion and contraction. Improper spacing can cause tiles to crack or pop off.
Quick rule: Always follow manufacturer instructions for specific products, but as a general guideline, ensure at least 80-95% mortar coverage behind tiles for walls, and 95% for ceilings. Regular visual and tactile checks can help catch issues early.
When to perform mock-ups or sample panels
Before diving into your full tile installation, especially in critical areas or with unfamiliar materials, create a small test area to validate your chosen thinset, tile, and support approach. This checklist helps ensure you’ve covered all bases.
- Check substrate flatness: Ensure the surface is within acceptable tolerances (usually L/360 for floors, L/240 for walls). Use a straight edge and feeler gauges to confirm.
- Test thinset consistency: Mix a small batch of your chosen thinset. It should have a smooth, workable consistency (like peanut butter) that’s not too wet or dry.
- Verify tile suction: Apply thinset to the back of a test tile and press it onto the substrate. After 24 hours, check for proper adhesion by gently pulling on the tile.
- Check tile spacing: Lay out your tiles with spacers to ensure grout lines are consistent and within acceptable ranges (typically 1/8″ to 3/8″).
- Test lippage: After the thinset has cured, check for lippage by placing a straight edge across multiple tiles. If it wobbles, you may need to adjust your trowel notches or substrate preparation.
- Inspect grout: Once tiles are set, apply grout to a small area and let it cure. Check for proper color match, consistency, and ease of cleanup.
- Test sealant: Apply your chosen sealant to the grout lines in the test area. After curing, check for proper adhesion and protection against moisture or stains.
- Perform visual and tactile adhesion checks: As previously discussed, ensure tiles are properly adhered by gently tapping them with a rubber mallet and listening for a solid sound.
Quick rule: Always perform mock-ups in the least visible area of your project to minimize any potential issues’ impact. If you skip this step, you risk expensive rework due to unforeseen problems with your chosen materials or methods.
Repair, Remediation, and Preventative Maintenance
Tackle sagging or delaminated tiles by removing and redoing affected areas, rather than chasing cosmetic fixes. For small issues, spot repairs may be possible if you verify substrate and adhesive compatibility. Reinstall when the underlying problem is unresolved.
Prevent future problems with regular maintenance: keep moisture in check, inspect seams, and monitor for any changes in tile or grout. Document observed issues and consult product instructions or a professional if something isn’t behaving as expected.
Safe removal and substrate repair techniques
First, wet the tiles to minimize dust. Use a utility knife to score the grout lines, then pry off the tiles with a flat bar or similar tool.
Inspect the substrate for damage. If the backer board is cracked or delaminated, replace it. Check membrane integrity and repair any punctures.
If framing components are damaged, replace them to ensure a solid base for your new tiles.
Re-tiling with improved materials and methods
Choosing the right materials can prevent future issues. Here’s what to consider:
- Thinset mortar: Use a modified, latex-fortified thinset with good bond strength and flexibility. Avoid low-quality mortars that can crack or stain.
- Reinforcement: Consider using fiberglass mesh or wire lath for added support, especially on large tiles.
- Waterproofing membrane: Choose a high-quality, compatible membrane. Avoid cheap membranes that can delaminate or allow moisture penetration.
- Tile selection: Opt for lightweight, non-porous tiles to reduce weight and prevent water absorption.
- Adhesive coverage: Ensure you’re using enough adhesive per square foot. Undercoverage can lead to weak bonds and delamination.
Conclusion
Strong, durable shower ceilings come from smart prep, careful product choice, and strict adherence to the steps that prevent sag and leaks. When you respect substrate prep, proper thinset selection, correct mixing and open time, and rigorous waterproofing and ventilation, you protect the finish and your shower’s structure for years.
First, check the basics in order: confirm the substrate is solid and clean, verify the ceiling is properly reinforced and plumb, select a thinset that matches your substrate and tile weight, mix and open it as specified, apply in the right thickness and pattern, seal with the right waterproofing system, and run a thorough inspection and testing routine before you set the tile. Then finish with a controlled cure and a plan for ongoing maintenance and moisture management, including ventilation and periodic checks for gaps or movement.
Common mistakes to avoid are skipping substrate preparation, choosing the wrong thinset or mismixing it, and rushing waterproofing or curing. Never ignore sag risk by skimping on support or underestimating tile weight, and never seal up a wet area without adequate ventilation. Always follow a safe sequence, test a small area first, and keep work areas dry and well-ventilated to reduce health and damage risks.
If the ceiling is suspect, or you’re unsure about substrate integrity, waterproofing detail, or ventilation needs, don’t push through. Consider bringing in a pro before irreversible mistakes stack up. Stay deliberate, stay safe, and you’ll end with a ceiling that stays dry, looks clean, and gives you long-lasting performance.
FAQ
What are the best signs your ceiling substrate is ready for thinset and tile to avoid sag?
Look for a rigid, clean surface with no loose material. Any dust, grease, or paint films should be removed, and imperfections should be addressed before tiling.
If the substrate flexes under light pressure, stop and fix it. Check that the surface is dry and free of staining from moisture before proceeding.
Which thinset features matter most for shower ceilings and what should I look for on the label?
Choose a thinset with the right polymer content and bond strength for vertical work, and one labeled for exposed showers. The label should call out suitability for ceilings and moisture exposure.
Always follow the manufacturer’s instructions for substrate type, cure time, and open time. If in doubt, check the datasheet or product page for ceiling or vertical tile applications.
How should I apply thinset and tile on the ceiling to prevent gravity deflection?
Use a notched trowel appropriate for your tile size and back-butter when needed to improve contact. Work in small areas and keep tiles level as you set them to avoid sag.
Apply only as much grout-free thinset as you can tile over while it remains workable. Follow the open time guidance from the thinset manufacturer and don’t rush the setting process.
Why is waterproofing layer placement important on the ceiling, and how do I verify it’s in place before tiling?
Ensure the waterproofing membrane is continuous and properly lapped at joints, with encroachment onto walls as recommended by the product instructions. A visible, undamaged membrane is easier to inspect than hidden layers.
Verify the system is compatible with your substrate and tile type, and confirm it’s installed according to the manufacturer’s guidance. If unsure, check the label, datasheet, or local guidance before tiling.