

Introduction
Drywall tips and tricks are practical steps and checkpoints you can follow to hang and finish sheets without unnecessary drama. This guide sticks to hands-on, in-your-closet style advice you can apply while you work. It keeps the process clear and reachable for a DIY job.
From measuring and cutting to taping and sanding, you’ll find practical milestones that help you stay on track. If a step feels off, check the product labels and manufacturer instructions or local rules for safe, compatible practice. Keep things simple, plan ahead, and know when to pause and reassess before moving on.
Key takeaways
- Plan sheet layout to minimize seams and maximize long, continuous wall runs.
- Secure studs and joists, inspect for moisture, and replace damaged panels.
- Splice drywall with accurate layout to avoid awkward joints and pops.
- Use a sharp knife and proper taping technique to seal seams.
- Let compound cure per instructions before sanding; wear a mask.
- Check for high spots and touch up texture before priming or painting.
Table of Contents
- Introduction
- Key takeaways
- Prep and Planning
- Wall and Ceiling Inspection & Prep
- Hanging Drywall: Layout and Installation
- Taping and Corner Bead Installation
- Applying Joint Compound (Mudding)
- Sanding and Visual Checkpoints
- Priming, Finishing Texture, and Painting
- Stop Points, Troubleshooting, and When to Call a Pro
- Conclusion
- FAQ
Prep and Planning
Start by outlining the scope of the project and listing the rooms or areas involved. Break the work into clear steps so you can track progress without juggling tasks at once. Check local rules or guidance if you’re unsure about requirements.
Make a simple materials checklist and a rough timeline based on your space. Identify potential challenges early, like doors, windows, or fixtures that affect drywall layout. Use the product label or manufacturer instructions to confirm bag weights and compound types before buying.
Assessing the Job and Measurements
First things first, grab your tape measure and a notepad. You’re gonna need ’em.
Start by measuring the area you’ll be concreting. It’s simple math: length x width = square footage. But remember, measure twice, cut once. It’s the same here – measure twice, pour once.
Next, calculate how many panels of concrete you’ll need. Most come in 80 sq ft panels. Divide your total area by 80 to find out how many you need. Don’t forget to add a bit extra for waste – I’d say around 5-10%.
Now, mark down any special features like doors, windows, or outlets. You’ll need to work around these when laying your concrete.
Tools and materials checklist
Before you start mixing concrete, use this checklist to ensure you have everything you need. It’s best to gather all tools and materials before beginning the job.
- Concrete mix: Check that you have enough bags for your project. A standard 80 lb bag covers about 0.6 cubic feet. Measure your area and calculate accordingly.
- Water: Ensure a clean, continuous water source is available. The water-to-cement ratio typically ranges from 4 to 6 parts water per part cement. Check the specific mix instructions on your concrete bags.
- Concrete mixer (optional but recommended): If using one, ensure it’s in good working condition and large enough for your project. A small mixer can handle up to 1/2 cubic yard at a time.
- Shovel: Check that you have a sturdy shovel for mixing and moving concrete.
- Wheelbarrow or concrete cart: Ensure it’s in good condition for transporting mixed concrete. A standard wheelbarrow holds about 3 cubic feet of concrete.
- Concrete rake (optional): This helps level and smooth the concrete surface, improving finish quality.
- Tamping tool: Check that you have a sturdy tamping tool to compact the concrete and remove air pockets. A standard tamper is about 1-1/2″ in diameter.
- Concrete float (optional): This helps smooth and finish the surface, improving the final look of your project.
- Formwork materials: Ensure you have enough lumber or other materials to create forms for containing the concrete. Check local rules regarding formwork strength and support.
Quick rule: Always check local building codes and manufacturer instructions before starting any project involving concrete. This ensures your work is safe, legal, and up to standard.
Material specs and standards explained
The right materials ensure your concrete work lasts and looks good. Here’s what you need to know.
- Portland Cement: The base of concrete. Look for ASTM C150 types (e.g., Type I, II). Cheap alternatives can cause weak bonds and cracking.
- Concrete Mix: Pre-made mixes save time. Check the bag for strength class (e.g., 3000 psi) and use a reputable brand to avoid weak mixes.
- Water: Clean, drinkable water works best. Too much or too little ruins concrete. Use a water-cement ratio of 0.45-0.60 by weight.
- Aggregates (Rock & Sand): Check labels for size and type (e.g., coarse, fine). Cheap, wrong aggregates cause weak, ugly concrete.
- Fiber Reinforcement: Optional but recommended. Adds strength and reduces cracking. Look for ASTM D7458 standards. Don’t skimp on quality or you’ll pay later with cracks.
- Admixtures (Chemicals): Speed up setting, increase strength, etc. Check labels for compatibility with your cement and mix. Don’t overuse; it’s expensive and can cause problems.
Pro tip: Buy materials from reputable sources, check labels, and store properly to maintain quality. Mix small batches at a time to ensure consistency and prevent waste.
Wall and Ceiling Inspection & Prep
Inspect all surfaces for moisture, damage, or irregularities that could affect hanging. Note any high spots, joints, or loose material that needs attention. Plan repairs before you start hanging panels.
Prepare the area by cleaning dust and debris and removing obstacles. If you spot moisture or mold signs, verify with an appropriate product label or citation and address it before proceeding. Ensure the substrate is flat enough according to your chosen drywall system.
Identifying types of damage and causes
Before starting any repair work, use this checklist to identify the type and cause of damage. This will help you determine the scope of repairs needed.
- Surface cracks (hairline to 1/8″ wide): Check for fine lines on walls or ceilings. Use a ruler to measure width. These are usually harmless, but can indicate minor settling or moisture issues if numerous.
- Wide cracks (>1/8″ wide): Measure crack width with a ruler or feeler gauge. Wider cracks may suggest structural problems like foundation settlement or excessive moisture.
- Vertical cracks: Check for cracks following the direction of drywall seams. These often result from minor settling and are usually easy to repair.
- Diagonal cracks: Look for cracks at a 30-60 degree angle to walls or ceilings. These can indicate structural issues, so check nearby walls and ceiling for signs of settlement or movement.
- Water stains (yellow, brown, or dark spots): Inspect stains closely; they may be caused by plumbing leaks, roof damage, or condensation. Check nearby areas for moisture or mold.
- Mold (black, green, or white spots): Look for visible mold growth on walls or ceilings. Use a moisture meter to confirm high moisture levels in affected areas. Mold indicates water intrusion and potential health risks.
- Sagging or bowed walls/ceilings: Check for signs of structural failure, such as bulges, waves, or deflection. Measure deflection with a straight edge and level; more than 1/8″ in 8′ indicates serious issues.
- Doors/windows sticking or misaligned: Test door and window operation. Sticking or misaligned openings can indicate structural movement or settling.
Quick rule: If you find any signs of structural damage, stop work immediately and consult a professional engineer or architect before proceeding.
Framing and structural checks
Before you start hanging drywall, use this checklist to ensure your walls and ceilings are structurally sound. It’s crucial to catch any issues now to avoid expensive rework later.
- Check stud spacing: Verify that studs are spaced 16″ or 24″ on center (OC). This is the most common spacing and ensures proper support for drywall. What goes wrong if you skip this: Incorrect spacing can lead to sagging or bowed walls.
- Inspect stud straightness: Ensure each stud is straight using a level or straight edge. A slight bow can cause drywall to crack during installation. What goes wrong if you skip this: Crooked studs make it difficult to install drywall and may result in visible imperfections.
- Check ceiling joist spacing: Make sure ceiling joists are spaced 16″ or 24″ OC. This provides the necessary support for drywall and any future ceiling fixtures. What goes wrong if you skip this: Inadequate support can cause sagging or cracking in the ceiling.
- Verify ceiling joist depth: Ensure ceiling joists are at least 2×8 or 2×10 for standard drywall installations. Shallower joists may require additional support or different drywall installation methods. What goes wrong if you skip this: Insufficient joist depth can lead to sagging or cracking in the ceiling.
- Check for rotting wood: Inspect all framing members for signs of rot, such as soft spots or discoloration. Rotted wood must be replaced before installing drywall. What goes wrong if you skip this: Drywall installed over rotted wood can lead to mold growth and structural issues.
- Verify load-bearing walls: Identify any load-bearing walls, which typically have double studs or additional support. These walls require extra care during drywall installation. What goes wrong if you skip this: Neglecting to account for load-bearing walls can result in structural damage and safety hazards.
- Check for proper blocking: Ensure there is blocking between studs at each 4′ or 8′ interval, as required by local building codes. Blocking provides additional support for drywall screws and helps prevent sagging. What goes wrong if you skip this: Inadequate blocking can cause drywall to sag or crack over time.
- Inspect fire stops: Check that all openings between walls, ceilings, and floors have proper fire-stopping material installed. This is crucial for fire safety and may be required by local building codes. What goes wrong if you skip this: Inadequate fire stopping can compromise fire safety and may result in code violations.
Quick rule: Always follow local building codes and consult manufacturer instructions for specific product requirements. This checklist provides a general guide, but your project may have unique needs based on location or design.
Hanging Drywall: Layout and Installation
Plan panel layout to minimize visible seams and natural break points. Mark ceiling and wall lines to guide the start of each sheet. Cut panels to fit around outlets, switches, and openings as needed.
Secure sheets in place with fasteners at consistent intervals, following the pattern in the instructions. Fit panels tightly without forcing, and adjust as you go for a clean look. Always verify fastener depth and spacing against the product data or manufacturer directions.
Cutting and fitting panels
Before you start cutting, check your drywall panels for any damage. They should be in good condition with no cracks or tears.
Scoring is the first step. Use a utility knife to score along your measured line. Press firmly but not too hard – you’re just creating a guide for the snap. Keep your knife level and steady.
Next, snap the panel along the scored line. You can use a straight edge or a drywall saw to help with this. Be careful not to tear the paper facing – it’s what holds the joint compound later on.
When fitting panels around openings and obstructions, always check the measurements twice. Drywall is unforgiving – once you cut it, that’s it. Use a combination square or a T-square to ensure your cuts are straight and accurate.
Fastening techniques and patterns
When it comes to hanging drywall, you’ve got two main choices for fasteners: screws or nails. Both have their uses, so let’s dive in.
Screws: These are your best bet for most jobs. They hold better over time and won’t pop like nails can. Use drywall screws, not regular ones – they’re designed to grip the gypsum core. Check the box for size; #6 or #8 are common, but follow manufacturer recommendations. Drive them in a countersunk pattern, about 1″ from edges and joints.
Nails: Some folks still use nails. They’re cheaper, but they can pop later on, especially if the wall moves. If you insist on using them, go for drywall nails, not finish nails. Use a nail set to sink them below the surface and fill with joint compound. Nail in a similar pattern as screws, about 1″ from edges and joints.
Now, about those patterns… You want to space your fasteners out evenly. A good rule of thumb is every 6-8″ along studs and joists. But always check local codes, some areas have specific requirements. And remember, never fasten into the drywall paper. It tears easily and you’ll end up with a weak hold.
Working ceilings and awkward areas
Hanging drywall on ceilings can be a pain in the neck, literally. Here’s how to tackle it safely and efficiently.
Safety first: Always have someone help you lift panels into place. Use a drywall lift if available. Wear safety glasses and tie back long hair.
For odd angles, like vaulted spaces or sloped ceilings, you’ll need to cut your panels accordingly. Refer back to the cutting section. Remember, it’s easier to cut too much off than to try and fit a panel that’s too big.
For small repairs, use drywall patches or mesh tape. But for larger areas, you might need to cut out the bad section and replace it with a new piece. Always check base compaction before hanging new panels to avoid sagging.
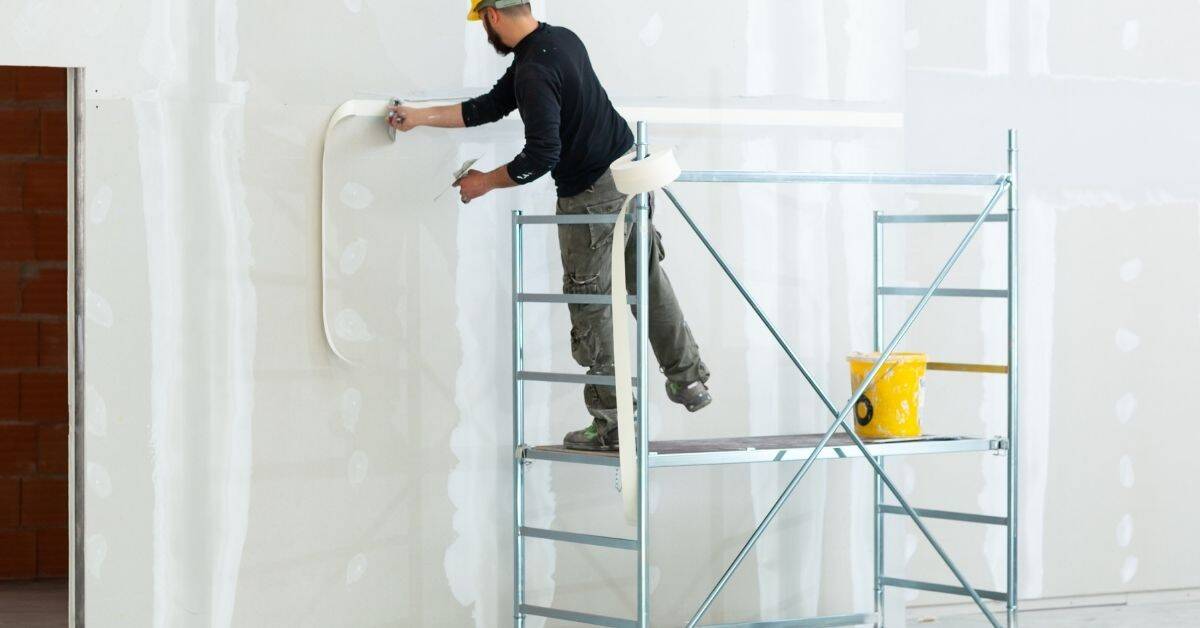
Taping and Corner Bead Installation
Apply paper or fiberglass tape across joints with a thin base layer of compound. Create a smooth, continuous surface by feathering edges where tape meets the mud. For corners, install corner beads first to establish straight lines.
Embed corner beads carefully and avoid gaps or buckling. Check that beads sit flush and true before the mud sets. If unsure, consult the manufacturer instructions or product label for any special installation steps.
Joint tape methods (paper vs. mesh)
When it comes to joint tape, you’ve got two main choices: paper and mesh. Both have their uses, so let’s dive in.
Paper Tape – This is your go-to for most interior walls and ceilings. It’s cheaper and easier to work with. Here’s how to use it:
1. Apply a thin layer of joint compound (mud) to the joint using a 6″ or 10″ taping knife.
2. Embed the tape into the mud, using firm pressure and a straight edge like a drywall knife or trowel. No need to overlap; just press it in firmly.
Mesh Tape – This is better for high-moisture areas like bathrooms and kitchens. It’s stronger, but also more expensive and harder to work with. Here’s the deal:
1. Apply mud to the joint as before.
2. Embed the tape, using firm pressure and a straight edge. But here’s the catch – you’ve got to overlap the tape by at least an inch on each side of the joint. This takes more mud and time.
Installing and finishing corner beads
Corner beads come in two main types: metal and plastic. Metal’s stronger, but plastic’s cheaper. Check the label to be sure.
Attaching them: Use drywall screws or nails, spaced every 4-6 inches. Don’t use too many, you don’t want to see screw holes later. Keep ’em flush with the surface.
Finishing: After taping (you’ve done that already, right?), apply joint compound over the bead. Use a 6-inch knife for the first coat, feathering it out on both sides. Let it dry. Sand lightly if needed. Apply another coat with a 10-inch knife, feathering even more. Let it dry. Now you’re ready to prime and paint.
Applying Joint Compound (Mudding)
Apply a first coat to all joints and screws to seal the substrate. Keep coats thin and even, allowing for proper drying time between passes. Plan a build-up strategy that suits the surface condition you’re working with.
Work in manageable sections and avoid overworking the mud. Maintain a clean trowel edge and consistently drag from center to edges. If you need exact product guidance, verify with the bag instructions or the manufacturer’s data sheet.
First coat (taping coat) techniques
Start by mixing your joint compound to a peanut butter-like consistency. This is crucial for embedding the tape and setting joints.
Apply the mud using a 6-inch or 10-inch taping knife, depending on your comfort level. Work in manageable sections, about 4 feet wide, to avoid drying out.
Key: Press firmly along the tape to ensure it’s fully embedded and remove any excess compound.
Second and finishing coats
After the first coat has dried, sand lightly with a fine-grit sanding screen or drywall sanding sponge. Wipe off any dust.
For the second coat, thin your mud slightly to help hide tape edges. Apply it perpendicular to the first coat for added strength.
Tip: Use a wider knife (12-inch or 14-inch) for better control and smoother application.
Feathering and blending edges
For the final coat, thin your mud significantly to create a smooth, feathered edge. This helps minimize sanding later on.
Start at one end of the joint and use a light, sweeping motion with your knife, gradually reducing the amount of compound as you move towards the edge. This creates a seamless transition.
Pro: Feathering edges also helps prevent ‘ridge’ formation, making sanding easier.
Sanding and Visual Checkpoints
Let each coat dry fully before sanding to prevent gouges. Use a light touch and move in long, even strokes to keep a flat surface. Inspect joints for uniformity and smoothness as you work.
Choose sanding grits by the stage of the finish and the level of smoothness desired. Check for ridges, high spots, or remaining tape ridges and address them promptly. When in doubt, reference the product instructions or local building guidelines for acceptable finish standards.
Sanding methods and dust control
Before you start sanding, make sure your drywall is fully cured and all mudding work is complete.
- Use a pole sander: Ideal for large areas. Keep it flat on the wall.
- Edge sanding: Use a palm sander or sandpaper by hand for edges and corners.
- Grit choice: Start with 120-grit, then finish with 150-grit for a smooth surface.
- Dust control: Wear a respirator. Use a vacuum attachment on your sander.
- Avoid over-sanding: It can damage the paper face and expose gypsum core.
- Sand with the grain: Go in straight lines to avoid swirl marks.
- Check for high spots: Feel the wall. Sand any raised areas.
- Avoid sanding too dry: It can create dust clouds and reduce effectiveness.
Quick rule: Always inspect your work after each pass to ensure a smooth, even surface.
Visual checkpoints and defect spotting
After sanding, walk the wall with a flashlight at different angles to spot any imperfections.
- Shadow lines: Check for visible tape or corner bead seams. Sand if necessary.
- Ridges: Feel for raised edges. Sand down if found.
- Soft spots: Press firmly. If it gives, apply more compound and sand again.
- Nail pops: Fill with spackling compound, let dry, then sand smooth.
- Cracks: Inspect for hairline cracks. Apply joint compound if found.
- Uneven surfaces: Check for dips or waves. Sand until smooth.
- Dust residue: Wipe with a damp cloth. Let dry before priming.
Quick rule: Fix any defects now to prevent them from showing through paint later.
Priming, Finishing Texture, and Painting
Select a primer compatible with your drywall and finish. Apply primer to achieve an even base before texture or paint. Follow the texture pattern if you’re matching an existing surface.
Plan your painting sequence to minimize touch-ups, starting with ceilings if applicable. Use the correct ventilation and drying times as indicated on the product label. If you’re uncertain about texture compatibility, check the manufacturer instructions before proceeding.
Primer selection and application
A primer is your first line of defense against drywall issues. It seals the surface, prevents tannins from bleeding through, and improves paint adhesion.
Choose a shellac-based or acrylic primer for new drywall. Shellac blocks stains while acrylic provides better adhesion for latex paints. For existing walls with minor imperfections, use a stain-blocking primer.
Apply primer using a roller and brush combo. Roll on the main surfaces and cut in edges with a brush. Aim for even coverage, about 2 coats for new drywall or 1 coat for existing walls.
Texture options and DIY application
Drywall textures hide imperfections and add visual interest. Common options include smooth, orange peel, and knockdown. Choose based on your desired look and skill level.
For orange peel, use a roller with textured nap. Dip it in joint compound, then roll onto the wall. Let it dry, then sand lightly to smooth any high spots.
To create a knockdown texture, apply joint compound using a trowel or hawk and knife. Once semi-dry, use a knockdown blade to press into the compound, then pull away at an angle. Let dry and sand lightly.
Painting and final inspection
Before you start painting, perform a final inspection. This ensures your hard work pays off with a flawless finish.
- Check for missed spots: Look over the entire surface to ensure no areas were skipped during taping and texturing.
- Inspect tape seams: Ensure all joints are taped, and there are no gaps or bubbles. Press gently to check adhesion.
- Feel for texture high spots: Run your hand over the surface to feel for any raised areas that need sanding.
- Check corners: Make sure corner beads are properly installed and not damaged.
- Look for nail holes: Fill any visible holes with joint compound, let dry, then sand smooth.
- Inspect patched areas: Ensure all patches are level, taped, and textured to match surrounding walls.
- Check for dust: Wipe down the surface with a damp cloth to remove any dust before painting.
- Test paint adhesion: Lightly scratch the surface with a nail. If primer or compound comes off, sand and reprime.
Quick rule: Always perform this final inspection before painting. It’s easier to fix issues now than after you’ve applied paint.
Stop Points, Troubleshooting, and When to Call a Pro
Identify decision points where progress should pause and options re-evaluated. If you notice recurring gaps, cracking, or buckling, stop and reassess the approach. Document the issue and consult guidelines before moving forward.
Know when a professional should be involved, such as structural concerns or stubborn moisture problems. Use product labels, datasheets, or local rules to determine the appropriate next steps. When in doubt, scheduling a pro can prevent bigger, costlier mistakes.
Common problems and quick DIY fixes
Cracking joints are common. Use a flexible joint tape, apply mud, let it dry, then sand.
Nail pops happen when nails push through the drywall. Fill with mud, let dry, sand, and repaint.
Visible seams? Apply more mud, feather edges, let dry, sand lightly.
When to pause and re-evaluate the project
If you see persistent movement, stop. Check studs, ensure they’re secure.
Slow drying mud? Might be too humid. Wait for drier conditions or use accelerators.
Uneven substrate? Sand more, apply more mud to fill low spots.
When to call a professional
If you find structural damage, stop. This is beyond DIY.
Widespread mold? Call a specialist. It could indicate hidden water leaks.
Complex electrical/plumbing behind walls? Don’t DIY. Hire a licensed pro to avoid safety hazards.
Conclusion
Finish a solid, safe job by sticking to a plan that protects people, the structure, and the look you want. When you respect prep, layout, and proper slow work, you get durability and an even appearance you can be proud of.
Before you call it done, run this quick check in order: verify walls and ceilings were inspected and prepped, confirm drywall is securely hung with straight lines, ensure joints and corner beads are set and taped, apply the compound in thin, even coats with time to dry, sand only where needed, spot-test primer on a small area, and test your texture and paint on a hidden patch first. Do each step deliberately, and let curing times pass between coats to avoid cracking or dust in the finish.
Common mistakes to avoid are rushing the hanging or mudding, skipping small repairs, or coating too thick at once. Don’t skip safety gear, and never work with damp materials or overheated rooms. Test small areas first and clean up dust before painting to prevent bubbles or poor adhesion. If you see persistent cracking, peeling, or walls that stay out of plumb, don’t push through—address the issue now or call a pro.
When in doubt about structural issues, large joints, or complex textures, it makes sense to bring in a pro rather than risk costly redo. Stay deliberate, finish clean, and you’ll have a room that looks right and lasts hard. You’ve got this—keep the line tight and the pace steady, and proceed with confidence.
FAQ
How can I spot and fix common mudding mistakes early?
Look for ridges, puckers, or tape showing through. If you see texture differences, wipe and rework that area after the mud reaches skin level hardness. Check the label or manufacturer instructions for drying times and recoat guidance.
What’s the best way to test a patch for adhesion and finish before committing to the whole wall?
Apply a small amount of compound to a hidden or scrap area and let it dry completely. Sand lightly and check for flaking or cracking. Use this patch to compare how it sands and takes paint with the rest of the wall.
How do I choose a texture or finish and test it without redoing the entire project?
Pick a sample area and apply your texture or skim coat there first. Let it cure and compare to what you want on a visible patch. If it looks off, adjust on the sample before wider use, and always follow the product label instructions.
When should I call a pro or stop DIY work, and what signs indicate trouble?
Stop if joints crack after drying, tape shows through after sanding, or there’s persistent dust and peeling paint from the drywall surface. If you’re unsure about compound compatibility or edge care, check manufacturer instructions or local guidance before continuing.