
Introduction
This guide is a practical checklist for diagnosing why drywall screws fail and how to fix them.
You’ll learn how to identify causes, run simple tests, and apply fixes in a real job site setting.
It’s written for hands-on DIY work, not a classroom manual.
Identify causes by considering screw type and length, substrate material, and whether the screw was driven to the right depth.
For tests, reseat or replace suspect screws, check for loose panels by applying pressure, and look for stripped heads or pulled-out drywall.
Fixes include selecting the correct screw for the substrate, backing out and re-driving with steady, controlled leverage, and ensuring the head sits flush; if you’re unsure about torque or depth, check the product label, manufacturer instructions, or local rules.
Key takeaways
- Check screw length and type per drywall thickness before installation.
- Verify screw depth to sit slightly below surface without tearing paper.
- Test for wood vs metal studs to choose correct screw pattern and torque.
- Use proper pilot holes where specified to prevent wood splitting and dulling.
- Quick fixes: reseat screws with a compatible bit and avoid overdriving.
- Safety: wear eye protection and keep power tool tips away from others.
Table of Contents
- Introduction
- Key takeaways
- Quick Troubleshooting Checklist (at a Glance)
- Tools and Materials Checklist
- Identifying Common Drywall Screw Problems (Causes)
- Diagnostic Tests and Visual Checkpoints (How to Test)
- Fixes and Step-by-Step Repairs (from Quick Fixes to Full Remediation)
- Choosing the Right Screws and Fasteners
- Proper Screw Placement and Technique
- Safety, Code, Cost, and Planning Considerations
- Conclusion
- FAQ
Quick Troubleshooting Checklist (at a Glance)
When you start diagnosing drywall screw issues, begin with the obvious symptoms. Look for screws that won’t bite, heads that spin, screws that pull out, or signs of corrosion and snapping. Use a quick test to confirm each symptom so you can triage efficiently.
Next, map out a fast flow: identify whether you have wood or metal studs, verify the screw type and length, and confirm pilot hole size and drilling technique. Check that the screw reaches solid backing by at least a basic amount, that pilot holes were used on hard substrates, and that you’re using the correct drywall screw type for the job. Then try immediate fixes in order: switch to the proper length and type, predrill or widen holes as needed, use anchors or toggles for brittle drywall, and avoid overdriving that damages the paper facing. Finally, validate fixes with quick tests like reseating in scrap drywall, testing on a mock load, and reassessing moisture or corrosion presence to decide if a different fastener is required.
Symptom-to-solution map
Use this checklist to quickly diagnose and address common drywall screw issues.
- Screw won’t bite: Check if you’re using the correct screw type (coarse-thread for gypsum). If skipped, screws may strip or break.
- Head spins: Ensure pilot holes are predrilled. Without them, screws can spin and damage drywall paper.
- Screw pulls out: Verify screw length reaches into solid substrate by at least 1 inch. Insufficient length leads to pull-outs.
- Screws corrode or snap: Inspect for moisture or corrosion. If present, address the source and use appropriate fasteners.
- Screw head is overdriven: Check if you’re overdriving screws. This damages paper facing and weakens hold.
- Screws pop out after installation: Ensure you’re using wall anchors or toggle bolts for brittle drywall or hollow spots.
- Screw head is loose: Recheck if screw length is sufficient and pilot holes are used. Loose heads indicate insufficient engagement with substrate.
- Screws strip the hole: Switch to a longer, wider, or self-drilling screw for harder substrates.
Quick rule: Always start by checking screws and pilot holes before moving on to substrate issues.
When to repair vs replace
Use this checklist to determine if a local repair is sufficient or if panel replacement or structural work is needed.
- Small crack/hole: If less than 6 inches, repair with joint compound and tape. Larger ones may require panel replacement.
- Loose screw/anchor: Tighten or replace if possible. If not, consider replacing the entire panel.
- Water damage: Inspect for mold and structural integrity. Minor damage can be repaired; severe cases need panel replacement.
- Dented drywall: Small dents may be filled and sanded. Large ones or those affecting structure require panel replacement.
- Crumbling drywall: This indicates moisture damage. Replace the entire panel and address the moisture source.
- Warped drywall: Warping affects structural integrity. Replace the panel and consider addressing underlying causes (e.g., humidity).
- Multiple issues in one panel: It’s often easier and more cost-effective to replace the entire panel rather than attempting multiple repairs.
Quick rule: If damage is extensive, affects structural integrity, or requires multiple repairs, consider replacing the entire drywall panel.
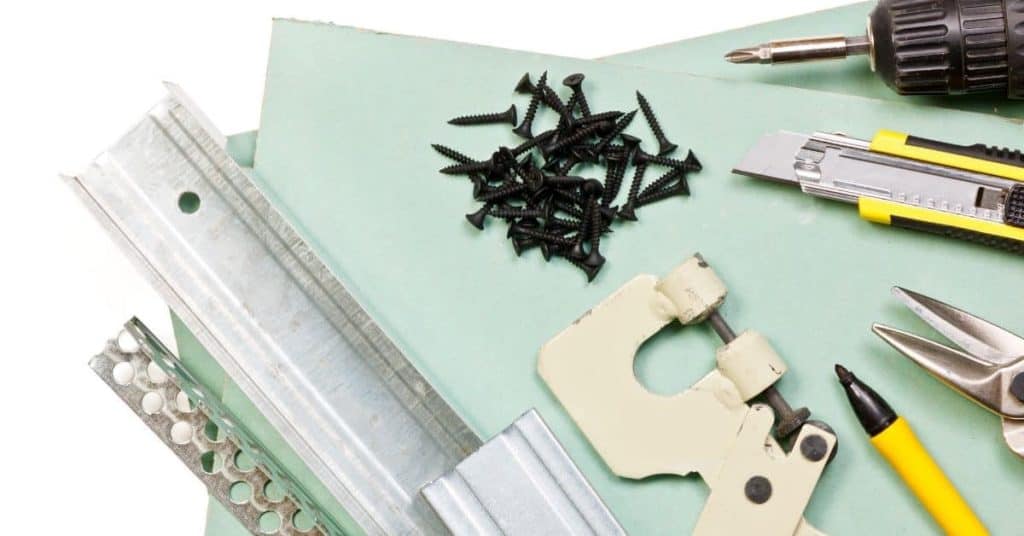
Tools and Materials Checklist
Start by identifying the problem signs and the product specs you must match to stay on the right track. Note the screw type, length, thread pattern, coating, and substrate compatibility to ensure you pick the right fastener. Use this to build a quick validation plan before you drill a single hole.
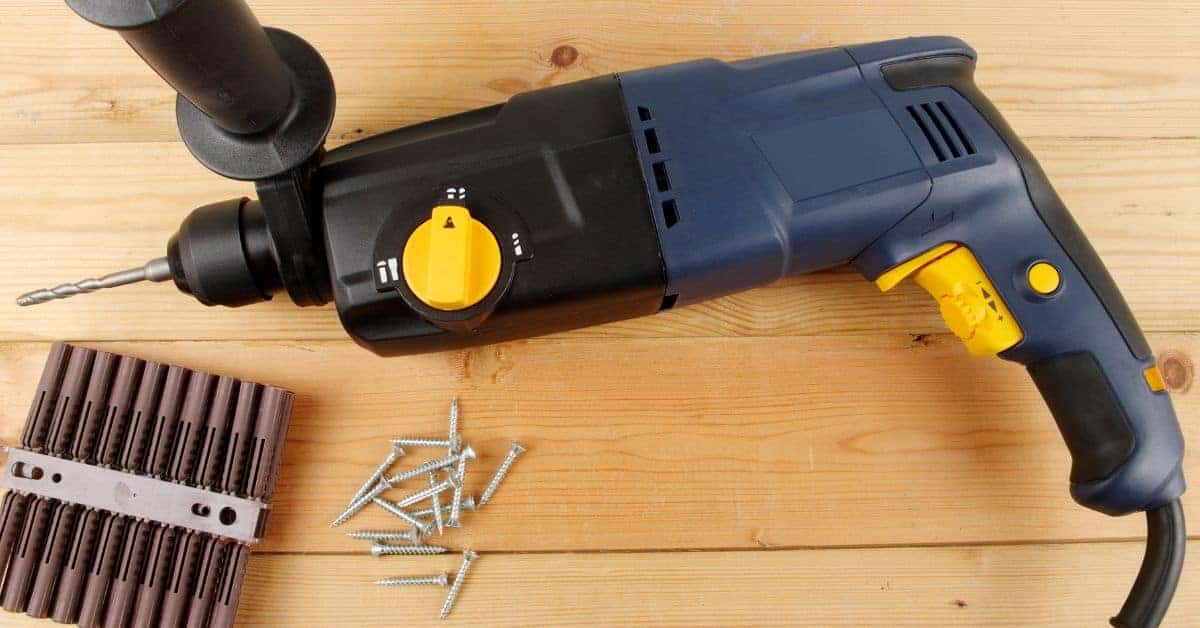
Gather core tools and consumables you’ll rely on: an impact driver or drill with the appropriate bits, a screw gauge or calipers, a magnetic stud finder, a screw extractor, a tape measure, and a small level for alignment. Have on hand drywall screws rated for the substrate, concrete screws if needed, wall anchors or sleeves, corrosion-resistant coatings, washers, backer material, and any thread sealant or adhesive specified by the fix. Always read packaging and labels for substrate compatibility, length and gauge, coating or galvanization, and any lot or date codes to avoid expired hardware.
Essential tools and PPE
Before you start, ensure you have the right tools to diagnose and fix drywall screw issues safely. This checklist helps you gather everything needed.
- Impact driver or drill: For driving screws into concrete. Check it’s in good working order.
- Masonry bit: To pre-drill holes for screws. Ensure it matches your screw size.
- Screwdriver bits: Compatible with your impact driver or drill. Verify they’re secure and undamaged.
- Screw gauge or calipers: To measure screw length and gauge. Check they’re accurate and clean.
- Magnetic stud finder: For locating metal studs or obstructions. Test it on a known metal surface.
- Screw extractor: To remove stripped screws. Ensure it’s the right size for your screws.
- Tape measure: For accurate measurements. Check it’s calibrated correctly.
- Small level: For aligning drywall panels. Verify it’s true and undamaged.
- Safety glasses: Protect eyes from debris. Ensure they fit well.
- Work gloves: To protect hands from cuts and injuries. Check they’re not worn out.
- Dust mask: For protection against drywall dust. Ensure it fits securely.
Quick rule: Always prioritize safety first. Wear appropriate PPE throughout the job.
Fasteners and consumables to have on hand
Stock up on these fasteners and materials to tackle common drywall screw issues efficiently. This checklist helps you prepare.
- Drywall screws: Rated for concrete. Check lengths match your substrate thickness and labels for compatibility.
- Concrete screws (e.g., Tek or Tapcon): For when drywall screws won’t cut it. Verify they’re the right size and type for your application.
- Wall anchors or sleeves: As needed, for securing drywall to concrete. Ensure they match your screw size and substrate type.
- Corrosion-resistant coatings: Like zinc or galvanized finishes. Check labels for compatibility with your screws and environment.
- Washers: If needed, for added support. Verify they’re the right size for your screws.
- Backer material: For reinforcing weak areas. Ensure it’s suitable for your substrate and application.
- Thread sealant or adhesive: As specified by the fix. Check it’s compatible with your screws and substrate.
- Joint compound: For filling gaps and holes. Verify it’s the right type for your repair.
- Patch materials: Like mesh tape and drywall mud. Ensure they match your joint compound and application.
Quick rule: Always check manufacturer specs to ensure you’re using the right fasteners and consumables for your specific job.
Identifying Common Drywall Screw Problems (Causes)
Break down the failure modes you’re likely to see, with quick definitions for pops through joints, overdriven or underdriven screws, stripped heads, corrosion, and pull-out. Include hidden issues like skim coat cracking or screw-head wobble to catch early signs.
Group root causes into substrate conditions, screw selection, installation technique, and environmental factors. Consider backing material, wood versus metal studs, bit sharpness, torque, and edge distance that affect bite. On site, inspect head seating, test pull-out, note any rotation without tension, and verify stud type and cavity depth. Call out patterns like wrong length for thickness, missing pilot holes, dull tools, driving too fast, and moisture-related corrosion as common culprits. Use a quick decision tree: substitute the correct screw type and length, adjust pilot hole size, predrill where needed, switch to corrosion-resistant fasteners in damp zones, and re-secure with proper spacing to prevent repeats.
Installation errors
Mistakes during installation can lead to drywall screw problems. Here are some common ones to avoid:
- Inadequate torque: Too much or too little force when driving screws can cause heads to strip or screws to pop.
- Wrong screw type: Using self-drilling screws on metal studs or drywall with a skim coat can lead to damage and poor holding power.
- Incorrect length: Screws that are too short won’t hold the drywall securely, while those that are too long may poke through.
- Improper spacing: Screws spaced too far apart can cause drywall to sag or pop. Too close together wastes materials and makes finishing difficult.
To avoid these issues, follow manufacturer guidelines for torque, use the right screw type for your application, choose screws of appropriate length, and space them evenly according to code requirements.
Environmental and material causes
Material choices and environmental factors can impact the performance of drywall screws. Consider these aspects:
- Moisture exposure: High humidity or water exposure can cause corrosion, leading to screw failure. Use corrosion-resistant fasteners in damp zones.
- Framing movement: Wood studs can shift over time, causing screws to loosen. Use longer screws and consider using construction adhesive for added support.
- Vibrating loads: Areas subject to vibration (e.g., near machinery) require heavier-duty fasteners. Consult manufacturer guidelines for suitable screw types.
- Corroded fasteners: Old or improperly stored screws may corrode, leading to poor holding power. Inspect and replace any suspect fasteners.
Understanding these factors helps you choose the right materials and prevent common issues like corrosion, cracking, and weak bonds.
Design and planning mistakes
Poor design choices can lead to drywall screw problems. Here are some common mistakes to avoid:
- Incorrect backing: Installing drywall on soft or uneven surfaces can cause screws to pop or pull out. Ensure a solid, flat surface before installation.
- Unsupported seams: Seams without proper support (e.g., no blocking) can sag or crack over time. Always install blocking at seams and corners.
- Using nails instead of screws: Nails are not suitable for drywall installation due to their tendency to pop and lack of holding power. Always use screws.
- Ignoring manufacturer/code requirements: Failing to follow guidelines for screw spacing, length, or type can lead to problems down the line. Always consult relevant codes and manufacturers’ recommendations.
Avoiding these design and planning mistakes helps ensure a strong, durable drywall installation that will last.
Diagnostic Tests and Visual Checkpoints (How to Test)
Begin with a visual checklist: look for screw head seating, corrosion or rust streaks, stripped heads, head sinking, and any deformation around the fastener. These cues guide where to focus repairs. Note patterns that point to backing or substrate issues.
Then perform bite and pull-out checks: a gentle torque test with a screwdriver can reveal engagement or stripping. Assess substrate integrity by looking for cracks, powdery dust, or crumbling edges near the fastener. Observe load indicators like excessive flex or squeak under light load and plan isolated, one-area-at-a-time fixes before full remediation.
Visual inspection checklist
Before you start poking and prodding, use this visual checklist to identify potential issues at a glance.
- Screw heads: Check for dimpling or sinking. This could indicate the screw is too short or not properly set.
- Rust streaks: Rust on screws suggests moisture, which can weaken the screw’s hold and cause corrosion.
- Corrosion: Heavy rust or white powdery deposits around the screw head mean it’s corroding. This weakens the screw’s grip.
- Stripped heads: Screws with stripped heads can’t be tightened further and may spin freely, causing the drywall to sag or fall.
- Cracks around screws: Cracks near screws indicate stress on the drywall. This could be due to over-tightening, drywall shrinkage, or movement in the wall structure.
- Haloing: A halo of discoloration around a screw suggests moisture damage or poor drywall compound application.
- Wood or substrate deformation: Warping, bulging, or other deformities near screws indicate structural issues that need immediate attention.
Quick rule: If you spot any of these signs, mark the location and proceed with further testing. Don’t skip this step; visual checks help isolate problems quickly.
Physical tests to run
Now that you’ve identified potential problem areas visually, it’s time for some hands-on testing.
- Gentle torque test: Try turning screws with a screwdriver. If they spin freely or resist, the screw may be stripped or backing out.
- Push and pull: Gently push and pull on the drywall around suspect screws. Any give indicates a problem.
- Tapping: Tap lightly on the wall with your knuckles. A hollow sound suggests there’s no solid support behind, indicating a loose or missing screw.
- Check for cracks: Press firmly on either side of suspect screws. If you see new cracks form, the screw is not properly securing the drywall.
- Test resin/anchor checks: For screws with anchors, try to pull the anchor out with pliers. If it moves easily, it’s not set properly.
Quick rule: Don’t rely on just one test. Combine these methods to get a clear picture of your screw’s condition and security.
When to open up the wall
Sometimes, you need to cut a small access hole to inspect framing, insulation, or hidden moisture. Here are signs that indicate it’s necessary.
- Persistent squeaking: If screws keep squeaking despite your efforts, there might be movement in the wall structure that needs investigation.
- Wet spots on walls: Water stains or wet spots could mean hidden moisture damage. Cutting a small hole can reveal the source and extent of the problem.
- Nail-like noises: A nail-like noise when you press on the wall suggests there’s no solid support behind, indicating a loose screw or missing framing member.
- Crumbling drywall edges: If drywall edges crumble easily, it could indicate moisture damage or poor installation. Opening up the wall can reveal the cause and extent of the problem.
Quick rule: Only cut into walls as a last resort after thorough visual and physical testing. Always mark the location before cutting to minimize damage and ensure you’re addressing the correct area.
Fixes and Step-by-Step Repairs (from Quick Fixes to Full Remediation)
Start with quick fixes that address common issues, such as reseating a loose screw or patching small gaps with lightweight material. Use temporary shims to restore panel alignment if needed and avoid full panel removal unless necessary.
Then move to safe, repeatable tests to confirm bite and grip, including ensuring screw depth aligns with the stud line and verifying resistance to pull-out. When reseating or replacing screws, choose the correct type, predrill as required, and drive with proper technique to avoid new cracks. Escalate from quick fixes to remediation when screws show persistent movement, corrosion spreads, or surrounding drywall is damaged. Finally, implement preventive steps like proper spacing, using adhesive backing where appropriate, and a maintenance check to inspect fasteners periodically.
Step-by-Step Repair Process
Follow these practical steps to fix drywall screw issues, from preparation to final checks.
- Preparation: Gather tools and materials. Put on safety glasses and gloves. Clear the work area.
- Inspection: Locate the problem. Check for loose screws, gaps, or misaligned panels.
- Main Work:
- For quick fixes, resetting screws or filling small gaps.
- For major issues, remove damaged drywall and replace with new sections.
- Finishing: Apply joint compound. Sand smooth. Prime before painting.
- Final Checks: Inspect your work. Ensure panels are level and aligned. Test screw grip and bite.
Repair for Screw Pops and Loose Heads
Fix loose or popped drywall screws with these simple steps. Safety first: wear safety glasses.
Remove the loose screw using a screwdriver. If it’s too damaged, drill out the head.
Pre-drill a new pilot hole, then drive in a replacement screw at the correct depth. Apply joint compound, embed drywall tape, and sand smooth.
Fixing Overdriven or Stripped Screws
Extract stripped screws using a screwdriver or an extraction tool. If the hole is enlarged, use a larger screw or an anchor.
For overdriven screws, you may need to fill the hole with a small patch or use a plug before driving in a new screw.
Note: If the drywall is severely damaged, consider replacing the entire section.
Addressing Corrosion and Moisture Damage
Remove rusted screws using a screwdriver or pliers. If the drywall is damaged, replace it with a new section.
Use corrosion-resistant screws for future installations. To prevent moisture damage, ensure your home’s plumbing is in good condition and consider using a vapor barrier.
Tip: Always address the source of moisture to prevent recurring issues.
Choosing the Right Screws and Fasteners
Start with substrate-specific choices: align screw and fastener types with wood studs, metal studs, cement boards, and drywall surfaces; note when dedicated anchors are required. This helps prevent mismatches that cause failures.
Think about thread type and length to match the backing: coarse-thread for wood, fine-thread or self-drilling variants for metal, and ensure enough embedded length without risking hidden hazards. Check head style and drive compatibility for flush mounting or countersinking, and consider material and coating choices for the environment. Pair anchors and fasteners properly when required, and always verify against manufacturer specs and pilot-hole guidance before installation.
Thread and head types explained
Choosing the right thread type and head style for your screws is crucial to ensure a secure hold and a professional finish. Let’s break down when to use each.
Coarse-thread screws: These are ideal for wood studs as they can bite into the material quickly, providing good grip. However, they’re not suitable for metal studs or cement boards as they can strip the threads and damage the substrate.
Fine-thread screws (or self-drilling): For metal studs, fine-thread or self-drilling screws are your best bet. They have a slower pitch, allowing them to drill into the metal without stripping. They’re also great for cement boards as they can penetrate and grip well.
Head styles: Bugle heads are countersunk, making them perfect for flush mounting drywall. Flat/pan heads provide more surface area, giving better grip but may not sit flush. Round heads offer a balance between the two, providing good grip while still being able to sit flush with some effort.
Corrosion resistance and materials
Selecting the right material and coating for your screws is vital, especially in moisture-prone areas or exterior applications. Here’s what to look for:
- Steel (zinc-coated): General-purpose use. Zinc coating provides basic corrosion resistance but isn’t suitable for high-moisture areas.
- Stainless steel: Ideal for moisture-prone areas and exterior applications. It’s more expensive but offers excellent corrosion resistance.
- Galvanized steel: Similar to zinc-coated, galvanizing provides better corrosion resistance than plain steel. Suitable for general use but not recommended for high-moisture areas.
- Ceramic-coated: Offers superior corrosion resistance and can withstand exposure to chemicals. Ideal for garage or workshop applications.
- Plastic or composite screws: Used with cement boards, these screws won’t corrode but may not provide the same holding power as metal screws in some substrates.
Anchors and alternatives
Sometimes, a screw alone isn’t enough. Here are situations where you might need anchors or alternative fasteners:
Toggle/expansion anchors: Use these when screwing into hollow walls or when extra holding power is needed. They expand within the wall to provide a strong grip.
Self-drilling anchors: These are great for situations where predrilling isn’t possible or practical. They drill their own pilot hole as they’re screwed in, making installation quick and easy.
Adhesive backing: For lightweight materials like drywall, an adhesive backing can provide extra hold. This is often used with toggle anchors for added security.
Proper Screw Placement and Technique
Define a reliable pattern and spacing for the substrate, distinguishing between wood studs and concrete or other backing. Note typical stud spacing and margins from edges and joints to keep panels stable.
Choose the right fastener and pilot approach to prevent splitting or head failure, and set the depth so the screw bites without overdriving. Practice a steady driving technique with the correct angle and pressure to achieve a consistent head depth suitable for mud and tape. Avoid common placement mistakes by keeping rows aligned, maintaining even spacing near edges, and avoiding placement too close to joints. Use a quick quality check to confirm depth and inspect for dimples or pops after mudding, adjusting the pattern as needed when multiple panels are involved.
Edge, seam, and field placement rules
When driving screws into concrete forms, you’ve got to think about where you’re placing them. It’s not just about banging ’em in anywhere. Here are the rules:
Edges and Seams: At edges and seams, place your screws every 6-8 inches along the form. This helps keep the form square and prevents it from warping or bulging.
Field Placement: In the field (the middle of the panel), space your screws about 12-16 inches apart. But remember, check base compaction first – if it’s not solid, you might need to go closer together.
And here’s a pro tip: stagger your screws in a bricklaying pattern for added strength. It’s like how they build walls – staggered rows make it stronger.
Driver technique and depth control
When driving screws, it’s crucial to control the driver’s speed and depth. This ensures your screws are seated just below the surface without tearing or stripping.
For power drivers: Use the clutch setting to control torque. Start with a medium setting, then adjust as needed. Too high, and you’ll strip; too low, and you won’t get a good bite.
For manual drivers: Apply steady pressure. Don’t rush it. For finish work, slow down even more to avoid stripping or breaking the screw head.
To control depth, use a depth-countersink bit. It’s got a built-in stop that seats the screw just below the surface. If you don’t have one, mark your screws with tape or a pencil to know when to stop.
Special cases: ceilings, corners, and irregular substrates
When you’re up on a ladder or working in tight spaces, remember these tips:
Ceilings: Use a drill with a clutch to prevent over-tightening. Hold the driver at a 90° angle and let it do the work. Check your screw length – too long can poke through, too short won’t hold.
Corners: Inside corners need extra support. Use a longer screw (usually 2-3″ longer than standard) at an angle, driving into both studs. Be careful not to split the drywall.
Irregular substrates: If you’re working with metal studs or uneven framing, check your screws are rated for that material. Use a pilot hole to prevent stripping and snapping. Always double-check local rules for specific requirements.
Safety, Code, Cost, and Planning Considerations
Safety comes first with appropriate PPE, safe handling of screws, dust control, and ladder or scaffold safety. Plan for proper containment and minimize noise and dust during cuts or drilling.
Code considerations should guide when drywall-on-concrete fastening falls under local rules, whether mechanical anchors are required, and any fire or moisture ratings. Use a quick decision tree to decide when to call an inspector if you encounter unexpected hollow sounds or improper embedment depth. Consider cost implications of rework and compare the price of using the correct screws and anchors upfront. Plan to prevent failures by specifying the right screw type, length, and corrosion resistance, and by coordinating with the substrate condition and other trades to avoid conflicts. When to consult an inspector: document issues and follow up with a field review if you see persistent cracking, improper embedment, or repeated noncompliant methods.
Safety and jobsite best practices
First things first, safety. You need the right gear for the job:
Eye protection: Safety glasses or goggles to keep dust out of your eyes.
Dust mask: To breathe easy while cutting or drilling.
Hearing protection: If you’re using power tools, protect those ears. And when working at height:
Ladders/scaffolds: Use them right – follow the 4:1 rule, keep ’em level and secure.
Fall protection: Harness up if you’re more than six feet off the ground. Now, about that dust:
Containment: Keep it to a minimum. Seal off areas with plastic sheets, use HEPA vacuums. And noise:
Consideration: Be mindful of your neighbors and the time of day.
Building codes, inspections, and structural concerns
Before you start, check these boxes:
- Local code: Verify your area’s building codes. Some require mechanical anchors.
- Fire/sound ratings: Check if your drywall needs to meet certain ratings.
- Moisture barriers: Some areas need them, especially in basements or damp climates.
- Permits/inspections: Know when you need ’em. Usually for load-bearing walls or fire-rated construction.
- Manufacturer’s instructions: Follow their guidelines for installation and loading.
- Edge distance: Minimum 10mm from edges, 25mm if using screws longer than 65mm.
- Fire stopping: Check if you need to seal around pipes or wires.
- Structural integrity: Ensure your walls can take the load without cracking or leaning.
Quick rule: If in doubt, consult an inspector. Better safe than sorry.
Cost impact and planning to avoid rework
Mistakes cost time and money. Here’s how to avoid ’em:
- Wrong screws/anchors: Using the wrong ones can lead to patching, re-anchoring, extra materials, labor delays.
- Improper embedment: Too shallow or deep? Both cause problems. Aim for 10-25mm below surface.
- Substrate condition: Moisture, vibration, heat – consider these factors when choosing screws and placement.
- Curing/setting time: Allow enough time for screws to set properly.
- Adjacent trades: Coordinate with them to avoid conflicts. Like blocking electrical outlets or cutting into pipes.
Using the right screws, anchors, and planning ahead? That’s your best bet to keep costs down and rework to a minimum.
Conclusion
Getting drywall screws right matters for safety, durability, and a smooth finish. When you fix the issue now, you prevent loose boards, popped screws, and visible flaws that can cost time and money later.
Start by surveying the Quick Troubleshooting steps in order: confirm screw type and length, check for proper placement and alignment, test a small section for grip and pull-out, and then choose the right fasteners and methods for the job, proceeding from quick fixes to full remediation only as needed.
Common mistakes to avoid include using the wrong screw type or length, overdriving or underdriving screws, and rushing through the tests without verifying hold in a real load. Always wear eye protection, keep the work area dry and well-lit, test changes in a small area first, and clean up dust and debris to avoid hidden damage.
If the wall is structurally compromised, the surface shows widespread cracking, or you’re unsure about code requirements and long-term safety, don’t push on alone—call a professional. With careful checks, small tests, and disciplined practice, you can finish strong and move on to the next project with confidence.
FAQ
What are the most common causes of drywall screw problems?
Screw heads pop up because they’re too shallow, too deep, or the wall board is flexing. Stripped threads come from over-torque or poor pilot holes. Rust or staining means moisture or poor storage of screws before use.
How can I test to diagnose screw issues without tearing out the wall?
Check for screw head feel as you drive: it should seat with even resistance and not spin. Tap the screw with a screwdriver to hear a solid bite versus a hollow or dull sound. Look for gaps between the screw head and the plaster or board edge, and run a quick poke with a thin screwdriver to see if the screw holds or slips.
What are the common mistakes to fix when installing drywall screws?
Avoid driving screws too deep or leaving them proud. Use the correct pilot hole and match screw length to the material. Don’t mix screws for different substrates without checking the manufacturer’s guidance. Pre-drill where needed to prevent splitting and misalignment.
How do I ensure proper torque and depth for drywall screws?
Screw so the head sits just below the surface, not sinking into the paper or board core. Use a consistent technique and stop when you feel firm resistance without stripping. If you’re unsure about depth, test on a scrap piece or a small hidden area first.