
Introduction
Drywall fasteners over steel studs are screws used to attach drywall to metal framing. They’re the fasteners you drive with a screwdriver or drill to secure gypsum to metal studs. Follow the screw manufacturer instructions and local rules for type and installation, and check the packaging label for compatibility with steel studs.
To avoid stripping, use the proper bit and stop when the screw head seats flush with the surface. Spacing and alignment depend on the drywall weight and stud gauge, so verify with the material label and framing guidelines. If in doubt, consult the screw manufacturer instructions and your local building codes.
Key takeaways
- Use corrosion-resistant drywall screws or coatings designed for steel studs.
- Check screw length for sufficient thread engagement without piercing opposite cavity.
- Follow recommended spacing and layout patterns to prevent wobble and nail pop.
- Avoid stripping by avoiding overdriving; use pilot holes and correct driver settings.
- Inspect fastener heads for embedment and corrosion before drywalling over installed studs.
- Document installed fastener type and pattern for future repairs and audits.
Table of Contents
- Introduction
- Key takeaways
- Why Steel Studs Change the Fastening Game
- Fastener Types for Drywall on Steel Studs
- Choosing Screw Length, Thread Engagement and Coatings
- Spacing, Layout, and Fastener Schedules
- Avoiding Screw Stripping and Head Failures
- Tools and Materials Checklist for Installers
- Repairing Stripped Holes and Retrofit Fixes
- Inspection, Quality Checkpoints, and Documentation
- Conclusion
- FAQ
Why Steel Studs Change the Fastening Game
Steel studs present a different set of physics than wood. Thin-gauge metal offers less bearing area and can bend or twist under load in unexpected ways. The failure modes change how you choose fasteners and how you drive them for a secure hold.
The article will focus on practical choices and installation methods tailored to steel studs. You’ll learn what works best in typical drywall applications and how to execute it on site without guesswork.
Compare steel vs. wood stud behavior
Steel and wood studs behave differently under load, affecting how screws hold.
Wood: Screws bite into fibers, distributing load evenly. Deformation is gradual.
Steel: Screws engage threads quickly, focusing load on a smaller area. Deformation can be sudden and catastrophic.
Common failure modes with steel studs
Understanding failures helps prevent them:
Stripping: Over-tightening or using wrong screw type damages threads.
Pull-through: Insufficient thread engagement allows drywall to pull off.
Screw shear: Excessive load causes screw to bend and break.
Drywall tear-out: Screws too close to edge cause drywall to rip.
Corrosion: Moisture exposure weakens screws over time.
Fastener Types for Drywall on Steel Studs
Self-drilling screws usually speed up work and reduce predrilling. Self-tapping or thread-cutting screws work well when you need strong thread form in metal. Fine and coarse thread variants have different bite, shear, and withdrawal behavior.
Specialty fasteners are warranted in tricky layouts or fire and acoustic packages, while standard drywall screws may suffice in straightforward installations. Always check the product label or manufacturer instructions to confirm compatibility with your steel thickness and panel type.
Self-drilling vs. Self-tapping vs. Coarse-thread Screws
When it comes to drywall fasteners for steel studs, you’ll encounter three main types: self-drilling, self-tapping, and coarse-thread screws.
Self-drilling screws have a drill bit tip that creates their own pilot hole as they’re driven in. They’re the fastest to install but may leave a slight mark if not fully seated.
Self-tapping screws cut their own threads into the steel stud, providing excellent holding power. They’re slower to install than self-drilling screws but offer better pull-out resistance.
Coarse-thread screws are typically used with pilot holes and provide good holding power without stripping the steel. They’re a good balance between speed and strength.
Head Styles and Drive Types
The head of your drywall screw plays a significant role in how it seats, finishes, and works with your driver.
Bugle heads have a rounded shape that sinks into the drywall, providing a smooth finish. They’re great for visible areas but can strip if over-tightened.
Flat heads are designed to sit flush with the surface, ideal for painted or taped joints. They require more care not to strip the head.
Drive types include Phillips, square, and Torx. Phillips is the most common, while square drives offer better grip and reduced stripping risk. Choose a drive type that fits your screwdriver and works best with your installation style.
Choosing Screw Length, Thread Engagement and Coatings
Determine length by adding up the material thickness and ensuring the embedment into the steel meets the manufacturer spec. Do not guess; verify embedment requirements on the data sheet or instruction sheet for your screws. Choose a thread form that matches the steel grade and panel relyable engagement.
Consider coatings and corrosion resistance if the environment or fire/sound requirements call for it. Upgrading may be warranted for exposed or damp conditions, but always cross-check with local codes and product guidance.
How to calculate correct screw length
The key to choosing the right screw is calculating its total length. You’ll need to consider several factors:
Drywall Thickness: Standard drywall comes in 1/2″ and 5/8″.
Backing or Layers: If you’re installing drywall over existing walls, account for any backing layers.
Minimum Stud Embedment: You’ll need at least 3/4″ of embedment into the steel stud. Consult manufacturer datasheets and local codes for exact sizes.
Thread pitch and grip in thin-gauge steel
The geometry of a screw’s threads plays a crucial role when working with thin metal like light-gauge steel studs.
Pitch: A smaller pitch (distance between threads) means more threads per inch. This provides better pull-out resistance and reduces the risk of stripping.
Grip: Grip refers to the distance a screw can penetrate before it bottoms out. For thin metal, you’ll want a shorter grip to avoid punching through.
Corrosion protection and material compatibility
The right screw for the job isn’t just about size; it’s also about how it holds up over time in your specific environment.
- Zinc Plating: A basic zinc coating provides good corrosion resistance. It’s suitable for most indoor, dry environments.
- Galvanized: Galvanizing offers better protection than plain zinc. Use it when exposure to moisture is a concern.
- Stainless Steel: For severe conditions, like high humidity or outdoor use, stainless steel is the way to go.
- Avoid Aluminum: Never use aluminum screws with steel studs. They can cause galvanic corrosion, leading to weak bonds and staining.
- Check Specs: Always consult manufacturer specs and local requirements for your specific job site conditions.
Spacing, Layout, and Fastener Schedules
Panel type and thickness, stud gauge, and orientation all influence spacing. Loading and acoustic or fire requirements also shift the layout needs. Create a fastener schedule that can be referenced on site and stays consistent with drawings.
Final spacing must be validated with panel and fastener manufacturers or code. Document the rationale and keep the schedule accessible for inspections and future work.
Field vs. Edge Fastening and Pattern Considerations
Fastening drywall to steel studs involves two main areas: field (center) and edges.
Field fasteners hold the panel in place, preventing movement under loading. They should be spaced evenly across the panel’s face, typically 12″-16″ apart.
For seams, use a staggered pattern to avoid alignment with studs. This spreads stress evenly and prevents seam separation. For example, if your field spacing is 16″, offset seams by 8″.
How Stud Gauge and Panel Thickness Affect Spacing
Thinner steel studs (gauge) or thicker drywall panels require closer fasteners to maintain structural integrity.
Thinner studs (25-gauge) flex more, so you’ll need closer spacing, often 8″-10″. Thicker panels (>1/2″) also move more and need closer fasteners to keep them in place.
Always adjust your layout based on these factors. If unsure, consult the panel or screw manufacturer’s guidelines.
Building a Site-Specific Fastener Schedule
A good schedule keeps everyone on-site informed and ensures code compliance.
Include these columns:
- Panel Type/Thickness
- Stud Gauge
- Fastener Type/Specs
- Spacing (Field & Edges)
- Inspection Notes
Store it digitally or print copies for easy access. Update as needed and share with trades, inspectors, and anyone else on-site.

Avoiding Screw Stripping and Head Failures
Use the correct screw type for steel and the right driver settings to minimize stripping. Pilot tips and proper seating technique prevent cam-out and head damage. Monitor the torque and seating depth as you go to catch issues early.
Establish simple checks on scrap material before production work and don’t assume one setting fits all. If heads begin to strip or slip, stop and reassess the material and tool choice on a test piece.
Driver selection and clutch/torque control
First off, you gotta pick the right driver for your screw gun. It’s like choosing a hammer – too big or small, you’ll regret it.
Check your screws. They’ve got different sizes at the head, so get a driver that fits snug. Too loose, and you’ll strip; too tight, and you won’t drive ’em in.
Now, adjustable screw guns are your friend here. They let you control torque – that’s how hard you’re driving those screws. Too much, and you’ll strip or break the head. Too little, and they won’t hold.
Use a depth nose bit if you can. It helps stop overdriving by butting up against the surface. No more stripped screw heads or broken wood.
When and how to pre-drill or use pilot holes
Pre-drilling or using pilot holes is a must when you’re dealing with thin materials. It helps prevent screws from stripping out or causing stud deformation.
Check your screw thickness. If it’s over 1/4″, you should always pre-drill. Thinner screws might not need it, but it’s still a good practice to avoid stripping.
Here’s how to decide based on the material and screw type:
- Thin materials (like plywood or drywall): Always pre-drill. Use a drill bit slightly smaller than your screw.
- Thick materials (like 2x4s): You can usually skip it, but if you’re using long screws, consider drilling a pilot hole to prevent splitting.
Proper seating technique and stopping cues
When driving screws, it’s crucial to seat them properly to avoid stripping or head failures. Here are some visual and tactile cues to guide you:
Head seating: As you drive the screw, watch the head closely. When it’s flush with the surface, back off slightly. Overdriving can strip the head or cause it to mushroom.
Panel pull-down: For face-framing screws, check if the panel pulls down slightly as you tighten. This indicates proper seating and good contact between the screw and the framing member.
Before starting your production run, always try on a scrap piece to get a feel for the correct seating point. This will help you avoid overdriving screws and ensure a solid, lasting connection.
Tools and Materials Checklist for Installers
Build a practical jobsite checklist with essential tools, bits, and fastener variants. Include marking tools and basic PPE to support consistent, high-quality installs. Leave space to add project-specific items and counts.
Keep spare bits and fasteners on hand, and verify compatibility with the steel studs you are using. Refer to manufacturers’ instructions for any tool-specific settings.
Power tools and driver accessories
Before starting any installation work, use this checklist to ensure you have the right power tools and driver accessories. This will help you maintain consistent results and avoid costly mistakes.
- Screw Gun (Clutch Type): Check that it has an adjustable clutch to prevent stripping screws. Test it by tightening a screw into a scrap piece of wood until the clutch slips.
- Cordless Drill: Ensure it’s fully charged and has enough torque for your application. Try driving a few screws into a piece of plywood to test its power.
- Depth Nose (for Screw Gun): Verify that the depth nose is the correct size for your application. Measure the thickness of your material and choose a nose that will allow you to countersink the screw head slightly below the surface.
- Bit Types: Gather various bit types like Phillips, Flathead, and Torx based on your screws’ heads. Ensure they’re in good condition with no damage or wear.
- Magnetic Bit Holder: Check that it’s securely attached to your drill or screw gun. Test its magnetism by picking up a metal bit.
- Impact Driver (optional): If using, ensure it’s fully charged and has the correct bits for your screws. Test it by driving a few screws into a scrap piece of wood.
- Cord Management: Check that extension cords are long enough to reach all work areas without straining the cord or tool. Ensure they’re in good condition with no frays or damage.
- Safety Equipment: Verify you have safety glasses, ear protection (if needed), and gloves for handling materials.
Quick rule: Always double-check your tools before starting work. A few minutes of preparation can save hours of rework later.
Fastener inventory and labeling
Use this checklist before starting any installation work to ensure you have the right fasteners in stock and they’re clearly labeled.
- Check anchor bolt sizes: Verify bolts match the required size for your concrete slab or wall thickness. Check manufacturer’s instructions or local building codes if unsure.
- Count expansion screws: Ensure you have enough to secure all framing members. A common mistake is underestimating the number needed.
- Verify screw lengths: Measure and confirm screw lengths are suitable for your application. Too short won’t provide proper hold; too long can cause damage or protrude.
- Label rebar tie wire boxes: Clearly mark each box with the wire gauge (e.g., 16, 17) to avoid mixing during installation.
- Check epoxy anchors: Ensure you have the correct type and size for your application. Check manufacturer’s instructions for proper use and load ratings.
- Verify wedge anchor sizes: Confirm wedge anchors match required expansion range for your concrete thickness. Check local codes or manufacturer’s guidelines if unsure.
- Count and label chemical anchors: Ensure you have enough for all installations. Label boxes with the specific anchor type (e.g., Expando, Red Head) to avoid confusion.
- Check nut and washer sizes: Verify nuts and washers match bolt sizes. Mixed sizes can cause improper fit or damage.
Quick rule: Always keep manufacturer tech sheets on site for quick reference to avoid installation errors and ensure compliance with local codes.
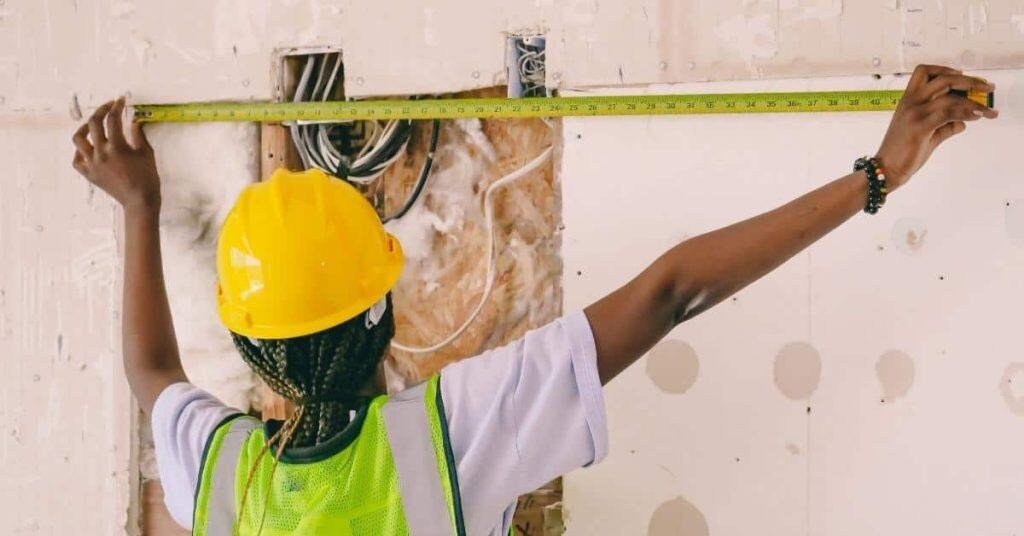
Measuring and layout tools
Before you start any concrete work, make sure you have the right measuring and layout tools. Use this checklist to double-check your gear.
- Tape Measure: Check it’s in good condition with no kinks or stretch marks. Confirm its accuracy by measuring a known distance (like a door frame).
- Chalk Line: Test it by snapping a line on a flat surface. The line should be straight and consistent.
- Stud Gauge: Verify it’s calibrated correctly by measuring a known stud spacing (usually 16″ or 24″ on center).
- Jigs/Templates: Ensure they’re sturdy, accurate, and fit your intended use. Test them on scrap material before using on the job.
- Level: Check it’s plumb and level by placing it on a flat surface. The bubble should be centered in both directions.
- Square: Verify its accuracy by checking if the 90-degree angle is true. A quick check against a known square edge can confirm this.
- String Line or Laser Level: Test it on a flat surface to ensure straight, accurate lines. Check batteries are fresh and replace if necessary.
- Layout Stakes/Markers: Ensure they’re in good condition with no broken points or faded markings. Confirm they can be driven into the ground easily.
Quick rule: Always double-check your tools before starting any layout work. A few minutes spent verifying can save hours of rework and costly mistakes.
Repairing Stripped Holes and Retrofit Fixes
Start with the simplest repair options that maintain system integrity. Retap, use a larger screw, or install a repair insert as appropriate for the damage. Document the chosen option and its rationale on site.
When repairs are insufficient, consider blocking or stud replacement as needed. Escalate to more robust fixes if the original fastening schedule cannot be restored safely.
Quick onsite repairs for stripped fasteners
When you encounter a stripped screw, don’t panic. There are quick fixes to keep your drywall installation moving.
Alternate Thread Form: Switch to a different thread form like a self-drilling or self-tapping screw. These can grab onto the existing hole and pull themselves in.
Metal Anchors: If you have access to the backside, use a metal anchor. Drill out the stripped hole, insert the anchor, and reinstall your screw.
Relocate Fastener: Sometimes, moving the screw location slightly can save you. Just ensure it’s still within your approved spacing schedule.
When to replace or reinforce studs and backing
Not every stripped screw means a stud needs replacing, but here are signs to look out for.
Stud Replacement: If the stud is significantly damaged (bent, cracked), it’s best to replace it. Remove the drywall, cut out the bad stud, and install a new one.
Reinforcement Options: Sometimes, you can reinforce instead of replacing. Blocking adds extra support between studs. Channels can be attached to existing studs for added strength. Specialty anchors may also help.
Always document any deviations from your original schedule and consult with a pro if unsure.
Drywall finish repair after fastener failure
After extracting failed fasteners, follow these steps to keep your drywall looking smooth.
Patching: Use a drywall patch kit. Apply joint compound in thin layers, letting each one dry before sanding lightly. Repeat until the area is flush with the wall.
Re-fastening: Before re-attaching the drywall, ensure your studs are secure and reinforced if necessary. Use new screws and follow your original spacing schedule.
Finishing Tips: Prime the patched area to seal it and help paint adhere evenly. When painting, use a light touch to avoid ‘telegraphing’ – where the patch shows through as a slight texture difference.
Inspection, Quality Checkpoints, and Documentation
Define a concise set of visual checks and quick tests to verify fastener compliance. Use simple procedures to confirm embedment, seating, and spacing consistency. Keep notes ready for handover and inspections.
Coordinate with local inspectors and reference manufacturer and code documents as you go. Maintain clear documentation that shows how the fastener schedule was applied on the project.
Visual finish and fastening checks
Use this checklist after installation to ensure a smooth, secure drywall finish.
- Head seating: Check that all screw heads are flush or slightly below the surface. Protruding heads can cause bumps in your finish.
- Spacing consistency: Ensure screws are evenly spaced (usually 12″-16″ apart) and follow the approved fastening schedule.
- Absence of cracks or rust staining: Inspect for any cracks around screw heads, indicating a weak bond. Rust stains could signal moisture issues.
- Correct fastener type at critical locations: Verify that special fasteners (like toggle bolts) are used where needed, like near windows and doors.
- No stripped screws: Check for any stripped screw heads; these need immediate repair to prevent further issues.
- No missing screws: Ensure no screws are missing or loose. This can cause drywall to sag or fall off over time.
- No overdriven screws: Overdriven screws can cause the steel studs to deform, weakening their support.
- Correct screw length: Verify that screws are long enough to penetrate at least 3/4″ into the steel studs for proper holding power.
Quick rule: If any issues are found, address them immediately to prevent bigger problems down the line.
Simple pull tests and sampling protocols
Conduct these tests to ensure drywall is securely fastened and can withstand expected loads.
- Random sampling: Test a random sample of screws (at least 5%) across the installation, not just those that look suspect.
- Pull test method: Use a pull test tool or a simple lever bar to apply force to the drywall. The screw should hold without pulling out.
- Acceptable force: Apply enough force to simulate expected loads, but not so much that you damage the drywall or screws.
- Document results: Record which screws were tested and their results for future reference.
- Consult local codes: Always confirm acceptable test methods with your local building authority to ensure compliance with codes.
Quick rule: If a screw fails the pull test, replace it immediately and retest.
Jobsite documentation and installer sign-off
Proper documentation keeps everyone on the same page and ensures accountability.
- Fastener schedule: Keep a laminated copy of the approved fastener schedule on site for easy reference.
- Record changes: Note any changes to the schedule, such as additional screws or different screw types used in specific areas.
- Installer sign-off: Have installers and/or the foreman sign off on completed sections once they pass visual checks and pull tests.
- Date each section: Record the date when each section was completed to track progress and responsibility.
- Store documents safely: Keep all documentation in a secure, dry location on site to prevent loss or damage.
Quick rule: Regularly review and update documentation to ensure everyone is working from the most current information.
Conclusion
Locking in drywall on steel studs comes down to using the right fasteners, correct spacing, and avoiding overdriving or stripping. When you respect the engagement, coatings, and layout you’ll get a clean finish that lasts and looks right.
Make it happen now by checking that you have the proper screw type and length for steel studs, confirm your fastener schedule and layout, mark the lines, start with a pilot if needed, drive screws straight and to the correct depth, test a small area for stripping or head failure, repair any stripped holes or retrofit if required, and keep notes on measurements and results for future projects.
Common mistakes to avoid are mixing screw types or coatings, skipping layout or spacing checks, and over tightening or under tightening the screws. Practice safe habits: wear eye protection, work with controlled drill speed, test a sample before full installation, and stop if you see head stripping or thread pullout. If the work exceeds the plan, or you run into unexpected insulation or metal framing issues, call a professional rather than guessing, and remember why these steps exist: safety, durability, and a flawless finish you can trust.
When in doubt about complex framing, access, or repair scope, bring in a pro sooner rather than later and stay focused on the core rules: use the right fasteners, follow the layout, and document what you did. With that approach, you’ll finish strong and move on to the next project with confidence.
FAQ
Can I reuse drywall screws on steel studs after removing them?
No. Reusing screws can strip the hole and weaken the hold. If you’ve removed a screw, drive a new one with the correct type and length for steel studs.
Should I use self-drilling screws or pre-drill when attaching drywall to steel studs?
Use screws designed for steel studs—these are typically self-tapping or self-drilling. Follow the screw manufacturer’s instructions for the best results and check any local guidelines or the project specs.
What’s the best way to avoid stripping screws on steel studs?
Don’t over-tighten. Use the proper bit and drive until the head seats firmly without cam-out. If you’re unsure, back off slightly and recheck with the manufacturer’s guidance or at the job site’s standards.
How do I verify I have enough thread engagement into the steel stud?
Choose screws that are long enough to engage the stud adequately while still allowing the drywall to sit flat. If in doubt, refer to the screw label or datasheet and confirm with the manufacturer’s recommended fastener depth and guidance for steel studs.