
Introduction
Rock-face texture in concrete is a rough, split-look finish created with simple form liners. This article covers easy, affordable ways to get that look without heavy equipment. You’ll want to check the liner instructions and local rules before you start.
If you don’t have ready-made liners, you can improvise with basic plywood or foam boards to create the texture. Work in small sections, keep the form tight, and press the texture while the concrete is still workable. Always verify product labels and manufacturer instructions for liners, and follow local codes or rules that affect form work.
Key takeaways
- Plan texture depth and joint lines before pouring to avoid patching later.
- Choose between liners or DIY textures based on available tools and mess tolerance.
- Secure formwork firmly; flex or movement destroys texture detail during vibration.
- Test small sample patch to calibrate patterns before full-scale work.
- Wear eye protection and gloves; concrete dust and sharp edges are hazards.
- Release agents or skins should be cleaned and re-applied carefully between uses.
Table of Contents
- Introduction
- Key takeaways
- What Is Rock Face Texture and Typical Uses
- Form Liners Vs DIY Alternatives — Quick Comparison
- Tools, Materials and Safety Checklist
- Site Prep, Formwork and Reinforcement Basics
- Technique a — Hand Tooling, Chipping and Split-Face Methods
- Technique B — Molds, Skins, Stamps and Lightweight Inserts
- Color, Release Agents and Finishing Treatments
- Curing, Demolding and Visual Checkpoints
- Conclusion
- FAQ
What Is Rock Face Texture and Typical Uses
Rock face texture introduces a rugged, natural look with pronounced shadow lines and varied surface roughness. The scale of the texture matters, from fine grain to larger, boulder-like facets, and it should read as a deliberate irregular patina rather than flat stucco. This finish is popular for features like retaining walls, facades, planters and landscape elements that benefit from a tactile, outdoorsy character.
When planning, check the project label or data sheet to confirm the texture depth and pattern repeat for your chosen method. Manufacturer instructions and local rules may also define acceptable finishes for specific applications. Use those references to guide tool choice and surface prep before you commit to a technique.
Visual characteristics to aim for
The key to a convincing rock face finish is capturing the natural randomness and depth of real rocks. Here’s what you should aim for:
Depth: Use form liners or textures that create shadows, giving your concrete surface dimension.
Randomness: The pattern shouldn’t be too uniform. Mix up the sizes and shapes of your aggregate and vary the direction of your brush strokes when texturing.
Edge definition: Sharp edges on the ‘rocks’ help sell the illusion. Use form liners with well-defined patterns or carve out edges with a chisel after the concrete has set.
Best use cases for DIY methods
DIY rock face texture is perfect for small to medium-sized projects where you want a unique, natural look without breaking the bank. Here are some great uses:
Retaining walls: A textured surface helps prevent erosion and gives your wall a rustic charm.
Patios and walkways: Add a touch of nature to your hardscaping with a rock face finish. It’s slip-resistant too!
Planters and landscape features: Textured concrete planters blend seamlessly into the garden, while textured water features add visual interest.
Form Liners Vs DIY Alternatives — Quick Comparison
Commercial form liners offer repeatable patterns and a cleaner transfer, but they can cost more and require careful alignment to avoid seams. DIY methods provide flexibility for unique shapes and smaller jobs, with lower upfront costs but more handwork and inconsistency possible. The right choice depends on your budget, desired repeatability and the level of customization you need.
Be sure to review the liner or impression product instructions for backing, release, and maintenance requirements, and compare them with what you plan to improvise. Local codes or project specs may also affect whether a DIY approach is acceptable for your surface and environment. If in doubt, verify with the manufacturer or supplier before proceeding.
Cost, time and repeatability trade-offs
Form liners might seem expensive at first, but they’re quick to set up. You can reuse them for consistent results.
DIY alternatives, on the other hand, are cheap initially. But they take more time to prepare each pour. Over multiple projects, DIY might become more economical.
Consider your project’s scale and budget. If it’s a one-off job, DIY could be the way to go. For repeated use or tight deadlines, liners might be worth the investment.
Customization and creative control
Form liners offer a range of textures, but they’re limited to what’s in stock. DIY lets you create unique effects that aren’t available commercially.
Want a specific rock face texture? With DIY, you can make it yourself using natural stones or custom-made molds. The sky’s the limit with your imagination and some elbow grease.
Just remember, while DIY offers more creativity, it also means more work on your part to achieve that unique look.
Durability and finish consistency
Form liners provide consistent results every time. They’re designed for durability, ensuring your texture lasts.
DIY methods can be a bit hit or miss. One pour might look great, the next could have air bubbles or inconsistencies. But with practice, you can improve your technique.
To close that gap, consider additional surface treatments like sealers or stains after pouring. This can help protect and enhance your DIY texture, making it last longer and look better.
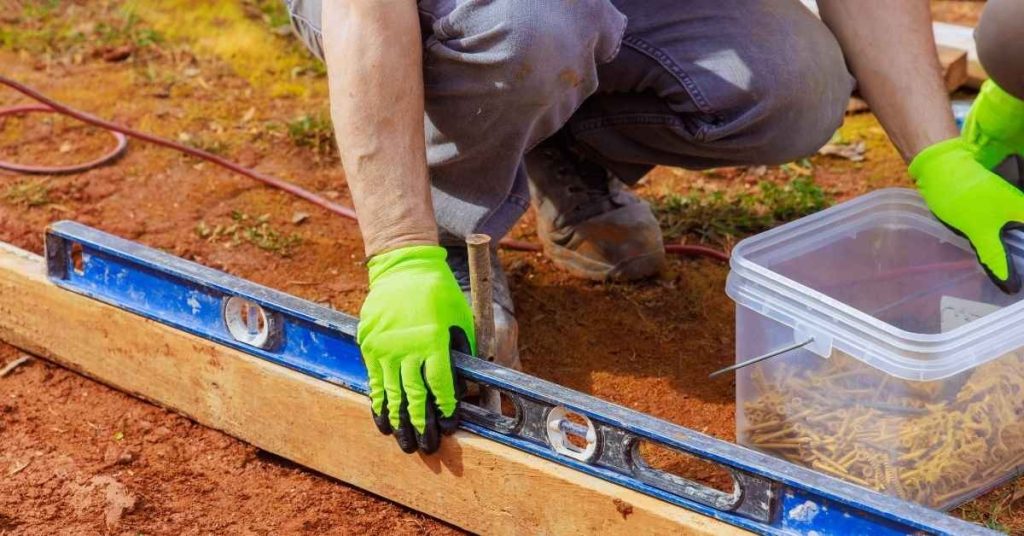
Tools, Materials and Safety Checklist
Essential items include basic hand tools, a suitable concrete mix, release agents, texture aids and personal protective equipment (PPE). Optional additions can be lightweight inserts, extra bracing and temporary supports for formwork. Gather these ahead of time to prevent mid-project delays.
Before starting, double-check PPE fit and availability, plus material labels for any handling or storage cautions. Review safety checks on the jobsite to ensure formwork and reinforcement are secure and compliant with your local standards. If any specification is unclear, consult the product label or manufacturer instructions for details.
Essential tools and personal protective equipment
Before you start, make sure you have all the necessary tools and PPE to ensure a safe and efficient job.
- Tape measure: To accurately measure your form dimensions. Inaccurate measurements can lead to wasted concrete or an improper fit.
- Level: To ensure your forms are level and plumb. Uneven forms result in a poor finish.
- Shovel: For mixing and moving concrete. Using the wrong tool can slow down work and cause back strain.
- Gloves: To protect your hands from cuts, abrasions, and concrete burns. Working without gloves can lead to injuries.
- Safety glasses: To shield your eyes from debris and concrete splatter. Eye injuries are serious and can be prevented with proper eye protection.
- Ear protection: To reduce noise levels when using power tools. Prolonged exposure to loud noises can cause hearing damage.
- Steel-toed boots: For foot protection from falling objects and sharp edges. Without proper footwear, you’re at risk of serious injuries.
- Hard hat: To protect your head from impact and penetration injuries. A hard hat is crucial when working in areas with overhead hazards.
Quick rule: Always wear your PPE before starting any task to minimize risks.
Concrete materials, additives and release agents
Choose the right concrete mix and additives for your project to ensure a strong, durable finish.
- Concrete mix: Select a mix designed for your specific application. Using the wrong mix can result in weak or poorly finished concrete.
- Water reducer admixture: To improve workability without reducing strength. Skipping this can lead to a poor finish and weak concrete.
- Air entraining admixture: To introduce tiny air bubbles, improving freeze-thaw resistance. Omitting this can cause cracking in cold weather.
- Fiber reinforcement: To enhance strength and reduce cracking. Without fibers, your concrete may crack under stress.
- Release agent: To prevent the concrete from sticking to forms. Skipping this can make it difficult or impossible to remove forms without damaging the concrete.
- Concrete sealer: To protect the finished surface and enhance its appearance. Without a sealer, your concrete may stain easily and have a shorter lifespan.
Quick rule: Always follow manufacturer guidelines for mixing and application to achieve the best results.
Optional texture tools and consumables
These specialty items can help you create unique textures and enhance your concrete’s appearance.
- Texture skins: To apply a pattern or design to the surface. Using the wrong skin can result in an unappealing finish.
- Foam inserts: For creating unique textures and patterns. Incorrect use can lead to inconsistent results.
- Concrete stamps: To imprint designs onto the surface. Using stamps improperly can result in a poor finish or damaged stamps.
- Chisels: For creating custom textures and patterns. Improper use can cause injuries or damage to the concrete.
Quick rule: Practice using these tools before applying them to your project to ensure consistent results.
Site Prep, Formwork and Reinforcement Basics
Begin with a clean, stable substrate and a true surface plane. Align forms carefully and brace them to resist movement during pour and vibration. Place reinforcement in the intended location to avoid texture distortions or blowouts at the edges.
Before pour day, verify that form release and edge conditions meet your pattern goals, and confirm bracing and tie-in points exist where needed. If you’re unsure about local requirements, check a code reference or the supplier guidance for formwork and reinforcement standards.
Building and Bracing Forms for Texture Work
Start with sturdy formwork. Use 1/2″ or 5/8″ plywood, not OSB. It’s stronger and holds detail better.
Space your forms evenly to prevent warping. Every 16-24″ is good. Use 2x4s or 2x6s for spacing.
Brace forms every 3-4 feet. Use 2x4s, 2x6s, or even 4x4s as needed. Tie them to the ground if possible. This keeps forms from spreading or misaligning under pressure.
Reinforcement, Embeds and Joint Planning
Position rebar and ties away from texture areas. They can leave marks or cause blowouts. Use chairs to keep them off the form.
Place embeds carefully. They should be flush with the form face to avoid leaving gaps in your texture.
Plan joints wisely. Stagger them and avoid placing them directly under loads. This helps prevent cracking that could spoil your face.
Surface Protection and Drainage Considerations
Protect forms from rain and sun. Use tarps or plastic sheeting to keep water out. Direct sunlight can cause surface cracks.
Ensure proper drainage. Slopes should be at least 1/4″ per foot away from the house. This prevents water from pooling on your slab.
If you’re pouring in cold weather, insulate and heat forms to prevent freezing. This can cause blowouts or weak concrete.

Technique a — Hand Tooling, Chipping and Split-Face Methods
Start with fresh to green concrete and work with chisels, bush hammers, and grinders to carve or chip the surface for a natural rock look. Timing matters: tooling too early drags concrete; too late you’ll smear the texture instead of crisp edges. Practice on a scrap area to dial in pressure and motion before the main surface.
Keep the work surface clean of debris and use proper PPE when grinding or chiseling. Check tool manufacturer guidance for recommended speeds, wear limits, and safe use practices, and adapt your technique to the local environmental conditions and concrete mix you’re using.
Timing: when to tool, chip or carve
The curing stage of your concrete is crucial for creating a natural rock-face look. Too early, and you’ll damage the panel. Too late, and it’s too hard to work with.
- Fresh Concrete (1-2 hours after pour): This is when you want to start tooling or chipping. The concrete is still soft enough to remove material but not so wet that it crumbles.
- Partially Cured (4-8 hours): For a more aggressive look, wait until the concrete has partially cured. This gives you better control over your tooling and chipping.
- Avoid Over-curing: Once the surface is hard and dry, it’s too late for effective tooling or chipping. You’ll only damage the panel.
- Use a Moisture Meter: Rent one to check if your concrete has reached the right moisture content (around 12-15%) before you start working on it.
- Timing for Carving: For deeper carvings, wait until the concrete is at least 70% cured. This gives you better control and prevents crumbling.
Tools, motions and pattern planning
The right tools and motions help create a natural, random texture. Here’s what you need to know:
- Hand Tools (Chisels, Bush Hammers): These are your basic tools for chipping and carving. Rent them if you don’t have them ($10-$20 per day). Use short, controlled motions to avoid repetitive marks.
- Grinders with Diamond Blades: For larger surfaces or deeper cuts, use a grinder with diamond blades. Rent one for around $50-$75 per day. Move the blade in random patterns to mimic nature’s irregularity.
- Timing-Based Tooling: This involves using tools at specific intervals during curing to create unique textures. It requires planning and timing, but it can produce stunning results.
- Pattern Planning: Sketch out your pattern before you start. This helps ensure randomness and prevents repetitive marks. You can also use nature’s patterns (like tree rings or rock formations) as inspiration.
- Avoid Repetitive Motions: Keep your motions varied to mimic the natural, random look of real rock faces. If you find yourself making the same motion repeatedly, stop and change it up.
Cleaning and touch-up after tooling
Once you’ve finished tooling or chipping your concrete, it’s time to clean up and touch up any areas that need attention:
- Remove Loose Material: Use a stiff-bristled brush or broom to remove any loose material from the surface. You can also use compressed air if you have access to an air compressor.
- Fill Small Voids: For small voids or cracks, use a concrete patching compound. Apply it with a trowel or putty knife, then smooth it out and let it cure according to the manufacturer’s instructions.
- Blend Patched Areas: To blend patched areas with the rest of your texture, use a grinder with a light touch. Move the blade in small circles or random patterns to match the surrounding texture.
- Clean Up Tools: Clean your tools thoroughly after use. This prevents rust and makes them easier to store. Use soap and water for hand tools, and follow the manufacturer’s instructions for grinders and other power tools.
- Seal the Surface: Once you’re satisfied with your texture, seal the surface with a concrete sealer. This protects the surface from moisture and stains, and helps maintain the natural look of your rock face.
Technique B — Molds, Skins, Stamps and Lightweight Inserts
Foam or urethane molds, reusable texture skins, stamps and lightweight inserts offer repeatable textures with less manual variation. They’re designed to transfer pattern and depth with less labor than hand tooling. Use inserts to create pockets or distinct facets as part of the overall rock-face look.
Follow the supplier’s installation and release directions, and ensure the substrate and form are compatible with the chosen texture aid. If you’re mixing and matching DIY inserts, verify compatibility with your concrete mix and environmental conditions by checking product sheets or talking to the supplier.
Creating and positioning foam or urethane molds
To make simple molds, trace your desired pattern onto a sheet of foam or urethane. Cut it out carefully using a sharp knife or electric carving tool.
Positioning is key. Place the mold in your form, ensuring even contact with the concrete surface to capture every detail. Use screws or nails to secure it temporarily.
Before pouring, apply release agent to prevent the mold from sticking. This lets you remove it easily once the concrete has set.
Using texture skins and stamps on fresh concrete
Press texture skins or stamps into wet concrete to create intricate patterns. Apply release agent first, then position the skin or stamp firmly against the surface.
Use even pressure across the entire tool. Too much can cause it to stick; too little won’t capture the detail. Hold for about 15-30 seconds before lifting straight up.
If you’re using stamps with multiple pieces, align them carefully and press each one simultaneously for a consistent look.
Temporary inserts and backer systems
Lightweight inserts like expanded foam or plastic create relief in your concrete surface. Cut them to shape, then attach securely to the form using screws or adhesive.
Safety first: Ensure inserts are firmly fastened before pouring. Vibrations from the concrete can dislodge loose pieces.
Remove inserts once the concrete has set but is still green (around 24-48 hours). Use a utility knife to cut any adhesive bonds, then gently pry them off. Be careful not to damage the finished surface.
Color, Release Agents and Finishing Treatments
Color options range from integral tones to surface-applied stains and patinas that resemble natural stone. Release agents influence both color transfer and texture clarity, so choose a product that suits your pattern and concrete curing window. Finishing coats can seal and protect while enhancing the look of the rock-face texture.
Read the colorant and release agent labels to confirm compatibility with your concrete mix and form material. If you’re unsure, consult the manufacturer instructions or data sheet for recommended pairings and any required curing or sealer steps before final finishes.
Integral color versus surface stains and washes
When it comes to achieving natural stone tones, you’ve got two main options: integral color or surface stains/washes.
Integral color involves adding pigment directly to your concrete mix. This gives a consistent, uniform color throughout the slab. It’s great for deep, solid colors but may not provide the variation and patina of natural stone.
On the other hand, surface stains and washes are applied after the concrete has cured. They can create beautiful, varied tones and patinas, mimicking the look of weathered stone. However, they might not penetrate as deeply as integral color, making them more susceptible to wear.
Choose based on your desired depth of color and how much variation you want. For a consistent, solid color, go with integral. For a more natural, varied look, opt for stains/washes.
Choosing and managing release agents
Release agents are crucial to prevent your formwork from sticking to the concrete. They also affect your final surface’s color and texture.
There are two main types: silicone-based and wax-based. Silicone gives a smooth, glossy finish while wax provides a more matte, textured look. Choose based on the desired finish of your ‘rock face’ texture.
Applying release agents is straightforward: spray or brush them onto your formwork evenly. But remember, too much can cause discoloration, so follow the manufacturer’s guidelines.
Before applying any finishing treatments, you must remove or neutralize all residue. Use a suitable cleaner and follow safety precautions. A clean surface ensures better adhesion of subsequent products.
Sealers, consolidants and protective coatings
After achieving your desired texture and color, it’s crucial to protect your concrete with sealers, consolidants, or protective coatings.
Sealers prevent water and dirt from penetrating the surface. They’re great for enhancing color vibrancy but can make the surface look shiny if not chosen carefully.
Consolidants fill microscopic voids in the concrete, improving its durability and resistance to damage. They don’t change the appearance much but enhance overall performance.
Protective coatings, like urethanes or epoxies, provide a tough, durable layer on top of your concrete. They can alter the surface’s appearance slightly and offer varying levels of slip resistance and UV protection. Choose based on your specific needs and desired look.
Curing, Demolding and Visual Checkpoints
Coordinate curing methods to protect texture while preserving crisp detail, and plan demolding timing around your concrete’s set state. Avoid rushing demold if the texture still needs time to fully develop. A gentle, controlled approach reduces the risk of surface damage.
Develop a simple visual checklist: ensure the texture reads clearly, edges are sharp, and there are no obvious blowouts or voids. If any issues are apparent, review product instructions and local guidance before applying final finishes or accepting the pour as complete.
Effective curing practices for textured faces
Curing is crucial to maintain the texture and prevent cracking. Use this checklist after initial set.
- Moisture retention: Cover with plastic sheeting or wet burlap to keep moisture in, but avoid over-saturating.
- Temperature control: Protect from extreme heat or cold. Ideal curing temp is 50-60°F (10-15°C).
- Curing time: Textured surfaces need longer curing. Aim for 7 days minimum.
- Edge protection: Keep edges moist and protected to prevent cracking.
- Color consistency: Ensure no discoloration due to improper curing or contaminants.
- Avoid water ponding: Prevent water from pooling on surface as it can cause discoloration and efflorescence.
- Regular inspection: Check daily for any signs of cracking, discoloration, or excessive moisture loss.
- Proper demolding: Ensure formwork is removed at the right time to prevent damage to texture.
Quick rule: Curing is a balancing act. Too little moisture can cause cracking, too much can lead to discoloration and efflorescence.
Safe demolding and handling procedures
Demold carefully to preserve texture and prevent damage. Use this checklist before removing forms.
- Curing time: Allow sufficient curing time (at least 7 days) before demolding.
- Edge support: Ensure edges are well-supported to prevent breakage during removal.
- Form release: Apply release agent generously to ease form removal and protect texture.
- Slow and steady: Remove forms slowly and evenly to avoid stress on concrete.
- Edge protection: Use wedges or props to support edges during removal.
- Avoid impact: Do not strike forms with hammer or other tools. This can damage texture.
- Handling heavy panels: Use lifting devices and distribute weight evenly when moving large, heavy panels.
- Inspect for damage: Check for any cracks, chips, or other defects immediately after demolding.
Quick rule: Patience is key. Rushing demolding can lead to damaged texture and weakened concrete.
Visual inspection checklist before sealing
Inspect the textured surface carefully before applying sealers or other finishes. Use this checklist for a thorough check-up.
- Voids: Look for any voids, honeycombs, or missing texture. These need to be patched and retooled.
- Cold joints: Check for any cold joints (where concrete set before next pour). These can cause weak points in texture.
- Discoloration: Inspect for any discoloration due to improper curing, contaminants, or efflorescence. This may need cleaning or touch-up.
- Cracking: Check for any hairline cracks. These should be repaired before sealing.
- Texture consistency: Ensure texture is consistent across the entire surface. Inconsistencies may need touch-up.
- Contaminants: Remove any dirt, oil, or other contaminants that could interfere with sealer adhesion.
- Moisture content: Check for excessive moisture. Sealing wet concrete can trap moisture and cause problems later.
- Edge quality: Inspect edges for any damage, cracking, or missing texture. These need to be repaired before sealing.
Quick rule: A thorough visual inspection is your last chance to address defects before they’re sealed in and become bigger problems later.
Conclusion
Rock face texture comes down to control, timing, and safe work habits. When you protect people and the concrete, the result looks durable and consistent, not patched and patchy.
Now, move from planning to action: verify you have the right form liners or DIY alternatives, double-check site prep, gather tools and release agents, mix and apply in small steps, test a shallow patch first, cure properly, demold carefully, and inspect for cracks or chips before finishing. Start with a practice spot, lock in your workflow, and proceed in logical, repeatable passes until the texture matches what you want.
Common mistakes to avoid are rushing the texture before the concrete stiffens, skipping release or testing, and overworking the surface or misapplying color or finishing treatments. Work in clean, controlled conditions, follow safety rules for lifting, ventilation, and eye protection, and never force a tool that won’t seat or a mold that won’t release. If a project feels too large, or if underlying forms or reinforcement look suspect, call in a pro and stop before damage occurs—it’s cheaper to ask early than to repair later. Stay deliberate, stay safe, and the rock face will come out strong and right.
FAQ
Can I get a rock face texture with common DIY methods without special form liners?
Yes. You can achieve a rock-like surface by hand tooling, chipping, or using simple inserts. Start with a rough gypsum or concrete mixture and use hand tools to create irregular edges and splits.
Be mindful that results depend on the mix, form, and curing conditions. If you need a consistent look, compare your options and follow the manufacturer’s instructions for any inserts or skins you choose to use.
How long should I wait before removing forms or inserts and inspecting the texture?
Wait until the surface firms enough to hold its shape. Check the product label or manufacturer instructions for guidance on set times and cure state before demolding.
If you’re unsure, test a small area first or wait a bit longer in cooler conditions. Do not rush demolding to avoid tearing or cracking the texture.
What are the most common mistakes with rock face texture, and how can I avoid them?
Common issues are tearing, overly uniform surfaces, and hard-to-remove form liners. To avoid these, work the surface while the concrete is at the right rigidity and use even, light tooling pressure.
Keep forms clean, align inserts correctly, and follow your chosen method’s instructions. If a method looks off, stop and reassess before proceeding to the next step.
How do I clean and store tools and forms after finishing the texture?
Clean tooling right after use with water and a stiff brush. Remove any concrete residue before it hardens to prevent sticking.
Dry and store tools in a dry area. Protect forms or liners from direct sun and extreme temperatures to extend their life and performance.