
Introduction
Foamed concrete is a lightweight mix used for making planters and fill, mixed with air-entraining foam to reduce weight. This article walks you through practical, hands-on steps for mixing, placing in forms, and finishing for a durable, good-looking result. Check the product instructions and local rules for material limits before you start.
Choose the right materials a DIY user can source and read the manufacturer instructions for how to mix and foam stability. Pour or place in your mold in stages, build up the shape, then smooth and finish the surface. Let it cure according to local guidelines and consider drainage and sealing for aesthetics and longevity.
Key takeaways
- Measure foam concentrate and cement per label, then mix thoroughly in batches.
- Lock the mold with a level base and clean liners before pouring.
- Maintain consistent mixing speed to avoid clumps and air pockets.
- Use light taps to settle concrete and release trapped air.
- Wear gloves and eye protection; foam slurry can irritate skin.
- Cure in a shaded area, protect surface, and avoid direct heat.
Table of Contents
- Introduction
- Key takeaways
- What Foamed Concrete Is and Why Use It for Planters and Fills
- Tools and Materials Checklist
- Preparing Molds, Reinforcement, and Planter Design
- Step-by-Step Mixing Process
- Placing, Pouring, and Avoiding Defects
- Finishing Surfaces, Curing, and Drying Guidance
- Troubleshooting and Common Mistakes
- Safety, Environmental Impact, and Disposal
- Conclusion
- FAQ
What Foamed Concrete Is and Why Use It for Planters and Fills
Foamed concrete, also called cellular concrete, is a cement mix that incorporates air voids to make it much lighter than standard concrete. Those air pockets lower density and add insulating and moisture-handling properties, setting it apart from traditional concrete and from some lightweight blends that rely on different aggregates. This makes it a practical choice for planters, raised beds, frost-insulating fills, and other nonstructural fills where you need to move material and manage soil moisture without the weight of conventional concrete.
For DIY work, the method matters: you can use pre-foamed slurry or in-situ foaming, and that choice affects workability, mixing equipment, and how you heat or cure the mix. Always check the product label or datasheet for curing guidance and any additives for permeability or water repellence, and plan around a slower cure in hot sun or windy spots. The payoff is easier handling and better moisture control in planters, but treat it as nonstructural and follow safe practices for mixing, curing, sealing, and weatherproofing.
Basic properties and benefits
Foamed concrete is a lightweight, porous material made by incorporating air bubbles into cement paste. This creates a cellular structure that’s much lighter than traditional concrete.
Porosity allows for better drainage and moisture handling, preventing waterlogging which can harm plant roots. It also provides thermal insulation, helping to maintain soil temperature and protecting plants from extreme heat or cold.
The lightweight nature of foamed concrete makes it easier to handle and install compared to traditional concrete. Its porous structure also promotes aeration, benefiting plant health by allowing oxygen to reach the roots.
Best use cases and limitations
Foamed concrete is ideal for large planters and custom shapes due to its lightweight nature and ease of casting. It’s also great for nonstructural fills like voids around utilities, providing frost insulation and preventing soil erosion.
However, it’s not suitable for heavy loads or structural walls as it lacks the compressive strength of traditional concrete. Also, avoid using it where high water retention is required, as its porous nature can lead to excessive drainage.
For planters, foamed concrete works well in bottoms and raised beds, but consider alternatives like fiberglass or potting solutions for above-ground structures that need to be moved frequently.
How it compares to traditional concrete and other materials
Choosing the right material depends on your project’s needs. Here’s how foamed concrete stacks up against others:
- Traditional Concrete: Heavier, stronger but less porous; ideal for structural applications.
- Fiberglass: Lightweight, durable, but more expensive and less insulating than foamed concrete.
- Potting Solutions: Good for small pots, but lack the durability and insulation of foamed concrete.
- Expansion Foam: Lightweight, easy to shape, but not as durable or strong as foamed concrete.
- Cork: Excellent insulator, but less durable and can degrade over time.
Wrong material choices can lead to issues like cracking (traditional concrete in planters), staining (fiberglass), or weak bond (expansion foam). Always consider your project’s specific needs when choosing a material.
Tools and Materials Checklist
This section covers a complete materials and tools checklist for making sound, repeatable concrete foams and pours. You’ll want to have the right cement types, foam agents, water conditions, and fillers, plus the additives that affect workability and set. Include the essential mixing gear, shovels, molds or forms, and the right PPE to keep you safe and your mix consistent.
Why it matters: a well-planned batch and the right equipment prevent surprises on pour day, from unexpected set times to poor compaction. Use the labeling and manufacturer instructions for foaming agents, plasticizers, and curing compounds, and track batch records for each project. Stay mindful of dust, chemical handling, and waste disposal, and have a clear plan for mold release and post-pour curing to protect your work.
Materials: cement, foaming agent, aggregates, and additives
Before you start mixing, ensure you have the right materials for your foamed concrete. Here’s a checklist to help you.
- Cement: Choose Portland Type I/II for general use. For high heat applications, consider high-alumina cement. Check the bag label for type and manufacturing date.
- Foaming agent: Use pre-formed foam concentrate or ready-to-use foam. Ensure it’s compatible with your chosen cement type. Check the product data sheet for compatibility and storage instructions.
- Aggregates: Lightweight aggregates like expanded shale, slate, or perlite work best. Avoid heavy materials like gravel. Check aggregate size and bulk density to match your planter/fill needs.
- Water: Use clean, potable water. Temperature should be between 50-80°F (10-27°C) for optimal foam stability.
- Admixtures: Optional, but useful for specific applications. Superplasticizers improve workability; air-entraining agents enhance freeze-thaw resistance; fibers or polymers boost strength and durability. Check manufacturer guidelines for dosage rates.
- Fiber reinforcement (optional): If using, ensure they’re compatible with your chosen cement type and aggregate. Check fiber length and dosage rate.
- Set accelerators/retarders (optional): For faster/slower setting times. Check manufacturer guidelines for dosage rates and storage instructions.
- Curing compounds/sealants (optional): To protect the surface and enhance durability. Check compatibility with your chosen cement type and aggregate.
Quick rule: Always check product labels and data sheets to ensure compatibility and safe handling.
Mixing and placement equipment
To mix and place foamed concrete efficiently, you’ll need the right tools. Here’s a checklist to help you.
- Mixer: A drill with a paddle attachment or a small cement mixer works well for small batches. For larger batches, consider renting a professional mixer.
- Foam generator/foaming agent (hand-foaming option): To generate stable foam. Check if it’s compatible with your chosen foaming agent and has the required output rate.
- Measuring tools: Use a scale for accurate cement and aggregate measurement, and graduated cups for water and admixture dosing.
- Shovels/trowels: For mixing and placing concrete. Stainless steel or plastic trowels work best with foamed concrete.
- Molds (for planters): Ensure they’re the right size, shape, and depth for your needs. Check if they have a suitable release agent applied.
- Vibration/tamping accessories: To remove air pockets and ensure even compaction. Consider renting a vibrating screed or tamper for larger projects.
- Curing blankets/enclosures (optional): To maintain moisture and temperature during curing. Check size, insulation value, and ease of application.
- Low-budget alternatives: For mixing, consider using a wheelbarrow or large tub with a hand-held mixer. For placing, use buckets and shovels.
Quick rule: Always check tool compatibility and functionality before starting your project.
Safety gear and site prep items
Safety is paramount when working with foamed concrete. Here’s a checklist to help you prepare your site and protect yourself.
- Eye/face protection: Wear safety glasses or goggles to protect from debris and splashes. Check they fit well and provide adequate coverage.
- Gloves: Use rubber or nitrile gloves to protect your hands from cement and chemicals. Check for a good grip and durability.
- Respirator/ventilation: Wear a respirator when handling foaming agents to avoid inhalation. Ensure it fits well and provides adequate protection. Ventilate the work area if possible.
- Dust control: Use wet methods or vacuums to control dust during mixing, placing, and finishing. Check equipment functionality before starting.
- Surface protection: Lay down drop cloths or plastic sheets to protect plants, grass, and surrounding areas from concrete spills.
- Temperature control (optional): Use heat lamps or insulation blankets to maintain optimal curing temperature. Check equipment functionality before starting.
- Containment (for planters): Use barriers or enclosures to contain the foamed concrete and prevent it from spreading onto unwanted areas.
- Spill response kit: Have a kit ready with absorbents, personal protective equipment, and cleanup instructions for chemical spills.
Quick rule: Always prioritize safety. Check gear functionality before starting your project, and follow manufacturer guidelines for safe handling and storage of chemicals.
Preparing Molds, Reinforcement, and Planter Design
Choosing the right molds and sizes is key, along with a reliable release method and a plan for internal supports, drainage, and wall thickness. Think modular or custom shapes that demold cleanly and don’t trap foam or moisture. Decide on how you’ll brace the form and vent for air pockets so the planter cures solid and straight.
This matters because a good mold setup makes demolding easier and keeps the planter durable enough for regular use. Practical decisions on drainage channels, bottom filters, and reinforcement affect plant health, root growth, and weight distribution. A clear workflow from mold prep to demolding saves time and money and helps you avoid rework or weak spots.
Choosing and preparing mold materials
The material you choose for your molds directly impacts the quality and finish of your foamed concrete planters. Here are some options:
- Wood: Cheap, easy to find, but requires sealing with a release agent to prevent sticking and absorption of moisture.
- Silicone: Expensive but reusable, provides a smooth finish, and doesn’t require lining. Use food-grade silicone for safety.
- Plastic: Inexpensive, durable, but may not provide as smooth a finish as other materials. Line with a release agent to prevent sticking.
- Modular molds: Allows for easy creation of complex shapes and patterns. Ensure they’re compatible with foam concrete and use appropriate joining techniques.
- Custom molds: Can be made from various materials, but ensure they’re properly sealed or lined to prevent sticking and allow easy demolding.
Reinforcement and inserts for durability and drainage
Adding reinforcement and inserts can enhance the strength and functionality of your foamed concrete planters.
Lightweight rebar: Incorporate it into larger planters to distribute weight evenly and prevent cracking. Ensure it’s compatible with foam concrete and doesn’t interfere with the foaming process.
Drainage cores: Use plastic or metal inserts to create drainage holes. Place them strategically to avoid root rot and drowning of plants. Ensure they’re secure and won’t float during placement.
Fibers or netting: Add these for extra reinforcement, especially in larger planters. They help distribute stress evenly and prevent cracking. Ensure they’re compatible with foam concrete and don’t interfere with the foaming process.
Designing custom shapes, textures, and sizes
Foamed concrete allows for creative freedom in designing your planters. Here are some methods to create unique designs:
Curves and tapers: Use flexible molds or carve foam blocks to create curved or tapered profiles. Ensure the mold is properly supported to maintain its shape during placement.
Texturing: Apply textures to your molds using materials like sandpaper, fabric, or even leaves before casting. Remove any loose particles before placing concrete to avoid weak spots.
Embedded items: Incorporate decorative items like stones, shells, or glass into your planters. Ensure they’re securely placed and won’t float during placement. Consider their impact on the overall weight of the planter.
Step-by-Step Mixing Process
This section lays out a safe, repeatable mixing sequence for slurry, foam, and components so you can do it with less guesswork. Start with PPE, ventilation, and a clean-up plan, then prep dry components and verify they’re clean and compatible before you begin. Premix dry parts, gradually add water, and mix to a smooth base while keeping the workflow steady and free of surprises.
This matters because a controlled process helps prevent contamination, preserves foam quality, and reduces batch-to-batch variation in your project. Follow the order, watch for signs of changing texture, and finish with quick checks and clean-up to stay on the right side of safe work and curing.
Step-by-Step Process
Follow these practical steps to safely and effectively mix foamed concrete for your DIY planters and fills.
- Wear appropriate PPE, including gloves, safety glasses, and a dust mask. Ensure proper ventilation in your workspace.
- Gather all materials: cement, lightweight aggregates, foaming agent, water, and any additives.
- Verify material quality: check moisture content, cleanliness, and compatibility of all components before mixing.
- Prepare the cement slurry by gradually adding water to the dry mix while stirring. Aim for a smooth, lump-free consistency.
- Generate foam using your chosen method (mechanical or chemical) and assess its stability and bubble structure.
- Combine the slurry and foam gently, folding them together to preserve the foam and avoid segregation.
- Perform quick quality checks on the final mix before placement. Check for consistency, air content, and workability.
- Handle batches carefully, especially in hot or humid conditions, to maintain foam stability during placement.
- Clean up thoroughly after mixing, following safety protocols for disposal of any leftover materials.
Making the cement slurry
Creating a smooth, lump-free cement slurry is crucial for successful foamed concrete. Here’s how to achieve it:
Start by mixing your dry components – cement and lightweight aggregates – in a clean container.
Gradually add water while stirring continuously. Use just enough water to create a smooth, creamy consistency without any lumps or dry patches. The slurry should flow easily but not be too runny.
Take your time and ensure the mixture is well-combined before moving on to the next step. A properly made slurry will have no visible dry spots or lumps, indicating a good base for your foamed concrete.
Generating and assessing foam quality
Proper foam generation is key to achieving the desired lightweight properties in your foamed concrete. Here’s how to make and assess foam:
Use a foamer or premix method to generate foam. Follow the manufacturer’s instructions for optimal results.
Assess foam quality by examining its stability and bubble structure. Stable foam will maintain its volume and consistency over time, while unstable foam may collapse or lose air content quickly.
Ideal foam should have small, uniform bubbles with no large voids or collapsed areas. Store generated foam briefly in a clean container until ready to use, ensuring it remains stable during this time.
Folding foam into slurry and batch management
Gently folding foam into your cement slurry helps preserve the foam’s air content and ensures a homogeneous mix. Here are some tips for successful batch management:
Slowly pour or scoop the generated foam onto the surface of your prepared cement slurry.
Using a clean, wide-bladed tool (such as a trowel or flat shovel), gently fold the foam into the slurry. Work from one side to another in smooth, even strokes, ensuring no unmixed areas remain. Avoid overmixing, which can cause foam collapse and segregation.
Manage batch sizes carefully to maintain consistency throughout your project. Small batches may be easier to control but require more frequent mixing. Larger batches can save time but risk variation in mix quality if not handled properly. Adjust batch size based on your project’s needs and your ability to maintain consistent results.
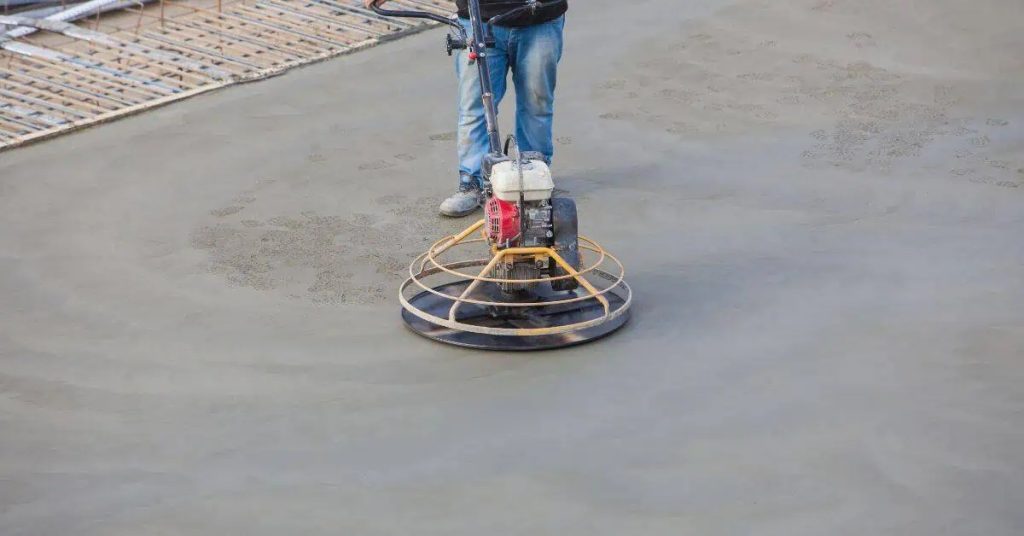
Placing, Pouring, and Avoiding Defects
Mold prep sets you up for a smooth pour: choose a mold that’s easy on foam, seal any gaps, treat the surface so release is clean, and vent or line as needed to avoid foam traps. When you pour, fill in stages from the bottom up and keep the pour rate steady to minimize shear and edge runs, while maintaining a consistent layer height to reduce segregation. Finish by consolidating gently—tap or light vibration as you work from the center outward, without banging the foam or disturbing the surface, so you don’t crush the foam or create obvious seams.
This matters because creeping defects hide where you can’t see them until you demold or it’s cured, and DIY pours are often the first place foam is ruined. Understanding how temperature, mix consistency, and proper seating of internal supports affect distribution helps you avoid large voids and laitance, while targeted consolidation reaches corners and pockets without collapsing the foam. If you see signs of segregation or pockets forming, plan a careful re-pour or patching, then cure under suitable conditions to lock in even density and a smooth, durable finish.
Pouring strategies and alternatives to vibration
When working with foamed concrete, vibration is a no-no. It can damage the delicate foam structure. Here’s how to pour without it:
Controlled Pour Heights: Pour in small layers, no more than 6 inches at a time. This helps maintain foam stability.
Flow Management: Use a funnel or pouring spout to control the flow of concrete into your mold. Avoid sudden stops and starts that can cause segregation.
Instead of vibration, use gentle methods to consolidate the concrete. Lightly tap the sides of the mold with a trowel or use a small, handheld vibrator on the lowest setting. But remember, less is more when it comes to foam.
Layering, lifts, and open time considerations
For deeper pours, work in layers. This helps maintain a consistent density throughout your concrete piece:
Timing Between Lifts: Allow each layer to settle for about 10-15 minutes before adding the next one. This gives the foam time to redistribute and the concrete to consolidate.
Monitor your mix’s workability as time passes. Foam can start to break down after about an hour, so plan your pours accordingly. If you’re not ready to pour, keep your mixed concrete in a sealed container to maintain its freshness.
Remember, foamed concrete sets faster than regular concrete. So, once you start pouring, work quickly but carefully to avoid defects.
Integrating drainage and soil interface
Good drainage is key for healthy plants. Here’s how to design your planter for optimal drainage:
Drainage Channels: Incorporate small channels or holes at the base of your mold to allow water to escape. You can use plastic inserts or simply poke holes in your mold before pouring.
Create a comfortable interface for your potting soil and plants. This means providing enough space for roots to grow and preventing soil from washing out:
Root Space: Design your planter with extra depth to accommodate root growth. A general rule of thumb is to provide at least 2 inches of space below the crown (the point where the roots meet the stem) of your largest plant.
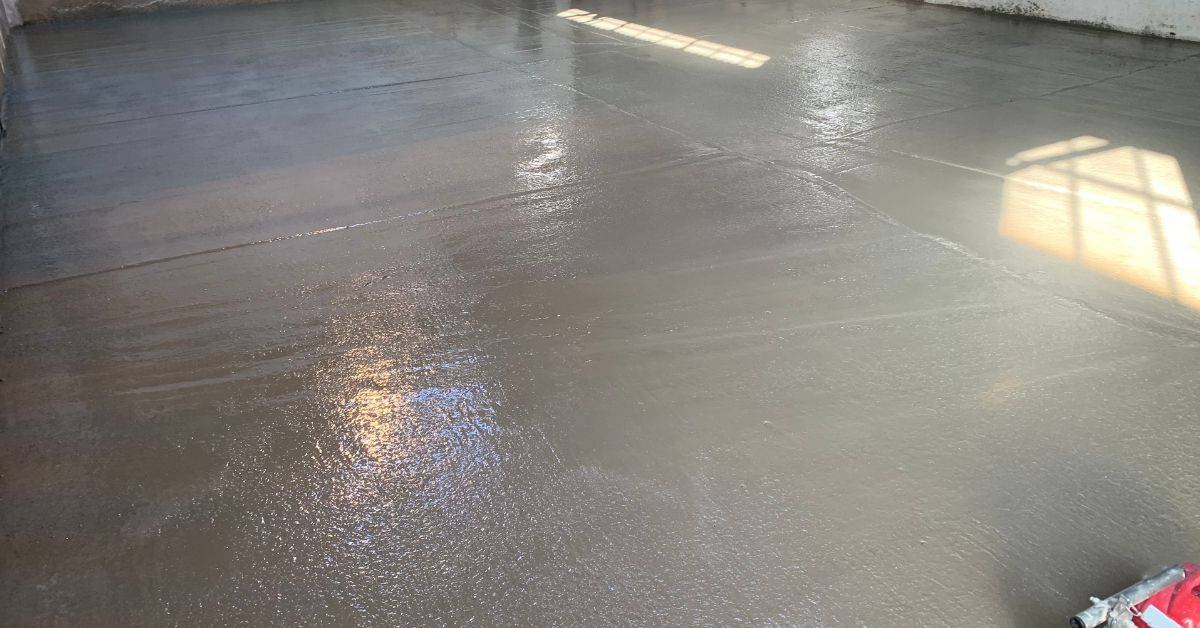
Finishing Surfaces, Curing, and Drying Guidance
Finishing foamed concrete planters means choosing surface options that work with lightweight foam, such as cement-based renders, skim coats, sealants, UV coatings, and decorative treatments. Plan curing and drying to prevent cracking by following product labels and manufacturer guidance, and consider moisture and weight when selecting finishes.
During cure, keep humidity moderate and temperatures steady, using misting, plastic covers, or curing blankets as needed and avoiding abrupt moisture loss. After demolding, smooth edges, feather joints, inspect for pockets, and prepare inner surfaces for soil or water containment, then apply interior vs exterior sealants and plan for recoat intervals.
Surface finishes, coatings, and aesthetics
Once your foamed concrete planter is demolded, it’s time to think about the finish. You’ve got options here.
For a smooth look, use a trowel to apply a cement-based render or skim coat. These are compatible with lightweight foams but keep in mind they’ll add some weight to your planter.
Sealants and UV-protective coatings can extend the life of your planter. Apply these after any renders have cured. For a decorative touch, consider stenciling or painting before sealing.
Note: Always check product labels for compatibility with foamed concrete and moisture considerations.
Curing methods and moisture control
Proper curing is crucial to avoid cracking. Keep your planter moist during the first few weeks after pouring.
For small planters, wrap them in plastic or use a curing blanket. For larger ones, mist them regularly. Maintain an ambient temperature between 50-70°F (10-21°C) for best results.
Curing time depends on size: expect around 3 weeks for small planters and up to 6 weeks for large ones. Gradual drying helps prevent shrinkage cracks.
Tip: Avoid direct sunlight during curing as it can cause uneven heat distribution and drying.
When to pot and long-term conditioning
Before adding soil, ensure your planter is fully cured and dry. This usually takes around 4-6 weeks but can vary depending on size and curing conditions.
Check for any moisture pockets by tapping the surface. If it sounds hollow, it’s ready. Lightly plant or handle your planter to confirm it supports weight without movement.
For long-term conditioning, recoat sealants periodically to protect against weathering. Every 2-3 years should suffice in outdoor environments.
Remember: Patience is key here. Rushing can lead to cracks and weakened structure.
Troubleshooting and Common Mistakes
Troubleshooting is about spotting collapse, uneven density, weak spots, and surface defects early. Look for over-watered mix, under-mixing, air voids, or honeycombing. Fixes include rework with a fresh pass, targeted tweaks, and better curing to prevent recurrence.
Do quick checks on foam-to-bulk, mix consistency, batch variation, and formwork cleanliness. Prevent problems by strict dosing, proper mixing order, controlled curing, and solid compaction using formwork and vibration. If you see defects, address them now and document what you changed for next time.
Diagnosing voids, segregation, and weak zones
Voids or low-density areas in your foamed concrete can lead to weak spots. Here’s how to detect them:
Visual Inspection: Look for any depressions or uneven surfaces after pouring. These could indicate voids or segregation.
Tapping Test: Gently tap the surface with a hammer. A dull thud indicates a weak zone, while a clear ringing sound suggests good density.
If you find issues, consider these fixes:
Patching: For small voids, mix a fresh batch of slurry and foam, then inject it into the affected area.
Injecting: For larger voids or weak zones, use an injection gun to fill them with a suitable grout.
Remaking: If the problem is extensive, you may need to remake that part of the pour. Discard the affected batch and start fresh.
Preventing and treating cracks and delamination
Cracks and delamination in foamed concrete are often due to rapid drying or poor mixing. Here’s how to prevent them:
Controlled Curing: Keep the poured concrete moist and cool during the initial curing period. Use curing blankets or misting if necessary.
Proper Mixing Sequence: Always mix dry ingredients first, then add liquids and foam agent. This ensures a consistent mix.
If cracks appear, treat them promptly to prevent further damage:
Crack Repair: Use a polymer-modified repair mortar to fill thin cracks. For wider cracks, you may need to chisel out the affected area before filling.
Delamination Treatment: If delamination occurs, use a bonding agent on the affected surface before applying a fresh layer of foamed concrete.
Visual and tactile checkpoints during each stage
When to Use: Check these points at every stage of the process – mixing, pouring, curing, and demolding – to catch issues early.
- Mixing: Confirm foam-to-bulk ratio and mix consistency with a standard slump or flow test. Inconsistent batches can lead to weak spots.
- Pouring: Inspect formwork cleanliness and sealant integrity. Dirty forms or faulty seals can cause surface defects.
- Curing: Protect the poured concrete from sun, wind, and rapid drying. These can cause cracks and delamination.
- Demolding: Check for any signs of honeycombing, cracking, or dusting on the surface before removing forms.
- Voids: Look for any depressions or uneven surfaces that could indicate voids or segregation.
- Tapping Test: Gently tap the surface with a hammer. A dull thud indicates a weak zone, while a clear ringing sound suggests good density.
- Moisture Content: Check for consistent moisture throughout the pour. Uneven moisture can cause cracks and delamination.
- Compaction: Ensure proper compaction techniques are used to avoid air voids and weak spots.
Quick Rule: Regular, thorough inspections at each stage help ensure a strong, durable foamed concrete pour.
Safety, Environmental Impact, and Disposal
Safety comes first with cement and foam agents. Wear gloves, goggles, and a respirator if needed, and protect skin and eyes at all times; store and label materials so nothing mixes up. Use good ventilation and choose the mixing method (wet-mix or dry-muck) to keep dust and fumes under control.
This matters because improper handling can burn skin, irritate lungs, or cause heat buildup in curing. Following correct mixing practices, clean-up protocols, and responsible waste disposal protects your family, your neighbors, and your project, while preventing costly mistakes; always check product labels and local rules for disposal of washwaters, slurries, and foam concentrates.
Personal safety and chemical handling
Safety comes first when working with foamed concrete. Here’s what you need:
PPE: Gloves, goggles, and a respirator for dusty conditions.
Handling: Keep cement dry to prevent burns. Store foam agents in cool, well-ventilated areas. Always follow labeling instructions.
First aid: For cement burns, rinse immediately with water. If irritation persists, seek medical help.
Environmental benefits and sourcing choices
Foamed concrete has environmental perks:
Reduced material use: Less cement means lower CO2 emissions.
Lighter transport: Reduces vehicle fuel consumption and emissions.
Sourcing choices: Opt for recycled aggregates and low-embodied cement products to further reduce environmental impact.
Waste management and end-of-life options
Minimize waste and dispose responsibly:
Leftover mix: Harden or neutralize with water. Don’t pour down drains.
Molds: Clean, recycle, or repurpose if possible.
Containers: Rinse and dispose of according to local regulations. Foam concentrates may be hazardous waste.
Conclusion
Foamed concrete is a practical, lightweight option for planters and fills when you mix, place, and cure with discipline. Stay focused on safety, ensure the surface looks right, and build with confidence that your planter will last.
Check the work as you go: start with a clean mold, follow the mixing guide and foam proportion, confirm the material flows well without excessive segregation, pour in steady layers with tamping to remove air pockets, finish the surface while it’s workable, and keep the curing area protected from drafts and direct sun until it is solid enough to handle. Treat every step as a small test: verify set time, don’t rush curing, and track moisture and temperature for predictable results.
Two common mistakes to avoid are skipping the preparation steps and rushing the cure. Do not use the wrong foam agent or incorrect water content, and never work on an unsupported or damaged mold. Always wear eye protection and gloves, work in a ventilated area, keep children and pets away, and never cure in extreme heat or cold. If you’re unsure about the mix or if the planter will bear heavy loads, pause and recheck the design or call for help before proceeding.
If the project calls for unusual shapes, large sizes, or high load requirements, consider consulting a professional to confirm the design and curing plan. With careful prep, steady mixing, and controlled curing, you’ll have durable, good-looking planters that perform well for years to come. Stay pragmatic, stay safe, and finish strong.
FAQ
How do I mix foamed concrete for DIY planters?
Follow the product instructions on the foam concentrate and cement mix. Mix the base concrete first, then add foam according to the label, keeping the mixture workable but not over-fluid. Stir until you have a uniform, lightly airy consistency and avoid excessive foaming.
What materials should I choose for foamed concrete?
Use a well-graded cement or cementitious mix suited to lightweight work, plus a foam agent designed for construction use. Select molds or forms that match your planter size and allow for easy release. Check labels for compatibility with water, curing conditions, and any additive restrictions.
How should I place and pour the foamed concrete into molds?
Fill gradually in layers and tap to settle, then smooth the surface. Keep the mix from being too thick or too runny; work from the bottom up and avoid trapping air pockets. Debulk gently but don’t overwork, which can break the foam structure.
What finishing and curing steps improve durability and look?
Finish while the surface is workable, then cover or mist cure if the plan requires it. Remove the mold carefully after initial set and seal or paint as needed for aesthetics. Let curing continue in a stable environment and avoid rapid drying or freezing near the end.