
Introduction
Cellular concrete is a lightweight concrete mix used for trench backfill and under-slab fill. It is also known as foamed or aerated concrete, and it’s discussed as a DIY-friendly option with attention to local rules and product instructions. It’s not a substitute for every job, so check what your project requires first and follow the manufacturer’s directions.
It has roots in early foaming techniques and is commonly produced by introducing air pockets during mixing. In practice, you’ll need to verify the density, strength, and suitability for trench backfill or under-slab use with the supplier or local code. DIY limits are real: plan for proper forms, placement, and curing, and if your loads or exposure are critical, consider getting help or guidance from a pro.
Key takeaways
- Cellular concrete, also called foamed or aerated concrete, features stable air voids.
- Manufacturing creates bubbles in cement slurry through foaming agents or gas.
- Density varies with mix and process; lower density reduces strength and load.
- Common applications include trench backfill and under-slab fill with caution.
- DIY limits: avoid structural uses beyond backfill; verify codes, instructions, and curing.
- Safety: wear eye protection, avoid dust, and follow foam agent instructions.
Table of Contents
- Introduction
- Key takeaways
- What Is Cellular Concrete? Brief History and Common Names
- How Cellular Concrete Is Made
- Key Properties and Performance Characteristics
- Advantages and Limitations
- Applications with Emphasis on Trench Backfill and Under-Slab Fill
- Design, Specifications, Standards, and Cost Considerations
- Practical Installation Guidance and DIY Step-by-Step
- Safety, DIY Limits, and Common Mistakes
- Conclusion
- FAQ
What Is Cellular Concrete? Brief History and Common Names
Cellular concrete is a lightweight form of concrete with air voids that lower density and change how it behaves in strength and insulation. It differs from conventional concrete and from foamed or autoclaved variants in how the air pockets are created and distributed. You’ll see terms like foam concrete, aerated concrete, and cellular concrete used in product labeling and marketing today.
A brief history shows early experiments, mid‑century adoption in Europe, and later commercialization of several cellular compositions. Over time mixes, foaming methods, and curing approaches expanded where cellular concrete could be used beyond niche projects. Understanding the naming variations helps you read product data sheets and labels more accurately.
Brief history and development
Cellular concrete’s roots trace back to early 20th-century experiments with foam. The first mechanized foaming systems emerged around the 1930s, making large-scale production possible.
Post-WWII, cellular concrete gained traction in Europe for non-load bearing applications like infill panels and insulation. By the 1960s, commercial products started appearing, expanding its use in construction.
Over time, evolving mixes, foaming agents, and curing methods led to stronger, more durable variants. Today, cellular concrete is widely used in various civil and building projects.
Common names and terminology
You might hear different terms for the same thing: cellular concrete, foamed concrete, or aerated concrete. They all refer to concrete with air voids, but there are slight differences.
Foamed concrete usually has a higher air content (20-30%) and lower density (<500 kg/m³). Aerated concrete typically has less air (10-20%) and is denser (around 600 kg/m³). Cellular concrete is an umbrella term covering both.
When shopping, check product data sheets for these terms. They’ll help you understand the product’s properties and choose the right one for your project.
How Cellular Concrete Is Made
The core steps are simple in concept: mix a cement slurry, introduce air with a foaming agent or pre‑formed foam, and allow the mixture to set with the air voids intact. This creates the cellular structure that reduces density and alters strength and insulation.
Material choices and proportions drive final properties. Cement type, water‑cement ratio, aggregate size, and foam concentration all influence density, strength, and thermal performance. Equipment like mixers, foam generators, and curing regimes also shape the end product.
Main ingredients and admixtures
Choosing the right materials is crucial for creating quality cellular concrete. Here’s what you need to know about the main components:
- Cement: Type I or II cement is commonly used. Look for ASTM C150 ratings. Avoid low-quality cement that can cause weak bond and cracking.
- Water: Clean water is essential. Salty or contaminated water can stain the concrete and affect strength.
- Foam agent/additives: These create air voids. Look for stable foam with uniform bubble size. Too much foam causes over-foaming, leading to weak concrete.
- Specialty admixtures: Some jobs require accelerators or retarders. Follow manufacturer guidelines to avoid improper curing and weak concrete.
- Aggregates: Lightweight aggregates like expanded shale or slate improve insulation but reduce strength. Use clean, well-graded aggregates for best results.
Manufacturing/process overview
The manufacturing process of cellular concrete involves two main methods: batch foaming and in-situ foaming. In batch foaming, foam is generated separately and then mixed with the concrete slurry. In-situ foaming introduces air via air-entraining admixtures during mixing.
Foam can be generated using foam generators or pre-formed foam. The choice depends on job requirements and available equipment.
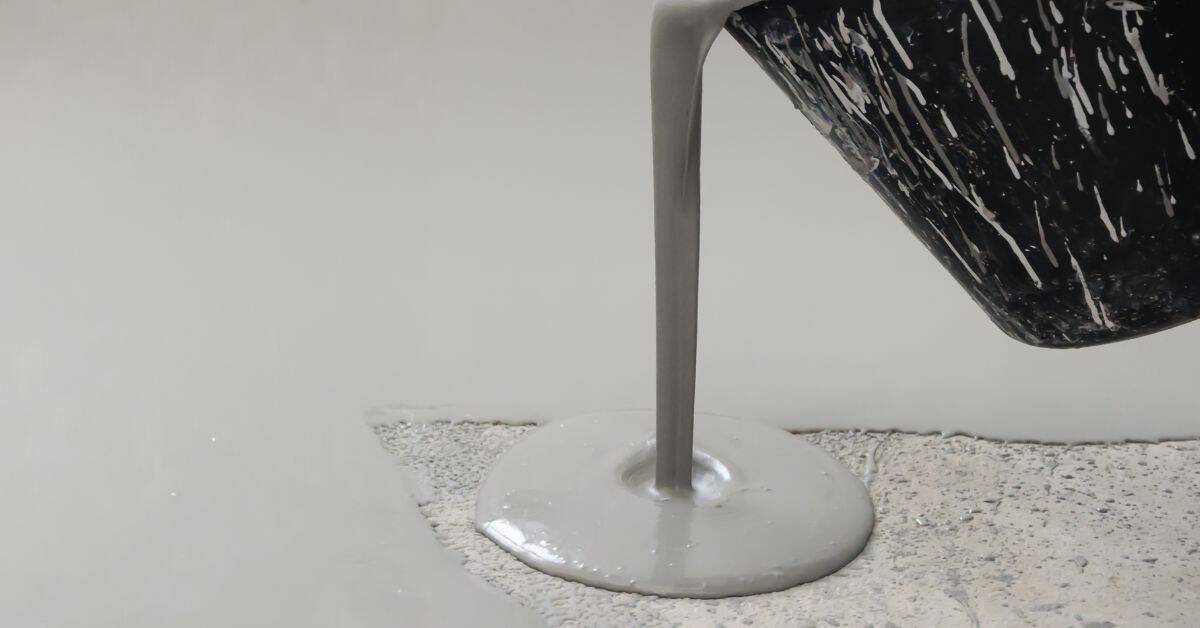
Pumping and placement should be done carefully to avoid segregation. Moisture curing is typically used, but heat curing can also be applied for faster strength gain.
Density control and material properties
Controlling density is vital as it affects both the strength and thermal performance of cellular concrete. Here’s how:
- Water-cement ratio: Lower ratios increase strength but decrease insulation. Look for ratios between 0.4 to 0.6.
- Aggregate type and size: Larger, lighter aggregates reduce density but can cause segregation if not properly mixed.
- Foam concentration: More foam reduces density but too much causes weak concrete. Look for stable foam with uniform bubble size.
- Curing method: Moisture curing preserves strength and insulation, while heat curing speeds up strength gain but can dry out the concrete.
- Quality control checks: Regularly test density to ensure it falls within the desired range (typically 20-50 pcf).
Key Properties and Performance Characteristics
Key properties to assess include density, compressive strength, stiffness, and how the material behaves under loading in trench backfill and under-slab scenarios. Creep and long-term settlement are also important considerations for structural interfaces.
Durability aspects matter too: how it handles moisture, permeability, and freeze–thaw exposure, plus compatibility with soils and subgrades. Workability, including foaming ratio and flow, affects how you place it in trenches or under slabs and how it bonds to surrounding materials.
Mechanical and Load-Bearing Behavior
Cellular concrete’s compressive strength is key for trench backfill and under-slab use. It typically ranges from 500 to 2,000 psi, depending on the density. Higher densities mean higher strengths, but they also increase cost.
Modulus of elasticity determines stiffness. Expect values around 10-30% of normal concrete’s. This means cellular concrete will compress more under load, reducing settlement risks in trenches and slabs.
Creep behavior is another crucial factor. Cellular concrete creeps less than normal concrete due to its lightweight nature. This minimizes long-term settlement and maintains structural integrity over time.
Thermal, Fire, and Water Resistance
Cellular concrete’s low thermal conductivity provides insulation benefits. It helps maintain stable temperatures in trenches and under slabs, reducing heat loss or gain.
Fire performance is excellent due to its high water content. It can reach 4 hours fire resistance with densities around 20-30 pcf. This makes it a suitable choice for areas requiring fire protection.
Water absorption and permeability are low, thanks to the closed-cell structure. This ensures minimal water penetration, protecting against freeze-thaw damage and maintaining long-term stability in subsurface and slab contexts.
Advantages and Limitations
The advantages include reduced weight for easier handling, insulation benefits, and potential for controlled placement around utilities. In trench backfill you may gain improved stability and void reduction; under-slab fills can see reduced dead load in some designs.
Limitations to consider include curing requirements, moisture sensitivity, and the need to coordinate with rebar and utilities. If your project involves complex geometry, sealing joints, or unusual soil conditions, you may need professional input.
Advantages (weight, workability, speed, sustainability)
Cellular concrete’s light weight is a major advantage for trench backfill and under-slab fill. It reduces the load on foundations and improves stability compared to traditional heavy fills.
Its workability allows it to be easily pumped into place, speeding up installation and reducing labor costs. Plus, it requires minimal compaction, saving time and equipment.
Sustainably, cellular concrete uses less cement per cubic yard than regular concrete, making it a greener option for eco-conscious homeowners.
Limitations and site considerations
While lightweight, cellular concrete has limited structural capacity. It’s not suitable for bearing heavy loads or as a primary structural element.
Some mixes can be sensitive to water or freeze-thaw cycles. Ensure your chosen mix is compatible with local climate and moisture conditions.
Access and pumping constraints may arise in tight spaces or where utilities are present. Always assess the site before starting work.
In some cases, alternatives like expanded polystyrene (EPS) or rigid foam insulation might be more suitable, especially for under-slab fill where thermal performance is crucial.
Applications with Emphasis on Trench Backfill and Under-Slab Fill
This section focuses on how cellular concrete is used specifically for trench backfill and under-slab fills. Its lightweight nature, flowability, and insulating qualities influence choices around utilities, foundations, and slab interfaces.
In trench backfill you’ll consider load, settlement control, and moisture management; in under-slab fills you’ll weigh insulation, vapor control, and how it ties into the existing subgrade or radiant systems. Scenarios vary by project type and site conditions.
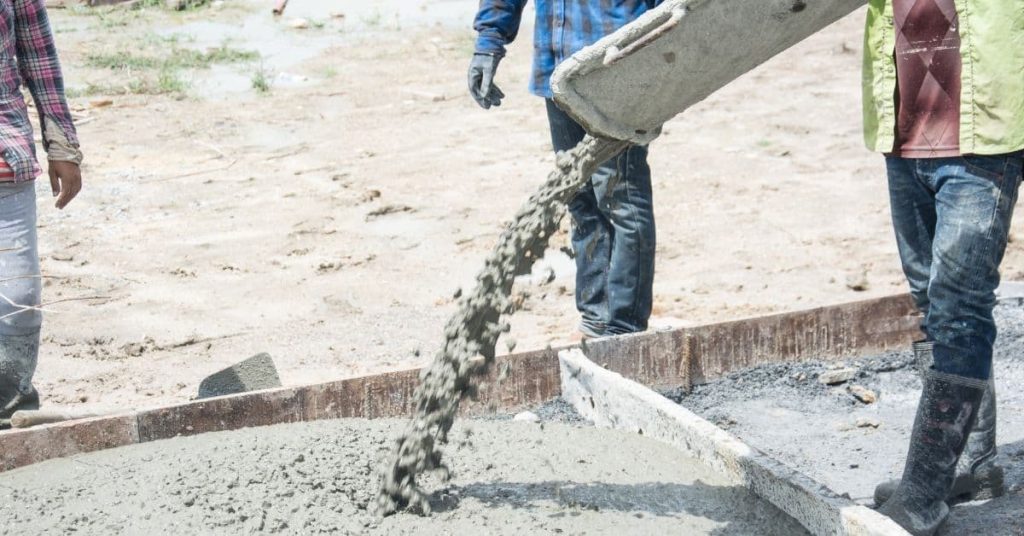
Trench backfill applications and best-fit scenarios
Cellular concrete is ideal for trench backfilling due to its lightweight, flowable nature. It’s often used around utilities, pipelines, and service trenches.
Benefits: Reduces settlement risk for surrounding soils, minimizes voids, and provides good drainage.
It’s typically chosen over traditional fills when there are concerns about soil stability, utility protection, or where quick backfilling is needed to keep projects on schedule.
Under-slab fill and slab-on-grade applications
Cellular concrete serves as an excellent under-slab fill, providing insulation, frost protection, and void filling. It’s used in slab-on-grade projects and for retrofits.
Considerations: It supports the slab, controls settlement, and integrates well with vapor barriers. Its low density reduces dead-load on slabs.
In cold regions, cellular concrete helps prevent frost heave by keeping the subgrade temperature above freezing. For radiant systems, it provides a stable base for tubing or panels.
Design, Specifications, Standards, and Cost Considerations
Design objectives center on achieving target density, strength, and thermal performance suitable for trench backfill or under-slab use. Align these with project expectations and local requirements before selecting a mix.
Expect to review foam volume, cement ratios, aggregate size, and curing methods. Also plan for tests, documentation, and how to budget equipment, labor, and lifecycle considerations.
Material specs and standards explained
Choosing the right material is crucial for a successful project. Here’s what you need to consider:
- Density: Target 10-20 lbs/ft³ for trench backfill, 15-25 lbs/ft³ for under-slab fill. Too low and it floats; too high and it’s heavy.
- Compressive Strength: 500-3000 psi. Higher strength for load-bearing applications, lower for void fill.
- Flowability (Slump): 6-12 inches. Too little and it doesn’t flow; too much and it collapses.
- Curing: Moisture-cured or steam-cured. Check local climate and site conditions.
- Foam Volume: 30-60% by volume. Too little foam and it’s heavy; too much and it’s weak.
Cost analysis and budget planning
Budgeting for cellular concrete involves several cost factors:
Material: Cost varies by density, foam volume, and region. Expect $50-$150/yd³.
Pumping: Rental or hired service. Plan on $200-$600/day plus fuel.
Site Prep & Disposal Savings: Cellular concrete reduces site prep and disposal costs compared to traditional backfill.
Estimate project cost drivers: volume needed, pumping days, site access, and disposal savings. Compare with traditional backfill options.
Practical Installation Guidance and DIY Step-by-Step
This section defines what a DIYer can reasonably accomplish and when you should bring in a professional for design or complex placement. Clear limits help protect the structure and the project timeline.
Prepare the site safely, follow manufacturer guidance, and sequence mixing, placement, and curing to prevent segregation and cracking. Use a straightforward checklist to verify consistency and catch issues early.
Tools and materials checklist
Before you start your cellular concrete project, ensure you have all necessary tools and materials at hand. This will save time and prevent delays.
- PPE: Hard hat, safety glasses, work gloves, steel-toed boots, and high-visibility vest.
- Tape measure: To ensure accurate dimensions for trench excavation and slab preparation.
- Shovel and rake: For manual site prep and leveling.
- Trench box or shields: For safe trenching, if required.
- Concrete mixer (rental): For on-site batching of cellular concrete.
- Pump (rental): For placing cellular concrete in trenches and under slabs.
- Air-entraining agent: To add to the mix as per manufacturer’s recommendation.
- Testing tools: Moisture meter, air content meter, and density gauge for quality checks.
Quick rule: Always double-check your checklist before starting work. Missing items can lead to delays or poor results.
Step-by-step: trench backfill process
Follow this step-by-step guide for a successful cellular concrete trench backfill project.
- Site prep: Clear the area, ensure access for equipment, and check weather conditions. Why? To prevent delays and ensure safety.
- Excavate trench: Dig to required depth and width, ensuring stability of sides. Check: Trench is straight and level.
- Prepare bedding: Lay a layer of well-compacted granular material at the bottom. Why? To provide a stable base for the cellular concrete.
- Batch cellular concrete: Mix according to manufacturer’s instructions, aiming for a slump of 4-6 inches. Check: Consistency and temperature are within specified ranges.
- Pump cellular concrete: Pump the mix into the trench, ensuring even distribution. Why? To avoid voids and ensure proper compaction.
- Level and compact: Use a vibrator or tamper to level and consolidate the cellular concrete. Check: No bridging or overworked soils.
- Inspect: Check for any voids, unusual densities, or other issues. If yes: Consult a professional immediately.
Step-by-step: under-slab fill process
Follow this step-by-step guide for successful under-slab placement of cellular concrete.
- Prepare substrate: Compact the soil, ensure it’s level and stable. Why? To provide a solid base for your slab.
- Lay vapor barrier: Install a poly sheet to prevent moisture migration. Check: Barrier is intact and overlaps properly.
- Formwork and reinforcement: Set up forms, place rebar as per design. Why? To support the slab and add strength.
- Batch cellular concrete: Mix according to manufacturer’s instructions, aiming for a flow of 12-16 inches. Check: Consistency and temperature are within specified ranges.
- Pour/pump cellular concrete: Fill the formwork or pump under the slab, ensuring even distribution. Why? To avoid voids and ensure proper compaction.
- Level and finish: Use a screed to level the top of the slab, then float and trowel for a smooth surface. Check: No low spots or high points.
- Protect temporarily: Cover the slab with plastic sheeting to retain moisture during curing. Why? To promote proper curing and strength development.
Safety, DIY Limits, and Common Mistakes
Safety comes first with PPE, trench safety, and awareness of electrical and moisture hazards. Always reference local codes and guidelines when planning any backfill or slab work.
Know when to involve a licensed contractor or engineer, especially for load calculations, reinforcement, or complex forms. Troubleshooting quick references help you pause work and seek expert advice when signs of trouble appear.
Safety guidelines and precautions
Personal Protective Equipment (PPE): Wear a hard hat, safety glasses, gloves, and steel-toed boots. Use a dust mask when handling dry materials.
Handling Wet Material: Keep your distance from the pour area to avoid splash injuries. Use proper lifting techniques for bags of mix components.
Site Ventilation: Ensure adequate ventilation in enclosed spaces like trenches to prevent asphyxiation. Use a fan if necessary.
Traffic Control: Implement traffic control measures around the work area to prevent accidents. Stop and call a professional if you notice any electrical hazards or unstable trench walls.
DIY limits and when to hire professionals
Stick to small, non-structural tasks like preparing the site, mixing small batches of cellular concrete, or simple backfilling. Leave complex tasks to licensed contractors.
Load Calculations and Slab Design: These require a structural engineer’s expertise. Incorrect calculations can lead to slab failure.
Reinforcement and Complex Forms: Hire professionals for these tasks. Improper reinforcement can cause cracking, while complex forms need expert handling to prevent leaks or misalignment.
Permits: Check local codes and obtain necessary permits before starting any work. DIY projects may still require permits depending on your location and the scope of work.
Common mistakes and troubleshooting
Learn from these common errors to avoid costly rework:
- Improper Density Control: Inconsistent mix ratios can lead to weak cellular concrete. Always follow the manufacturer’s guidelines.
- Poor Substrate Preparation: Unprepared surfaces can cause adhesion issues and slab settlement. Ensure the substrate is clean, dry, and primed if necessary.
- Inadequate Compaction: Insufficient compaction can result in voids and reduced strength. Use a vibrator or tamper to ensure proper compaction.
- Ignoring Drainage: Poor drainage can cause water buildup, leading to slab heaving or cracking. Ensure proper drainage before pouring.
- Poor Curing or Joint Sealing: Inadequate curing and joint sealing can cause premature slab failure. Follow the recommended curing schedule and seal joints properly.
If you notice signs of failure like settlement, cracking, or heaving, stop work immediately and consult an expert. Early intervention can prevent minor issues from becoming major problems.
Conclusion
Cellular concrete backfill and under-slab fills can save time and improve durability when you do it right, but safety and correct curing choices matter as much as strength and cost. Get the job solid and the finish clean by following proven steps from design to placement and inspection.
First, confirm the project fits local design expectations, check trench and slab dimensions, prepare a small test batch to verify mix behavior and curing, set up proper formwork and access, manage moisture and temperature during curing, and document the steps for quality control and future maintenance. Keep the sequence simple: verify specs, mix correctly, test a small area, place in lifts with even compaction, protect while curing, and inspect before you backfill further or pour over it. Use proper PPE, control dust and spills, and never rush setting or curing; the material needs time to gain strength before load or further work.
Common mistakes to avoid are skipping a test batch or ignoring the specified mix proportions, letting the material cure in direct sun or wind without protection, and failing to control moisture or curing time. Other pitfalls include inadequate formwork or backfill sequencing, uneven placement or under-compacting, and ignoring safety checks around utilities. Remember: if you’re unsure about design requirements, mixing ratios, or load conditions, pause and verify with notes from the project specs, or consult a professional. When the project involves structural loads, complex trenching, or uncertain standards, call in a qualified contractor. Stay patient, test small first, and the result will look right, perform well, and stay durable for years to come.
FAQ
What is cellular concrete and how did it develop?
Cellular concrete is concrete with air or foam bubbles embedded to reduce density. It was developed to lower weight and improve insulation in various construction tasks. Early versions used simple foaming techniques and evolved with modern admixtures and production methods.
What are common names and how does it relate to foam or air-crete?
Common names include cellular concrete, foamed concrete, and aerated concrete. They all refer to the same idea—mixing air into the cement matrix to create a lighter material. Check product labels or manufacturer instructions to confirm terminology for a given batch.
How is cellular concrete made and what affects its density?
It’s made by introducing air or foam into a cementitious mix so bubbles are distributed throughout. The amount and size of the bubbles, plus mixing method and water content, drive density. For exact density ranges and acceptable mixes, refer to the supplier’s instructions and local rules.
What are the key properties and main advantages for trench backfill and under-slab fill?
Cellular concrete is lighter than conventional concrete, provides insulation, and can improve drainage. It can reduce loads on ground and allow for easier handling on site. Its durability and fire-related properties depend on the mix, so always follow the manufacturer’s guidance and verify suitability for your project.