
Introduction
SCC, or self-consolidating concrete, is a flowable mix that settles around dense rebar without vibration. For DIY, this means less hammering and fewer air pockets, but you still need good formwork and clean rebar. Always check the product label and local rules for any restrictions or requirements on your project.
Advantages and disadvantages depend on your setup: SCC can save time in tight spaces but may cost more and require careful proportioning and handling. Use cases favor SCC for pours with dense rebar or crowded forms, while regular concrete can work well where vibration is easy and access is good. When working with dense rebar, plan ahead for tools, materials, and reliable resources, and follow manufacturer instructions and local guidelines for mixing, placement, and curing.
Key takeaways
- Know the concrete types: SCC flows easily; regular concrete requires vibration.
- Dense rebar planning: use bigger window for SCC placement and consolidation.
- Tools and resources: consult manufacturer instructions and local codes for mix options.
- Safety first: prevent dust and fumes; provide proper PPE and ventilation.
- Cost considerations: compare material requirements and labor for SCC versus regular.
- Best-use guide: SCC for complex rebar clusters; regular for simple forms.
Table of Contents
- Introduction
- Key takeaways
- What SCC and Regular Concrete Are — Clear Definitions
- Advantages and Disadvantages of SCC and Regular Concrete
- Best Applications — Where Each Material Performs Best
- Working with Dense Rebar — Planning and Placement Strategies
- Practical Next Steps and Trusted Sources
- DIY Feasibility — What Homeowners and Small Contractors Can Realistically Do
- Safety, Quality Control, and Visual Checkpoints
- Cost Comparison, Common Mistakes, and a Decision Checklist
- Conclusion
- FAQ
What SCC and Regular Concrete Are — Clear Definitions
Self-Compacting Concrete, or SCC, is a flowable mix that settles into forms under its own weight without needing mechanical vibration. It sticks together well enough to move through tight spots yet remains cohesive enough to prevent segregation. In contrast, conventional concrete relies on vibration to fill forms and push air out, which changes how you place and finish it.
Key rheology differences matter in dense rebar zones: flowability, viscosity, and passing ability determine how well the mix can flow around clusters of reinforcing steel without sacrificing surface finish. SCC is designed to be highly flowable with controlled viscosity, reducing the need for aggressive compaction. Traditional concrete needs vibration to achieve consolidation, especially where rebar is crowded or forms are complex.
What is SCC?
SCC, or Self-Compacting Concrete, is a high-flow concrete that doesn’t need vibration to settle and consolidate. It’s made with cement, fine aggregates like sand, and specific admixtures that give it its unique properties.
Imagine pouring liquid into a glass – that’s how SCC flows through forms and around rebar. No shaking or vibrating needed, making it easier on workers and equipment.
Key to SCC: High flowability, low viscosity, and passing ability through dense rebar zones.
What is regular (conventional) concrete?
Regular concrete behaves differently. It’s more like thick soup than liquid. To settle and consolidate, it needs vibration or mechanical consolidation.
The basic components are the same – cement, water, sand, and coarse aggregates. But the mix design and admixtures make it less fluid.
Key to regular concrete: Lower flowability, higher viscosity, and requires external compaction.
Key performance differences
SCC flows better, reducing segregation risk. It finishes smoother with less effort. But it’s sensitive to mix design and needs careful batching.
Regular concrete is more forgiving in mix design but requires vibration for consolidation. It can be trickier to finish smoothly in dense rebar zones.
Choose based on your needs: SCC excels in tight spaces, regular concrete is better where vibration’s accessible.
Advantages and Disadvantages of SCC and Regular Concrete
For dense rebar, SCC provides superior workability and cohesiveness, helping it to move around congested shapes without separation. It often reduces vibration time and can improve surface finish in tight spaces. However, SCC can be more prone to bleed or laitance if the mix design isn’t properly balanced for the specific formwork and curing conditions.
Regular concrete, while more equipment-intensive on site, can be simpler to mix and less sensitive to certain inconsistencies in aggregates or admixtures. It typically carries a lower upfront mix cost but may require more labor to compact and finish in dense reinforcement. The choice hinges on rebar layout, finish requirements, and the project’s schedule and budget constraints.
Advantages of SCC
SCC’s high flow allows it to pass through dense rebar easily, reducing the need for vibration. This means less labor and faster placement times.
Improved surface finish: Due to its self-leveling nature, SCC provides a better surface finish without additional effort.
SCC can also speed up construction as it requires less time to place and compact compared to regular concrete. This is particularly beneficial in projects with tight timelines.
Disadvantages and limitations of SCC
Material sensitivity: SCC is more sensitive to variations in materials and admixtures. Any deviation can lead to poor performance or segregation.
Stricter quality control is required for SCC. On-site checks like slump flow, T 50/50, and J-ring tests are crucial to ensure the concrete meets standards around dense rebar.
SCC may come at a higher cost due to the need for specific admixtures and the precision required in mix design.
When regular concrete is preferable
Regular concrete is simpler and more economical when it comes to mass pours. It’s robust and can handle variations in materials better than SCC.
For low-rebar elements or areas with limited pump access, conventional concrete might be a better choice. Regular concrete can still be placed effectively even if vibration is required.
If the project has a long curing period or isn’t time-sensitive, regular concrete could be more suitable due to its lower cost and less stringent quality control requirements.
Best Applications — Where Each Material Performs Best
Use SCC when you have heavily reinforced areas prone to honeycombing or where access for vibration is limited, such as complex slabs or densely clustered columns. Look for projects where pumpability and quick form release matters without sacrificing finish quality. For simpler forms or exposed surfaces where vibration is manageable, traditional concrete with vibration can be a practical choice.
Real-world examples include heavily reinforced slabs and transfer decks where flow and finish are critical, versus straightforward pours with minimal congestion where a standard mix works fine. Check local guidelines, supplier recommendations, and jobsite performance data to confirm what works best for your form geometry and curing plan.
Best uses for SCC
SCC shines where high flowability and self-leveling are needed. Think:
Heavily reinforced slabs: SCC flows around dense rebar, reducing honeycombing.
Precast forms: Complex shapes and congested reinforcement benefit from SCC’s pumpability and segregation resistance.
Architectural sections: Excellent finish requirements are met with SCC’s ability to fill intricate details without vibration.
Best uses for regular concrete
Regular concrete is great where vibration is easy and cost is a factor. Consider:
Slabs-on-grade: Simple formwork, low-visibility surfaces make conventional mixes ideal.
Large-volume pours: Regular concrete’s lower cost per cubic yard makes sense for big projects.
Simple formwork: Easy access for vibrators and simple forms keep costs down.
Choosing for dense rebar situations
When reinforcement congestion is high, consider these factors:
Element thickness: Thinner elements may need SCC to ensure proper consolidation.
Accessibility: If vibrators can’t reach all areas, SCC’s self-consolidating nature helps.
Finish requirements & structural specs: High finish demands and strict structural requirements often lean towards SCC.
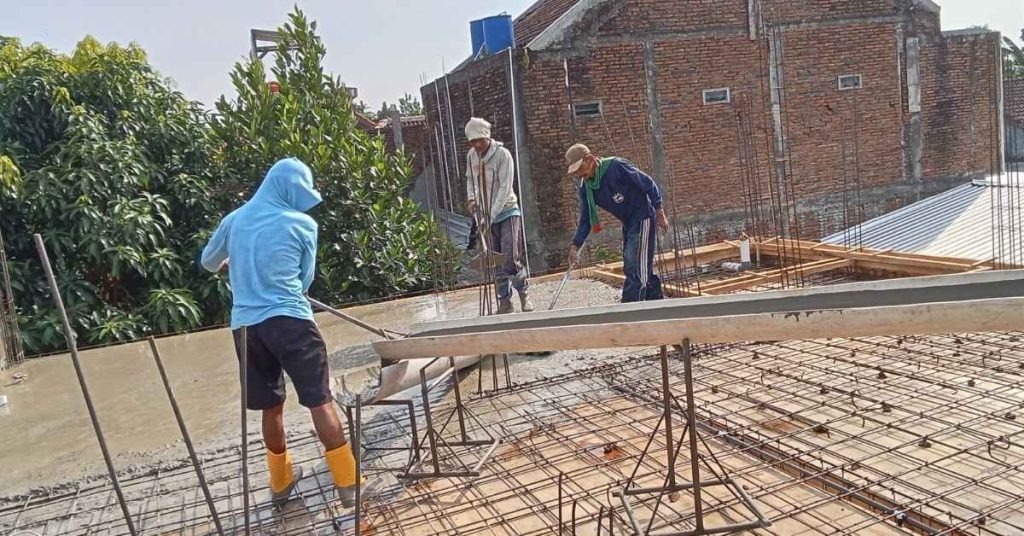
Working with Dense Rebar — Planning and Placement Strategies
Planning around dense rebar starts with aligning formwork and reinforcement to minimize voids and ensure proper cover. Consider how the chosen concrete type will flow and whether you will rely on vibration or pump placement. Set up pour sequencing and access routes to keep the mix moving smoothly and reduce segregation risk.
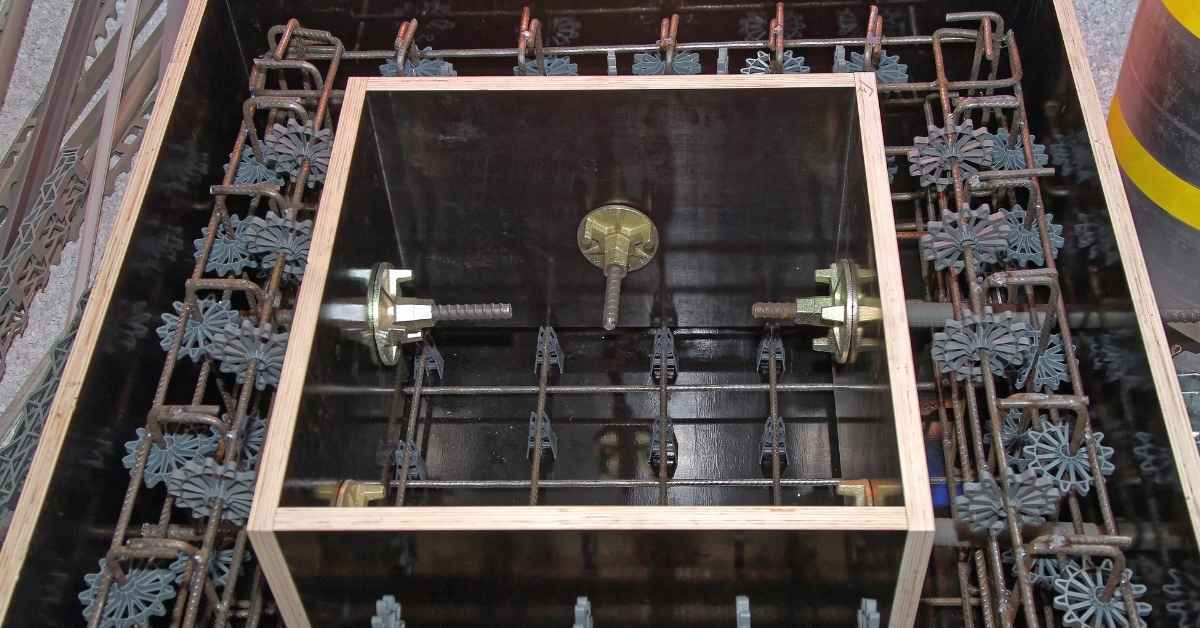
Formwork and spacers play a big role in dense zones, as do shoring and support during placement. Decide early whether SCC or regular concrete best fits the form geometry and your crew’s ability to manage compaction and finishing. Verify that curing plans accommodate the chosen method and environment.
How SCC performs with dense rebar
Self-compacting concrete (SCC) is designed to flow through tight spaces, making it ideal for dense reinforcement. With the right mix design and proper anti-segregation measures, SCC can pass through bars spaced as close as 50 mm center-to-center.
Key: SCC’s ability to self-level and consolidate means it can fill voids between closely spaced bars without additional vibration. However, ensure your SCC mix is flowable enough to pass through the rebar mesh without blocking.
Remember, even with SCC, there are limits. If reinforcement is too dense (bars closer than 50 mm), segregation may occur, leading to weak spots in your concrete. Always consult with a structural engineer for dense reinforcement placements.
How to place regular concrete with dense rebar
Placing regular (conventional) concrete with dense rebar requires careful planning and technique. Here’s how:
Staged placement: Pour concrete in small sections, moving from one end of the formwork to the other. This helps prevent cold joints and ensures proper consolidation.
Targeted vibration: Use needle vibrators or immersion vibrators to consolidate concrete around dense reinforcement. Vibrate only until concrete starts to flow; over-vibration can cause segregation.
Access matters: Ensure your team has access to all areas of the formwork, especially high-rebar zones. Poor access can lead to inadequate consolidation and weak spots in your concrete.
Formwork, access, and sequencing tips
Proper formwork, access, and sequencing are crucial when working with dense rebar. Here’s what you need to know:
Form strength: Ensure your formwork is strong enough to withstand the pressure of concrete placement, especially in high-rebar zones.
Pour heads and pump vs bucket: Use pour heads or a concrete pump for better control when placing concrete. This helps minimize segregation and ensures proper consolidation around dense reinforcement.
Sequencing to avoid cold joints: Pour concrete in a logical sequence, moving from one section of the formwork to another without creating cold joints. This helps maintain the structural integrity of your concrete.
Practical Next Steps and Trusted Sources
Create a practical checklist for tools, forms, and materials before the pour, including recommended admixtures and PPE. Establish a clear sequence for dense-rebar pours and identify which steps require vibration or pumping. Gather reliable references from manufacturers and standards groups to align your plan with accepted practices.
Document expectations for flow, finish, and curing, and set up simple in-field checks to catch issues early. Use trusted sources to confirm mix compatibility, placement windows, and testing procedures, and keep notes for future bidding and planning discussions.
Tools and equipment checklist
Before you start, ensure you have the right tools for the job. Here’s a quick checklist to help you.
- Pump: Essential for SCC, helps control flow and reduces segregation.
- Mixer: A powerful mixer ensures consistent concrete mix.
- Vibrator: While SCC needs less vibration, you’ll still need one to remove air pockets.
- Screed: Helps level and finish the concrete surface.
- PPE (Personal Protective Equipment): Safety glasses, hard hat, gloves, and boots are a must.
- SCC-specific tools: Flow meter, slump cone for testing flowability.
- Rebar cutter/bender: For precise rebar cutting and bending on-site.
- Formwork equipment: Scaffolding, clamps, ties, and wedges for form setup.
Quick rule: Always check your tools before starting. Faulty equipment can lead to weak concrete or safety hazards.
Materials, admixtures, and testing needs
Choosing the right materials is crucial for a successful pour. Here’s what you need to consider:
- Aggregates: Well-graded aggregates ensure good flow and strength. Avoid excessive fines or large particles.
- Cement: Use Type I or II cement for most projects. Check the fineness and specific surface area.
- Superplasticizer: Helps reduce water demand, improve flow, and enhance strength. Look for a viscosity-modifying type (VMA) for SCC.
- Air-entraining admixture: Improves freeze-thaw resistance. Check the air content and stability.
- Cured-seal options: Consider using cured membranes or sealers to protect the concrete surface from moisture loss and staining.
Quick tip: Always test your materials on-site before pouring. Wrong materials can lead to weak, porous, or discolored concrete.
Reliable resources and who to consult
Consulting the right people and resources can save you time and ensure a successful pour. Here’s who to turn to:
Structural Engineer: They design the structure, so they know best about rebar placement, formwork, and concrete types.
Ready-Mix Supplier: They can provide tailored mix designs based on your needs. Ask for trial mixes to test flowability and segregation resistance.
Industry Standards and Technical Guides: ACI 318 (Building Code Requirements for Structural Concrete) and local codes are invaluable resources. Also, consult manufacturer documents for their products.
DIY Feasibility — What Homeowners and Small Contractors Can Realistically Do
For DIY projects with moderate rebar density, start with smaller, non-structural pours to learn how SCC behaves in your forms. Assess your mixing, placing, and finishing skills, and be realistic about equipment needs such as pumps or flowable mixes. Know when the scope or risk level warrants a pro review or supervision.
Prepare a clear plan for formwork, rebar spacers, and cure management, and be ready to adjust if observations show signs of poor consolidation. If the reinforcement layout is complex or load-critical, use professional help to verify the design and placement guidelines.
DIY-friendly projects and required skills
For DIYers, small projects with SCC in dense rebar contexts are practical. These include non-structural countertops, small footings, simple slabs, walkways, and garden walls.
To tackle these, you’ll need essential skills and preparation:
Mixing: Understand how to mix SCC to the right consistency for your project. Placement: Know how to pour and spread concrete without causing segregation or honeycombing. Compaction: Use vibrators to ensure dense, void-free concrete around rebar.
Projects to avoid as DIY — when to hire professionals
Certain projects with SCC and dense rebar are best left to professionals. These include critical structural elements, complex formwork, or where mix control and pumping are required.
- Structural slabs: Incorrect pours can lead to structural failures.
- Complex formwork
- Pumping requirements: Long distances or high volumes need professional pumping equipment.
- Critical mix control: Admixtures for SCC must be precisely measured to avoid issues.
: Intricate shapes require expert setup and dismantling.
If you’re unsure, consult a pro. It’s better to spend on expertise than risk costly mistakes.
Step-by-step planning for a DIY pour
Proper planning ensures your SCC pour goes smoothly. Here’s a concise sequence:
- Check design and specs: Ensure your plans are accurate and meet local codes.
- Source material and trial mix: Order materials, then test your mix design on-site to ensure it meets requirements.
- Tool check: Gather all necessary tools – mixer, vibrators, forms, trowels, etc. – before you start.
- Site prep: Clean and level the area, set up formwork, and place rebar according to your plan.
- Placement plan: Map out pour locations and sequences to avoid overworking concrete or causing segregation.
- Pour and consolidate: Follow your placement plan, using vibrators to ensure proper consolidation around rebar.
- Surface finishing: Level and finish the surface as required by your project.
- Curing practices: Follow recommended curing procedures to prevent premature drying and cracking.
Safety, Quality Control, and Visual Checkpoints
Establish a safety framework covering all stages of the pour, including rebar handling, overhead work, and fall protection. Define PPE requirements and lockout procedures for equipment to prevent injuries. Review site-specific hazards and tailor controls accordingly.
Implement quality checks such as forms, spacers, and surface cleanliness before the pour. During placement, monitor consolidation behavior, temperature, and early curing to spot issues quickly. Use visual cues like surface uniformity and absence of obvious voids to judge progress and plan corrective actions.
Safety and PPE for concrete work
Before you start any concrete work, ensure you’re protected. Use this checklist to gear up right.
- Hard Hat: Protect against falling objects.
- Safety Glasses: Shield eyes from debris and splashes.
- Steel-toed Boots: Guard feet from heavy equipment and dropped tools.
- Gloves: Protect hands from cuts, burns, and chemicals. Choose rubber for wet work, leather for handling rebar.
- High-vis Clothing: Increase visibility to equipment operators.
- Respirator: Protect against dust during cutting/grinding. Use when required by OSHA standards.
- Ear Protection: Guard against loud equipment noise.
- Lockout/Tagout: Ensure equipment is safe before operating or maintaining it.
- Fall Protection: Use harnesses and anchors for overhead work, deep forms, or sloped surfaces.
Quick rule: Always wear PPE. It’s your first line of defense against job site hazards.
On-site quality checks and simple tests
Regularly check concrete quality during placement to ensure a strong, durable pour. Use this checklist for both SCC and regular concrete.
- Slump/Slump-Flow: Check flowability (SCC) or consistency (regular) using ASTM C143/C143M test. Adjust mix as needed.
- Air Content: Verify air content with a pressure meter (ASTM D6767). Too much air weakens concrete, too little causes bleeding.
- Concrete Temperature: Maintain temperature between 50°F and 90°F (10°C to 32°C) for proper setting. Use insulated forms or heating/cooling blankets if needed.
- Consolidation: Check regular concrete compaction with a nuclear gauge (ASTM C1715). SCC should consolidate on its own.
- Bleed Water: Observe bleed water. Too much indicates segregation or excessive water content.
- Rebar Coverage: Ensure rebar is fully encapsulated with at least 2 inches (50 mm) of concrete.
- Finishing: Check surface finish. Excessive laitance or segregation indicates problems with mixing, transport, or placement.
Quick rule: Regular checks ensure quality. Don’t rely on luck; test your concrete.
Visual checkpoints and common defects
Inspect the fresh and hardened concrete for signs of proper placement, filling, and finishing. Use this checklist to spot issues early.
- Surface Appearance: Fresh concrete should have a uniform color and texture. Discoloration or patchiness indicates problems.
- Honeycombing: Look for voids in the surface, indicating poor consolidation or inadequate vibration (regular concrete).
- Voids Around Rebar: Check rebar encapsulation. Voids indicate insufficient concrete coverage, which weakens the structure.
- Segregation/Laitance: Excessive laitance or segregation indicates problems with mixing, transport, or placement. It can weaken concrete and affect surface finish.
- Cold Joints/Washout: Check for cold joints (where new concrete meets old) and washout (concrete loss due to bleeding). Both can weaken the structure.
Quick rule: Regular visual checks help catch defects early. Address issues promptly to prevent costly rework.
Cost Comparison, Common Mistakes, and a Decision Checklist
Understand the main cost drivers, including materials, labor, equipment, and potential savings from reduced vibration time. Consider how pumping or delivery needs affect overall project cost and schedule. Use a framework to compare SCC and regular concrete for your specific job conditions without assuming fixed prices.
Be aware of common mistakes such as overusing SCC in unsuitable spots or underestimating the need for proper slump control. Use a simple decision checklist that weighs rebar density, form complexity, access for pumping, finish requirements, and project timeline to guide your choice.
What affects cost and how to compare
Before comparing SCC vs regular concrete, understand what drives their costs.
- Material Costs: Ask about cement, fly ash, silica fume, and admixture prices per cubic yard.
- Labor Savings: SCC reduces labor for vibration/compaction. Ask suppliers if this is factored in.
- Formwork Savings: SCC’s self-leveling nature can reduce formwork needs. Inquire about potential savings.
- Equipment/Pumping Needs: SCC requires specific pumping equipment. Ask about rental or purchase costs.
- Trial Mixes: Some suppliers include trial mixes in their quotes. Others charge extra.
- Rejects/Waste: Segregation or failed placements can lead to waste. Ask how this is handled.
- Curing/Containment: SCC may reduce curing time/containment needs. Verify if savings are significant.
- Project Size: Larger projects might see lower total installed costs with SCC despite higher material prices.
Quick rule: Always ask suppliers for a detailed breakdown of costs to make an informed decision.
Common mistakes when selecting or placing concrete
Avoid these pitfalls when choosing and pouring SCC or regular concrete.
- Wrong Mix Selection: Don’t assume SCC is always better. Regular concrete might be sufficient and cheaper.
- Inadequate Trial Mixes: Skipping trial mixes can lead to poor performance. Always insist on them.
- Poor Formwork: Insufficient formwork support can cause SCC to leak or collapse. Ensure forms are sturdy enough.
- Wrong Placement Method: SCC requires proper pumping and placement techniques. Ignoring this can result in poor finish quality.
- Ignoring Engineer Specs: Disregarding specified mix designs, slump levels, or placement methods can lead to failed placements.
- Improper Slump/Visco Control: Too much or too little slump/viscosity can cause issues. Maintain the right balance.
- Insufficient Consolidation: Inadequate consolidation in dense rebar sections can lead to honeycombing and reduced strength.
- Incorrect Admixture Dosages: Too much or too little admixtures can affect SCC’s performance. Stick to recommended dosages.
Quick rule: Always follow engineer specs, conduct trial mixes, and use proper placement techniques to avoid costly mistakes.
Quick decision checklist
Use this checklist to decide whether SCC or regular concrete is right for your project.
- Rebar Density: High rebar congestion favors SCC’s better flow properties. Check if your project has dense rebar sections.
- Formwork Complexity: Simple forms favor SCC due to its self-leveling nature. Complex forms might need regular concrete for better control.
- Access/Space for Pumping: SCC requires space and access for pumping equipment. Check if your site accommodates this.
- Required Finish Quality: High finish quality needs might favor regular concrete’s better compaction control. Assess your project’s finish requirements.
- Schedule Pressures: Tight schedules can benefit from SCC’s faster placement and reduced labor needs. Consider your project’s timeline.
- Budget Constraints: Regular concrete is often cheaper. If budget is tight, consider regular concrete or optimize SCC mix designs to reduce costs.
- Testing Requirements: SCC requires specific tests (slump flow, J-ring, V-funnel). Ensure you can conduct these tests on-site.
- Readiness for SCC Practices: Implementing SCC requires proper batching and curing practices. Ensure your team is ready to adopt these practices.
Quick rule: Consider all factors before deciding. SCC isn’t always the best choice, but it can offer significant benefits in the right project.
Conclusion
When working with dense rebar, your best path is plain language, careful planning, and a focus on safety and durability. Use the mix that fits the task, control flow and compaction, and avoid cutting corners that ruin appearance or strength.
Make the plan explicit: confirm the structural requirements, inspect the rebar layout, choose the appropriate mix, size the forms, mix and place in workable batches, verify slump and flow, vibrate and consolidate without overworking, finish cleanly, and ensure proper curing and protection. Start small if you’re unsure, test a short pour, and document results so you can adjust next time.
Common mistakes to avoid are skimping on formwork or joints, overwatering or drying cracks, neglecting compaction in tight rebar areas, and skipping curing or protective measures. Always wear PPE, keep your work area stable and free of trip hazards, and never rush a critical pour. If the project involves complex detailing, very dense reinforcement, or high load paths, call in a pro rather than pushing through alone; bigger pours and challenging layouts are where the risk climbs. Stay disciplined, and you’ll get a solid, durable finish that lasts.
FAQ
When should I choose self-consolidating concrete (SCC) vs. regular concrete for dense rebar work?
Choose SCC when you need easy flow around tight rebar without vibrating. For simple pours or when you don’t have good access for vibration, regular concrete with proper vibration can work, but you’ll need more careful placement.
How does SCC behave with dense rebar, and what should I watch for on site?
SCC flows around rebar and fills voids more reliably, but keep an eye on adequate consolidation to avoid float or segregation. Always follow the product label and manufacturer instructions for slump, cure, and placement around rebar.
What are the main cost and material planning differences between SCC and regular concrete?
SCC typically costs more per yard and may require different mix components or additives. Check local supplier options and get exact quotes; compare it to regular concrete with the same slump and cure requirements to decide what fits your budget.
What are the key safety and handling guidelines I should follow for both types?
Wear PPE, work in ventilated areas, and follow all mixer and concrete bag instructions. If you’re unsure about a product’s safety data or recommended handling, read the label and manufacturer’s directions or ask the supplier.