

Introduction
Bad chimney flashing can cause leaks and damage if not fixed.
You’ll learn how to identify common symptoms of failing flashing, understand the main causes, and evaluate when DIY fixes are appropriate. The guide walks through practical, step-by-step approaches and tips you can apply to protect your chimney and roof.
Key takeaways
- Inspect flashing for lifted metal, gaps, or rusted sections along chimney base.
- Look for water stains on ceiling or attic, staining around flue collar.
- Replace or reseal flashing only after removing old mortar or sealant fully.
- Use stainless steel or aluminum flashing; avoid cheap paints that trap moisture.
- Sealant should be weatherproof, compatible with roofing material and flashing.
- If roof pitch inaccessible, hire pro to avoid fall hazards and code issues.
Table of Contents
- Introduction
- Key takeaways
- What is chimney flashing and why it matters
- Common causes of bad chimney flashing
- Signs and symptoms of failing chimney flashing
- DIY inspection checklist and visual checkpoints
- Common DIY fixes for chimney flashing problems
- Safety precautions and common DIY mistakes to avoid
- Cost comparison: DIY vs. professional repair and when to hire
- Long-term maintenance and prevention strategies
- Conclusion
- FAQ
What is chimney flashing and why it matters
Chimney flashing is the metal barrier that seals the roof-to-chimney junction, and it’s different from the general roof flashing you see around hips and valleys. Common materials are aluminum, galvanized steel, and copper, each with trade‑offs for DIY work: aluminum is light and easy to form, galvanized steel is sturdy but can rust if coatings fail, and copper resists corrosion but costs more; check the label or datasheet for specifics.
Its primary job is to direct water away from joints, seal gaps, and integrate with the roofing material so shingles or tiles sit properly over it. You’ll see configurations like step flashing, counter flashing, and sometimes cricket or boot considerations depending on the chimney and roof setup, and each is chosen to fit the junction best. If flashing fails—loose pieces, gaps, rust, or peeling sealant—water can work its way under shingles and into the attic, causing leaks and damage; use the product label/datasheet for guidance on installation details and suitability for your roof.
Types of flashing and where they sit
Flashing around chimneys comes in different types, each designed to fit specific areas. Step flashing is the most common, used along the sides of the chimney where it meets the roof shingles. It’s installed as you lay down the shingles, creating a watertight seal with each row.
The counterflashing, on the other hand, goes over the step flashing and attaches to the chimney itself. This piece is crucial for preventing water from getting behind the step flashing. At the base of the chimney, you’ll find an apron or base flashing that covers the bottom edge where the roof meets the chimney.
For chimneys with a slope on one side, like a saddle or cricket, special cricket flashing is used to divert water away from this vulnerable area. This type of flashing can be tricky and often requires professional installation if it’s not done right.
How flashing fails to protect your home
Flashing failure starts with gaps or improper overlaps. When water finds its way through these openings, it can seep into the roof structure and cause significant damage over time. Rust and corrosion are also major culprits; metal flashing that isn’t properly maintained will weaken and allow water to penetrate.
The biggest risk is when water follows the path of least resistance inside your home. Once it gets past the flashing, it can travel down into the attic or walls, damaging insulation and causing mold growth. This not only leads to costly repairs but also poses health risks due to moisture buildup.
To prevent these issues, regular inspections are key. Look for signs like peeling sealant, loose nails, or visible rust. Addressing small problems early can save you from major headaches down the road.

Common causes of bad chimney flashing
The common causes of bad chimney flashing boil down to the flashing’s two main parts—base or step flashing around the chimney and counter-flashing that seals against it—and how each part can fail, letting water creep in. Improper initial installation, deteriorating or incompatible materials, a cracked crown or mortar, roof aging, ice damage, and debris are the big drivers you can spot from ground or attic checks. Look for gaps, missing sealant, rust on metal pieces, cracked or missing mortar, crown cracking, or damp spots and stains that tell you something isn’t sealing up right.
This matters because once flashing leaks start, water finds gaps and travels in ways you might not expect, so you’ll benefit from clear, at‑a‑glance DIY checks: scan the flashing overlap and joints from the exterior, inspect vent flanges and surrounding shingles, and note interior signs like attic dampness or ceiling stains. You’ll also weigh whether to do quick sealant touch‑ups or a more durable re‑flashing with compatible materials, counter‑flashing, and possible crown repair, always keeping proper overlap and return methods in mind. When to call a pro comes down to how extensive the damage is, the roof height and slope, any structural concerns, prior failed repairs, and the real risk of water intrusion or personal injury.
Weather and environmental damage
The weather takes a toll on chimney flashing over time. Rain, snow, ice dams, and UV exposure can all cause wear and tear that leads to leaks.
Wind-driven rain is especially tough on chimneys. It can force water into small gaps around the flue or where the flashing meets the roof shingles. Ice dams form when melting snow refreezes at the edge of your roof, pushing water back under the shingles and up against the chimney.
UV rays from sunlight degrade rubber and plastic sealants over time. This can lead to cracking and failure of the sealant, allowing moisture in. Storm debris, such as branches or hail, can also damage flashing by creating gaps or puncturing it entirely.
Poor installation and flashing design flaws
Improper installation is a major cause of bad chimney flashing. If the flashing isn’t installed correctly, water can easily find its way into your home.
A common mistake is not providing enough overlap between the roof shingles and the base flashing. This leaves gaps where water can seep in. Another issue is missing kick-out flashing at the corner of a gable roof, which allows water to run down the wall instead of off the roof.
Proper sealing around pipes and vents is crucial but often overlooked. If these areas aren’t sealed correctly, moisture will find its way into your attic or walls over time. Using incompatible materials can also lead to premature failure. For example, aluminum flashing on a galvanized steel chimney can cause galvanic corrosion.
Corrosion, material wear, and roof movement
The materials you choose for your flashing play a big role in how well it holds up over time. The wrong choice can lead to rust, cracking, or weak bonds.
- Rust and corrosion: Iron-based metals like steel will corrode if not properly sealed against moisture. Look for galvanized or aluminum options that resist rust better.
- Thermal expansion: Metal flashing expands and contracts with temperature changes, which can cause cracks over time. Use materials rated to handle thermal movement without failing.
- Aging mortar: Cracked or missing mortar joints allow water to seep into the chimney structure. Regular inspection and repair of these areas is key.
- Incompatible sealants: Using a cheap, low-quality sealant can lead to cracking and failure over time. Opt for high-quality silicone or butyl-based products that last longer.
Signs and symptoms of failing chimney flashing
Interior signs point to flashing issues and often show up after a light leak. Look for water stains, mold or musty odors, and attic insulation saturation; these often mean the flashing at the chimney is failing. Exterior cues—streaks around the chimney, loose or lifted flashing, corroded metal, and damaged mortar—help confirm the problem.
This matters because it guides you when to DIY with temporary fixes and when to call a pro. Do safe checks from ground with binoculars, inspect caulk and joint gaps, watch for gaps around the chimney, and document with photos; then ask a contractor about flashing lift, voids, deteriorated sealant, and the repair scope.
Interior warning signs
When it comes to spotting failing chimney flashing, the first place to look is inside your home. Water stains on walls and ceilings near the chimney are a clear sign that water is getting in. Mold growth and musty odors in attics or basements can also indicate ongoing leaks.
Localized ceiling drips right above the fireplace or around the chimney area should raise red flags. If you notice paint or wallpaper peeling off walls near the chimney, it’s likely due to moisture seeping through compromised flashing.
Another key indicator is wet insulation in your attic. This can lead to a bigger problem if not addressed promptly. Check for dark spots on ceiling tiles and stained insulation around the chimney area.
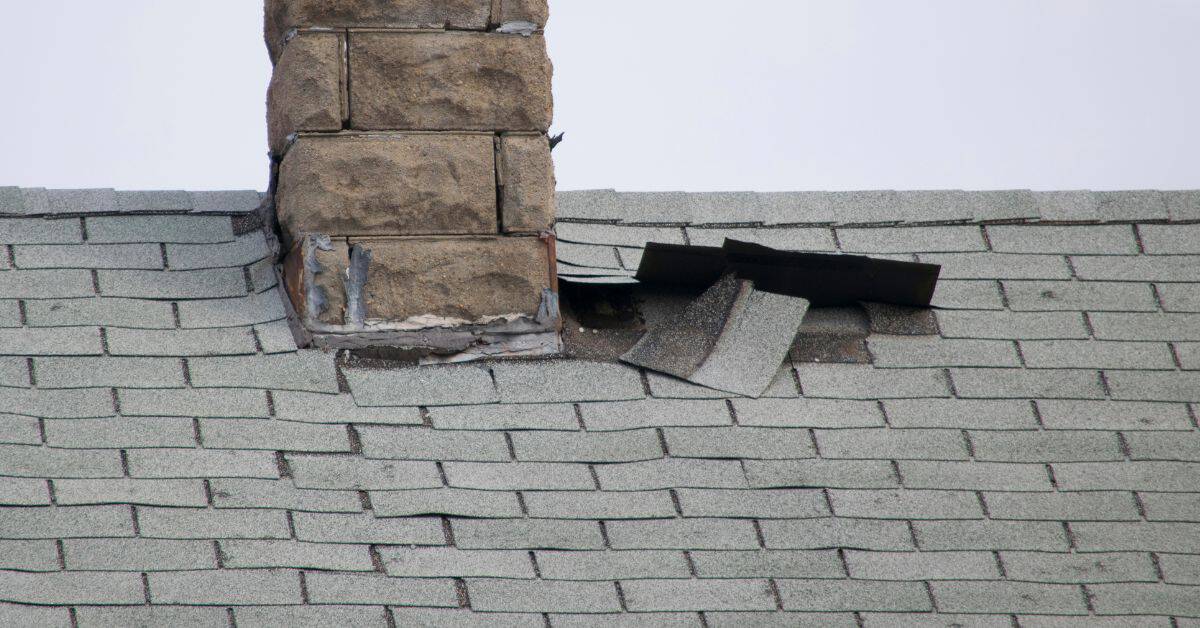
Exterior and roofline signs
The exterior of your home is another critical area to inspect when checking for failing chimney flashing. Look for visible rust or corrosion on metal flashing, which can indicate water damage over time.
Gaps, cracks, or missing mortar around the base of the chimney are clear signs that water can easily enter. Also, check for damaged shingles near the chimney; loose or missing shingles often signal a bigger issue with the flashing.
Debris traps at the bottom of the chimney can also indicate ongoing leaks. If you see leaves and other debris collected there, it’s likely because water is pooling and washing down through these areas. Lastly, pay attention to any sagging in your roofline near the chimney; this could be a sign that water has weakened structural supports.
DIY inspection checklist and visual checkpoints
Start with safety first and outline a simple photo plan before touching any area. Do a step-by-step inspection of the chimney, focusing on the crown and mortar, the flashing along the sides, and the roof/shingle interface, plus any interior signs like water stains. Take date-stamped photos: wide shots for context, close-ups of seams and fasteners, and notes on symptoms without touching damaged areas.
Keep PPE and basic tools ready and document every finding with a short description of location and potential causes. Use the results to separate safe DIY fixes from items that need a pro, and prepare a clear estimate request listing observed damages and recommended actions.
Tools and materials checklist for inspection
Before you start, gather your gear to ensure a thorough and safe inspection.
- Ladder: Use it to reach the roof safely. Skipping this can lead to falls.
- Safety harness: Wear it if working at heights over 6 feet. Not using one risks serious injury or death.
- Flashlight: Check dark areas for water damage and cracks. Missing this tool means you might miss critical details.
- Mortar probe: Test the chimney crown’s integrity by poking around. Without it, you won’t know if mortar is crumbling.
- Camera or smartphone: Take photos of any issues found. No pictures mean no proof for repair estimates.
- Tape measure: Measure gaps and damage accurately. Missing this means rough estimates that may not be useful.
- Notebook and pen: Write down observations and measurements. Not doing so can lead to forgetting details.
- Scale ruler: Use for close-up photos of flashing and mortar joints. Without it, repair pros won’t have accurate dimensions.
Quick rule: Always prioritize safety first before starting any inspection work.
What to photograph and record
Document your findings with clear photos for future reference or to show a contractor.
- Wide shots of chimney: Capture the overall view. Missing this means no context for damage extent.
- Close-ups of flashing details A & B: Focus on specific areas like step and counter-flashing. Not doing so leaves gaps in your documentation.
- Mortar cracks and spalling: Look closely at the chimney crown and joints. Skipping this can hide critical issues.
- Roof shingle condition: Check for lifting, missing nails, or damage near flashing. Not recording this means ignoring potential leaks.
- Interior water stains: Take photos of any ceiling or wall discoloration. Missing these signs can delay necessary repairs.
- Date and weather conditions: Note the date and recent weather when taking photos. Without dates, it’s hard to track changes over time.
Quick rule: Always take both wide-angle and close-up shots for a comprehensive record of your inspection findings.

Common DIY fixes for chimney flashing problems
Spot the signs of DIY trouble: peeling flashing, rusted nails, water stains on ceilings, or leaks after rain. Distinguish minor sealant wear from actual flashing failure and know which fixes you can safely attempt. The aim is a lower-risk, stepwise repair that cleanly seals joints without turning a simple job into a bigger problem.
Prepare with safe roof access, debris cleanup, and selecting the right materials for the job, such as compatible sealants and proper prep. Apply with the expected cure time in mind to keep joints watertight and avoid over-sealing. If you see loose flashing, rust-through, brick mortar deterioration, or crown cracks, stop DIY work and call a pro; routine inspections and regular gutter care help prevent problems.
Temporary patches and sealing
When you spot minor issues like peeling sealant, water stains on the ceiling, or small leaks after rain, a quick fix can buy you time. Start by cleaning the area thoroughly with a wire brush to remove dirt and old sealant. Use roofing cement or waterproof flashing tape as temporary patches.
Apply these materials over any gaps or cracks where water might seep in. Make sure the surface is dry before applying, and press firmly to ensure good adhesion. This won’t last forever but can keep your home protected until you tackle a more permanent fix.
Note that if you see rusted nails or flashing that’s starting to peel off entirely, it’s time for a professional to take over. These are signs of deeper issues that require proper replacement rather than just sealing.
Re-nailing, re-sealing step flashing joints, and shingle repair
If you notice loose flashing or gaps around the chimney, start by checking if nails are still holding tight. If they’re loose, drive them back in firmly to secure the flashing again. This is a quick fix that can prevent further damage.
Next, focus on re-sealing any joints where step flashings meet. Use silicone or urethane sealant for this job. Clean the area first and let it dry before applying new sealant. Make sure you get into all those tight spots to ensure no water can sneak through.
If shingles around the chimney are damaged, replace them carefully. Cut out the old ones and fit in new ones that match your roof’s style. This might seem tricky at first, but it’s crucial for maintaining a watertight seal. Remember to check if there are any signs of deeper issues like cracked mortar or flashing damage before you start.
Replacing flashing sections (when DIY is reasonable)
In some cases, replacing small pieces of flashing can be a viable DIY project. This includes apron and step flashings that are badly damaged or missing entirely. However, always measure twice to ensure you get the right size.
To replace these sections, start by removing any old flashing carefully without damaging surrounding materials. Use new metal sheets cut precisely to fit your chimney’s dimensions. Secure them with roofing nails driven in at an angle for better hold.
Overlap each piece properly according to building codes and manufacturer instructions. This ensures water won’t find its way underneath the new flashing. If you’re unsure about any part of this process, it’s best to consult a professional before proceeding.
Safety precautions and common DIY mistakes to avoid
Safety comes first on a roof: wear the right PPE, keep a stable ladder, use roof anchors or fall protection, and double-check harness connections before you step out, plus gloves, eye protection, and proper boots. Check the weather, wind, and surface conditions, work with a buddy, and plan a clear exit path so you don’t get boxed in or stranded mid-job, and establish a spotter at the eave if possible. Move deliberately to inspect the roof, identify chimney flashing components, start a controlled work zone, protect surrounding areas from kicked-up debris, and keep a clean path to stepping surfaces at all times.
Common DIY mistakes that create leaks or void warranties include improper flashing installation, using incompatible sealants, over-tightening fasteners, neglecting substrate prep, and skipping substrate tests or inspections. Also avoid temporary fixes that don’t address the root cause, like sticking on a smear of sealant without backing, covering damage without repairing underlying issues, or skipping substrate prep that later undermines waterproofing. Have the right tools and materials on hand—different flashing types, sealants, caulk, roof cement, putty knives—and know when gaps exceed your scope, when damage suggests structural problems, or warranty terms may be void, at which point a professional assessment is warranted.
Roof safety and PPE
Before you start any work on your roof, make sure the ladder is stable and secure. Use a buddy system to help stabilize the ladder while you climb up. Always wear proper personal protective equipment (PPE), including non-slip shoes, gloves, and a hard hat.
Check the weather forecast before starting any work. Avoid working on wet or icy surfaces as they increase your risk of slipping. If there’s strong wind or ice present, it’s best to call in a professional instead of risking injury.
Set up fall protection gear like roof anchors or harnesses if you’re working at heights where falls are possible. Have an escape route planned out and never work alone on the roof. Always have someone nearby who can help in case of emergency.
Installation mistakes that cause repeat failures
Avoid these common errors to prevent future leaks or warranty issues:
- Inadequate overlap: Ensure flashing overlaps properly to direct water away from the chimney. Use a minimum of 4 inches of overlap for effective drainage.
- Incompatible metals: Mixing different types of metal can cause corrosion and weaken your flashing over time. Stick with materials that match or are compatible with existing components.
- Over-relying on sealant: Relying too much on caulk instead of proper flashing will lead to leaks as the sealant deteriorates faster than metal flashing.
- Neglecting substrate prep: A clean, dry surface is crucial for proper adhesion. Clean and prime any damaged or rusted areas before installing new flashing.
Avoid these mistakes to ensure your chimney flashing lasts longer and performs better.
Cost comparison: DIY vs. professional repair and when to hire
Cost for DIY repairs is mostly the materials you need for resealing and flashing, which runs roughly from a low end to a moderate range. Contractor repairs cost more, because you’re paying for labor, removal, reinstall, scaffolding if needed, and any extra chimney work. In short, DIY is cheaper up front, but scope and access push contractor quotes higher.
Understand what drives the price: how much damage there is, how tall the chimney is, and whether flashing must be replaced or just resealed. Use DIY for minor resealing on accessible single-story sections with no interior leaks; hire for active leaks, rot, or high-risk spots. If you’re calling a pro, get at least three quotes, check licenses and warranties, and discuss full replacement versus repair to plan for long-term maintenance and potential warranty coverage.
Budgeting for repairs and full replacement
When tackling chimney flashing issues, start by budgeting for the materials you’ll need. For minor resealing jobs, expect to spend around $40–$150 on sealant, roofing cement, and new flashing strips.
If your repair involves replacing damaged step flashing or extensive work due to corrosion, costs can rise significantly. Factor in a contingency for hidden water damage that might require additional materials like shingles or even replacement of the chimney crown.
For full replacement, anticipate higher expenses as you’ll need new flashing and possibly scaffolding if your chimney is tall. Professional estimates will vary widely but typically range from $300 to over $1,200 depending on the extent of work needed.
Remember, a thorough inspection can help you avoid costly surprises later. If unsure about the scope or severity of damage, it’s wise to consult with a professional before finalizing your budget.
When to call a pro and what to expect from an estimate
Certain signs indicate the need for professional help, such as extensive rust or structural rot. If your chimney shows significant damage like lifted flashing or repeated leaks, it’s time to bring in a contractor.
A professional will assess the integrity of your chimney crown and check for any mortar damage that could affect stability. They’ll also inspect the roof around the flashing for signs of water intrusion.
When getting estimates from contractors, ask about their licensing, warranties, and whether they offer full replacement or just repairs. Request documentation on previous work and references to ensure you’re hiring a reputable company.
Remember, if your attic shows signs of moisture damage or drywall is affected, professional intervention is crucial to prevent further structural issues.
Long-term maintenance and prevention strategies
A clear annual inspection is the backbone of long‑term flashing life. Check chimney flashing seams, step and kerb flashing, mortar joints, caulk around the base, and any fasteners or nails that show corrosion or loosening. After heavy rain, freezes, or high winds, keep the habit of cleaning debris, resealing or replacing compromised sealant, and verifying there are no leaks when you give a careful roof‑edge water test a go. Do the DIY basics: clean the flashing surface, apply a compatible exterior sealant or metal‑safe sealant tape, address small cracks promptly, and make sure the flashing overlaps properly to shed water away from the chimney.
Keep a simple stock of materials and tools on hand so you’re not chasing parts in a hurry: exterior sealant, flashing repair tape, an exterior caulk gun, putty knife, solvent for caulking, ladder stabilizers, and a basic roofing pry bar. Decide DIY versus pro upfront: hairline cracks and minor sealant failures are DIY; large gaps, rusted or loose flashing, visible movement, persistent leaks, or any sign of structural damage deserve a pro. Tie this to long‑term prevention by scheduling professional resealing every 5–10 years and including chimney flashing checks in your overall roof maintenance plan.
Seasonal inspection schedule and quick maintenance tasks
After storms or seasonal changes like heavy rains, freezing cycles, and windstorms, use this checklist to keep your chimney flashing in top shape.
- Check seams: Look for gaps or cracks. If you find any, reseal them immediately to prevent water intrusion.
- Clean debris: Remove leaves, twigs, and other trash around the base of your chimney. Debris can trap moisture and cause damage over time.
- Inspect step flashing: Look for loose or missing pieces. If you find any issues, re-nail them to prevent water from seeping in.
- Test sealant: Check the caulk around your chimney base for cracks and splits. Replace it if necessary to maintain a watertight barrier.
- Mortar joints: Look for crumbling mortar at the top of your chimney. Repair or replace as needed to keep water out.
- Roof edge test: Carefully pour water from the roof’s edge near the flashing to check for leaks. Be cautious not to overdo it and damage shingles.
- Caulk condition: Inspect caulk around your chimney base for signs of wear or cracking. Replace as needed to maintain a tight seal.
- Fastener inspection: Check nails, screws, and other fasteners for corrosion or loosening. Tighten or replace them if necessary to prevent flashing from lifting.
Quick rule: Regular checks can catch small issues before they become big problems.
Material choices and upgrades for longevity
The materials you choose for your chimney flashing play a crucial role in its durability and resistance to wear. Opting for the right material can save you from costly repairs down the line.
- Stainless steel: Use stainless steel for chimneys exposed to salt spray or acidic environments. It resists corrosion better than other metals.
- Copper flashing: Copper is highly resistant to weathering and can last up to 50 years with proper maintenance. Look for thick gauge copper for best results.
- Aluminum flashing: Aluminum is lightweight and easy to install but needs regular maintenance due to its lower resistance to corrosion compared to other metals.
- Polyurethane sealant: Use polyurethane-based sealants rated for exterior use. They form a strong bond with metal and resist UV damage better than silicone.
- Counterflashing installation: Ensure proper overlap of counterflashing over the main flashing to prevent water from entering behind the chimney. Improper installation can lead to leaks and structural damage.
Making smart material choices upfront will help you avoid costly repairs later on.
Conclusion
FAQ
What are the common signs of bad chimney flashing?
You might see water stains on the ceiling or wall near the chimney. There can be damp spots, mold, or a musty smell around the firebox. Peeling paint or stained masonry near the flashing is another red flag.
What usually causes chimney flashing to fail?
Flashing can fail from improper installation or old, brittle sealant. Movement from settling or heavy rain can crack seals. Metal flashing that shrinks or corrodes also leaks over time.
Can I fix chimney flashing myself, and how should I start?
If you have basic carpentry and sealant work, you can reflash the area. Start by removing old cement or tar, clean the surface, and reseal with asphalt or metal flashing. If the roof is steep or the chimney is large, hire a pro—safety first.
What DIY fixes should I avoid with chimney flashing?
Avoid silicone caulk as a long-term fix on flashing. Do not stack shingles over damaged flashing or sealant. Don’t ignore leaks—water can ruin the roof decking fast if you let it go. Seek professional help if you’re unsure about the extent of the damage.