
Introduction
Mold can be cleaned from an air conditioner with proper cleaning steps and prevention.
This guide walks you through recognizing symptoms, identifying common causes, and practical DIY fixes you can safely apply.
Key takeaways
- Inspect AC for visible mold, check condensate drainage and filters regularly.
- Use appropriate PPE, turn off power, and ventilate before cleaning mold.
- Identify symptoms like musty odor, visible stains, and allergy-like reactions in occupants.
- Central systems require duct cleaning and coil sanitizing; window units need sealing.
- Use diluted household bleach or hydrogen peroxide for non-porous surfaces only.
- When in doubt, stop and call a licensed HVAC pro for assessment.
Table of Contents
- Introduction
- Key takeaways
- Quick overview: what this guide covers
- Symptoms and signs your AC has mold
- Causes and risk factors for mold growth in AC systems
- Health risks and who’s most vulnerable
- Safety precautions and PPE for DIY mold cleaning
- Step-by-step DIY mold cleaning for central and window ACs
- When to hire a professional and how to choose one
- Prevention, seasonal maintenance, and common mistakes to avoid
- Conclusion
- FAQ
Quick overview: what this guide covers
This guide covers the full picture: symptoms such as visible mold, odors, and moisture buildup, plus the causes and health risks. It lays out a practical DIY cleaning workflow, safety tips, and clear limits on when to call a pro, along with prevention steps.
Homeowners, renters, and DIYers will learn how to diagnose common signs, identify risk factors, and protect themselves. Understanding the scope keeps you from wasted effort and unsafe practices, and shows where to stop and seek professional help.
Inspecting the AC for mold and moisture hotspots
Start by turning off power to your air conditioning unit. This is crucial for safety, especially when dealing with electrical components. Look inside the unit for visible signs of mold growth, which often appears as black or green patches.
Next, check around coils and drain pans for condensation buildup and moisture spots. These areas are prime breeding grounds for mold due to constant humidity. Use a flashlight to inspect hard-to-reach corners where water might be pooling without your immediate notice.
Taking photos of these areas is essential documentation. It helps track progress during the cleaning process and serves as a reference point if issues persist or worsen over time.
Step-by-step DIY cleaning procedure (preparation, cleaning, and drying)
This sequence ensures thorough removal of mold and prevents regrowth by addressing all affected areas.
- Turn off power to the AC unit at the circuit breaker. This step is non-negotiable for safety.
- Remove access panels using a screwdriver or wrench, exposing coils and drain pans. Take photos before disassembly for reference.
- Mix a solution of one part bleach to three parts water in a spray bottle. Apply this mixture directly onto moldy surfaces, ensuring full coverage.
- Use a brush or scrubber to agitate the mold thoroughly. Scrubbing breaks down stubborn growth and loosens spores for removal.
- Rinse all treated areas with clean water from a hose or bucket. This step washes away residual bleach and dead mold particles.
- Dry the unit completely using towels or a fan. Moisture left behind can lead to regrowth, so thorough drying is critical.

Symptoms and signs your AC has mold
Mold in an AC system shows up in what you can see, smell, and feel. Look for visible colonies or staining on the unit, ductwork, coil surfaces, insulation, drip pans, or condensate lines. Odd musty or earthy odors near intakes, vents, or registers are a big clue, and if you notice allergy-like symptoms that worsen when the system runs, that’s another red flag.
Moisture problems often go hand in hand with mold, so watch for ongoing condensation, leaks, damp insulation, or standing water in the drain pan. You may also see performance issues like weak air flow, uneven cooling, or strange temperature swings, which can point to mold affecting the system’s efficiency. If filter changes happen fast or you see mold-like stains on the filter or duct surfaces, take that as a sign to inspect more closely and consider professional testing and cleaning guidance.
Smells and air quality clues
If you notice a persistent musty, earthy smell coming from your AC unit when it’s running, that’s often the first clue mold is present. This smell can be particularly strong near intake vents or registers.
In addition to odors, allergy-like symptoms such as sneezing, coughing, irritated eyes, and a runny nose may worsen when you turn on your AC system. These health cues are red flags that mold could be growing inside the unit or ductwork.
When these signs appear, it’s wise to inspect your AC for visible mold growth and moisture issues. Don’t ignore persistent smells; they can indicate a serious problem needing immediate attention.
Visual and physical signs on/around the unit
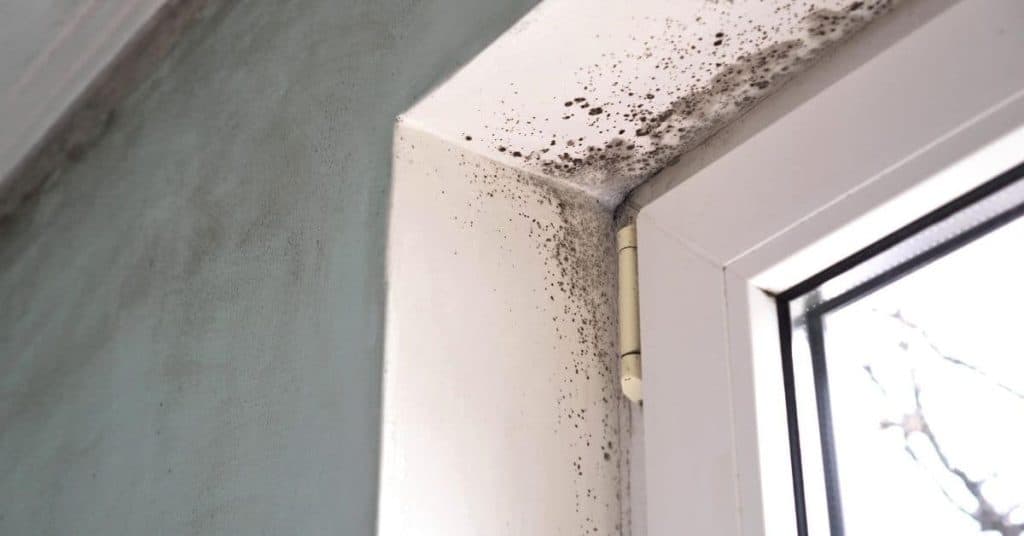
Mold often shows up as black or green spots, especially in damp areas like drain pans, coils, or around ductwork. If you see these colonies, it’s a clear sign of mold growth.
Discolored insulation or duct seams can also be indicators of hidden mold. Look closely at any visible parts of your AC system for signs of staining or discoloration that could suggest moisture intrusion and subsequent mold formation.
Mold tends to thrive in dark, damp environments where air circulation is poor. Regularly inspect these areas for visual clues; early detection can prevent more extensive damage and health issues down the line.
Performance and condensation clues
A drop in airflow or uneven cooling throughout your home is often a sign of clogged filters, dirty coils, or other blockages that can lead to mold growth. Reduced performance could mean there’s moisture buildup inside the unit.
If you notice frequent filter clogging or excessive dust build-up, it might indicate ongoing condensation issues within the AC system. This persistent dampness creates an ideal environment for mold to grow.
High indoor humidity levels and standing water in the drain pan are also red flags. These conditions suggest that your AC isn’t effectively managing moisture, leading to potential mold problems if left unchecked.
Causes and risk factors for mold growth in AC systems
Moisture, airflow problems, and organic debris create ideal conditions for mold in AC systems, so you should start with the big picture of where moisture and food for mold come from. Indoor humidity, condensate from cooling coils, roof or plenum leaks, and seasonal condensation all raise moisture levels inside ducts and on coils, elevating relative humidity where mold spores can take hold. Common trouble points to watch are drain pans, condensate lines, furnace/plenum interfaces, and sealed duct joints, where leaks or standing water invite mold and allow it to spread.
Airflow gaps and filtration gaps create stagnant zones that let damp air linger and spores settle, especially when filters are dirty or mis-sized and ducts are blocked. Organic debris like dust, skin cells, insulation fragments, pollen, and dead insects accumulate on coils, drip pans, and inside ductwork, giving mold a ready food supply and foothold. Do simple visual checks, keep filters clean or replaced, and clear drain lines; if you see persistent moisture, staining, or musty odors, call a professional for proper assessment and remediation.
Moisture sources inside AC units
The primary culprit for mold growth in your AC system is moisture. This can come from several places: condensate pans, clogged drain lines, and even leaks from the roof or plenum. When it’s humid outside, your unit works overtime to remove moisture from the air, leading to higher humidity levels inside ducts and on cooling coils.
Condensation is another major source of moisture. As cold air passes over warm surfaces like pipes or walls, water droplets form. If this happens in areas with poor airflow, it can lead to standing water that fosters mold growth. Dirty filters also contribute by trapping moisture and creating a breeding ground for spores.
To prevent these issues, keep your condensate pan clean and ensure drain lines are clear of debris. In humid climates, consider running dehumidifiers to lower indoor humidity levels. Regularly check for leaks around the unit and fix them promptly to avoid long-term moisture problems.
Airflow and filtration problems
Poor airflow is a major risk factor for mold growth in your AC system. When air doesn’t move freely through the ducts, it can lead to stagnant zones where moisture accumulates and mold thrives.
Dirty or undersized filters are common culprits here. Filters that are too thick or clogged with dust restrict airflow, causing pressure imbalances within the system. This not only reduces efficiency but also allows moisture to linger in areas like cooling coils and drain pans.
In addition, blocked vents and improperly sized ductwork can exacerbate these issues. When air has trouble moving through the system, it creates pockets where mold can take hold. Regular maintenance—like cleaning filters and checking for blockages—is key to preventing this.
Materials and environmental factors
The materials used in your AC system play a crucial role in how susceptible it is to mold growth. Certain materials can act as food sources for mold, while others may trap moisture more easily.
- Dust accumulation: Dust provides nutrients for mold spores and should be regularly cleaned from coils and ducts.
- Fiberglass insulation: While common, it can break down over time, releasing fibers that feed mold growth. Look for alternatives like foam or rubber that resist moisture better.
- Ductboard: Ductboard is prone to cracking and staining when exposed to moisture, leading to mold issues. Ensure proper sealing around joints to prevent leaks.
- Nearby vegetation: Plants near your unit can increase humidity levels, encouraging condensation and mold growth. Keep plants at a distance from the AC unit.
- Indoor plants: While nice for aesthetics, indoor plants raise humidity levels inside the home, promoting mold in AC systems. Use dehumidifiers to counteract this effect.
Health risks and who’s most vulnerable
Short-term symptoms
Mold exposure can cause immediate reactions, especially for those sensitive to it. Common short-term symptoms include sneezing, coughing, and a runny nose. You might also experience itchy eyes or throat irritation, making you feel uncomfortable.
If you have asthma or allergies, mold in your AC can trigger an attack or worsen existing conditions. Symptoms like wheezing and shortness of breath are red flags that need attention. It’s crucial to address these issues promptly before they escalate.
Children, the elderly, and those with weakened immune systems are particularly vulnerable. They may show signs such as skin rashes or persistent coughs more quickly than others. If you notice any of these symptoms after using your AC, it’s a sign that mold might be present and needs to be cleaned out.
Remember, quick action is key when dealing with mold. Don’t wait for symptoms to worsen; take steps to clean the unit thoroughly and ensure good ventilation during the process.
Long-term and severe concerns
Prolonged exposure to mold can lead to more serious health issues over time. Chronic respiratory problems, such as persistent coughing or wheezing, are common in those continuously exposed to mold spores. These symptoms may not go away even after the AC is cleaned.
For individuals with pre-existing conditions like asthma or allergies, long-term exposure can significantly worsen their health status. It’s important to seek medical advice if you notice these issues persisting despite cleaning efforts.
In severe cases, mold exposure can lead to more serious complications such as bronchitis or even pneumonia. This is especially risky for children and the elderly who have weaker immune systems. If symptoms are severe or don’t improve after addressing the AC issue, consulting a healthcare provider is essential.
When dealing with extensive mold growth or hidden sources of moisture, professional remediation might be necessary to prevent long-term health risks. Don’t hesitate to call in experts if DIY efforts aren’t resolving the problem effectively.

Safety precautions and PPE for DIY mold cleaning
Set up containment and ventilation before you touch any mold: isolate the cleaning area with plastic, seal doors, and shut down or bypass the HVAC if you can. Wear a properly fitted respirator, splash goggles, chemical-resistant gloves, disposable coveralls, and shoe covers, and follow a clear donning and doffing routine. Keep the work zone ventilated with a portable HEPA purifier and a fan directing air outdoors, and avoid creating a closed, stagnant space that concentrates spores.
This matters because controlling spores from the start protects your lungs and the rest of the house, and it reduces cross-contamination during cleanup. Use damp-wipe methods or HEPA-filtered vacuuming for loose spores, and never dry brush or use high-pressure washing. Do not mix cleaners with bleach or ammonia, work from the least contaminated area toward cleaner sections, and bag or seal contaminated PPE and materials when you’re done.
Personal protective equipment checklist
Before you start cleaning, make sure you have the right gear on hand.
- N95 respirator: Check it fits snugly. Skipping this can lead to breathing in mold spores.
- Goggles or face shield: Ensure full coverage of eyes and face. Missing this leaves your eyes exposed to irritants.
- Chemical-resistant gloves: Confirm no holes or tears. Damaged gloves expose skin to cleaning agents.
- Disposable coveralls: Make sure they fit well, covering all clothing underneath. Loose-fitting gear can let spores in.
- Splash-proof apron: Ensure it covers the front and sides of your body. Without this, you risk getting mold on your clothes.
- Disposable shoe covers: Check they fit snugly over shoes. Leaving bare feet or non-protected footwear exposes you to spores.
Quick rule: Always wear full PPE before entering the work area.
Containment and ventilation techniques
To prevent mold from spreading, seal off your work area with plastic sheeting. Use duct tape to secure it around doorways and vents.
Set up a fan to blow air out of the room and into the outdoors. This keeps spores contained and prevents them from circulating through your home’s HVAC system.
If you bypass or shut down the HVAC, make sure to use portable HEPA filters in the work area to clean the air. Avoid creating a stagnant environment that traps mold spores.
Safe cleaners and what to avoid
Avoid using harsh chemicals like bleach or ammonia, which can irritate your skin and lungs. Stick to safer options for effective cleaning.
- Detergent solution: Mix mild dish soap with water. Avoid strong detergents that could damage surfaces.
- Vinegar (5%): Dilute 1 part vinegar to 3 parts water. Don’t use undiluted as it can be too harsh on some materials.
- Isopropyl alcohol: Use a 70% solution for disinfecting. Avoid rubbing alcohol, which is not suitable for cleaning surfaces.
Maintain safety by sticking to these guidelines and avoid mixing chemicals that could produce toxic fumes.
Step-by-step DIY mold cleaning for central and window ACs
Shut it down safely and start with a clear checklist you can trust for both window and central units: disconnect power at the main breaker, switch off the thermostat, and verify there’s no live electricity near condensate lines or exposed metal surfaces, then don your gloves, eye protection, and a respirator if you sense mold exposure risk. Do a quick visual diagnostic to note visible mold, check the condensate pan and drain line for clogs, inspect the filter, blower wheel, and evaporator or condenser coils, and mark any recurring moisture sources such as leaks or high humidity that feed mold growth.
Follow a careful cleaning protocol that uses detergent or a commercially approved mold cleaner, lightly scrubbing accessible surfaces without aggressive abrasion that could damage coatings, and then rinse to remove residue while avoiding oversaturation of sensitive components; keep biocide use to a minimum and only use products that are labeled safe for plastics, metals, and coil coatings, sticking to manufacturer guidance on compatibility. When you’re working on a window unit, plan for exterior access and coil cleaning, while central systems demand access panels, duct considerations, and attention to the main drain, air handler cabinet, and return air paths, so don’t skip any step just because the layout is different. After reassembly, power up and run a full cooling cycle, monitor for odors and moisture, and implement ongoing prevention by keeping the mold-moisture balance in check, cleaning or replacing filters regularly, and scheduling inspections; if odors persist, obvious leaks appear, or conditions worsen, stop and call a pro.
Step-by-Step Cleaning Process
This sequence ensures your AC unit is thoroughly cleaned and mold-free, ready for safe operation.
- Shut off power: Disconnect the circuit breaker to ensure safety. Verify no live electricity using a voltage tester.
Quick check: Thermostat shows OFF. - Access components: Remove panels and covers to access coils, filters, and drain pans. Use gloves and eye protection.
Quick check: All parts are visible and accessible without damage. - Clean condenser and evaporator coils: Spray mold cleaner on coils, gently scrub with a soft brush or cloth. Rinse thoroughly.
Quick check: Coils look clean and free of debris. - Sanitize drain pan and line: Use a long-handled brush to remove clogs and apply mold cleaner. Flush with water.
Quick check: Drain is clear, no standing water. - Clean filters and replace if needed: Remove old filter, clean or replace with new one. Ensure proper fit.
Quick check: Filter fits snugly without gaps.
Prep: power off, access, and tools & materials checklist
Use this checklist before starting any cleaning to ensure you have everything needed.
- Power off: Disconnect AC at the breaker. Confirm no live electricity.
Safety risk: Electrical shock if not done properly. - Gloves and eye protection: Wear gloves and safety glasses to protect yourself from mold spores and chemicals.
Quick check: Gear is on before handling any parts. - Mold cleaner: Use a commercial-grade cleaner safe for AC components. Avoid harsh chemicals.
Safety risk: Damage to coils or plastic if wrong cleaner used. - Soft brush and cloth: For gentle scrubbing of coils and other parts.
Quick check: Tools are clean and ready to use. - Vacuum with HEPA filter: To remove mold spores from hard-to-reach areas.
Safety risk: Spreading mold if vacuum isn’t equipped properly.
Quick rule: Always verify power is off and wear PPE before starting any work.
Cleaning methods for coils, drain pans, filters, and vents
For coils: Apply mold cleaner directly to the surface. Gently scrub with a soft brush or cloth. Rinse thoroughly.
For drain pans: Use a long-handled brush to remove debris and clogs. Spray mold cleaner inside and flush with water.
For filters: Remove old filter, clean if reusable, replace if needed. Ensure proper fit in the slot.
For vents: Vacuum around edges and inside using a HEPA-equipped vacuum to prevent spreading spores.
Rinse, dry, reassemble, and test
Thoroughly rinse all parts after cleaning. Dry with a clean cloth or let air-dry completely to prevent mold regrowth.
Reinstall filters, panels, and covers in their proper positions. Ensure everything is securely fastened before reconnecting power.
Power on the AC unit and run through a full cooling cycle. Check for any unusual noises, odors, or moisture issues.
Maintain regular cleaning schedules to prevent future mold growth. Monitor system performance regularly and address any issues promptly.
When to hire a professional and how to choose one
DIY isn’t always enough for mold. If you’re dealing with hidden growth behind drywall or ductwork, recurring moisture, or components that require special handling like electrical or HVAC, you should hire a pro. Look for licensed credentials, containment plan, written scope, and transparent pricing, and compare several bids.
This matters because bad containment or weak cleaning can keep odors and spores coming back. A good contractor will show a remediation plan, references, and post-remediation testing or guarantees. Gather multiple detailed bids and check for insurance and credentials before you sign.
Red flags that require pros
If you spot mold covering more than a few square feet, especially if it’s behind drywall or inside ductwork, it’s time to call in the professionals. Mold hidden from sight can spread quickly and cause serious health issues.
Another red flag is when mold keeps coming back after your cleaning efforts. This often indicates a persistent moisture issue that needs professional attention. Professionals have the tools and expertise to find and fix these underlying problems.
If anyone in your household has asthma, allergies, or other respiratory conditions, DIY cleanup might not be safe. Professional remediation ensures thorough removal without risking further health complications.
Questions to ask and cost expectations
When hiring a mold remediation contractor, start by asking about their credentials and licensing. Look for IICRC or similar certifications that prove they have the knowledge and experience needed.
Ask for detailed bids with breakdowns of costs and services included. A professional should provide a written scope of work outlining containment measures, disinfectant use, and post-remediation verification steps.
Costs can vary widely depending on the extent of mold damage and required cleanup methods. Expect to pay more for extensive remediation involving removal and replacement of contaminated materials.
Prevention, seasonal maintenance, and common mistakes to avoid
This section gives a practical prevention plan to stop mold from returning, focusing on humidity control, airflow, proper drainage, and mold-suppressing practices in ducts and condensate pans. It adds a seasonal maintenance checklist for spring and fall and calls out common mistakes to avoid.
Following these steps helps you spot moisture early and decide when a DIY fix is enough or when to bring in a pro. The idea is consistent checks, simple habits, and clear signals like damp spots or musty odors, plus a printable routine you can follow at home. Check the product labels or local rules for specifics, and don’t ignore leaks or hidden moisture.
Routine maintenance schedule and seasonal checklist
Use this checklist every spring and fall before the seasons change.
- Check filters monthly: Replace or clean them if they look dirty. Skipping can lead to poor airflow and higher energy bills.
- Inspect coils biannually: Clean dust off indoor and outdoor units. Overgrown dirt reduces efficiency.
- Drain pan check twice yearly: Look for blockages or leaks. A clogged drain causes water damage.
- Seal gaps around ducts: Use caulk to seal any cracks or holes. Unsealed areas let in dust and moisture.
- Condensate line flush quarterly: Pour a cleaning solution through the line. Clogs can cause overflow.
- Test insulation condition annually: Replace if it’s damaged or missing. Poor insulation leads to condensation.
- Inspect for leaks after storms: Check around windows and doors. Leaks can lead to mold growth.
- Replace UV light filters yearly: If your system has one, clean the filter regularly. Dirty filters reduce effectiveness.
Quick rule: Stick to a regular schedule to keep your AC running smoothly and prevent mold issues.
Humidity control and HVAC upgrades
Keep humidity levels between 40% and 60%. Use dehumidifiers if needed, especially in basements or humid climates.
Add proper insulation to walls and attics. This stops moisture from condensing on cold surfaces inside your home.
Treat condensate lines with biocides regularly. This prevents mold growth within the drain line.
Consider UV lights if you have persistent mold issues. They kill airborne spores, reducing allergen levels in your air.
Common DIY mistakes that make mold worse
Avoid these common pitfalls to prevent mold from returning after cleaning.
- Inadequate drying: Make sure all wet areas are completely dry. Moisture left behind can cause new growth.
- Wrong chemicals: Avoid bleach for general cleaning. Use products designed to kill mold and mildew.
- Improper containment: Seal off the area properly before you start. Contamination spreads easily.
- Ignoring underlying causes: Fix leaks or moisture issues immediately. Addressing only surface problems won’t solve the root cause.
Maintaining a clean and dry environment is key to preventing mold from coming back.

Conclusion
Mold in your AC isn’t just a hassle—it affects safety, durability, and how your system performs. When you handle it right, you protect your family, reduce repairs, and keep the air you breathe clean.
Now go through this quick, practical check: verify you have the right PPE and ventilation, disconnect power before touching any components, inspect the unit for obvious mold spots and moisture, clean a small area first to test your method, follow the step-by-step cleaning plan for your central or window unit, rinse and dry surfaces thoroughly, reassemble carefully, and run the system with fresh air and a close eye on moisture and odors.
Common mistakes to avoid are skipping safety gear or rush-cleaning with harsh chemicals, using unapproved cleaners that can damage seals or fan motors, and neglecting to dry parts or to address the source of moisture. Stick to tested methods, test in a small spot, and never press through with a live electrical device if you see persistent mold growth or water leaks.
If mold keeps returning, if you’re dealing with a large system, or if anyone in the home has serious allergies or respiratory issues, call a professional and choose one with HVAC mold experience and clear pricing. Stay cautious, stay methodical, and you’ll keep the system clean, safe, and reliable for another season.
FAQ
What are the common signs of mold in your AC?
You’ll notice a musty smell and black or green spots on parts you can access, like the vents or drain pan. You might also see increased dust and humidity in the room. If you have allergy symptoms when the system runs, that’s a red flag.
What causes mold to grow in an air conditioner?
Moisture and warmth create a perfect mold setup. Leaky or blocked condensate drains, dirty filters, and poor insulation invite mold behind the panels. If the system never dries out after a cooling cycle, mold will take hold fast.
Can I clean mold myself, or should I call a pro?
You can handle surface mold on accessible parts. If mold covers the coil, insulation, or is spreading behind panels, stop and call a pro. Hidden mold and electrical components are a safety risk you don’t want to mess with.
What are safe DIY steps to clean mold from the AC?
First, power off the system and wear gloves, goggles, and a mask. Clean accessible surfaces with detergent and water, then use a mold fungicide labeled for HVAC use and rinse. Dry everything thoroughly and fix the moisture source, like a leaky drain or dirty filter, to prevent a comeback.