

Introduction
Painting interior doors is applying a finished coat to interior door surfaces to improve look and protection.
This article shares practical, hands-on steps to fix brush marks and get a smooth, even finish. This is meant to be a real-world, DIY-friendly guide you can actually follow on a jobsite. Stay practical and check product labels and manufacturer instructions for drying times and compatibility.
You’ll use common tools and grab-and-go fixes that don’t require fancy gear. Take your time with prep, apply thin coats, and follow the drying guidance on the label. If you spot brush marks or drips, fix them with light sanding and a careful follow-up coat.
Key takeaways
- Prepare doors by removing hardware and protecting surrounding trim to avoid spills.
- Sand between coats, clean dust, and test adhesion on an inconspicuous area first.
- Choose sheens and primers compatible with doors’ material and existing finish.
- Use light, even strokes and avoid loading brush to minimize brush marks.
- Inspect for drips and defects under good lighting; fix promptly before curing.
- Safety: work in ventilated space, wear goggles, mask, and gloves; follow label.
Table of Contents
- Introduction
- Key takeaways
- Quick Overview and Goals for Repainting Doors
- Tools and Materials Checklist
- Surface Prep: Removal, Cleaning, Filling, and Sanding
- Choosing Paint and Primer: Sheens, Chemistry, and Adhesion
- Application Methods and Techniques to Avoid Brush Marks
- Fixing Brush Marks, Drips, and Other Surface Defects
- Special-Case Doors and Tricky Substrates
- 16 Pro Tips — Grouped, Practical Advice to Guarantee a Professional Result
- Conclusion
- FAQ
Quick Overview and Goals for Repainting Doors
Painting interior doors is about restoring their look and protecting the surface from daily use. Readers usually want a smooth, durable finish that hides flaws and stands up to routine cleaning. Set expectations for the effort involved and what a full repaint versus spot touch-ups can achieve.
A full repaint is warranted when there are widespread marks, heavy wear, or compromised finish. Spot touch-ups work for minor scuffs or isolated chips without reworking the entire door. Consider your door material, hardware, and access to space when deciding which approach to take.
Why repaint interior doors
Repainting your interior doors is more than just a fresh coat of paint. It’s an update to your home’s style, a protective layer against wear and tear, and makes cleaning easier.
An updated color or finish can transform the look of your space. It’s a quick way to refresh a room without breaking the bank.
Paint protects your door from daily use. A new coat fills in any nicks or scratches, preventing them from getting worse over time.
Easier cleaning is another benefit. Dirt and grime won’t stick as much to a fresh paint job, making maintenance a breeze.
Signs you need to repaint or refinish
So, how do you know when it’s time to pick up that paintbrush? Here are some telltale signs:
First, look for visual cues. Scratches, chips, and peeling paint are all indicators that your door needs attention. Dents or dings can also be a sign of wear.
Next, consider the feel of your door. If it’s tacky to the touch, it might be time for a new finish. This could mean the old paint is failing or there’s a buildup of dirt and grime that won’t come off.
Lastly, check the sheen. If your door has an outdated or dull finish, repainting can give it a fresh look. It’s also a good idea to repaint if you’re changing the color or style of your room.
Tools and Materials Checklist
Start with a prep kit: putty or filler, sanding blocks, brushes, rollers, a compatible primer, and the paint you plan to use. Organize consumables like painter’s tape, rags, and clean containers for mixing and thinning if needed. Don’t forget protective gear and drop cloths to keep the work area clean.
Create a painting kit separate from prep and finishing supplies. Include options for DIYers and pros, and always check product labels for any specific requirements. Verify compatibility, recommended application methods, and cure guidance on the manufacturer instructions or data sheets.
Essential tools (brushes, rollers, sandpaper, scrapers)
Before you start painting, make sure you have the right tools for the job. This checklist will help you achieve a smooth finish and avoid brush marks.
- Brushes: Choose natural or synthetic bristles based on your paint type. Synthetic works well with latex paints, while natural is better for oils.
- Roller covers: Select a cover with the right nap length for your surface – shorter naps for smooth surfaces, longer for textured ones.
- Sandpaper: Use 120-grit or 220-grit sandpaper to prep surfaces. Skipping this can lead to rough finishes and poor paint adhesion.
- Scrapers: Have a sharp, sturdy scraper for removing old paint and preparing surfaces.
- Putty knife: Use a flexible one (1/8″ – 3/4″) for filling small holes or cracks.
- Sandblock: A sanding sponge or block helps you apply even pressure while sanding.
- Tack cloth: Remove dust with a tack cloth before painting to avoid leaving marks in your finish.
- Painter’s tape: Use blue tape for sharp lines and green tape for less precise areas. Don’t skip this; it prevents paint from bleeding onto unwanted surfaces.
Quick rule: Always check your tools before starting to ensure they’re in good condition. Dull or damaged tools can ruin your finish.
Paints, primers, fillers and consumables
Choosing the right paints, primers, and fillers is crucial for a successful job. Here’s what to consider.
- Primer: Use a stain-blocking primer if your door has stains or tannins. For new doors, a universal primer works well.
- Paint formulation: Choose latex for most interior jobs due to its durability and easy cleanup. Oil-based paints offer better adhesion but take longer to dry.
- Fillers: Use spackling compound or wood filler to fill holes, cracks, or gouges before sanding smooth.
- Tack cloths: Use these to remove dust from surfaces before painting. Skipping this can leave marks in your finish.
- Masking supplies: Use painter’s tape and drop cloths to protect areas you don’t want painted. Don’t skip this; it prevents overspray and keeps your workspace clean.
Quick rule: Always check product labels for compatibility, drying times, and application instructions.
Safety and workspace gear
Protecting yourself and your workspace is crucial when painting. Here’s what you need:
- Respirator: Use a NIOSH-rated respirator to protect against paint fumes. Don’t skip this; it protects your lungs.
- Ventilation: Ensure proper ventilation by opening windows or using fans. This prevents the buildup of harmful fumes.
- Drop cloths: Use canvas or plastic drop cloths to protect floors and furniture from paint spills. Don’t skip this; it keeps your workspace clean.
- Temporary door hangers: Have a few on hand to prop open doors while painting. This prevents you from having to touch the wet paint with your hands or tools.
Quick rule: Always prioritize safety over speed. Take your time and follow proper procedures to protect yourself and your workspace.
Surface Prep: Removal, Cleaning, Filling, and Sanding
Hardware should be removed or relocated to prevent damage and to expose all edges. Clean the door thoroughly to break up grease and dirt with a degreasing step. Fill gouges or imperfections with a compatible filler and let it set according to label directions.
Sand progressively to create a keyed surface that accepts primer well. After filling, re-sand to feather repairs and avoid conflicting textures. Build enough dry time into your plan to minimize rework and ensure a flat, even base.
Removing hardware and labeling parts
Start by removing all hardware from your door. This includes knobs, hinges, and strike plates.
Tip: Use a screwdriver to gently pry off any stubborn pieces. Be careful not to damage the door.
Label each part with painter’s tape and a marker as you remove it. This will help you put everything back in the right place when you’re done painting.
Decide whether you’ll paint the door on or off its hinges. Off-hinge is usually easier, but if your door is heavy, you might prefer to leave it hanging.
Cleaning and deglossing
Before painting, you need to clean the door to remove any dirt, grease, or old finish. This ensures your new paint adheres properly.
Use a mild detergent like dish soap mixed with warm water. Apply it with a soft cloth or sponge, then wipe off with a damp cloth.
Tip: For tough grease spots, use a degreasing cleaner designed for kitchen surfaces. Always test cleaners on a small hidden area first to ensure they don’t damage the finish.
If your door has a glossy or semi-gloss finish, you’ll need to degloss it. This opens up the surface so paint can adhere better. Use a deglosser or sand lightly with 220-grit sandpaper, then wipe off any dust.
Filling and sanding strategies
Inspect your door for any gouges, holes, or other imperfections. Use a spackling compound or wood filler to fill these areas.
Tip: Apply the filler with a putty knife, then let it dry according to the manufacturer’s instructions. Sand any excess off with 120-grit sandpaper.
Once your door is filled and clean, start sanding. Begin with coarse sandpaper (80- or 100-grit) to remove any old finish and smooth out the surface. Work in the direction of the grain.
After sanding with coarse paper, switch to a finer grit (220 or higher) to create a smooth, keyed surface for your paint. Be careful not to over-sand, especially around edges, as this can create flat spots where paint won’t adhere properly.
Choosing Paint and Primer: Sheens, Chemistry, and Adhesion
Discuss finish sheens and paint chemistries in terms of how they affect look, durability, leveling, and how visible brushing may be. Consider the door’s exposure and cleaning needs when selecting a finish. Remember that adhesion and flexibility matter for moving door surfaces.
Pick a primer suited to the problem doors and substrate, and verify its compatibility with the chosen top coat. Always check the manufacturer labels or data sheets for cure times and substrate compatibility. If in doubt, confirm with the product instructions before applying.
Which sheen for interior doors and why
Choosing the right sheen is crucial for your interior doors. It affects durability, how well it hides imperfections, and cleaning ease.
Flat or Matte: Great at hiding imperfections but shows dirt easily. Not ideal for high-traffic areas.
Satin: The most popular choice. Balances between durability and ease of cleaning. Hides minor imperfections well.
Semigloss or High-Gloss: Very durable, easy to clean, and reflects light. Shows every imperfection though. Best for smooth surfaces like painted doors or new wood.
Paint chemistry: latex, waterborne alkyd, and oil options
Different paint chemistries perform differently on interior doors. Here’s what to consider:
Latex (Water-based): Fast drying, low odor, easy cleanup with soap and water. Good for most interior doors. May not be suitable for highly porous woods due to poor leveling.
Waterborne Alkyd: Combines the best of latex and oil. Dries slower for better leveling, but still cleans up with water. Ideal for smooth surfaces or when a tougher finish is needed.
Oil-based: Excellent leveling, durability, and adhesion. Slow drying allows for longer open time to blend out brush strokes. Requires mineral spirits for cleanup. Yellows over time and has strong odor.
Primer and adhesion tips (stain-blocking, tannin bleed)
Primers improve paint adhesion and seal the surface. Here’s when to use specific types:
Stain-Blocking Primer: Use on knotty woods or repairs to prevent tannin bleed. It seals the wood and prevents discoloration through the paint.
Bonding Primer: For glossy surfaces or when painting over different materials. It promotes adhesion and helps paint flow evenly.
Universal Primer: Versatile, can be used on most surfaces. Seals porous woods and promotes even paint coverage. Not as effective at blocking stains as a stain-blocking primer.
Application Methods and Techniques to Avoid Brush Marks
Explore brush, roller, and spray options, noting how each can affect texture and brush marks on panels and rails. Use even strokes and maintain a consistent direction to reduce lap lines. Work from dry edge to wet edge to keep a uniform appearance.
Set up a workflow that minimizes stop points and avoids overloading the tool with paint. Maintain a steady pace and avoid dragging through dried edges. Adjust technique based on the door’s detail to keep a smooth surface finish.
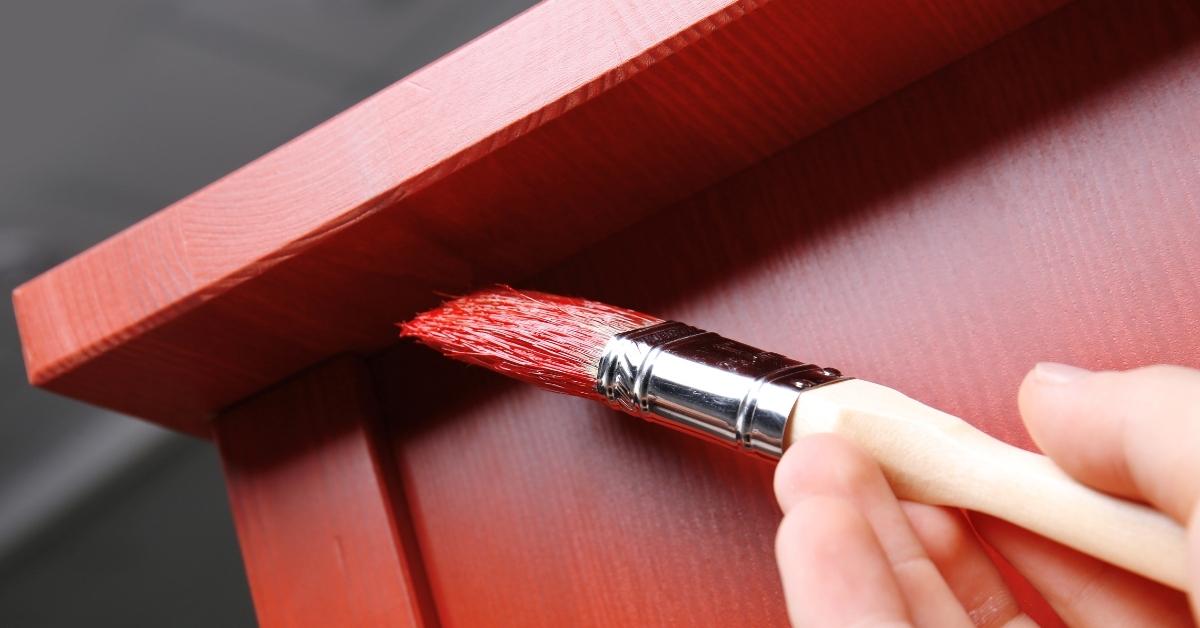
Brush technique basics and advanced tips
A good brush is key. Synthetic bristles work well with latex, while natural bristles are better for oil-based paints.
Load your brush by dipping it about 1-2 inches into the paint, then taping off excess on the lip of the can. Use long, smooth strokes, following the grain of the wood. For a smooth finish, use the ‘tip off’ technique – lightly touch the surface with the tips of your brush to spread any remaining paint and reduce visible marks.
Consistency is key. Maintain a wet edge by not letting the paint dry out between strokes. Work in manageable sections, like panels and rails separately.
Rollers and foam pads for smooth finishes
Fine-nap rollers (1/8 inch or less) are great for interior doors. Foam pads can also give a smooth finish, but they’re more prone to stipple marks.
Back-rolling helps achieve a uniform surface. Load your roller, then lightly roll it over the area you’ve just brushed. Use long, even strokes, working in one direction only.
Avoid stipple. To do this, don’t press too hard with your roller and avoid rolling over dried paint.
Spraying doors: when and how
HVLP or airless sprayers can give a flawless finish. They’re great for large jobs, like spraying multiple doors at once.
Set up your sprayer according to the manufacturer’s instructions. Mask off areas you don’t want painted. Thin paint as needed – consult your paint’s label for guidance. Test on a scrap piece of wood to dial in atomization and flow rate.
Practice makes perfect. Before spraying, practice on a test board until you get a smooth, even coat.
Fixing Brush Marks, Drips, and Other Surface Defects
Identify common defects early, such as raised grain, brush brushiness, or runs, so you can plan fixes. Wet sanding can level small brush marks and nicks, followed by a light scuff for the next coat. Use slow, even passes and remove dust between steps.
For deeper issues, consider applying a leveling coat or, if necessary, stripping and starting over. Determine the right repair based on the defect’s depth and the stage of finishing. Always verify the repair approach against product guidelines or manufacturer instructions.
Wet-sanding and rubbing out imperfections
First, let’s tackle those raised brush hairs, runs, or orange peel. Grab some fine grit sandpaper – 220 or 320 works well. Wet the paper and the door.
Gently sand in the direction of the grain. You’re not trying to cut through the paint here, just smooth out those imperfections. Rinse often to keep the dust at bay.
Before you recoat or rub out to gloss, check for any missed spots. Wipe with a damp cloth to remove dust and let it dry. Inspect under different lighting angles to ensure everything’s smooth.
When to recoat vs. sand back to primer
Deciding whether to recoat or strip and start over depends on a few things. First, check adhesion. Gently scratch the surface with a nail. If the paint peels off, you’ll need to strip it.
Next, look at show-through. If you can see the old color or grain through the new paint, you might need to sand back to primer. A quick rub with fine grit sandpaper and a clean coat should do the trick.
Lastly, consider texture. If there are deep runs or drips that won’t come out with wet-sanding, it’s time to strip and start fresh.
Visual checkpoints to inspect before calling a job done
Before you declare the job done, run through this checklist. It’s best to do this in natural light or with consistent artificial lighting.
- Check for missed spots: Inspect every inch of the door. A quick fingertip drag can help reveal any smooth areas that need another coat.
- Inspect under different angles: Look at the door from various angles to spot any imperfections you might miss straight on.
- Feel for rough spots: Run your hand over the surface. Any raised hairs or bumps will catch your fingertips.
- Check for drips and runs: Look closely at edges and corners where drips can hide.
- Inspect around hardware: Make sure paint didn’t build up or get missed around hinges, knobs, or other hardware.
- Check for dust nibs: These tiny imperfections can happen during sanding. A quick rub with a damp cloth should reveal them.
- Look for any ‘holidays’: These are areas where the paint didn’t adhere properly, leaving bare spots.
- Inspect the edges: Make sure the edge of the door is smooth and even. No rough spots or drips here!
Quick rule: If you find any issues, fix them before the paint cures completely. Once it’s cured, you’ll be starting from scratch again.
Special-Case Doors and Tricky Substrates
Address MDF, factory-coated doors, previously varnished or stained surfaces, glazed doors, and raised-panel constructions with substrate-specific prep steps. Use compatible products and follow label guidance for adhesion and build. Be mindful of edge swelling and joint issues that can crop up with certain materials.
Note any substrate quirks and plan accordingly, including edge preparation and hardware compatibility. Check for any substrate-related warnings on product data sheets or manufacturer instructions. When in doubt, verify with the label instructions before proceeding.
Painting MDF and hollow-core doors
MDF and hollow-core doors need special care. They’re prone to swelling and fiber exposure.
Edge sealing is crucial for MDF. Use a good quality filler, like wood putty, along the edges. Let it dry, then sand smooth.
For both types, use a good primer that seals and prevents swelling. Latex primers work well. Apply with a roller or brush, ensuring full coverage.
Use a high-quality paint designed for these substrates. Waterborne alkyds often perform best. Apply with a foam pad or roller for smooth results.
Refinishing previously varnished or lacquered doors
Varnished or lacquered doors need deglossing for paint to stick. Use a deglosser or sand lightly with 220-grit.
Do an adhesion test. Paint a small, hidden area. If it peels, strip the varnish completely using a chemical stripper.
Use a bonding primer for best adhesion. Apply with a roller or brush, ensuring full coverage. Let it dry according to the manufacturer’s instructions.
Paint with your chosen finish. Waterborne alkyds often work well here too.
Glass, recessed panels, and hardware-sensitive areas
Mask off glass and hardware with painter’s tape. Use a putty knife to apply glazing compound or caulk in any gaps, smoothing it out.
For recessed panels, use a foam pad or small roller to paint the edges first. Then, fill in the panel using a fan brush or small roller, working from one side to the other to avoid flooding details.
Let each coat dry according to the manufacturer’s instructions before sanding lightly with 220-grit and applying the next coat. This helps maintain a smooth finish without getting paint where you don’t want it.
16 Pro Tips — Grouped, Practical Advice to Guarantee a Professional Result
Organize tips into prep, application, and finishing groups so you can implement them without sifting through endless notes. Keep each tip short and actionable to prevent overthinking during the job. Focus on preventing brush marks and boosting durability with simple checks and steps.
Use the grouped approach to stay consistent across doors and projects. Tailor the tips to your door type and environment, while always verifying any critical instruction on product labels or manufacturer data sheets. Apply what makes the most sense for your setup and work pace.
Prep and tooling tips
Get your job off to a smooth start with these essential prep steps and tool selection tips.
- Clean doors: Remove dust, dirt, and grease. Use mild soap and water, or a degreasing agent for heavy buildup.
- Remove hardware: Unscrew knobs, hinges, and other hardware to prevent paint drips and ensure even coverage.
- Sand lightly: Use 120-grit sandpaper to scuff up the surface for better paint adhesion. Wipe off dust with a damp cloth.
- Tape off edges: Apply painter’s tape along door frames and trim to keep paint from bleeding onto other surfaces.
- Toolkit: Have on hand: good-quality brushes (2-3 inches), rollers or foam pads, sandpaper, painter’s tape, drop cloths. Rent a sprayer if you’ve got multiple doors or complex designs.
Application and finishing tips
Master these application techniques to achieve a professional-looking finish with minimal brush marks.
Start by cutting in along edges using a good-quality angled brush. Maintain a ‘wet edge’ as you work, blending new strokes into previously painted areas.
For rollers: Use a medium-nap roller cover for most surfaces. Apply paint in ‘W’ or ‘M’ patterns to ensure even coverage and avoid lap marks.
If spraying, maintain consistent distance from the door (6-12 inches) and use steady, overlapping strokes. Inspect your work closely to catch any missed spots or drips early on.
Drying, curing, and maintenance tips
Proper drying and curing ensure a durable finish that stands up to daily use. Follow these guidelines for best results.
Drying time: Allow at least 24 hours of undisturbed drying time between coats. For optimal cure, wait 7-10 days before rehanging doors or subjecting them to heavy traffic.
To maintain your newly painted doors, clean spills promptly with a damp cloth and mild soap. Touch up nicks and scratches as needed using a small artist’s brush and matching paint.
For long-term care, apply a fresh coat of paint every 3-5 years or as needed to protect the door from moisture and wear.
Conclusion
Finish with confidence by treating the door like a small finished project: clean, dry, and properly prepped, then built with thin, even coats that protect the surface and look straight and professional. The goal is a durable, wipeable finish that lasts while resisting brush marks and drips.
First, verify you’re following a simple sequence: test a small area to confirm adhesion and sheen, mask edges and hardware, apply primer and paint in thin coats, maintain a steady pace with smooth strokes, and let each coat cure before the next. Use a well-ventilated space, work with the door closed for longer open areas when needed, and keep tools unplugged or unplugged when moving between steps.
Common mistakes to avoid include skipping surface cleaning or using damp rags, applying paint too thick or in hot or humid conditions, and rushing the finish by brushing over wet areas or misusing solvents. Safety rules are simple: wear eye protection, gloves if you’re sensitive to solvents, keep your work area well ventilated, and store rags in a metal can with a tight lid to prevent spontaneous combustion. If you’re unsure about a substrate or you’re dealing with a tricky substrate, test first and proceed with caution.
If the surface or substrate presents persistent issues, or a result looks off after two with careful thin coats, consider calling a pro rather than forcing a risky fix. Stay steady, follow the plan, and you’ll have doors that look like they were bought finished—ready for everyday life and years of use.
FAQ
What small prep steps help prevent brush marks before you start painting?
Make sure the surface is clean and smooth. Lightly sand high spots and wipe away dust, then prime or spot-prime problem areas according to the manufacturer’s instructions.
How do I fix a drip or sag without sanding through the new coat?
Wait for the paint to set up to a skin, then carefully sand the bump smooth with fine sandpaper. Recoat once the surface is clean and dry per the product label.
When should I choose a foam roller over a brush for doors?
Use a foam roller for large flat panels to lay down a smooth coat without visible brush marks. A good brush is handy for edges and corners; switch to a roller where you can to reduce streaks.
How do I handle doors with tricky substrates or finishes?
Check the substrate’s compatibility with the paint and primer you plan to use. Follow the manufacturer’s instructions for bonding primers or sealers, and test a small area first to ensure adhesion.