

Introduction
Interior painting is the process of applying paint to interior walls and surfaces to refresh color and protection. This guide gives practical, hands-on steps you can follow on a typical room project. You’ll learn how to prep, choose materials, and know when to stop to check for flaws.
Start with a clear plan, remove clutter, and protect floors and fixtures before you crack open a can. Keep a steady pace, use the right brushes or rollers, and check label instructions for drying times and re-coats. If a spec matters for your space, verify it on the product label or with the manufacturer’s instructions and follow local rules.
Key takeaways
- Plan room by room and label zones to avoid misapplied coats.
- Prep surfaces with light dusting, patching, and sanding for adhesion.
- Remove or protect fixtures; masking tape edges to prevent bleed-through.
- Stir and test small areas before full coat to confirm color and finish.
- Maintain ventilation during painting; keep children and pets away from fumes.
- Inspect for drips, patch flaws, and recoat only after curing or drying.
Table of Contents
- Introduction
- Key takeaways
- Project Planning and Scope
- Tools and Materials Checklist
- Surface Preparation: Step-by-Step
- Painting Steps and Techniques
- Color Selection and Testing
- Paint Quantity, Purchasing and Cost Tips
- Safety, Ventilation and Environmental Concerns
- Troubleshooting, Inspections and Touch-Ups
- Conclusion
- FAQ
Project Planning and Scope
Start by naming the rooms and surfaces you’ll work on, so everyone knows what’s in scope. List any repairs, priming needs, and the finishes you plan to use. Set a rough timeline and note key decision points to prevent scope creep.
Check product labels or manufacturer instructions when you’re unsure about surface compatibility or drying cues. If in doubt, consult the label, data sheet, or your local rules to confirm requirements before you buy or apply anything.
Assess room condition and surface types
Before you start slapping paint on walls, take a good look at the surfaces you’ll be working with. Grab a flashlight and inspect every inch of your walls, ceilings, trim, and fixtures.
Check for any damage like cracks, holes, or water stains. These will need to be repaired before painting. Also, note the type of surface you’re dealing with – drywall, plaster, wood paneling, etc. Different surfaces require different prep work.
Stains, especially those from smoke, water, or mold, need special treatment. Don’t just paint over them; they’ll bleed through your new paint and leave ugly marks.
Lastly, look at the existing paint job. If it’s peeling or flaking, you’ll need to scrape it off and sand the surface smooth before painting.
Define goals, timeline, and stop points
Know what you want to achieve with this paint job. Are you going for a fresh, clean look? A bold statement color? Once you know your goal, set realistic milestones for yourself.
Plan out when you’ll tackle each room or section of the project. Remember to factor in drying time between coats and any major repairs you’ve identified.
There might be times when you need to pause the project. Maybe you find asbestos behind that old wallpaper, or maybe you just can’t figure out how to fix a certain issue. Know when to stop, take a break, and either learn more about the problem or hire a pro.
Don’t be afraid to call in an expert if something’s beyond your skill level. It’s better to admit you need help than to mess up a job that could cost thousands to fix.
Budgeting and permits to consider
Before you head to the hardware store, sit down and budget for your project. Figure out how much paint, tape, sandpaper, and other supplies you’ll need. Don’t forget to factor in any repairs or touch-ups.
Also, consider labor costs if you decide to hire help. And don’t forget about the cost of a professional if you hit a snag and need expert assistance.
Lastly, check with your local building department. If your project involves structural changes, like removing walls or installing new fixtures, you might need permits. Ignoring these rules can lead to fines and even forced demolition of your work.
Tools and Materials Checklist
Make a room-by-room list of must-have tools and consumables, plus extras that speed the job. Include brushes, rollers, trays, drop cloths, sandpaper, and putty for small repairs. Don’t forget sealers, tape, and a quality painter’s knife.
Note any specialty items that could save time, like a roller extension or a trim brush. Verify sizes and compatible accessories on product labels or manufacturer instructions before purchase.
Essential tools and PPE
Before you start your concrete project, ensure you have all the necessary tools and personal protective equipment (PPE) to work safely and efficiently. Use this checklist to verify each item.
- Paintbrushes (various sizes): For applying edge sealers and painting lines. Check bristles are firm yet flexible.
- Rollers (9″ and 18″): For applying concrete sealer. Ensure roller covers are in good condition with no holes or tears.
- Trays: For holding sealers and paints. Check they’re sturdy enough to prevent spills.
- Ladders (extension or step): For reaching high areas. Inspect for stability, secure feet, and check for any damage before use.
- Masking supplies: Tape, plastic sheets, etc. Check tape adhesion and sheet integrity to prevent leaks around edges.
- Safety glasses: Protect eyes from debris. Ensure they fit well and provide adequate coverage.
- Gloves (latex or nitrile): For handling sealers, paints, and tools. Check for proper fit to prevent slipping.
- Respirator: For protection against harmful fumes. Ensure it fits properly and is rated for the specific chemicals you’re using.
Quick rule: Always prioritize safety over speed. Double-check your PPE before starting any task to avoid potential hazards.
Recommended consumables and replacements
Use this checklist before starting any task to ensure you have the right supplies on hand. It’s a quick way to avoid common mistakes and keep your project moving smoothly.
- Masking Tape (1.5″ – 2″): Check width and stickiness. Press firmly to ensure it adheres well, preventing paint bleed.
- Drop Cloths: Inspect for tears or holes. Use canvas or plastic with a textured surface for better grip on the floor.
- Sanding Pads (80-120 grit): Feel for smoothness and check size to fit your sander. Skip this step and you’ll end up with rough surfaces or no sanding at all.
- Caulk (Acrylic Latex, Paintable): Check label for paintability and suitable surface types. Missing these can lead to peeling or discoloration.
- Spackle: Ensure it’s lightweight and suitable for your wall type (drywall, plaster). Wrong spackle can crack or not dry properly.
- Abrasive Sponge/Steel Wool: Check coarseness. Too fine won’t remove old paint, too coarse may damage surfaces.
- Sandpaper (120-220 grit): Feel for smoothness and check size to fit your sander. Wrong grit can leave scratches or not remove material at all.
- Painter’s Pyramids: Check size and stability. These prevent paint drips and ensure even drying, so don’t skip them!
Quick rule: Always check consumables before starting a task. Using the wrong or worn-out supplies can lead to rework, delays, and poor results.
Material specs and standards explained
Before you start your painting project, use this checklist to ensure you’ve got the right materials. Check these details when you’re at the store or before you start work.
- Paint VOC rating: Look for a number on the label (e.g., 50 g/L). Lower numbers mean fewer volatile organic compounds, which are better for indoor air quality and comply with most local regulations. Check your local rules to ensure you’re within limits.
- Finish level: Choose from Flat, Eggshell, Satin, Semi-Gloss, or High-Gloss based on the surface you’re painting. Flatter finishes hide imperfections better but are harder to clean; glossier finishes are easier to clean but show imperfections more. Check the label for recommended uses.
- Sheen level: Similar to finish, sheen refers to the amount of light reflected by the paint. It’s usually expressed as a percentage (e.g., 10% Sheen). Higher percentages mean glossier finishes. Check the label and compare with your needs.
- Color: Ensure the color you’ve chosen matches your expectations. Check the label for color codes or ask for a sample to test at home before buying.
- Paint type: Choose between water-based (latex) and oil-based paints based on the substrate you’re painting. Latex is generally better for indoor use, while oil-based is better for outdoor use or surfaces that need tougher protection. Check the label for recommended uses.
- Primer: Some paints include primer; others don’t. If your paint doesn’t have a built-in primer, buy one separately to ensure better adhesion and coverage. Check the label or ask the store associate if you’re unsure.
- Substrate compatibility: Ensure the paint is suitable for the surface you’re painting (e.g., walls, trim, metal, etc.). Check the label for recommended substrates.
- Dry time: Look at the label for dry times. Faster-drying paints can help you complete your project quicker, but they may not be suitable for all surfaces or conditions. Consider your project’s needs and local weather conditions.
Quick rule: Always check the paint label before buying. It’s the best source of information about what you’re getting and how to use it safely and effectively.
Surface Preparation: Step-by-Step
Clean the surfaces to remove dirt, dust, and oils that hinder adhesion. Repair cracks or holes with appropriate filler and let it dry according to label directions. Lightly scuff glossy areas to improve grip for primer.
Condition the surface as needed with primers or bonding agents, following the product instructions. If you’re unsure about the right prep products, check the data sheet or manufacturer guidelines for the specific surface you’re painting.
Step-by-Step Process
The surface preparation process ensures your paint job looks great and lasts. Follow this clear, numbered sequence to prep like a pro.
- Preparation & Safety Checks: Inspect surfaces for damage, remove obstacles, and ensure safety with proper lighting and ventilation.
- Cleaning: Remove dirt, grease, or stains using a suitable cleaner. Let it dry before proceeding.
- Repair & Sand: Fill holes, cracks, or gaps with spackling compound. Once dry, sand smooth and feather edges for a seamless finish.
- Wipe Down: Damp-wipe surfaces to remove dust. Let it dry completely before priming.
- Final Checks: Inspect your work, ensure all repairs are sound, and double-check that everything is clean and dry for optimal paint adhesion.
Cleaning, Patching and Sanding
Thorough cleaning, proper patching, and careful sanding create a smooth surface ready for painting.
Grease and stains hinder paint adhesion. Use a degreaser or heavy-duty cleaner to remove them completely. For tough stains, use a scrub brush.
To patch holes, apply spackling compound with a putty knife, feathering the edges for a smooth finish. Let it dry according to the manufacturer’s instructions before sanding.
Sanding creates a smooth surface for paint to adhere to. Use fine-grit sandpaper (120–150) and sand with the grain of the surface. Wipe off dust with a damp cloth before proceeding.
When and How to Prime
Priming ensures better paint adhesion, covers stains, and provides a uniform surface for painting. Here’s when and how to use it.
Use primer on new drywall, stained surfaces, or when switching from dark to light colors. Apply it with a roller or brush, following the manufacturer’s instructions for coverage.
Choose the right primer: latex primer for latex paint, oil-based primer for oil-based paint, and shellac-based primer for stains. Apply it evenly, allowing it to dry according to the manufacturer’s instructions.
Check coverage by lightly running your hand over the primed surface. If you can still feel imperfections or see stains through the primer, apply a second coat.
Visual Checkpoints for Prep
Before painting, use this checklist to ensure your surfaces are ready. A thorough visual inspection prevents common failures and ensures a lasting paint job.
- Smooth Surface: Feel the surface with your hand. It should be smooth with no rough spots or raised grain.
- No Holes or Cracks: Inspect for holes, cracks, or gaps. Any defects should be filled and sanded smooth.
- Clean: The surface should be clean with no dirt, grease, or stains visible.
- Dry: Touch the surface to ensure it’s dry. Moisture can cause paint to peel or bubble.
- No Wax or Residue: Check for any wax, residue, or previous sealants that could hinder paint adhesion.
- Evenly Primed: If primed, the surface should have an even coat of primer with no missed spots or over-applied areas.
- No Fading or Discoloration: The surface should not show signs of fading, discoloration, or tannin stains (brownish spots).
- Properly Sanded: Feel the surface. It should be smooth with no visible sanding marks.
Quick rule: If you’re unsure about any aspect, revisit that step or consult a pro to avoid costly mistakes.
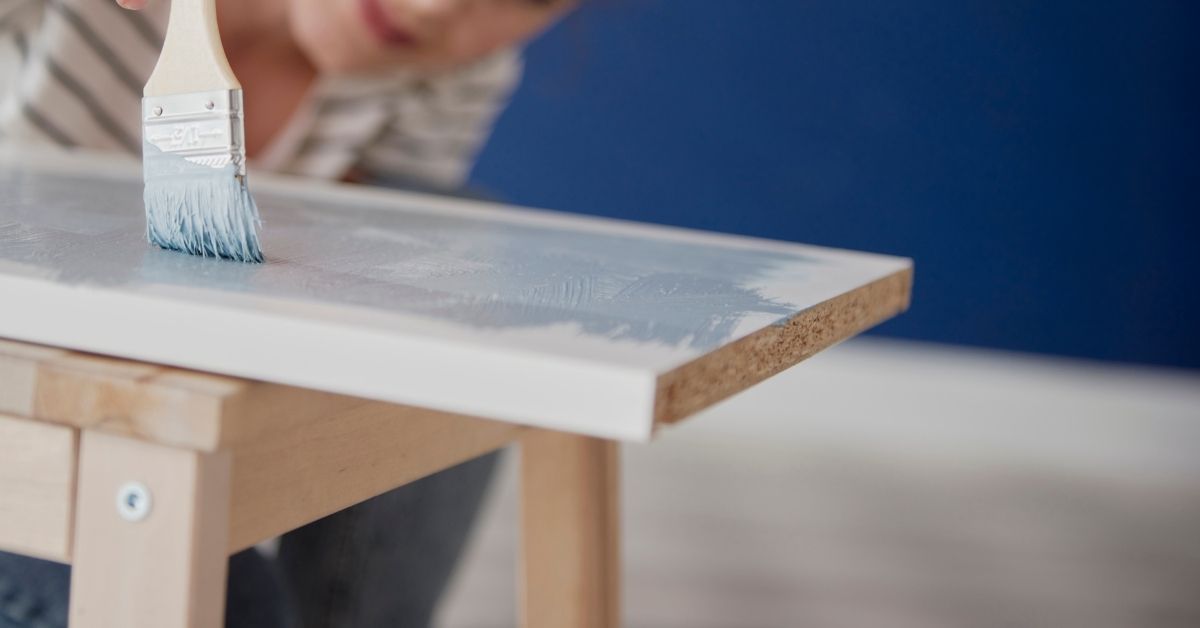
Painting Steps and Techniques
Follow a logical order: ceiling first, then walls, then trim to minimize drips on finished work. Use consistent strokes and avoid overloading the brush or roller. Keep a wet edge to reduce visible lap marks.
Tip: use long, smooth passes and maintain a steady pace for a professional look. For anything unusual, verify technique recommendations on the product label or with the manufacturer instructions before proceeding.
Cutting in, rolling, and maintaining a wet edge
Start by cutting in along edges using a 2-inch angled brush. Hold it at a 45-degree angle to the surface. Dip just the tips of the bristles into paint, then use smooth strokes to apply paint to the edge.
For rolling, work from one corner of the wall towards the opposite side. Apply even pressure and maintain a ‘W’ or ‘M’ pattern for best coverage. Keep your roller full but not overloaded with paint.
Key to avoiding lap marks: Maintain a ‘wet edge’. Work in small sections, overlapping previously painted areas by about 2-3 inches before the paint starts to dry.
Painting trim, doors and ceilings
Start with ceilings, as drips can ruin your wall finish. Use a roller cover designed for smooth surfaces. Work in sections, maintaining that wet edge.
Next, tackle trim. Use a 2-inch angled brush and cut in along edges first. Then use the same brush to paint the trim itself, working with the grain of the wood. For glossy trim, use a synthetic bristle brush for better control.
Finally, do doors. Cut in around the edges using your 2-inch angled brush. Then, open the door slightly and paint the raised panels or flat areas first. Close the door and paint the outer edge, working from top to bottom.
Drying, recoating, and when to stop
Check drying time on your paint can. Typically, it’s around 4 hours for latex paints but can vary. Touch the surface lightly with a finger – if there’s no tackiness, it’s dry enough to recoat.
When recoating, wait until the recommended time (usually 24-48 hours) to ensure proper adhesion and coverage. If you’re unsure, do a test patch first.
Stop work: if conditions aren’t ideal – too cold, humid, or drafty. Also, stop when you’ve reached your planned stopping point for the day. It’s better to have a few extra coats than to rush and make mistakes.
Color Selection and Testing
Choose colors that read well under different lighting and room uses. Test swatches on a small, inconspicuous area to compare undertones and how they interact with furniture and trim. Consider how sheens affect appearance on walls and ceilings.
Document the exact samples you test and how they looked at different times of day. If you’re unsure, rely on labeled tester kits or follow the manufacturer’s guidelines and test plan for accurate results.
Understanding light, undertones and room function
Lighting plays a big role in how colors look. Natural light can change throughout the day, making your paint appear different at sunrise than sunset. Artificial lights also cast their own glow, so consider that too.
Undertones are subtle hues within a color that affect its appearance. For instance, a blue with purple undertones will look different from one with green undertones. Think about your room’s function when choosing colors. Kitchens and bathrooms often need brighter, more durable colors.
Consider the mood you want to create too. Cool colors like blues and greens can make spaces feel larger, while warm colors like reds and oranges can make them feel cozy. But remember, these rules aren’t set in stone. It’s all about what you like.
Sampling and testing strategies
Before you buy gallons of paint, test your colors first. Paint large samples on your walls, about 2′ x 2′. This gives you a better idea of how the color will look in your space.
View your samples at different times of day to see how light affects them. Look at them when it’s sunny outside and again when it’s cloudy or dark. Also, check them under your artificial lights.
Dry paint can look different from wet paint. So, wait for it to dry completely before making your final decision. And don’t forget to consider the finish too. Glossier paints reflect more light and can make colors appear brighter.
Coordinating trims, accents and ceilings
Your trim, accents, and ceiling colors should work together with your wall color. For a classic look, use white or a light neutral for your trim. But don’t be afraid to experiment with color too.
Accent walls can add interest to a room. Choose a color that complements your main wall color but has enough contrast to stand out. And remember, less is usually more when it comes to accents.
As for ceilings, they’re typically painted white or a light neutral. But if you want to make a statement, consider a darker or bolder color. Just be sure it works with your overall design scheme. And always test your colors before committing to them.
Paint Quantity, Purchasing and Cost Tips
Estimate the amount of paint by area, and decide on container sizes that minimize waste. Keep a little extra for touch-ups after the job, and plan for potential color changes in the future. Discuss returns or exchanges for unopened containers when you’re done.
Store leftovers properly and label them with room, date, and color. If you’re unsure about coverage or waste, confirm with the product label or manufacturer instructions before buying more.
Simple coverage calculation and waste allowance
First, measure your walls. Length x Height = Square Footage. Most paint cans list their coverage per square foot.
Divide your total square footage by the can’s coverage to find out how many cans you need. Add 10-15% extra for cutting in, touch-ups, and waste.
For example, if you have 200 sq ft and a can covers 40 sq ft, you’d need 6 cans (200 / 40 = 5, then add 1).
Buying, storing and returning paint
Buy only what you need. It’s cheaper than buying too much and wasting.
When buying, check return policies. Some stores allow returns of unopened cans within a certain time frame.
Label leftover paint with room name, color, date opened, and sheen. Store in a cool, dry place away from direct sunlight.
Cost-saving approaches and quality trade-offs
Use mistint paint for base coats. It’s cheaper and fine under topcoats.
Choose satin or eggshell sheens over glossy ones. They’re cheaper and suitable for most rooms.
Spend more on prime and caulk. Cheap primer can lead to poor adhesion, and cheap caulk shrinks and cracks.
Safety, Ventilation and Environmental Concerns
Protect yourself with the right PPE and ensure proper ventilation in the room. Keep doors open or use temporary exhaust to manage fumes. Be mindful of kids and pets during the painting process.
Check VOC information and disposal guidelines on the product label or data sheet. Follow local rules for safe disposal of paints and thinners to minimize environmental impact.
Ventilation, PPE and Safe Working Conditions
Proper ventilation is key when painting indoors. Open windows and use fans to keep air moving.
Wear a mask designed for paint fumes to protect your lungs. Gloves protect your hands from chemicals, but remember to wash up afterwards.
If you feel dizzy or lightheaded, stop painting and get some fresh air. If symptoms persist, seek medical attention.
Handling, Cleanup and Disposal
Always store paint in a cool, dry place away from heat sources. After use, clean brushes and rollers thoroughly with water or the appropriate solvent.
Never pour leftover paint down drains. Find your local hazardous-waste disposal center to safely dispose of unused paint.
Store empty containers in a secure, well-ventilated area until disposal day.
Low-VOC Options and When to Choose Them
Volatile Organic Compounds (VOCs) can harm indoor air quality. Low-VOC paints are a healthier choice, especially for rooms where you spend a lot of time.
Choose low-VOC options for bedrooms, living rooms, and kids’ rooms. They’re also ideal for homes with poor ventilation or health-sensitive occupants.
Check labels and data sheets for VOC content. Look for products with 50 g/L or less for a true low-VOC paint.
Troubleshooting, Inspections and Touch-Ups
Identify common failures like drips, brush marks, or poor adhesion, and plan targeted fixes. Keep a small toolbox of quick-repair supplies for on-the-spot touch-ups. Do a final pass to ensure even coverage and color consistency.
Use a checklist to verify corner work, edge neatness, and overall finish quality. If you spot an issue, consult the product instructions or seek guidance from the label to confirm the correct corrective steps.
Fixing drips, lap marks, peeling and stains
Use this checklist to address common painting defects before they become bigger problems.
- Drips: Check for excess paint running down walls. Use a damp cloth to wipe off immediately.
- Lap marks: Look for visible lines where previous coats meet. Lightly sand, then re-paint with a thin coat.
- Peeling paint: Identify areas where paint is lifting or separating. Sand, prime, and repaint affected spots.
- Stains: Inspect for marks from dirt, grease, or other substances. Clean with appropriate solvent, then re-prime and repaint.
- Nail holes: Fill with spackling compound, let dry, sand smooth, then prime and paint.
- Cracks: Inspect for hairline cracks. Fill with spackling compound, let dry, sand smooth, then prime and paint.
- Muddy or uneven texture: Lightly sand, then apply a thin coat of primer before repainting.
- Allergen or mold spots: Clean with appropriate solution, ensure dry, then prime and paint.
Quick rule: Address defects promptly to prevent further damage and maintain a smooth, durable surface.
Final inspection checklist
Walk through the room with this list to ensure a thorough, high-quality paint job.
- Coverage: Check for missed spots or thin areas. Touch up as needed.
- Edges: Ensure edges are straight and clean. Touch up any rough spots.
- Hardware protection: Verify that doorknobs, switches, and outlets are covered with painter’s tape and untouched by paint.
- Cleanup: Check for leftover paint, dust, or debris. Clean as needed.
- Trim and accent colors: Ensure they match the intended scheme and are well-painted.
- Ceiling coverage: Inspect for missed spots or thin areas. Touch up as needed.
- Drip marks: Check for any missed drips, especially around edges and corners.
- Safety hazards: Ensure no wet paint remains on floors or surfaces where you might slip or stain clothing.
Quick rule: A thorough inspection ensures a professional-looking finish that will last.
Long-term maintenance and touch-up plan
Follow this guide to keep your paint job looking fresh for years to come.
- Document paint details: Record the brand, color, sheen, and finish of the paint used. Store with the room’s name or number.
- Touch-up kit: Prepare a small touch-up kit with leftover paint and brushes for minor repairs.
- High-traffic areas: Inspect these spots (like hallways, doors, and baseboards) every 6 months. Touch up as needed.
- Washable paint: Use it in high-traffic or messy areas for easy cleaning.
- Regular cleaning: Dust and clean walls annually to maintain their appearance.
- Inspect hardware: Check doorknobs, switches, and outlets annually. Touch up if paint is chipped or scratched.
- Exterior touch-ups: Inspect exterior surfaces annually. Touch up as needed to protect from moisture and UV damage.
- Professional help: If damage is extensive, consider hiring a professional for repairs.
Quick rule: Regular maintenance extends the life of your paint job and keeps your home looking its best.
Conclusion
Finish strong by sticking to solid prep, careful painting, and smart recheck steps. When you respect safety and proper technique, the result stays durable, looks clean, and costs stay in check.
First, verify your space, materials, and ventilation plan; then confirm surface readiness, protect floors and trim, mix and test color on a small patch, apply in the recommended order with appropriate drying times, and finally inspect and touch up as needed.
Common mistakes to avoid: skip or skim surface prep, overwork brushes or rollers, and ignore ventilation or cure times. Always follow a clear safety routine, wear the right protection, and test patches before full coverage to prevent costly mistakes. Safety first, test in a small area, and protect floors and furniture throughout the project.
If you encounter structural issues, hidden damage, asbestos or lead concerns, or large-scale priming and coating work, call a professional. When you can handle the prep, paint, and finish in manageable steps, you’ll finish with confidence and a job that lasts far beyond a season. You’ve got this.
FAQ
What should I do to protect floors and furniture during painting?
Move as much as you can out of the room. Cover what you can’t move with drop cloths or rosin paper. Use painter’s tape along edges and remove hardware if possible.
How can I tell if the surface is ready for paint after patching?
Let patches dry completely and lightly sand smooth. Wipe with a damp cloth to remove dust, then inspect for any high spots. If in doubt, check the patch manufacturer’s instructions or local guidelines for surface prep before painting.
What should I do if the paint dries too fast or shows brush marks?
Work in small sections and maintain a wet edge. Use a quality brush or roller suitable for the sheen you chose. If marks appear, feather them out and consider a light skim coat after the surface is clean and dry; follow product guidance for recoat times.
Should I cut in first or roll all over the wall?
Cut in first along ceilings, corners, and edges, then roll the large flat areas. Keep a wet edge to minimize lap marks. If you’re unsure, follow the paint label’s recommended technique or your patching/priming instructions.