
Introduction
Cutting glass tile is the process of shaping glass tiles to fit your layout by scoring and trimming with appropriate tools. Measure carefully, mark straight lines, and work slowly to avoid chips.
Before you cut, check the tile’s label or manufacturer instructions for any specific tool limits and safety notes. Use proper PPE, support the tile, and stop if you see cracking or the score line wanders—then recheck measurements and layout.
Key takeaways
- Always wear eye protection and gloves when handling glass tile and cutters.
- Use a stable work surface with painter’s tape to prevent chipping.
- Verify tile type and thickness because edges and cut methods vary.
- Measure twice, mark clearly, and consider spacer placement for grout lines.
- Practice on scrap tile before risky cuts to minimize waste.
- Stop and consult a pro when template fits awkwardly or tiles fracture.
Table of Contents
- Introduction
- Key takeaways
- Tools and Materials Checklist
- Safety and Workshop Setup
- Types of Glass Tile and How They Affect Cutting
- Measuring, Templating, and Layout
- Cutting Methods with Step-by-Step DIY Instructions
- Edge Finishing, Smoothing, and Sealing
- Visual Checkpoints and Quality Control
- Troubleshooting and When to Stop and Call a Pro
- Conclusion
- FAQ
Tools and Materials Checklist
Before you cut, lay out a clear list of tools, blades, and safety gear. Check that your tile cutter or wetsaw blade is rated for glass and free of chips. Verify that you have replacement blades and a damp sponge or cloth for cleanup.
Gather consumables and accessories in advance, including masking tape, a straightedge, and a marker with contrasting ink. Confirm tool compatibility with glass tile and planned methods by reading the product label or manufacturer instructions. If in doubt, note what to buy and where to check specs on the labels or datasheets.
Recommended blades and bits
Before you start cutting, make sure you have the right tools for the job. Here’s a checklist of glass-appropriate blades and bits to ensure smooth cuts.
- Diamond continuous rim wheel: For wet cutting on tile saws. Check label for RPM limit and material compatibility.
- Glass-specific diamond bit: For dry cutting with handheld tools. Ensure it’s rated for glass and fits your tool’s chuck size.
- Scoring bit: For making initial cuts on glass tiles before breaking along the score line.
- Glass cutting oil (optional): For lubricating and cooling during wet cutting to prevent overheating and cracking.
Quick rule: Always follow tool manufacturer’s guidelines for RPM limits, blade types, and material compatibility to avoid damaging tools or causing injuries.
Consumables and small supplies
These are the smaller items that make your glass cutting job easier and more accurate. Here’s a checklist to ensure you’re well-stocked.
- Masking tape: To mark out cutting lines and protect edges from chipping.
- Markers (grease pencil): For drawing clear, visible cutting lines on the tile surface.
- Backing material (e.g., plywood or MDF): To support tiles during cutting and prevent breakage.
- Spacers: To maintain even grout lines between tiles during installation.
- Glass tile sealant: To protect tile surfaces from moisture and stains after installation.
- Water delivery system (for wet cutting): A pump or gravity-fed system to keep the blade lubricated and cool during cutting.
- Spare blades and bits: Have extras on hand for when blades wear out or break during the job.
Quick rule: Keep your consumables organized and easily accessible to maintain efficiency throughout the project.
Safety and Workshop Setup
Set up a stable work area with a clear, flat surface and good lighting. Use spill pans or towels to manage water when cutting glass with a wet saw. Position ventilation or a dust shroud to control particles during dry cuts.
Keep a dedicated waste bin nearby and have a first aid kit within reach. Wear eye protection, gloves, and hearing protection as appropriate for the method you choose. If you’re unsure about any safety rule, consult the manufacturer instructions or local rules for glass work.
Personal Protective Equipment
Safety first, mate. Here’s what you need to protect yourself while cutting glass tile.
- Eye Protection: Safety glasses or goggles. They keep dust and debris out of your eyes. Pro tip: Go for anti-fog lenses if you’re working hard.
- Gloves: Leather work gloves protect your hands from cuts and heat. Key spec: Size matters, get a good fit.
- Hearing Protection: Earplugs or earmuffs reduce noise levels. Rentable option: Power tools can be loud, consider renting hearing protection if you don’t have your own.
- Respirator: For dry cutting, use a respirator to filter out glass dust. Key setting: Use P100 filters for best results. Price cue: Around $50-$70 for a good one.
- Safety Clothing: Long sleeves and pants protect your skin from cuts and heat. Jobsite warning: Don’t wear loose clothing that could get caught in tools.
Wet vs Dry Cutting Safety Differences
Wet cutting reduces dust, but it’s not all sunshine and roses. Here’s what you need to know.
Wet cutting uses water to suppress dust and keep blades cool. It’s great for reducing airborne particles, but you’ve got to be careful with electrical tools near water. Stop work immediately if you notice any loss of water flow or electrical issues.
Dry cutting is faster and easier to set up, but it creates a lot of dust. You’ll need proper ventilation and a respirator to keep your lungs clear. Pro tip: Keep the work area clean to avoid slip hazards from water or dust.
Both methods create heat, so keep an eye on those blades. If they start glowing red, give ’em a rest until they cool down. Jobsite warning: Never touch hot blades with your bare hands.
Types of Glass Tile and How They Affect Cutting
Glass mosaic, thick cast, tempered, and laminated tiles each cut differently. Understand that some tiles may crack or edge chip easily if treated like standard ceramic. Check the tile data sheet for recommended cutting approaches.
Confirm whether a tile is tempered or laminated, as that changes how you use scoring and breaking methods. If the label isn’t clear, ask the retailer or consult the manufacturer instructions before proceeding. Always verify the recommended technique from the product data sheet or instructions.
Tempered glass tiles
Tempered glass is pre-strengthened for safety. It’s designed to shatter into small, less harmful pieces when broken.
Important: Tempering happens after the glass is cut. So, you can’t cut tempered glass at home. Order it pre-cut or replace if sized wrong.
Cutting tempered glass after installation means replacing the whole tile. It’s a critical stop point for DIYers.
Laminated and backed glass
Some glass tiles have adhesives or backing layers. These change your cutting approach.
Backed tiles need special blades to cut through the extra layer without damaging it. Use a blade with a score-and-snap technique for clean cuts.
Watch out: Laminated glass can delaminate (peel apart) when cut dry. Always use water to cool and lubricate the blade, reducing heat and friction.
Measuring, Templating, and Layout
Accurate measurement starts with a clean line and a level reference. Create templates from cardboard or stiff paper to map out cuts. Double check layouts on a dry run before any blade touches tile edge.
Use layout marks to plan waste and minimize complex cuts. Verify template shapes with a straightedge and a level to ensure straight, square cuts. If you’re unsure about a template method, refer to the manufacturer guidance or product label for best practices.
Creating templates for curves and notches
Use this checklist when you need to cut glass tiles with curves or notches.
- Trace the curve/notch: Use a pencil and string, or trace directly from the field condition onto cardboard or thin plywood.
- Create template: Cut out the traced shape carefully. This will be your guide for cutting the tile.
- Test-fit template: Place the template on the tile to ensure it fits correctly. Make adjustments if necessary.
- Mark cut lines: Trace around the template onto the tile using a marker or pencil.
- Avoid overcutting: Be sure not to mark beyond the edge of the tile to prevent chipping.
- Check for accuracy: Double-check that your marks are correct and in the right places before cutting.
- Use template as guide: Align the template with your cut lines when placing the tile on the wet saw or nippers.
- Keep template safe: Store your template carefully to reuse it for future cuts if needed.
Quick rule: Always test-fit your template before cutting. This ensures accuracy and prevents wasted tiles.
Marking and clamping strategies
Proper marking and clamping are crucial for accurate cuts and preventing tile damage.
Use masking tape: Apply a strip of masking tape along the cut line before scoring. This helps prevent chipping and keeps your score line clean.
Clamp securely but gently: Secure the tile firmly to your work surface using clamps, but avoid over-tightening. Too much pressure can stress the tile and cause it to crack or break.
Avoid uneven clamping: Ensure that the tile is level and evenly supported when clamped. Uneven support can lead to inaccurate cuts or broken tiles.

Cutting Methods with Step-by-Step DIY Instructions
Start with the simplest method that suits your tile type, then move to more advanced techniques as needed. Follow a logical sequence and stop points for safety or technique failure. Keep your hands clear of blades and maintain a controlled feed rate.
When a method fails, stop and reassess the setup, template, and tile compatibility. Document the step where issues occur and switch to an alternate approach if required. Always cross-check manufacturer instructions or product data sheets for the recommended process.
Step-by-Step Process
Follow these practical steps to safely and effectively cut glass tiles at home.
- Preparation: Gather tools, wear safety gear, set up work area with good lighting and ventilation. Check: All tools are in working order.
- Marking: Use a pencil or marker to draw cutting lines on the tile’s face. Tip: Double-check your layout before marking.
- Clamping: Secure tiles to a stable surface using clamps, ensuring they won’t move during cutting. Check: Clamps are tight and even.
- Main Work: Perform the actual cut using your chosen method (wet saw, score-and-snap, etc.). Stop if: You feel excessive resistance or see cracks running irregularly.
- Cleanup & Final Checks: Remove clamps, clean up debris, and inspect your cuts. Check: All cuts are clean and accurate before installing.
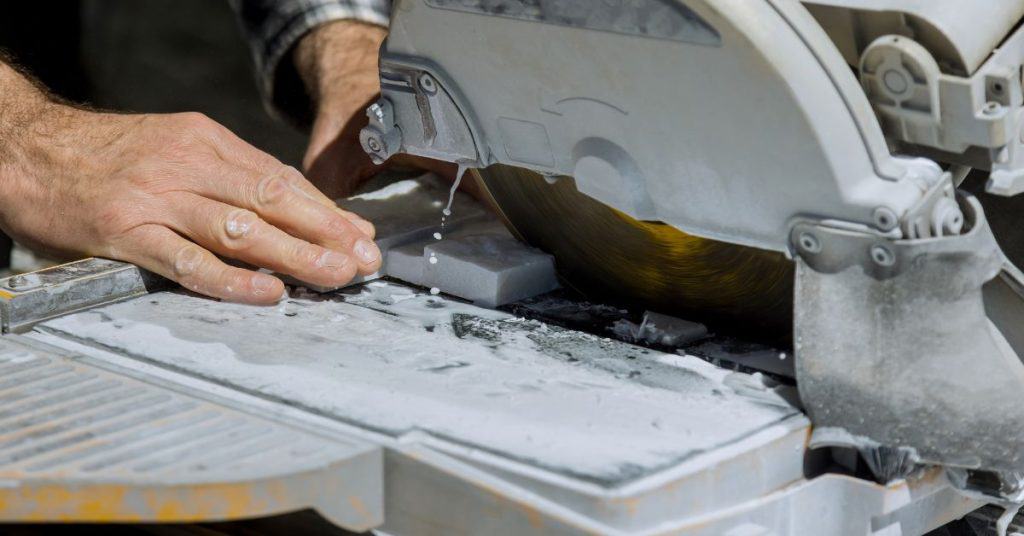
Wet tile saw (diamond blade)
Using a wet tile saw with a diamond blade is the most efficient way to cut glass tiles. Here’s how:
Setup: Install the diamond blade, fill the water reservoir, and adjust the blade guard. Tip: Always use a blade designed for glass.
Alignment & Feed: Align the tile with the blade, apply steady pressure, and feed slowly through the blade. Stop if: You feel excessive resistance or see unusual vibration.
Water Flow: Ensure water flows consistently onto the blade to prevent overheating and keep dust down. Check: Water level regularly during cutting.
Score-and-snap with glass tile cutter or wheel
For thin tiles, scoring and snapping is a simple, no-power method. Here’s how:
Scoring Technique: Place the tile on a stable surface, apply even pressure with the cutter, and score along your marked line. Tip: Use a straight edge as a guide.
Snapping: Apply consistent pressure to snap the tile cleanly along the scored line. Stop if: Cracks run irregularly or don’t follow the score line.
Pressure & Practice: Applying even, steady pressure is key. Practice makes perfect with this method. Check: Your snaps are clean and straight before installing.
Angle grinder or rotary tool with diamond wheel
For controlled edge and curved cuts, use an angle grinder or rotary tool with a diamond wheel. Here’s how:
- Edge Control: Secure the tile, align the wheel with your mark, apply steady pressure, and cut slowly. Tip: Use a guide for straight edges.
- Curved Cuts: For curves, use a continuous rim wheel and follow your template or mark carefully. Spec: Choose a wheel with the right size and grit for your tile thickness.
- Secure Holding: Use clamps or a vise to secure tiles during cutting. Warning: Never force the tool.
- Stop Conditions: If you feel excessive vibration or hear the motor straining, stop immediately. Check: Your cuts are clean and accurate before installing.
Tile nippers and hand tools for small shapes
For small sections or intricate shapes, tile nippers and hand tools can be useful. Here’s how:
- Progressive Nibbling: Gently squeeze the nippers to nibble away small pieces along your mark. Tip: Work slowly and carefully.
- Relief Cuts: Before nibbling larger curves, make relief cuts to reduce stress on the tile. Spec: Use nippers designed for glass.
- Stop if: You see visible stress cracks forming during cutting. Check: Your cuts are clean and accurate before installing.
To cut holes or make plunge cuts, use a diamond hole saw or rotary bit with a wet drilling method. Here’s how:
Pilot Technique: Drill a small pilot hole first to prevent the tile from cracking. Spec: Choose a bit size slightly smaller than your final hole.
Wet Drilling: Keep the bit wet during drilling to cool it and reduce dust. Stop if: You see excessive breakout or feel overheating. Tip: Use a slow, steady speed for best results.
Edge Finishing, Smoothing, and Sealing
Carefully grind or sand cut edges to remove sharpness and to match the desired edge profile. Use progressively finer grits and clean between steps. Wipe dust and residue away before grout or trim installation.
Polish edges to a smooth finish if the tile requires a factory-like edge. Test one scrap piece to confirm the finish matches the rest of the tile. If you’re unsure about finishing products, check the label or manufacturer instructions for compatibility with glass.
Hand diamond pads and sanding steps
Once you’ve cut your glass tiles, the raw edges need smoothing. That’s where wet diamond hand pads or sanding sticks come in.
Start with a coarse pad (around 120-grit) to remove major imperfections. Wet it and the tile edge before you begin. Work in one direction, following the edge.
Gradually move to finer grits (like 320 or 600) until the edge is smooth and uniform. Stop when you can’t feel any rough spots with your fingers. Be careful not to over-sand and thin the glass.
Polishing and edge protection
For a glossy finish, you can polish your glass edges. Use a polishing pad with cerium oxide or another suitable compound. Work in small sections, applying even pressure.
If you prefer not to polish, consider alternatives to hide rough edges. Trim pieces can be applied for a clean look. Or, use grout to fill the joints and protect the edges. This works well for subway tile installations.
Remember: Polishing is best done before grouting or applying trim. And always wear safety glasses when working with glass edges.
Visual Checkpoints and Quality Control
Inspect each cut for symmetry, edge quality, and fit with the layout. Look for burrs, chips, or micro-fractures that could affect grout. Verify that spacers and joints align consistently across the row.
Compare your cuts against the template and markings, and adjust as needed before proceeding. If something looks off, stop and re-measure rather than forcing a rough cut. When in doubt, consult product instructions or labeling for quality standards.
Common signs of a bad cut
Before you start laying your concrete, use this checklist to ensure each cut is clean and won’t cause issues later.
- Hairline cracks: Check for fine cracks along the edge. If present, re-cut that section.
- Chips or crumbling: Look for chipped or crumbly edges. Discard these pieces and recut.
- Delamination: Check for layers peeling away from each other. If found, discard and recut.
- Uneven edges: Ensure all edges are straight and even. Use a level or straight edge to confirm. Uneven cuts can cause tripping hazards.
- Dusty surface: A dusty cut indicates it’s too old. Discard and recut for better adhesion.
- Moisture on cut edge: Check for moisture on the freshly cut edge. If present, let it dry before using.
- Incorrect mix design: Ensure the concrete mix is suitable for your application (e.g., not too wet or dry). Check manufacturer instructions if unsure.
- Improper cutting tools: Use sharp, appropriate tools. Dull or wrong tools can cause poor cuts and rework.
Quick rule: If in doubt, recut. A few extra minutes now prevents expensive rework later.
Test-fit and dry layout
Before you start mixing concrete or laying blocks, follow this checklist to ensure a smooth process and prevent costly mistakes.
- Check block dimensions: Measure each block’s length, width, and height. Ensure they match the specified sizes on your plans.
- Inspect for damage: Look for cracks, chips, or other defects that could compromise the structure’s integrity. Replace any damaged blocks.
- Verify pattern alignment: Lay out a few courses to confirm the bond pattern (e.g., running bond, stack bond) aligns with your plans and maintains consistent joint spacing.
- Check edge fit: Test-fit corner blocks and ensure they interlock properly. Check for any misalignment or gaps that could indicate incorrect cutting.
- Confirm leveling: Use a laser level or string line to ensure all laid courses are level. Any high or low spots can cause issues later on.
- Check joint width: Ensure joints between blocks are consistent and match your specified width (usually 1/2″ to 3/4″).
- Verify wall plumb: Use a level or plumb bob to ensure the walls are vertical. Any deviation can lead to leaning walls and structural issues.
- Check for proper backfilling: Before laying the final courses, ensure the foundation has been properly backfilled and compacted to prevent settling and cracking.
Quick rule: Always double-check your measurements and layout before mixing concrete or applying mortar. A few minutes spent verifying can save hours of rework later on.
Troubleshooting and When to Stop and Call a Pro
Identify common cutting failures such as edge chipping, cracking, or uncontrolled breakage. Document symptoms and revisit the setup, blade choice, and water management. If the issue persists, it may be beyond straightforward DIY capability.
Establish clear criteria to stop, such as repeated edge damage or difficulty achieving consistent results. For safety or technical limits, seek professional help and refer to local rules or manufacturer instructions before proceeding with repairs or removal.
When to stop and reroute the job
Safety first, mate. If you’re dealing with tempered glass tiles, stop right there. They’re under pressure, cutting them can cause them to shatter unexpectedly.
If your cuts are getting wonky, tools are acting up, or you’ve got complex shapes like curves or intricate patterns, it might be time to call it quits on the DIY. Same goes if you’re planning to cut through structural elements – that’s a big no-no without proper training.
Persistent problems? Don’t force it. It’s better to stop and reassess than risk damaging your tiles or worse, hurting yourself.
Finding a pro and what to expect
Alright, you’ve decided it’s time to bring in the big guns. First things first, gather your info: tile type, size, any templates or patterns you’re using, and the edge finish you want.
A good pro will ask about these details. They might also offer services like custom cutting, edge polishing, or even installation. Don’t be shy to ask what they can do – it’s their job to know!
When you find a reputable cutter or shop, bring your samples and info along. They’ll use this to give you an accurate quote and timeline. And remember, quality work ain’t cheap, so don’t skimp on the budget.
Conclusion
This work pays off when every cut is accurate, the edges stay true, and the glass tile looks like a pro installed it. Prioritize safety and test steps on a scrap piece first so you don’t risk costly failure on the real tile.
Before you move forward, check that you have the right tiles, the right blade, and the right safety gear, then measure twice, mark cleanly, cut a test piece, dry-fit, trim as needed, and seal after smoothing. Go step by step, keep your workstation stable, and verify each edge before you grout.
Common mistakes to avoid are rushing through cuts, applying too much pressure, or using the wrong blade for your tile type; keep hands clear of the cut line, wear eye and ear protection, and keep water or dust control in play to protect both you and the tile. Remember Safety first, take time to test, and never cut over a finished surface.
If the job involves tricky angles, large areas, tempered glass, or you’re unsure about sealants, it makes sense to call a pro rather than push on. When in doubt, step back, reassess, and plan the next move like a foreman would. You’ve got this—finish clean, finish safe, and you’ll be humming along with secure, durable results.
FAQ
Can I cut glass tile with a standard tile cutter or do I need a specialized tool?
Always check the tile label or manufacturer instructions first. If the tile isn’t rated for scoring, use a wet saw or tool recommended by the maker.
What should I verify on the tile before starting a cut?
Look for any notes about edge finish or required protection. Follow the manufacturer’s guidance on cutting speed, water use, and blade type to avoid damage.
How do I avoid chipping or cracking when cutting the edge?
Support the tile fully and use a clean, appropriate blade. Make a slow, steady pass and stop at the cut line; don’t push hard or twist the tile.
What’s the safe way to finish and seal cut edges after installation?
Follow the product instructions for edge finishing or sealing. If unsure, check labels or manufacturer recommendations and use non-damaging sealing methods suited to glass tile.