

Introduction
Planning to apply Venetian plaster over existing texture? Understanding the timeline and duration of each preparation method—skim, sand, or remove—is crucial to set realistic expectations and ensure a smooth project.
Let’s break down the time commitment for each approach so you can plan your project effectively.
For the full guide, see Venetian Plaster Over Existing Texture: When to Skim, When to Sand, and When to Remove.
The Time Commitment: Skim, Sand, or Remove
Preparing your walls for Venetian plaster involves different time commitments depending on whether you choose to skim, sand, or remove the existing texture. Here’s a detailed breakdown of each method:
- Skim Coating (1-3 days): Skim coating is the quickest method as it only requires applying and drying joint compound.
- Sanding (2-4 days): Sanding takes longer due to the additional step of sanding down the texture. Allow extra time for sanding, vacuuming, and wiping down the walls.
- Removing Texture (3-7 days): Removing texture is the most time-consuming option. It involves scraping, sanding, repairing, and priming the walls before applying Venetian plaster.
These estimates assume you’re working on a typical room size (around 12′ x 12′) with standard wall texture. Larger rooms or more complex textures will require additional time.
Key takeaways
The preparation method you choose significantly impacts the overall project timeline, so it’s essential to factor this in when planning your Venetian plaster application.
- Assess wall texture and substrate to choose skim, sand, or remove approach.
- Prepare workspace: cover floors, protect outlets, remove baseboards and electrical covers.
- Gather tools and materials before starting; include joint compound mixing basics.
- Mix joint compound per manufacturer guidance and test consistency on scrap drywall.
- Apply skim or texture coat in thin passes; avoid overloading substrate.
- Safety: wear respirator, goggles, and dust containment; unplug power where needed.
Table of Contents
- Introduction
- Key takeaways
- Quick Decision Framework — Skim, Sand, or Remove?
- Tools and Materials Checklist
- Preparing the Workspace and Substrate
- Skim Coating over Existing Texture — Step-by-Step
- Sanding Existing Texture — When It Works and How to Do It
- Removing Texture Completely — Methods and Trade-Offs
- Applying Venetian Plaster and Finishing
- Safety, Budgeting, Timeline, and Troubleshooting
- Conclusion
- FAQ
Quick Decision Framework — Skim, Sand, or Remove?
Start by identifying the texture type and checking adhesion: light textures (orange peel, slight knockdown) often take a skim coat, well-adhered uniform textures can sometimes be sanded, and loose or deeply recessed textures generally need removal. Run quick tests—a scratch or etch to check bond, a moisture check in suspect areas, and a wipe-down to see how much contaminant or chalking comes off—to inform your choice.
Match the surface condition to your finish goals and constraints: if you need a perfectly smooth, low-sheen base for Venetian plaster you may favor skim coats or removal; if time and budget are tight and the texture is minor, sanding can be the compromise. Practical criteria: skim for lightweight texture or small imperfections, sand when texture is thin and solid, and remove when texture is flaky, damaged, or blocks the desired flatness; follow manufacturer instructions on products you plan to use.
Assess texture type and adhesion
First, figure out your existing texture’s profile. Use these terms:
- Light: barely noticeable, minor imperfections.
- Medium: visible but not deep, like knockdown or orange peel.
- Heavy: thick, like popcorn or deeply textured.
Next, test adhesion. Scratch the texture with a screwdriver or utility knife. If it comes off easily, it’s loose and needs removal.
Match to final Venetian plaster finish
Venetian plaster wants a smooth base. It won’t hide deep textures or imperfections.
For light textures, skim coating might do the trick. For medium and heavy, you’ll need more prep – sanding or removal.
Remember, Venetian plaster has a subtle sheen. If your texture is rough or uneven, it’ll show through the finish.
Budget, timeline, and skill considerations
Skim coating is cheap but time-consuming. It’s best for minor imperfections and light textures.
Sanding takes more time but less money than removal. It’s good if your texture is durable and well-adhered, with minimal depth.
Removal costs the most in materials and time. But it’s necessary for loose textures or when blocking a finish. Consider your DIY skill level too – removal is tougher than skim or sand.
Tools and Materials Checklist
Gather inspection gear first: flashlight, utility knife, putty knives, scrapers and replacement blades, moisture meter if water damage is possible, drop cloths, plastic sheeting, painter’s tape, and an inspection checklist; if old paint is suspected to contain lead, check local rules before disturbing it. For skim-coating, choose joint compound (note differences between setting-type and ready-mix on the product label), a mixing paddle and bucket, hawk, steel trowels, wide knives, and a “magic” trowel or equivalent for smooth application.
For sanding and cleanup collect sanding blocks/backer pads, a range of abrasives, sanding sponges, a HEPA-rated shop vac, respirator and eye protection, and tack cloths. Removal and plaster supplies include scraper blades, heat or wetting tools if appropriate, replacement drywall or patching compounds, mesh tape, compatible primers/sealers, Venetian plaster materials and sealers, mixing tools, and PPE; verify product compatibility and manufacturer instructions before starting.
Tools for skim-coating and plaster work
Before you start your skim-coating or plastering project, ensure you have the right tools. This checklist will help you verify each tool’s suitability.
- Screed Trowel (4-6mm): Check it’s straight and undamaged. Tap it gently on a hard surface to listen for any rattles or loose parts.
- Float Trowel (1200-1800mm): Ensure it’s clean, smooth, and free of bends or warps. Check the handle is securely attached.
- Steel Trowel (457-635mm): Inspect for sharp edges and a smooth surface. A dull trowel can cause imperfections in your finish.
- Hawk: Check it’s stable, with no cracks or wobbles. Ensure the handle is secure.
- Mixing Bucket (15-20L): Verify it’s clean and free of debris. A dirty bucket can contaminate your mix.
- Plaster Mixer: Test it by running it in empty air to ensure it works properly. Check the paddle is secure and undamaged.
- Sanding Block/Visual Inspection Light: Ensure the sanding block is flat and even, and your light provides clear, shadow-free illumination.
- Power Tools (optional): If using power tools like plaster mixers or sanders, check they’re in good working order. Test them before starting work.
Quick rule: Always inspect your tools before use to prevent costly mistakes and rework.
Materials and product choices
Before you start your skim-coating or plaster work, use this checklist to ensure you have the right materials. This will save you time, money, and prevent costly rework.
- Joint Compound: Check label for ‘Ready-Mix’ and ‘Setting Type’. Ensure it’s suitable for your project (e.g., light or all-purpose).
- Setting Compound: If using, confirm it’s compatible with your joint compound. Check manufacturer instructions.
- Primer/Sealer: Choose one that’s designed for your substrate (drywall, plaster, etc.). Check label for compatibility.
- Venetian Plaster Products: Ensure they’re genuine Venetian plasters or compatible alternatives. Check manufacturer instructions.
- Skim Coat Mix Ratio: Follow the product’s recommended mix ratio (usually 3:1 or 4:1 sand to compound).
- Plaster Type: Confirm it’s suitable for your project (e.g., lime, gypsum, or acrylic). Check manufacturer instructions.
- Plaster Mix Ratio: Follow the product’s recommended mix ratio. This varies by type and brand.
- Additives: If using additives (e.g., accelerators, retarders), ensure they’re compatible with your plaster or compound. Check manufacturer instructions.
Quick rule: Always check product labels and manufacturer instructions to confirm compatibility between materials. Incompatible products can cause poor adhesion, cracking, or other expensive issues.
PPE and dust-control supplies
Before you start any concrete work, ensure you have the right personal protective equipment (PPE) and dust control measures in place. This checklist will help you stay safe and maintain a clean worksite.
- Respiratory protection: Check your respirator’s filter class. For concrete dust, use a minimum of P100 filters.
- Eye protection: Inspect safety glasses or goggles for any cracks or scratches. Ensure they provide adequate side protection.
- Ear protection: If using power tools, check your earmuffs’ noise reduction rating (NRR). For concrete work, aim for at least 25 dB NRR.
- Gloves: Ensure gloves provide adequate grip and protection from concrete chemicals. Check for any tears or weak spots.
- Drop cloths: Measure drop cloths to ensure they’re large enough to cover the work area, preventing dust from spreading.
- Masking supplies: Verify you have enough tape and plastic sheeting for containing dust and protecting adjacent areas.
- Dust extraction system: If using power tools, check that your dust extractor is in good working order. Ensure hoses are connected properly to prevent leaks.
- Wet cutting/drilling: For concrete work, always use water when cutting or drilling to minimize dust. Check your water supply and ensure it’s functioning correctly.
Quick rule: Always prioritize safety first. Never skip PPE or dust control measures to save time or money. The consequences of inhaling concrete dust or not protecting adjacent areas can be severe and expensive.
Preparing the Workspace and Substrate
Protect the room thoroughly: cover floors, mask and seal off adjacent areas and HVAC, remove or shield trim and switch plates, and set up good task lighting and dust containment. Remove obstacles that interfere with flat work—trim, baseboards, light fixtures, and outlet covers—so you can get full, clean access to wall edges and corners.
Inspect the substrate for loose drywall paper, cracks, or water damage and repair with appropriate compound and tape; replace sections of drywall if they’re soft or delaminated. Clean the surface of dust, grease, and loose material, vacuum and wipe as needed, then choose and apply a primer or bonding agent compatible with your skim or plaster product—check the product data sheet for porosity and adhesion guidance.
Room prep, containment, and masking
Start by sealing off the work area to contain dust. Use plastic sheets and tape to cover doors and windows leading into the room.
Protect your floors by laying down drop cloths or plastic sheeting. Move any furniture out of the way if possible, or cover it with plastic.
Tape edges where the walls meet the ceiling and floor to prevent dust from settling in these areas. Use painter’s tape for a clean edge.
Removing trim, outlets, and fixtures
Before you start skim-coating or applying Venetian plaster, remove any trim, baseboards, light fixtures, switch plates, and outlet covers that might interfere with the process.
Remove baseboards for a cleaner edge. If you choose to mask them, be prepared for some texture to show through.
Take down light fixtures and outlet/switch plates. This gives you a smooth surface to work with and prevents dust from getting into these areas.
If you’re keeping any trim or hardware, mask it off carefully using painter’s tape. This will help prevent damage and keep dust out.
Surface cleaning and minor repairs
Before you start applying your finish, clean the surface thoroughly. Use a vacuum to remove any loose material from the walls. If necessary, lightly wash the walls with water to remove grease or dirt.
Check for cracks, holes, or loose texture. Patch these areas using a suitable joint compound. Ensure all joints are taped and sanded smooth.
Inspect for any underlying issues like moisture damage or mold. If found, address these problems before proceeding with your skim coat or plaster application.
Ensure the surface is flat, square, and free of any major imperfections that could show through your final finish.
Skim Coating over Existing Texture — Step-by-Step
Decide if skim coating will meet your Venetian plaster base needs by checking texture depth and adhesion; if the texture is shallow and sound, skim can produce a flat base, otherwise address problematic areas first. Prepare materials and tools: pick the right joint compound type per the product instructions, mix to a smooth, spreadable consistency, and have wide knives, trowels, sanding blocks, and PPE ready.
Work in thin, even passes—fill deep ridges first, then apply a consistent skim with overlapping strokes, keeping edges feathered to reduce lap marks; use a long straightedge to check flatness between coats. After the initial set, inspect and lightly sand high spots, clean dust, and seal with a primer recommended by the skim compound manufacturer before proceeding to Venetian plaster application.
Step-by-Step Process
This section guides you through the practical steps of skim coating over existing texture, ensuring a smooth base for your Venetian plaster finish.
- Safety first: Put on PPE – dust mask, eye protection. Lay down drop cloths to protect floors and fixtures.
- Clean walls with a damp cloth to remove dust. Fill deep ridges with thin mud using a wide drywall knife.
- Dampen overly dry surfaces with a spray bottle to reduce dusting during application.
- Check wall flatness using a long straightedge or string line. Address any major imperfections before proceeding.
- Mix joint compound to the right consistency (see next section). Apply a thin, even coat using a wide trowel in controlled, overlapping strokes.
- Allow appropriate set time between coats as per product instructions. Inspect for high spots and imperfections with angled light.
- Lightly sand with a block or screen after initial set to remove any minor imperfections. Wipe off dust with a damp cloth.
- Apply a sealing primer before proceeding with Venetian plaster application. Double-check safety measures and clean up your workspace.
Mixing joint compound to the right consistency
The ideal consistency is like thick pudding – not too runny, not too lumpy. This allows for easy application and smooth finish.
Start by mixing small batches at a time. Add water slowly, stirring continuously to avoid lumps. Check product instructions for specific guidelines.
Pro tip: A good test is to drop a dollop onto a scrap piece of drywall. If it holds its shape but isn’t too stiff, you’ve got the right consistency.
If it’s too runny, add more compound. Too thick? Add water, one teaspoon at a time, mixing well after each addition.
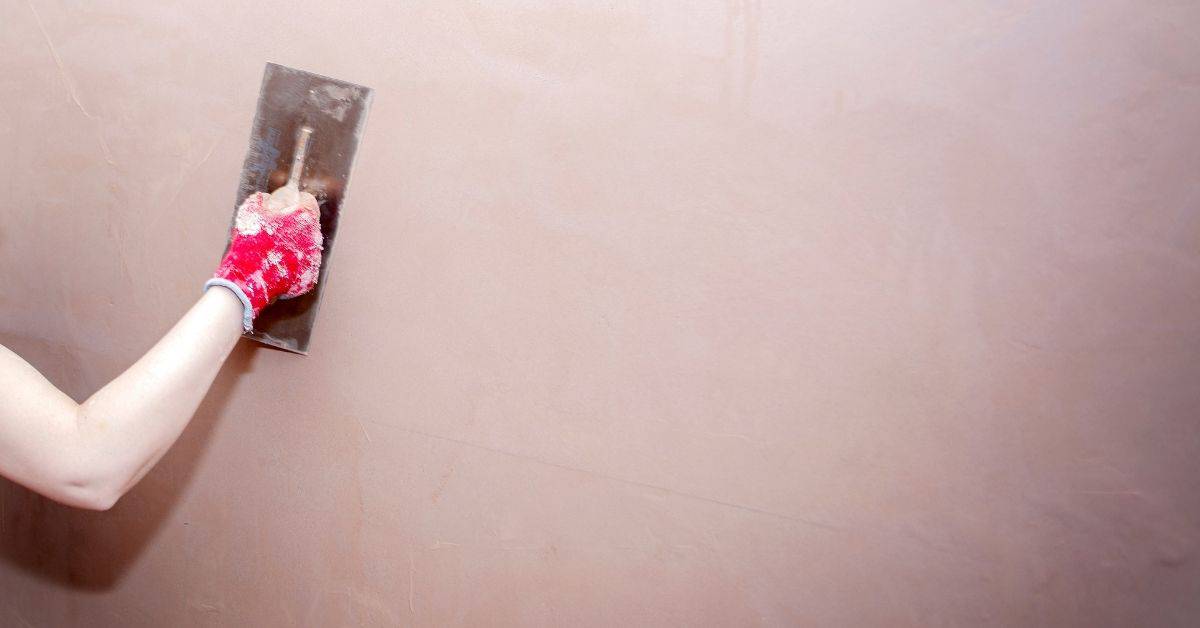
Applying and smoothing with a trowel
Work in manageable sections to keep the mud from drying out. Apply a thin, even coat using a wide trowel or ‘magic’ trowel.
Hold your trowel at a 45-degree angle to the wall for best control and smoothness. Use firm, steady pressure, applying more on high spots and less in valleys.
For textured surfaces, expect to make multiple passes – usually 2-3 – building up the mud layer by layer. Inspect your work after each pass, smoothing out any imperfections with your trowel.
Inspecting, sanding, and preparing between coats
After the initial set time, inspect your work using angled light. This helps reveal any high spots or imperfections that need attention.
For minor imperfections, use a light touch with fine-grit sandpaper or a scraping tool. Be careful not to sand through the mud layer.
After sanding, wipe off dust with a damp cloth. Apply a sealing primer to lock in any remaining moisture and prepare for the next coat. Always follow product instructions for specific drying times between coats.
Sanding Existing Texture — When It Works and How to Do It
Sanding is appropriate when the texture is light-to-moderate, uniformly bonded, and the substrate beneath is solid—avoid sanding if drywall paper is tearing, texture is flaky, or you risk exposing joints. Prioritize dust control: seal the area with plastic, run a HEPA shop vac, use a P100 respirator, and follow product or local guidance on handling old paint or potential lead hazards.
Use sanding blocks or pole sanders with progressively finer grits for controlled material removal, keeping strokes light and even to prevent gouging; test a small area first to confirm results and dust behavior. Wipe or vacuum between passes, inspect for remaining texture, then apply a light pass and prep with primer or a thin skim coat as recommended by the primer/product instructions before plastering.
When sanding is appropriate
Sanding can be a viable option when dealing with light-to-moderate textures that are well-bonded to the substrate. Check for solid adhesion by gently tapping on the wall; if it sounds hollow or feels loose, do not proceed with sanding.
Ensure the texture is thin and uniform. Sanding works best when you aim to smooth out the surface without removing too much material or exposing tape/joints. Inspect edges for any damage or signs of plaster failure before proceeding.
Sanding is most effective on surfaces that are not deeply recessed, as these may require more aggressive methods like skim coating or removal. Always remember, the goal is to create a smoother base without compromising the substrate’s integrity.
Sanding techniques and media selection
For hand-sanding, use a sanding block or pole sander with fine-grit sponges (120–180 grit) to start. This helps maintain an even pressure across the surface. Progress to 220–320 grit as you refine, ensuring a smooth finish.
With mechanical sanding, use orbital or vibrating sanders for larger areas. Keep the motion light and even to avoid gouges. Always follow the grain of the texture to minimize scratches.
Be mindful not to over-sand, especially on old surfaces. Over-sanding can remove too much material, expose tape/joints, or damage the substrate. Test a small area first to ensure you’re not removing more than intended.
Dust management and cleanup
Wear a high-quality P100 respirator for safety. Seal off the area with plastic to contain dust. Use a HEPA shop vacuum to capture dust as you sand, keeping your workspace clean.
Mist the surface lightly before sanding to reduce dust. This helps control airborne particles and makes cleanup easier. After sanding, use a damp cloth to wipe down the wall, removing any remaining dust.
Before priming or applying a skim coat, test a small area for dust control and finish response. This ensures good adhesion of subsequent coats. Always remember, thorough cleaning is key to successful plastering work.
Removing Texture Completely — Methods and Trade-Offs
Choose full removal when texture is loose, heavily damaged, or when achieving a flawless plaster finish outweighs the time and mess of removal; weigh budget, schedule, and the condition of the drywall before committing. Mechanical scraping is fast but creates dust and can damage drywall paper—use wide scrapers and expect repairs—while wetting techniques soften texture for gentler removal but introduce moisture risk to paper and framing.
For severe damage consider partial drywall replacement or re-skinning patched areas to ensure a durable substrate; plan for containment, disposal, and repairs after removal. Evaluate trade-offs: removal gives the best flatness for premium finishes but increases labor, potential replacement costs, and drying/priming steps—check product instructions and local disposal rules when choosing methods.
Mechanical and wet-removal options
When it’s time to remove texture completely, you’ve got a few methods at your disposal. Let’s dive into mechanical scraping and gentle wetting techniques.
Scraping: This is the most straightforward method. You’ll need tools like putty knives, wide-edge trowels, or texture scrapers. Work from top to bottom in small sections. Be prepared for dust – lots of it. Use a damp cloth to wipe as you go.
Wetting: For older finishes or plaster/lathe walls, wetting can help loosen the texture. Lightly mist the area with water using a spray bottle. Let it sit for 15-20 minutes before scraping. Be careful not to oversaturate – too much moisture can damage the underlying paper or cause paint to peel.
Remember, these methods are best suited for dry, sound walls. If you’re dealing with moisture damage or suspect materials, check below before proceeding.
Patch and replace vs full removal
Deciding between spot repair, replacing drywall panels, or going for a full skim coat depends on the damage and your wall’s condition.
Spot Repair: For minor damage, patching is quick and cheap. Use joint compound to fill holes or cracks, then sand and prime. This method blends into existing texture but may not be perfect if you’re aiming for a smooth finish.
Replace Panels: If sections are severely damaged or you want a consistent look throughout the room, consider replacing entire panels. Remove old drywall, install new panels, then skim coat the whole area. This ensures a uniform finish but is more time-consuming and expensive than patching.
Full Removal and Skim Coat: If your walls are in good condition but you want a smooth, even surface, full removal followed by a skim coat might be your best bet. It’s more work and mess, but it gives you the most control over the final finish.
Structural or hazardous-material concerns
Before you start removing texture, check for any underlying issues. The wrong material choices can lead to cracking, staining, or weak bonds.
- Moisture Damage: Look for warping, bubbling, or discoloration. If found, address the moisture source first before proceeding with removal.
- Older Finishes (Plaster/Lathe): These can be delicate. Be gentle when wetting and scraping to avoid crumbling or damaging the underlying structure.
- Asbestos: If your home was built before 1978, test for asbestos before disturbing any texture. Disturbing asbestos can release fibers into the air, posing serious health risks.
- Lead Paint: Similar to asbestos, lead paint is a hazard when disturbed. Test first, then follow safe removal procedures.
- Drywall Condition: Check for sagging, cracks, or other signs of damage. If present, consider replacing panels rather than attempting to skim coat over them.
Applying Venetian Plaster and Finishing
Confirm substrate readiness and use a primer or sealer specified by the plaster manufacturer to control absorption and bonding; perform a small porosity test if unsure and follow the product data sheet for compatibility. Mix plaster to the consistency recommended for your chosen system—traditional lime-based versus polymer-modified products vary—then plan the number of thin coats and bond strategies between layers as indicated by manufacturer guidance.
Apply base coats with a clean trowel, feathering edges and keeping a consistent stroke pattern; build color and sheen with subsequent thin layers, finishing with burnishing or polishing techniques called for by the product. Control environment (ventilation, temperature, humidity) during drying, use the recommended sealer or wax for maintenance, and address common issues like pinholes or trowel marks per manufacturer troubleshooting notes.
Primer and Sealer Requirements
Before applying Venetian plaster, it’s crucial to prime your surface. Priming ensures better adhesion of the plaster and helps achieve an even finish.
Bonding primers are essential when working with joint compound textures. They create a strong bond between the substrate and the plaster, preventing peeling. Use a primer that’s compatible with your joint compound to avoid any reactions.
PVA (polyvinyl acetate) sealers can also be used as a base coat. They control suction and help distribute the plaster evenly. Test your surface’s porosity before applying. If it absorbs water quickly, you might need to apply a second coat of primer or use a sealer.
Venetian Plaster Application Techniques
Start by mixing your Venetian plaster according to the manufacturer’s instructions. Traditional plasters are lime-based, while polymer-modified ones offer better flexibility and durability.
Use a trowel to apply the first coat, working in small sections at a time. The key is to feather the edges to avoid visible lines between coats. Let it dry for the recommended time (usually 24-48 hours) before applying the next layer.
For the final coat, use a steel trowel to burnish the surface. Work in small sections, using circular or cross-hatch patterns. Apply even pressure and maintain a consistent pace to achieve an even sheen. Drying time between coats and environmental conditions (temperature, humidity) can affect the final finish, so keep them consistent.
Sealing, Burnishing, and Maintenance
After the final coat has dried, apply a sealer or wax to protect your Venetian plaster finish. This step is crucial for maintaining the sheen and preventing stains.
Burnishing is the process of polishing the surface to achieve a higher gloss. Use a steel trowel and apply even pressure in circular or cross-hatch patterns. Start with light pressure, then increase as needed. Be careful not to over-burnish, which can cause the plaster to lose its stone-like appearance.
To maintain your Venetian plaster finish, clean it gently using a soft cloth dampened with water and a mild detergent. Avoid harsh chemicals that could damage the surface. Inspect your walls regularly for any signs of wear or damage. If you notice pinholes, trowel marks, or peeling, address them promptly to prevent further issues.
Safety, Budgeting, Timeline, and Troubleshooting
Always use appropriate PPE, ensure ventilation, control dust with HEPA filtration, and check for lead or asbestos before disturbing old coatings—follow local rules and product label warnings. Budget planning should consider material choices, finish level, number of coats, tool rental, and disposal, and allow contingency for repairs or substrate replacement without relying on exact costs.
Plan a realistic timeline broken into prep, decision (skim/sand/remove), execution, and curing phases; schedule around ambient conditions that affect drying and curing. Watch for common mistakes—poor prep, wrong primer, over-wetting, or skipping bonding steps—and hire a pro when structural, moisture, or complex finish requirements exceed DIY comfort; be ready to describe substrate condition and desired finish when consulting a contractor.
Safety and ventilation best practices
Proper ventilation is crucial when working with drywall compounds, plasters, and sealers. Open windows or use fans to keep the area well-ventilated.
Wear a respirator during sanding or scraping to protect against dust inhalation. Ensure your respirator fits properly and is rated for the type of dust you’re dealing with.
Electrical safety is paramount when removing fixtures. Turn off power at the circuit breaker, test wires with a voltage tester, and use insulated tools.
Contain dust using plastic sheets or zip walls to prevent it from spreading throughout your home, especially if you’re working in a living area.
Budget and timeline planning
Estimate project scope by room size, texture severity, and chosen method. Larger rooms or severe textures will take longer and cost more.
Check local material prices for drywall compounds, plasters, sealers, and tools. Don’t forget to factor in disposal costs if you’re removing texture completely.
Renting tools can save money but may add time if you’re inexperienced. Consider your skill level and whether it’s worth hiring or buying.
Plan for curing times. Venetian plaster needs ideal temperature (65-80°F) and humidity (40-70%) to cure properly. Schedule work around these conditions.
Common mistakes and troubleshooting
Here are some frequent errors and how to avoid or fix them:
- Insufficient prep: Skipping sanding, priming, or sealing leads to poor adhesion and finish. Always sand lightly, prime, and seal before applying Venetian plaster.
- Wrong compound consistency: Over-wetting or under-wetting the compound affects its application and final look. Mix according to manufacturer’s instructions and adjust water as needed.
- Skipping primer: Primer improves adhesion and prevents tannins from bleeding through. Always use a high-quality primer before applying Venetian plaster.
- Improper mixing: Inadequate mixing leads to inconsistent results. Ensure you mix thoroughly before each use, following the manufacturer’s guidelines.
- Skipping sealing: Sealer protects your finish and enhances its appearance. Always apply a high-quality sealer once the plaster is fully cured.
Regularly inspect your work for signs of these mistakes, and address them promptly to avoid costly rework.
Conclusion
Now you finish with a clear plan you can trust: choose skim, sand, or remove based on what actually works on your surface, and prioritize safety to avoid costly mistakes or damage to the wall and your health.
Test a small area first, protect the substrate and surrounding finishes, check the texture closely, and confirm your chosen method by following a simple, repeatable sequence: prep the workspace, apply or remove as needed, sand or skim in short passes, and inspect before moving on to Venetian plaster and finishing. If you’re unsure, keep the process conservative and proceed in incremental steps to prevent irreversible damage.
Avoid common slipups: don’t skip testing, don’t overwork a plaster or skim layer, and don’t grind through a delicate substrate or into backing materials. Use eye protection and a mask, ventilate well, and keep a clean, organized work area so dust and debris don’t creep into electrical or plumbing—these habits save time and money. If you hit stubborn texture, or the substrate shows weak spots, it’s better to pause and call a professional rather than force a fix.
FAQ
What prep steps should I do before applying Venetian plaster over texture?
Clear the room and protect floors with drop cloths. Remove or detach baseboards and electrical cover plates as needed to reach the walls cleanly. Hold a clean, dry surface under your work and fix any obvious defects before you start.
What tools and materials should I gather for the job?
Have a mixing container, a sturdy mixer or paddle, joint compound, water, and several trowels (including a magic trowel for skim coats). Also bring sanding blocks, a dust mask, eye protection, drop cloths, and painter’s tape for clean edges. Keep a scraper and putty knife on hand for nibs and imperfections.
How should I mix joint compound for a skim coat or plaster coat?
Mix it to a smooth, lump-free consistency that you can spread evenly. Follow the product label for mixing guidance and work in small batches to avoid setting too fast or thick patches. If it feels too thick or too thin, adjust with a little water or compound as directed by instructions.
How do I apply and smooth the coating in sections with a magic trowel?
Work in small, horizontal or vertical sections and keep a wet edge to avoid visible seams. Apply a thin layer, then smooth across the surface with steady, even strokes. Don’t overwork the same spot—let each section set a bit before moving to the next.