
Introduction
Venetian plaster over existing textured walls means deciding whether to skim, sand, or remove that texture so the final finish looks smooth and bonds properly. In plain jobsite terms: skim if the texture is shallow and solid, sand if it’s flaky or slightly high, and remove if it’s loose, highly uneven, or has adhesion problems—check the product label and manufacturer instructions for finish tolerances and bonding prep. Preparing the room like a pro matters—remove baseboards and electrical covers, protect floors and furniture, and have joint compound, mixing tools, and a clean trowel ready before you start.
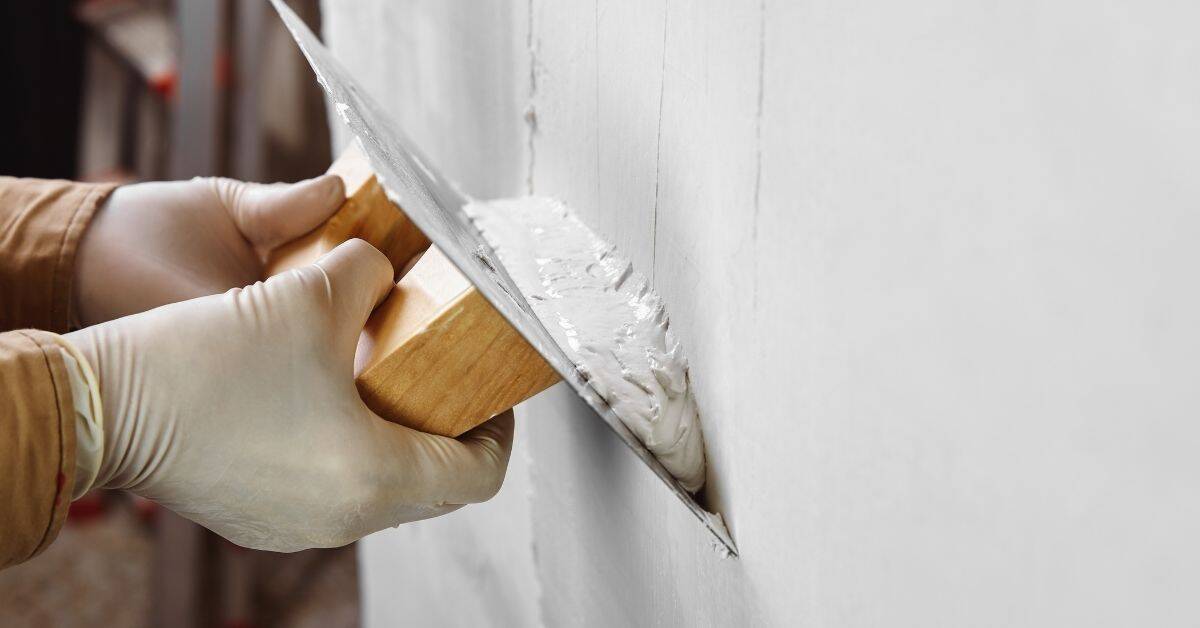
Mixing and applying joint compound for a skim coat is hands-on work: follow the compound label for water ratio, aim for a creamy, spreadable consistency, and load the trowel with smooth passes rather than bulky globs. Work in small sections, feather the edges with steady pressure, and sand only after it’s fully dry or as the compound instructions allow to avoid rework; if you’re unsure about a wall’s condition or adhesion, test a small area first or consult the plaster product’s guidance.
Key takeaways
- Prepare space by clearing furniture and removing baseboards and electrical covers.
- Gather and mix joint compound, setting up containment and dust control before skim.
- Apply skim coats with a trowel, smoothing texture toward uniform substrate.
- Inspect for high spots, cracks, moisture; wear respirator, plan sanding or removal.
- Prime and seal prepared surface before Venetian plaster for proper adhesion.
- Remove old texture safely when substrate shows damage; repair first.
Table of Contents
- Introduction
- Key takeaways
- Quick Decision Guide — Skim, Sand, or Remove?
- Planning, Prep, and Safety
- Materials and Product Selection for Venetian Plaster over Texture
- Skim-Coating Technique for Smoothing Texture Before Venetian Plaster
- Sanding and Spot-Leveling — Methods and Best Practices
- Removing Old Texture: Methods, Risks, and Substrate Repair
- Lighting, Inspection, and Visual Checkpoints During Prep and Plastering
- Priming, Sealing, and Final Venetian Plaster Application
- Conclusion
- FAQ
Quick Decision Guide — Skim, Sand, or Remove?
Begin by checking three visible and tactile factors: texture height, adhesion, and substrate condition. Do a small scrape test and a firm knock to judge how well the texture is bonded and whether voids or hollow sounds appear.
Use simple cutoffs: shallow, well-adhered texture usually lets you skim; moderate texture that is stable can be reduced by sanding and spot leveling; thick, rimed, peeling, or substrate‑compromised texture usually needs removal and repair. Verify any product limits on the label or technical data sheet and follow that guidance for final decisions.
When to skim: acceptable texture conditions
Skim-coating or direct plaster application works best on surfaces with a certain level of smoothness and stability. Here’s what you’re looking for:
First, check base compaction. If it’s solid and stable, you’re off to a good start. Skim-coating won’t fix poor compaction, so if in doubt, get professional advice.
Next, look at the texture. Acceptable conditions include:
- Smooth or lightly textured surfaces with no major cracks or holes.
- Surfaces that have been previously skim-coated and are in good condition.
- Newly poured concrete that has cured properly (at least 28 days) and shows no signs of settlement or cracking.
Remember, skim-coating isn’t a fix-all. It won’t hide major cracks or level out severely uneven surfaces. If you’re unsure, it’s always best to consult with a pro before starting any work.
When to sand or spot-level
You’ve already skimmed and got a decent surface. Now, check for these issues before plastering:
Low spots: If you see dips or valleys, grab your sand mix (1 part cement, 2-3 parts sand). Fill ’em up, let it set, then sand smooth.
Edges and corners: Feathering is key here. Mix a thin, soupy sand (1:4 or 1:5) to blend edges with the main surface. Be patient, don’t rush it.
Spot repairs: If you’ve got cracks or holes, fill ’em in with your sand mix. Let it set, then sand smooth. Remember, no big chunks of concrete left behind!
When full texture removal is necessary
Listen up, homeowner. There are times when you can’t just skim or sand over that popcorn ceiling. You gotta bite the bullet and remove it all. Here’s when:
Loose texture: If chunks are falling off or you can easily scrape it with your fingernail, it’s time for a full removal. Safety first, buddy.
Deep popcorn: If the texture is too deep, sanding won’t cut it. You’ll be at it forever and still won’t get a smooth finish. Trust me, I’ve seen it.
Delamination: When the old paint or texture starts peeling off in large pieces, it’s a sign that the whole thing needs to go. Don’t ignore this, it could lead to bigger problems.
Moisture damage: If you see water stains, mold, or mildew, stop right there. Moisture means trouble. You need to remove the old texture, fix the cause of the moisture, and start fresh.
Planning, Prep, and Safety
Start with a thorough inspection: check for moisture, mold, loose texture, and cracked joints to decide prep scope and whether permits or trade coordination are required. Document findings and plan sequencing so plaster work doesn’t get delayed by follow-on trades or unresolved substrate repairs.
Protect the room with sealed containment, negative‑pressure if possible, and a clean ingress/egress; use a respirator rated for fine dust, safety glasses, gloves, and disposable coveralls. Confirm disposal and lead/hazard rules with local authorities and consult product instructions for any specific PPE or ventilation requirements.
Tools and materials checklist
Before you start, make sure you have all the essential tools and consumables for skimming, sanding, removal, and Venetian plaster finishing. This list will help you stay organized and avoid mid-project trips to the hardware store.
- 5-in-1 trowel: For applying and spreading plaster; skipping this can lead to uneven application.
- Scrapers (6-inch & 12-inch): To remove old texture; not having these can make the removal process more difficult.
- Sander (orbital or pole sander): For smoothing surfaces after sanding or spot-leveling; skipping this can result in a rough finish.
- Respirator with P100 filter: Essential for protecting against dust during texture removal and sanding.
- Goggles: To protect your eyes from debris; forgetting these can lead to eye injuries.
- Plastic sheeting & drop cloths: For room protection and containment; skipping this can result in cross-contamination or damage to other areas.
- Venetian plaster kit: Includes base coat, finish coat, and sealant; ensure it matches your desired look.
- Tape measure & level: For accurate application and measurement; skipping these can lead to an uneven final product.
Quick rule: Always double-check your tools and materials before starting any project. It’s better to be prepared than to stop mid-project for supplies.
Dust control and PPE
Controlling dust is crucial when working with plaster and texture. Here’s how to protect yourself and your home from airborne particles:
Respirator: Use a respirator with a P100 filter to protect against fine dust particles. A half-face respirator provides better protection than a disposable mask.
Wear goggles or safety glasses with side shields to protect your eyes from debris. Some goggles come with a respirator attachment for added protection.
Use HEPA vacuums and dust barriers to contain dust within the work area. Regular vacuums may not capture fine particles, leading to cross-contamination or health issues.
Assessing the substrate and moisture issues
Before applying Venetian plaster, it’s crucial to inspect the underlying substrate for any damage, soft spots, or moisture. This step ensures a successful application and prevents costly repairs down the line.
Check for drywall damage: Inspect the walls for cracks, holes, or other signs of damage. Repair these issues before applying plaster to prevent them from showing through.
Look for soft spots or delamination: Press firmly on the wall with your hands or use a moisture meter to check for soft spots or delaminating drywall. These areas may need repair or replacement before proceeding.
Inspect for mold or moisture: Check for signs of water damage, such as discoloration, musty odors, or visible mold. If present, address the underlying cause and treat any affected areas before applying plaster to prevent further growth.
Materials and Product Selection for Venetian Plaster over Texture
Identify which Venetian plaster formulation you plan to use (lime, gypsum-based, or polymer‑modified) because each behaves differently over textured substrates and may need specific primers or base coats. Review manufacturer literature or product data sheets to confirm compatibility with existing finishes and recommended base layers.
Choose a bonding primer or skim material rated to adhere to textured surfaces and pick joint compounds or skim coats that list bonding to existing texture and appropriate indoor use. Check cure times, recoat windows, and any surface prep notes on the product technical sheet before starting test patches.
Venetian plaster types and finish options
When working with textured surfaces, understanding Venetian plaster types is crucial. Here are your main options:
Lime-based: Traditional, eco-friendly, but can be challenging to apply. Needs a compatible base coat and primer for adhesion.
Gypsum-based: Easier to work with, provides a smooth finish. May require flattening high points on texture before application.
Polymer-modified: Offers durability and flexibility. Can be used over light textures without sanding or skim coating.
Choosing the right skim coat or joint compound
Selecting the right product is key for a successful finish. Consider these options:
Ready-mix: Convenient, pre-blended. Ideal for small areas and touch-ups.
Setting-type compounds: Better for larger areas, offer more working time. Follow manufacturer mixing guidance for consistency.
Always choose products labeled for skim-coating over texture. Check VOC levels and water resistance for your specific needs.
Primers, sealers, and bonding agents
Using the right primer or sealer ensures a strong bond between your texture and new plaster. Here’s what to consider:
Cementitious primers: Ideal for textured surfaces, promote adhesion. Apply when you’re not using a skim coat.
Bonding agents/sealers: Can be used with or without skim coats. Enhance adhesion and seal the surface.
Plaster-specific primers: Some plasters require specific primers for optimal results. Always check the manufacturer’s recommendations.
Skim-Coating Technique for Smoothing Texture Before Venetian Plaster
Work in manageable panels and position raking lights to reveal highs and lows before you start; mix small batches and label them for consistent consistency across the wall. Test the compound on a scrap board so you can adjust water or additives until it spreads thinly without sagging.
Apply ultra‑thin coats with a wide trowel, maintaining a steady angle and feathered edges to avoid ridges; inspect each pass under angled light and allow the product to reach the manufacturer’s recommended set before the next coat. If you see low spots after two coats, add another thin coat rather than a single thick one, and follow product instructions for any sanding or priming between coats.
Mixing and achieving proper consistency
Start by gathering your joint compound or skim-coat powder. Follow the manufacturer’s instructions for mixing. Aim for a smooth, spreadable consistency – slightly thinner than drywall mud.
Thinning: If it’s too thick, add water in small increments until you reach the desired consistency. Stir well after each addition.
Thickening: If it’s too thin, let it sit for a few minutes to allow any air bubbles to rise and dissipate. Then, add more powder if needed. Always test on a scrap panel before applying to your wall.
Applying in sections and trowel technique
Divide your wall into manageable sections. Start at the top, working downwards to avoid drips.
Use a wide trowel or ‘magic trowel’ held at a consistent angle. Apply ultra-thin coats in an overlapping pattern, feathering the edges to avoid ridges. Maintain a steady rhythm for even coverage.
For each section, start at one corner and work your way across, then down. This helps minimize lap lines. If you do see any ridges or uneven spots, smooth them out immediately with light passes of the trowel.
Drying, curing, and when to sand between coats
Allow each coat to dry completely before applying the next. This usually takes around 24 hours in ideal conditions (70-85°F/21-29°C with low humidity). Use a damp cloth to test for dryness – if it’s dry, no residue will come off.
Once dry, lightly sand any imperfections or ridges using fine-grit sandpaper. Wipe off dust with a damp cloth. This step helps ensure a smooth surface for the next coat and ultimately, your Venetian plaster finish.
For light-to-moderate texture, you’ll typically need 2-3 coats. However, stop adding coats when you’ve achieved a uniform, flat substrate – over-smoothing can lead to delamination with Venetian plaster.
Sanding and Spot-Leveling — Methods and Best Practices
Decide whether sanding or scraping is appropriate by evaluating high spots, ridges, and how much profile must be reduced; use sanding for feathering and minor reduction, and plan removal for severe texture or hard‑attached ridges. Start with a hand block or sanding sponge on a test area to check results before stepping up to powered sanders.
Select tooling and grit progression that lets you feather without gouging, and always attach dust collection or use a HEPA vacuum with powered sanders. Wear an appropriate respirator, eye protection, and contain dust with barriers; if lead paint might be present, stop and confirm testing and disposal rules before continuing.
Hand sanding vs power sanding: pros and cons
When it comes to sanding your existing texture before applying Venetian plaster, you have two main options: hand sanding or using a drywall sander. Each method has its own advantages and disadvantages.
Pros of Hand Sanding
- Better control over pressure and area covered.
- Easier to feather edges and avoid gouges.
- Less dust generation compared to power sanders.
- Ideal for small areas or touch-ups.
Cons of Hand Sanding
- Time-consuming, especially on large surfaces.
- Requires more physical effort.
- May not remove heavy texture as efficiently as power sanders.
- Can lead to fatigue and inconsistent results if not done carefully.
Hand sanding is typically the better choice for small areas, feathering edges, or when you need precise control. For larger surfaces or heavier textures, a drywall sander may be more efficient.
Feathering and blending textured edges
When skim-coating only part of a wall or ceiling, it’s crucial to feather the edges to avoid visible ridges under your Venetian plaster. This technique involves gradually reducing the pressure and sanding strokes as you approach the unsanded area.
Start with a medium grit (e.g., 120-grit) sandpaper to remove heavy texture, then switch to a finer grit (e.g., 220-grit) for feathering. Begin sanding near the unsanded area with light, gentle strokes, gradually increasing pressure and stroke length as you move into the skimmed area.
Work in small sections, overlapping your strokes to ensure smooth transitions. Inspect your work frequently under good lighting to catch any missed spots or ridges. If needed, use a damp sponge to wipe away dust and reveal imperfections before moving on to the next section.
Alternatives to heavy sanding
In some cases, full-scale sanding may not be practical or desirable due to dust generation, time constraints, or the nature of your existing texture. Here are a few alternatives to consider:
Additional skim coats can help smooth out heavy texture without generating as much dust. Apply multiple thin coats of joint compound, allowing each to dry completely before sanding lightly with a fine-grit sandpaper.
For isolated high spots or ridges, spot-filling may be sufficient. Use a setting-type joint compound to fill in these areas, allowing it to dry before light sanding and priming.
If your existing texture is relatively smooth but has minor imperfections, applying a bonding primer can help create a better surface for Venetian plaster without the need for extensive sanding. These primers penetrate and seal porous surfaces, providing a more uniform base for your plaster finish.
Removing Old Texture: Methods, Risks, and Substrate Repair
Choose removal when texture is delaminating, rimed, or the substrate has been weakened; run a small‑area test to compare mechanical and wet methods and to see how drywall paper and joint compounds will react. Mechanical scraping risks paper tears and gouges, while wet methods can cause paper bubbling or deeper moisture intrusion, so weigh the tradeoffs against repair skill and time.
After removal, repair any torn paper, gouges, or seam damage with appropriate tape and compound and follow with a bonding primer once dry. If you’re unsure about moisture or hidden damage, check manufacturer guidance and local rules before proceeding and plan for re‑taping and flush finishing where needed.
Mechanical removal (scraping, sanding, re-taping)
Start by protecting your eyes and lungs with safety goggles and a dust mask. Use a wide-bladed scraper to remove loose texture. Be gentle; too much pressure can tear the drywall paper or damage the gypsum core.
If the paper tears, carefully cut it away with a utility knife. If the gypsum core is exposed, stop and reinforce before proceeding. Use joint compound to rebuild damaged areas, let it dry, then sand smooth.
For stubborn texture, use a pole sander or hand sander with 120-grit sandpaper. Sand lightly, following the direction of the paper fibers. Avoid deep sanding, which can damage the core and create voids.
Once textured areas are smooth, re-tape any exposed seams using drywall tape and joint compound. Let it dry before proceeding.
Wet scraping and softened texture approaches
For tougher textures, use a spray bottle to mist the area lightly. Let the water sit for about 15 minutes to soften the texture. Avoid over-wetting, as too much moisture can damage the drywall.
Use a wide-bladed scraper or putty knife to remove softened texture. Work in small sections, scraping from top to bottom. Be patient; let the water do some of the work for you.
If using chemical strippers, follow manufacturer’s instructions carefully. Test on a small area first to ensure compatibility with your drywall and texture. Never leave chemicals unattended and always wear appropriate PPE.
After removal, allow the substrate to dry completely before proceeding. This may take several days, depending on humidity levels.
Repairing and reinforcing the substrate after removal
Inspect the substrate for any gouges, tears, or other damage. Repair these areas using joint compound, applying in thin layers and allowing each to dry completely before sanding smooth.
If large sections of drywall are damaged, you may need to install new drywall sheets. Cut them to size, secure with drywall screws, then tape and mud the seams as usual.
For severe damage or to reinforce weak areas, use drywall reinforcement products like mesh tape or fiberglass reinforced joint compound. Apply according to manufacturer’s instructions before proceeding with your Venetian plaster application.
Before applying any primer or sealant, ensure your substrate is clean, dry, and free of any dust or debris. This will help your Venetian plaster adhere properly and last longer.
Lighting, Inspection, and Visual Checkpoints During Prep and Plastering
Use angled, directional lighting (raking light) to inspect for highs, lows, hairline cracks, and uneven skim work at each stage; normal room light will hide many defects that become visible under raking light. Run tactile checks—gloved fingers across the surface—to confirm visual findings and feel for ridges or loose material.
Do a small test patch to observe adhesion, drying behavior, and how the skim coat reads under your lighting setup before committing to a full wall. Maintain a short pre-skim, post-skim, and pre-prime checklist and photograph problem areas so fixes aren’t missed before you apply the final Venetian layers.
Using Directional Light and Test Patches
Before you start skim-coating or applying Venetian plaster, use this checklist to catch imperfections with angled lighting and test patches.
- Set up work lights: Position them at a 45-degree angle to cast shadows over the texture. This reveals high/low spots, hairline cracks, and uneven skim layers that room lighting hides.
- Check for shadows: Look for areas where light and shadow meet. Any variations indicate texture issues.
- Test patches: Apply small skim or patch in a hidden area to observe how it responds to light, how it dries, and whether sanding reveals new issues.
- Observe drying: Keep an eye on test patches as they dry. Any cracking or peeling indicates problems with adhesion or texture.
- Sanding observation: Lightly sand test patches to see if it reveals new issues or improves the surface’s appearance.
- Feathering check: Observe how light hits feathered edges. Any harsh lines indicate areas that need more blending.
- Check for loose texture: If test patches lift easily, it indicates loose or poorly adhered existing texture.
- Document issues: Photograph or log any problems found during this process to guide decisions on skimming, sanding, or removal.
Quick rule: Always inspect with directional light and test patches before starting major work. It saves time and materials in the long run.
Tactile Checks and Straightedge Use
Before applying Venetian plaster, use this tactile checklist to find high and low spots not visible to the eye.
- Wear gloves: Protect your hands with work gloves before running them along walls.
- Run fingers along walls: Feel for smoothness, ridges, dips, or loose substrate. This helps detect issues invisible to the naked eye.
- Use a straightedge: Run it along walls to find high spots (where it doesn’t touch) and low spots (where it wobbles).
- Check for ridges: Feel for any raised areas that indicate poorly feathered edges or high spots.
- Dip check: Press your fingers into the wall to feel for dips or hollow spots, indicating loose texture or substrate issues.
- Loose texture check: Gently tug on existing texture. If it feels loose, it needs to be removed or reinforced before skim-coating.
- Substrate differences: Note any differences in feel between plaster, joint compound, and existing texture. This helps identify areas that may need special attention.
Quick rule: Always use both sight and touch to inspect walls before applying Venetian plaster. It ensures a smooth, even finish.
Final Pre-Prime Checklist
Before applying primer or Venetian plaster, use this final checklist to ensure your surface is ready.
- Check adhesion: Lightly scratch the surface with a nail. If it peels or flakes, it’s not properly adhered.
- Uniform texture check: Inspect the entire surface for uniform texture. Any variations may need spot-leveling.
- Edge transitions: Ensure all edges are feathered and blended smoothly into the surrounding wall.
- Dry surface check: Make sure the surface is completely dry before priming or plastering. Moisture can cause adhesion problems.
- Dust-free check: Wipe down the surface with a damp cloth to remove any dust. A clean surface ensures good adhesion.
- Pocked/chipped zones: Inspect for any pocked or chipped areas that need attention before priming.
Quick rule: Always double-check your surface is ready before applying primer or Venetian plaster. It ensures a smooth, durable finish.
Priming, Sealing, and Final Venetian Plaster Application
Base your primer choice on substrate porosity and the skim coat product: use a plaster-specific primer or an appropriate PVA/adhesive primer per the product guidance to manage suction and adhesion. Seal highly porous skim coats so the Venetian base coat lays down uniformly and to reduce pinholing; consult the primer or plaster data sheet for recoat windows and compatibility notes.
Follow the manufacturer’s recommended sequence: base coat, build coats, and finishing passes with any polishing or sealing steps specified for the plaster system you chose. For final durability and stain resistance, use the suggested sealer or wax and verify curing and application instructions on product literature before polishing or handling the finished surface.
Primer and Sealer Application Tips
Start by choosing the right primer. Use PVA/adhesive primers for high suction, porous surfaces or where you need extra bonding power. Plaster-specific primers are great for standard walls with normal porosity.
Coverage: Aim for 8-12 sq ft per gallon. Apply two thin coats, allowing the recommended recoat window (usually 30 minutes to an hour).
Specialty primers: For difficult surfaces like new drywall or problem areas, use specialty bonding primers following the manufacturer’s guidelines.
Applying Venetian Plaster Over Prepared Substrate
Start with a base coat. Thin it slightly (5-10%) to improve coverage and workability. Apply using a trowel, working in small sections.
Layering: Follow up with thin coats of Venetian plaster, allowing each layer to dry according to the manufacturer’s instructions before burnishing or polishing. Build your desired texture gradually.
Avoid telegraphing imperfections: Ensure your substrate is well-prepared and primed. Use a straightedge to check for level surfaces and fill any gaps with joint compound if necessary.
Maintenance and Protective Finishes
For high-traffic areas, consider a topcoat or wax to enhance durability. Water-based sealers are easy to apply and maintain. Oil-based sealers offer more protection but require proper ventilation and longer drying times.
Maintenance: Clean spills promptly with a damp cloth. For tougher stains, use a mild soap solution. Avoid harsh chemicals or abrasive materials.
Reapplication: Reapply sealers every 2-5 years, depending on traffic and wear. Inspect your surface regularly for any signs of damage.
Conclusion
Getting a durable, smooth Venetian plaster look over existing texture hinges on choosing the right path and sticking to careful steps. Prioritize safety, test your approach on a small area, and proceed in a controlled sequence to avoid costly mistakes.
First, evaluate your surface and pick skim, sand, or remove as needed, then plan prep, prime, and seal before the final plaster. Do a patch test, set up proper ventilation and lighting, apply the chosen prep or skim coat, let it dry, inspect for flatness, spot-level any low spots, and then continue with priming, sealing, and the final plaster layer in clean, deliberate passes.
Common mistakes to avoid include over-sanding or thinning out surfaces too aggressively, skipping a test patch or failing to monitor moisture and temperature, and rushing priming or sealing before the substrate is truly ready. Safety rules to follow are simple: wear a proper respirator, protect adjacent areas, keep moisture and dust under control, and work in small sections you can fully judge before moving on. If the wall shows signs of severe substrate damage, or you’re unsure about the underlying condition after any removal, don’t push ahead—call a professional and get a solid plan.
When in doubt, especially with questionable substrate or large areas, bring in a pro for assessment and repair. With careful checks, deliberate steps, and a clear finish plan, you can achieve a durable, good-looking plaster surface that lasts.
FAQ
How do I prep the space before skim coating over existing texture?
Clear the area, protect floors, and remove obstacles. Cover outlets and switch plates, and tape trim to control dust. Dry any moisture and wipe surfaces ready for adhesion checks.
Should I remove baseboards and electrical covers, and how do I do it safely?
Yes, remove baseboards if you want a clean edge. Turn off power to outlets and lights, then unscrew covers carefully and set them aside. Keep track of small pieces so you don’t damage trim or wiring once you start skimming.
How do I mix and apply joint compound with a trowel for a smooth skim?
Mix to a workable consistency as per the product label. Apply with a wide trowel in thin coats, then pull the trowel flat to smooth high spots. Work in small sections and feather the edges to blend with the wall.
What lighting helps spot imperfections during prep and plastering?
Use bright, steady lighting from the side to reveal ridges and hollows. Move the light as you work to catch shadows that show high spots. Recheck under normal room lighting before sealing.