
Introduction
Burnishing Venetian plaster is a critical final step that requires precise timing. Knowing how long each stage takes ensures you achieve the desired sheen without damaging the finish.
This guide walks you through the burnishing process, breaking down each step by time to help you plan your project effectively.
For the full guide, see Venetian Plaster Burnishing: Tool Choice, Timing, and How to Avoid Black Marks.
Understanding the Burnishing Timeline
The entire Venetian plaster burnishing process takes approximately 3-5 days, depending on factors like climate and plaster type. Here’s a detailed timeline:
- Day 1: Surface Preparation (1-2 hours) – Clean, prime, or seal the wall; ensure it’s dust-free.
- Day 2: Plaster Application (30 minutes – 1 hour per coat) – Apply base coats as recommended by the manufacturer. Allow each coat to dry according to product instructions before applying the next one.
- Day 3: Initial Set and Burnishing Preparation (8-24 hours) – Let the final coat set but not fully cure. Perform touch tests to determine if it’s ready for burnishing.
- Day 4: Burnishing (1-2 hours per bay) – Divide your project into small bays and burnish each one, working quickly before the plaster cures too much. Follow the step-by-step technique outlined below.
- Day 5: Final Inspection and Touch-ups (30 minutes – 1 hour) – Inspect your work for any defects or missed spots. Make necessary touch-ups before the plaster fully cures.
Key takeaways
The preparation stage significantly impacts the overall timeline, so ensure you allocate enough time for surface readiness to avoid delays in your burnishing schedule.
- Ensure surface is fully cured and dust-free before starting the burnishing stage.
- Use the right tool for the finish: man-made or natural stones vary sheen.
- Test burnish timing with light pressure; stop if scratches appear or glaze drag.
- Protect surrounding surfaces; tape edges, wear sleeves, and ventilate work area.
- Avoid black marks by maintaining clean tools and consistent burnish motion.
- Address defects promptly: fix pinholes or color unevenness before final gloss.
Table of Contents
- Introduction
- Key takeaways
- What Burnishing Is and Why It Matters
- Preparation and Surface Readiness
- Tools and Materials Checklist
- Choosing the Right Tool for the Finish You Want
- Timing: When to Start Burnishing (Stages and Touch Tests)
- Step-by-Step Burnishing Technique
- How to Avoid Black Marks — Causes, Prevention, and Fixes
- Troubleshooting, Safety, Sustainability, and Budgeting
- Conclusion
- FAQ
What Burnishing Is and Why It Matters
Burnishing is a deliberate polishing action that compresses the surface of Venetian plaster to form a denser, more reflective face. It changes a matte finish into satin or high gloss by smoothing and sealing the outer layer rather than adding a separate film.
Not all plasters respond the same—lime-based, pigment-stable mixes and finishes that are clean, dry, and crack-free take a shine best; cementitious or heavily textured mixes may not. Check the product label or technical data sheet for suitability and wait until the plaster has reached the manufacturer’s recommended set and moisture state before attempting burnish passes.
What burnishing does to lime vs acrylic plasters
Burnishing transforms Venetian plaster surfaces, but the results vary between lime-based and acrylic plasters.
Lime-based plasters: These respond best to burnishing. The rubbing action compresses the surface, driving out moisture and creating a reflective layer that shifts from matte to satin or high gloss. It enhances durability, sheen, and visual depth.
Acrylic plasters: While acrylic plasters can be burnished, they don’t achieve the same level of polish as lime-based ones. Acrylics are more durable but less porous, so they don’t compress or reflect light as well. Burnishing mainly serves to even out the surface and enhance color saturation.
When to choose a high-polish vs matte approach
Choosing between a high-polish and matte finish depends on your desired aesthetic and performance needs.
High-polish: Aim for a mirror-like polish when you want a reflective, luxurious look. High-polish surfaces are easier to clean and show less dirt. However, they require more maintenance to keep the sheen intact.
Matte patina: A soft, matte patina is ideal for a subtle, understated look. It’s less demanding in terms of maintenance but may show more wear over time. Matte surfaces are also better at hiding imperfections and can be easier to touch up if needed.
Preparation and Surface Readiness
Good burnishing starts with a stable substrate: remove old loose coatings, grease, salts, and contaminants so the plaster bonds evenly. Repairs must be feathered and leveled; use a straightedge to confirm flats and bring highs/lows within the tolerance the plaster system allows.
Verify ambient and substrate moisture with a meter and follow the plaster manufacturer’s guidance on acceptable conditions and recoat windows. Prime or apply a bonding coat only with a product specified for your plaster type and run a small adhesion or porosity test before covering the entire wall.
Substrate cleaning, priming, and level requirements
Before applying Venetian plaster, your substrate must be clean, primed, and level. Start by removing any existing coatings like paint or sealer with a suitable stripper.
For lime-based plasters, use a primer designed for lime systems. For cement-based, choose one compatible with acrylic plasters. Always follow product instructions for application.
A smooth level surface is crucial for polished results. Fill high/low spots using a compatible patching compound and sand or skim-coat to achieve a tight tolerance. Use a straightedge or level to confirm flatness.
Moisture, temperature, and environmental checks
Moisture and temperature affect Venetian plaster’s setting. Use a moisture meter to check both ambient humidity and substrate moisture.
Ideally, keep relative humidity (RH) between 40-60% and surface dryness within manufacturer’s guidelines. Avoid working in humid conditions or where condensation might form.
Temperature should be between 50°F – 70°F (10°C – 21°C). If it’s too cold, warm the area first. Too hot? Cool it down before applying plaster.
Patchwork and skim-coat smoothing
Fill cracks and voids with a compatible patching compound, ensuring it’s level with the surrounding surface. Let it dry according to product instructions.
Sand the patched area lightly using fine-grit sandpaper (120-150 grit). Vacuum or wipe off dust. Apply a thin skim-coat of plaster over the entire area, feathering edges to blend with existing surface.
Let it dry, then lightly sand and clean again. Check for any remaining imperfections using a straightedge or level. Reskim if necessary. A smooth surface ensures even burnishing without flaws telegraphing through.
Tools and Materials Checklist
Gather non-reactive, clean tools first: stainless or plastic trowels, rubber floats, natural-fiber brushes, soft sponges, plastic mixing paddles, and a clean bucket system; separate consumables like lint-free rags and masking tape. Keep a dedicated cleaning station and color-code dirty versus clean items to avoid cross-contamination.
Include safety gear—respirator or dust mask, eye protection, gloves, and coveralls—and mild, non-reactive cleaning agents such as soap and water or manufacturer-recommended solvents for tool care. Inspect every tool for rust, pitting, or dried material and confirm compatibility with lime-based products per the product instructions before use.
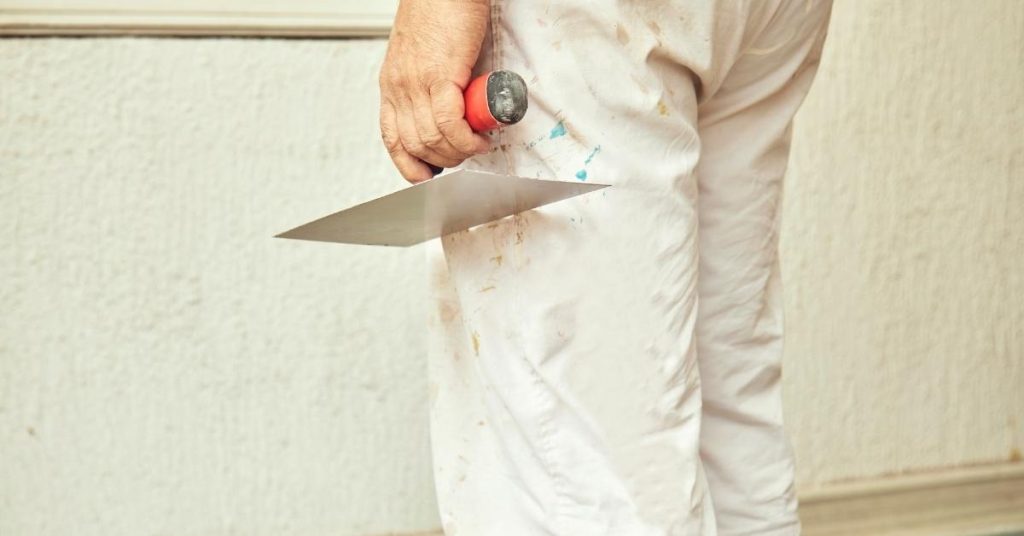
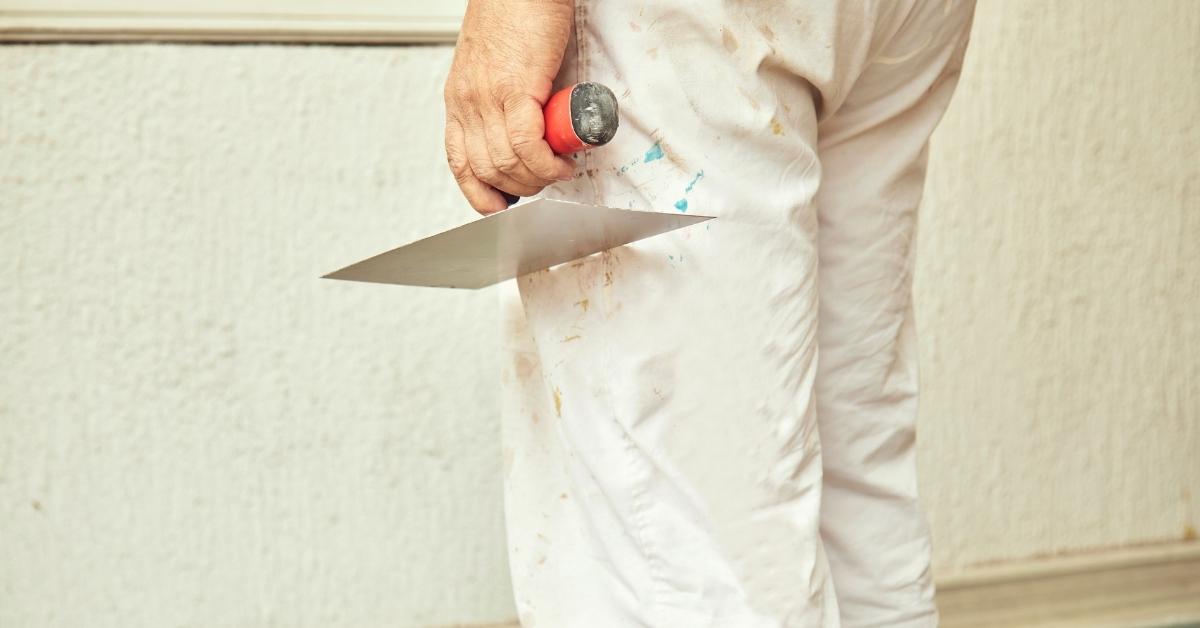
Burnishing tools overview (trowels, spatulas, cloths, pads)
Before you start burnishing, make sure you have the right tools. Here’s a quick checklist.
- Stainless steel trowel: Essential for applying and spreading plaster. Skip it, and you’ll struggle to apply an even layer.
- Flexible spatula: Needed for scraping off excess plaster and smoothing edges. Without it, you might end up with uneven surfaces or sharp corners.
- Soft cloths (cotton or microfiber): Crucial for burnishing. They help achieve a smooth, polished finish. Don’t skip, or your finish will be inconsistent.
- Polishing pads: For high-polish looks. Not necessary for matte finishes but give a professional touch when used right.
- Non-reactive trowel edge protector: Prevents rust or metal residue from contaminating the plaster.
- Plastic mixing bucket: Keeps your plaster clean and prevents contamination. Don’t mix in reactive containers.
- Natural fiber brushes: Help remove excess plaster and smooth surfaces before burnishing. Skip, and you’ll struggle to achieve a smooth finish.
- Rubber float: Useful for evening out the plaster layer before burnishing. Without it, your burnish might not be even.
Quick rule: Always check tools for rust, pitting, or dried plaster before use to avoid contamination.
Consumables and finish products (waxes, sealers, cleaners)
Post-burnish care is crucial. Here’s what you’ll need.
- Breathable sealer/wax: Protects the plaster from moisture and dirt. Skip it, and your finish might not last.
- Compatible with lime plaster: Always check compatibility to avoid discoloration or damage.
- Clean water containers: Essential for cleaning tools and maintaining a clean workspace. Don’t mix cleaning water with plaster water.
- Lint-free rags: For applying sealers/waxes. Regular rags can leave lint behind, ruining your finish.
- Masking tape and painter’s tape: Protects adjacent surfaces from plaster or sealer. Skip, and you might end up with unwanted marks.
- Drop cloths: Covers the floor to protect it from plaster drips. Don’t skip; cleaning dried plaster is tough.
- Dedicated cleaning solvent/mild soap: For tool maintenance. Use a non-reactive cleaner to avoid contamination.
- Test patches: Always test sealers/waxes on small, hidden areas first. This helps you avoid costly mistakes.
Quick rule: Never apply sealers/waxes until the plaster is completely dry and cured.
Safety gear and SDS checks
Your safety is paramount. Here’s what you need to protect yourself and dispose of materials responsibly.
- Dust mask/respirator: Protects from plaster dust. Skip, and you might inhale harmful particles.
- Safety glasses: Shields your eyes from debris. Don’t skip; eye injuries are serious.
- Gloves: Prevents skin irritation or chemical burns. Always wear appropriate gloves for the task.
- Knee pads: Protects your knees during prolonged periods on the floor. Skip, and you might end up with sore knees.
- Breathable coveralls: Keeps plaster off your clothes. Don’t skip; cleaning dried plaster is tough.
- Adequate ventilation: Essential for proper drying and to remove harmful fumes. Without it, you might feel unwell.
- Safety Data Sheets (SDS): Check SDS for handling, storage, and disposal guidelines. Skip, and you might mishandle or dispose of materials improperly.
- Cleaning stations: Designate separate cleaning stations for tools, brushes, and sponges to prevent contamination.
Quick rule: Always follow SDS guidelines for safe handling and disposal of materials.
Choosing the Right Tool for the Finish You Want
Tools dictate texture and sheen: steel trowels give sharper reflections, rounded plastic trowels and felts soften texture, and wool or microfiber pads refine gloss without scratching. Edge profile matters—a sharp edge can leave fine lines, a rounded edge yields smoother catches of light, and a beveled edge can help feather transitions.
Select materials that won’t react with lime or pigments and test any unfamiliar tool on a scrap panel to watch for staining or picking up pigment. Match tool choice to your timing and technique—wetter mixes and earlier passes tolerate stiffer tools, while final polishing prefers softer, smooth-faced burnishers—referencing manufacturer guidance when in doubt.
Stainless steel vs carbon steel vs plastic tools
When it comes to concrete work, the tool material matters. Here’s what you need to know:
Stainless steel is your best bet for most jobs. It won’t react with concrete like carbon steel can, preventing rust and stains. Plus, it’s durable and long-lasting.
Carbon steel tools are cheaper but they’ll rust if not properly maintained. They’re okay for small projects or when you’re on a tight budget, just keep them clean and dry.
Plastic tools have their place too. They’re lightweight, cheap, and won’t damage delicate surfaces. Use them for finishing work, like smoothing edges or troweling. But they’re not as durable as metal, so don’t expect them to last as long.
Always check your tools before you start a job. A quick once-over can save you headaches down the line.
Trowel size, flex, and edge finish considerations
The right trowel makes all the difference. Here’s what to consider:
Size matters. Larger trowels (12″ – 16″) cover more area faster but can be harder to control. Smaller ones (8″ – 10″) offer better control for tight spots and edges.
Flexibility counts. Stiffer trowels are great for leveling and initial screeding, while flexible ones help with final finishing. Check your concrete’s consistency; wetter mixes need more flex to avoid leaving marks.
Lastly, edge finish is crucial. A smooth, burr-free edge reduces the risk of scarring or marks. Inspect your trowel before use and replace if edges are damaged.
Cloths, pads and handheld polishers for final passes
When it’s time to finish your concrete, switch from metal tools. They can scratch the surface. Instead, use soft cloths or pads with handheld polishers.
Check your polisher. It should have adjustable speeds for different stages of polishing. Start slow, then increase speed as you go.
For a clean, burnished sheen:
- Use soft cloths or pads, not abrasive ones. They won’t damage the surface.
- Work in small sections. Overlap each pass by about half to ensure even coverage.
- Polish until you see a reflection. This means you’ve achieved a smooth, shiny finish.
Timing: When to Start Burnishing (Stages and Touch Tests)
Watch for stage milestones: initial set, a firmer surface for light passes, and the later stage suitable for final polishing; always follow the plaster product’s stated timing rather than guessing. Visual cues include a shift from wet sheen to a more satin look and the loss of surface tack or fingerprints.
Use gentle fingertip pressure to feel resistance without leaving marks and perform small test patches in discreet areas to confirm readiness. Record results and adjust for environmental factors—temperature, humidity, and airflow affect cure pace—using the product instructions as your primary reference.
Visual and Tactile Readiness Indicators
The first sign that your Venetian plaster is ready for burnishing is a change in its appearance. The wet, glossy look will start to fade, replaced by a satin or matte finish.
Gently press your fingertip onto the surface. You should feel slight resistance and no tackiness or residue left behind. This indicates that the plaster has set enough for initial burnishing.
Remember: Every product is different, so always follow the manufacturer’s guidelines.
Using a Test Patch Protocol
Before you start burnishing your entire wall, do a small test patch. This way, you can check if your timing and pressure are right.
Choose a hidden spot or an area that won’t be too noticeable if something goes wrong. Follow the full process – apply the plaster, let it set, then burnish it. Check the result. If it’s not what you expected, adjust your approach before moving on to larger areas.
Document your test patch results. Note down when you started, how long it took to set, and any adjustments you made. This will help you plan for the rest of your project.
Step-by-Step Burnishing Technique
Begin with broad, light passes to align texture, move to intermediate passes to compact and smooth, then finish with fine polishing tools; change tools when gloss development or slip indicates it. Maintain consistent, even pressure and use overlapping strokes—cross-hatch or parallel sweeps—so you don’t create lap lines or localized overwork.
Gauge pressure by feel: too light will not compact; too heavy will drag or darken the paste and risk marks—if you see drag lines or material buildup, back off and wait a touch longer. Stop when sheen and texture are uniform across the test area and avoid repeating full-area passes that can overwork the finish; if problems appear, consult the product guidance for recovery steps.
Step-by-Step Process
This section guides you through the practical steps of burnishing Venetian plaster, from preparation to final checks.
- Preparation: Gather tools (trowels, cloths, pads), safety gear, and check your work area is clean and dry. Why: A tidy workspace prevents dust and debris from marring the finish.
- Initial smoothing passes: Start with a wide trowel to flatten and compress the plaster using broad, even strokes. Why: This evens out the surface and removes any air pockets.
- Pressure control: Apply light pressure initially, gradually increasing as the plaster firms. Check: Look for consistent sheen across the surface to ensure even pressure.
- Mid-stage refinement: Switch to a felt wheel or microfiber pad for incremental polishing. Why: This builds sheen and prepares the surface for the final polish.
- Final polish: Use soft cloths or pads for the last pass, applying light pressure and maintaining even coverage. Check: Inspect for uniform texture and no drag lines.
- Waxing (optional): Apply a compatible wax or sealer to enhance protection and sheen. Why: This adds durability and extra gloss.
- Final checks: Inspect the entire surface for any missed spots, marks, or unevenness. When to call a pro: If you notice significant issues, consider hiring an expert to assess and correct the finish.
Initial smoothing passes and pressure control
Start with broad, even strokes to flatten and compress the plaster without digging into it. Lighter pressure is often better as the surface firms.
Tip: Apply just enough pressure to leave a slight imprint of your trowel’s edge in the plaster. This indicates you’re working at the right depth.
As the plaster firms, gradually increase pressure. Cue: You’ll see more sheen develop as you apply more force. Be careful not to overwork the surface or create black marks.
Remember, consistent contact is key. If your trowel starts skipping across the surface, you’re applying too little pressure. If it leaves deep grooves, you’re using too much.
Mid-stage refinement and sheen development
Once the plaster has firmed, switch to a felt wheel or microfiber pad for incremental polishing. This builds sheen and prepares the surface for the final polish.
Tip: Monitor reflections in the surface. As you burnish, you should see more light bouncing off the plaster, indicating increased gloss.
Be mindful of your stroke direction. A consistent pattern helps maintain even coverage and prevents lap marks. Example: Circular sweeps work well for small areas, while linear strokes are better for larger surfaces.
Rotate the substrate to avoid drag lines. Cue: If you notice any streaks or lines following your stroke direction, it’s time to rotate the surface.
Final polish, waxing, and finishing touches
For the last pass, use soft cloths or pads with light pressure to maintain even coverage. This ensures a uniform texture and no drag lines.
Tip: If using a handheld polisher, keep it moving at a consistent speed to avoid creating micro-scratches.
If desired, apply a compatible wax or sealer to enhance protection and sheen. Why: This adds durability and extra gloss, helping your Venetian plaster finish last longer.
After application, allow the wax or sealer to cure according to manufacturer instructions. Then, perform final visual checks for uniformity. Cue: Look for any missed spots, marks, or unevenness that may require touch-ups.
How to Avoid Black Marks — Causes, Prevention, and Fixes
Black marks often come from contaminants (lint, oils), metal reaction (rust or iron pickup), grit trapped during working, or overly aggressive burnishing. Visually they appear as streaks, smudges, or concentrated dark lines and can worsen if a contaminated tool is repeatedly used.
Prevent problems by using lint-free tools, non-reactive materials, clean water and rags, and by testing every tool on a scrap panel first; wipe down surfaces and tools frequently and keep a dust-free workspace. If marks appear, try localized light rework with a clean, appropriate tool or refinish the affected panel per the plaster manufacturer’s remediation instructions; when unsure, check the product data sheet for recommended corrective measures.
Step-by-Step Repair Process
Follow these steps to avoid and fix black marks on your Venetian plaster finish.
- Preparation: Clean the area, wear gloves, and ensure good ventilation. Why: Prevents dirt transfer and ensures safety.
- Identify cause: Check tools, surface, and products for contamination or incompatibility. Why: Targeted action requires knowing the root cause.
- Clean tools: Wipe down trowels, cloths, and pads with clean water and a mild detergent. Why: Removes residue that could cause marks.
- Test patch: Apply plaster to a small hidden area, let it cure, then burnish. Why: Ensures compatibility of products and working conditions.
- Repair or reapply: Lightly rework affected areas with clean tools, or remove and re-apply as needed. Why: Prompt action prevents spread of marks and maintains finish quality.
- Seal: Re-seal the repaired area if necessary to maintain protection. Why: Prevents moisture and dirt from causing further issues.
- Final check: Inspect the entire area for any remaining marks or inconsistencies. Why: Ensures a consistent, high-quality finish.
- Cleanup: Dispose of used materials properly and store tools safely. Why: Maintains tool life and keeps the workspace clean.
Common causes of black marks explained
Black marks on Venetian plaster can be caused by several factors:
Tool contamination: Lint, fibers, or residue from tools can transfer onto the surface and show up as dark marks.
Metal reaction: Iron or corrosion from metal tools can react with pigments in the plaster, causing discoloration.
Dirt/grit embedded: Small particles of dirt or grit trapped in the plaster during application can become visible after burnishing.
Overworking/burnishing too aggressively: Applying too much pressure or working the surface excessively can cause the plaster to darken or discolor.
Incompatible products/sealers: Using products or sealers that are not compatible with the Venetian plaster can lead to unwanted reactions and marks.
Prevention checklist (cleaning, tool choice, procedures)
Use this checklist before, during, and after applying Venetian plaster to minimize the risk of black marks.
- Clean tools: Pre-clean trowels, cloths, and pads with clean water and a mild detergent. Why: Removes residue that could cause marks.
- Choose non-reactive metals: Opt for stainless steel or coated tools to prevent metal reactions. Why: Reduces risk of discoloration from iron/corrosion.
- Prepare surface: Clean and prime the wall to minimize dust and ensure adhesion. Why: Prevents grit from embedding in the plaster.
- Consistent consistency: Keep the plaster at a consistent consistency throughout application. Why: Ensures even coverage and reduces overworking.
- Select compatible sealants: Choose sealants that are designed to work with Venetian plaster. Why: Prevents unwanted reactions and maintains finish quality.
- Test on hidden area: Apply plaster to a small, inconspicuous spot before full application. Why: Allows for testing of products and working conditions.
- Monitor working time: Keep track of the plaster’s working time to avoid overworking. Why: Prevents darkening or discoloration from excessive handling.
- Verify pH compatibility: Ensure that all products used have compatible pH levels. Why: Prevents unwanted reactions and maintains finish quality.
- Maintain clean water/cloths: Change water frequently and use clean cloths throughout the application process. Why: Prevents dirt or residue from being reintroduced onto the surface.
Quick rule: Regularly review and update your checklist based on the specific products and conditions of each project.
Fixes for black marks and when to recoat
If black marks appear, follow these steps to address the issue safely and effectively:
Gentle corrective steps: Lightly rework affected areas with clean tools or refinish small sections. Why: Allows for targeted repair without disturbing the entire surface.
Re-seal if needed: If marks appear after sealing, lightly sand and re-apply sealant to the affected area. Why: Maintains protection and enhances appearance.
When to remove and re-apply: If marks are extensive or deep, it may be necessary to remove and re-apply the entire panel. Why: Ensures a consistent, high-quality finish throughout the area.
Signs of full rework versus localized repair: Light, scattered marks can often be repaired locally, while dark, widespread discoloration may require full reapplication. Why: Helps determine the most effective and efficient course of action.
Troubleshooting, Safety, Sustainability, and Budgeting
Document defects and tackle them in order: identify whether marks, dull spots, or cracks are timing, material, or tool issues, then follow stepwise fixes—light rework, patch and re-burnish, or remove and reapply where needed. Control environment and timing to prevent problems: moderate temperature, stable humidity, and consistent airflow reduce drying issues that complicate burnishing.
Protect health with PPE, dust control, and ventilation and choose low-VOC or responsibly sourced materials when possible; follow waste-reduction practices like batching and reusing leftovers per local rules. For budgeting, track materials, decide which tools to rent or buy, and add schedule buffers for curing and potential touch-ups so costs and time aren’t underestimated.
Common mistakes and recovery tips
Even with careful planning, mistakes can happen during the Venetian plaster burnishing process. Here are some common errors to avoid and their recovery strategies.
- Overworking: Avoid overworking the plaster as it can cause cracking or dull spots. If this happens, lightly sand the area with fine-grit sandpaper (220-320 grit) and re-burnish.
- Wrong tool: Using the wrong trowel or burnisher can lead to poor results. Always use a high-quality, smooth-surfaced trowel for application and a smooth, flat burnisher for burnishing.
- Poor timing: Re-burnishing too early or too late can affect the finish. Wait until the plaster is no longer tacky but still slightly damp before re-burnishing.
- Inconsistent pressure: Applying inconsistent pressure while burnishing can result in blotchy spots. To fix, lightly sand and re-burnish with consistent pressure.
Remember, prevention is key. Always test your tools, techniques, and timing on a small patch before committing to the entire surface.
Health, safety, and disposal best practices
Safety should always be your top priority when working with Venetian plaster. Here are some essential health and safety measures to follow.
Ventilation: Ensure proper ventilation in the work area to prevent the buildup of harmful dust and fumes. Open windows or use fans to maintain good air circulation.
Dust control: Wear a respirator with a particulate filter to protect against silica dust. Also, keep the work area clean by regularly wiping down surfaces.
PPE and disposal: Wear appropriate personal protective equipment (PPE), including gloves, safety glasses, and long sleeves. Always follow the Safety Data Sheet (SDS) instructions for proper cleanup and disposal of materials.
Cost planning and eco-friendly options
Planning your budget is crucial to ensure a successful project. Here are some elements to consider when creating your budget:
Materials: Include the cost of plaster, sealers, and any necessary tools in your budget. Consider lime-based plasters, which are more eco-friendly than cement-based alternatives.
Tools: Decide whether to rent or purchase tools based on your needs and long-term plans. Remember to factor in any maintenance or repair costs for rented equipment.
Labor/learning time: If you’re hiring help, include labor costs in your budget. If you’re doing it yourself, account for the time spent learning and practicing techniques.
When choosing plasters, sealers, and other materials, look for low-VOC additives, eco-friendly sealers, and suppliers who practice responsible sourcing. Always check supplier claims and certifications to ensure you’re making an informed decision.
Conclusion
Burnishing Venetian plaster properly protects the finish and keeps the look sharp. Do the work with plan, protection, and patience, and you’ll avoid costly fixes and achieve a durable, smooth result.
Check in this order: ensure the surface is clean and fully dry, confirm the timing by completing the prior stages, select the right tool for the desired sheen, test a small patch, and burnish with light, even pressure while watching for uniform gloss and no new marks. Keep tools, materials, and the work area ready, and proceed in short, controlled passes until the finish reads evenly across the surface.
Common mistakes to avoid are overburnishing or burning through the film, starting burnishing too early or too late, and pressing too hard or using the wrong tool for the finish you want. Always test first on a concealed spot, wear eye protection and appropriate gloves, protect nearby surfaces, and clean up moisture or dust as you work. If you notice persistent or spreading black marks, back off and reassess the timing and technique rather than forcing a fix.
If the project scope or surface conditions feel uncertain, don’t push it. A professional can save time and prevent irreversible damage when the visible finish is critical. Stay focused, follow the tested sequence, and finish with confidence—your wall will look good and stay durable for years to come.
FAQ
How do I tell which burnisher tool to use for Venetian plaster?
Choose a tool that matches the finish you want and fits the work area. Check the tool label or manufacturer instructions for surface compatibility and recommended pressure. If unsure, read the product datasheet or ask the supplier what works best with your plaster mix.
When is the right time to burnish during the work, and what signs indicate it’s safe to proceed?
Burnish after you’ve achieved the initial set that your mix requires and before it fully hardens. Look for a firm surface that doesn’t smudge easily and a slight tackiness that your finger can feel without sticking. If in doubt, follow the timing guidance on the plaster package and test a small area.
What are the sure-fire ways to prevent black marks during burnishing?
Keep the surface clean of dust and release agents before burnishing, and use a clean, properly loaded tool. Avoid overworking any one spot and don’t press too hard or push material around. If you see issues, review the plaster manufacturer instructions and check local guidelines for burnishing practices.
How do I clean and maintain burnishing tools to avoid transferring residue?
Wipe tools with a damp cloth and, if needed, use a mild cleaner recommended for plaster tools. Dry tools thoroughly to prevent rust or staining. For best results, inspect tool edges and replace any damaged pads or wheels per the manufacturer’s guidance.