

Introduction
The seven most common roof leaks are identified, with clear DIY fixes you can try.
You’ll learn how to diagnose leaks, select safe repair methods, and compare smart, budget-friendly alternatives. The guide walks through practical steps, tips, and common mistakes to avoid so you can protect your home without heavy costs.
Key takeaways
- Inspect shingles for missing, cracked, or curled edges after storms and winds.
- Check flashing around chimneys, vents, and skylights for gaps or corrosion.
- Clean and inspect valleys where roof planes meet to prevent leaks.
- Keep gutters and downspouts free of leaves to avoid overflow.
- Monitor for ice dams in winter; improve attic insulation and ventilation.
- Seal and reinforce roof penetrations for mounts, HVAC, and vents.
Table of Contents
- Introduction
- Key takeaways
- 1. Damaged Shingles (missing, cracked, or curled)
- 2. Flashing Failures around Chimneys, Vents, and Skylights
- 3. Valley Leaks (where roof planes meet)
- 4. Clogged or Damaged Gutters and Downspouts
- 5. Ice Dams and Winter-Related Leaks
- 6. Roof Penetration Issues (satellite mounts, HVAC units, plumbing vents)
- 7. Underlayment and Decking Problems (blisters, rot, or failed roof felt)
- Preventative Maintenance: Seasonal Checklist and Long-Term Care
- Conclusion
- FAQ
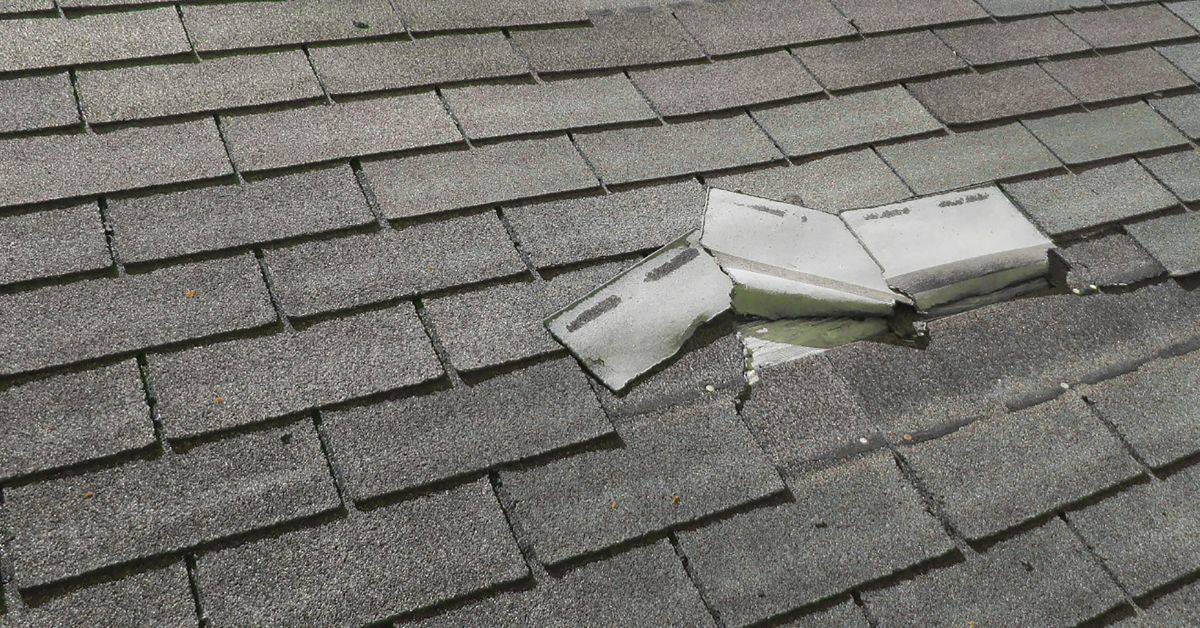
1. Damaged Shingles (missing, cracked, or curled)
Damaged shingles come from three main drivers: aging asphalt shingles, relentless UV sun, and storm hits that knock granules loose and lift edges. When granules wear away and flashing shows wear, tiny entry points form that can channel water into the roof system and set up leaks down the line. You’ll see missing, cracked, or curled shingles, lifted edges, curled tabs, and exposed flashing at valleys, chimneys, or transitions, which signal trouble that should be assessed before it worsens.
This matters because early visual checks plus a simple attic or interior tour can tell you if a patch is enough or if a full replacement is wiser. Safe ladder setup, careful tracking of signs like dark attic stains, damp insulation, or musty odors, and noting where water seems to travel help you decide on quick fixes and longer-term fixes. When DIY, you can use temporary patches or sealants for tiny gaps and secure damaged sections with tarps after storms, but avoid risky elevated work in wind and know when to call in a pro for flashing repair, roof replacement, or full warranty considerations; always check the product label or datasheet for guidance on materials used and proper application.
Signs to look for
When inspecting your roof, keep an eye out for signs of shingle damage. Look for areas where the protective granules are missing or worn down, creating bald spots. Lifted edges and curled tabs indicate that wind has taken a toll on your shingles. Also, check gutters for debris like loose shingle pieces, which can signal recent damage from storms.
Another key indicator is the condition of flashing around chimneys, valleys, and roof-to-wall transitions. Flashing should be tight against the surface to prevent water intrusion. Any gaps or lifted edges here are potential entry points for leaks. In your attic, look for dark stains on insulation or a musty smell, which can point to ongoing moisture issues.
Remember, regular visual checks from ground level and during routine maintenance can help catch these signs early before they turn into major problems. If you spot any of these issues, address them promptly to avoid costly repairs down the line.
DIY repair steps
To fix a damaged shingle temporarily, start by cleaning around the affected area with a stiff brush. Next, apply roof cement or sealant to any gaps and cracks, ensuring it bonds well with the surrounding surface. For more permanent fixes, consider replacing individual shingles.
When reseating flashing, make sure it’s properly aligned and sealed against the roof deck using roofing nails and additional sealant if needed. This prevents water from seeping underneath and causing leaks over time. Remember to use high-quality materials that match your existing roof for a seamless look and better durability.
If you’re dealing with extensive damage, prioritize tarping large areas after storms while avoiding risky elevated work in windy conditions. Always wear safety gear like harnesses when working at heights. For smaller patches, plastic roof tape can serve as an effective temporary fix until more permanent repairs are made.
Smart alternatives and upgrades
To reduce future leaks, consider upgrading to longer-lasting shingle options like architectural or dimensional shingles. These provide enhanced durability against weathering and UV exposure compared to standard three-tab shingles.
For areas prone to hail damage, impact-resistant shingles offer superior protection by resisting punctures and cracks from falling debris. This can significantly extend the lifespan of your roof while reducing repair costs over time.
In addition, improving attic ventilation with ridge vents or soffit vents helps regulate temperature extremes that can accelerate shingle aging. Proper airflow reduces moisture buildup inside the attic space, further minimizing the risk of leaks and mold growth associated with wet insulation.

2. Flashing Failures around Chimneys, Vents, and Skylights
Flashing is what seals the transitions around chimneys, vents, and skylights and keeps water from wicking into the deck. When sealant ages or cracks, nails and screws corrode where flashing is fastened, or flashing is loose or misfitted, leaks follow. Improper overlaps or gaps at the roof-to-flashing joints let water intrude.
If you see gaps, rusted fasteners, or peeling sealant, you’re looking at flashing failure. Knowing the types helps you spot the right fix and avoid patch jobs that fail. Some steps on steep roofs need proper safety gear or a pro.
Visual checkpoints
Use this checklist during spring and fall to catch issues before they turn into leaks.
- Gaps around chimneys: Look for spaces between the chimney and roof. Confirm by running a finger along edges; gaps should be no wider than 1/4 inch.
What goes wrong: Water seeps in, causing damage. - Rust on metal flashing: Check for reddish-brown stains or flaking paint on metal parts around vents and skylights. Confirm by touching the surface; it should feel solid without rust flakes.
What goes wrong: Rust weakens metal, leading to leaks. - Missing step flashing: Inspect where roof meets chimney for missing pieces of L-shaped metal that fit between shingles. Confirm by counting steps; there should be one every 12-18 inches.
What goes wrong: Missing step flashing allows water to run under the shingles. - Buckled or loose flashing: Look for bent, twisted, or lifted metal pieces around vents and skylights. Confirm by gently pressing on flashing; it should be firmly attached without movement.
What goes wrong: Loose flashing lets water in during rain. - Proper slope of roof: Check that the roof slopes away from chimneys and vent pipes to direct water flow. Confirm by looking for a slight incline where metal meets shingles.
What goes wrong: Water pools on flat areas, causing leaks. - Sealant condition: Inspect caulk or sealant around flashing edges; it should be intact and flexible. Confirm by pressing gently; it shouldn’t crack or break.
What goes wrong: Dried-out sealant fails to prevent water entry. - Skylight frame alignment: Check that the skylight frame sits evenly with no gaps between glass and roof. Confirm by looking for consistent spacing around all sides of the skylight.
What goes wrong: Misalignment allows water to seep in.
Quick rule: If it looks like a gap, rust, or missing piece, take action before winter storms hit.
DIY resealing and patching
To fix flashing failures around chimneys, vents, or skylights, start by cleaning the area thoroughly. Remove old sealant with a scraper and chisel to expose clean metal for new adhesive. Check your local building codes before you begin; sometimes specific products are required.
For step flashing repairs, replace any damaged pieces instead of just patching them. Cut out the faulty sections and fit in new ones that match. Make sure there’s no water trapped under shingles by lifting edges slightly to check for moisture or debris.
When resealing, use a high-quality sealant designed for roof flashing. Apply it evenly around all joints and corners, pressing firmly against the metal to create a tight bond. Don’t forget to inspect nearby areas while you’re up there; often multiple issues are found at once.
Long-term alternatives
If you’ve been dealing with flashing failures around chimneys, vents, and skylights, it’s time to think long term. Instead of patching up the same spots repeatedly, consider upgrading your flashing to metal options that are more durable and less prone to leaks. Metal flashing can be custom-fitted for a perfect seal.
Another option is to go with integrated or welded flashing systems designed specifically for chimneys and roof penetrations. These systems eliminate gaps where water can seep in, providing peace of mind against future leaks. If your home’s flashing issues are severe, consult a professional contractor who specializes in retrofits. They can assess the situation and recommend the best long-term solution.
3. Valley Leaks (where roof planes meet)
Valleys are where two roof planes meet and funnel runoff into a single line, which speeds up flow and can pool. That concentrating effect makes valleys a high-leak hotspot, especially if valley liners are worn or shingles at the valley are damaged or installed poorly. Gaps in flashing and degraded sealants in this zone are common failure points you’ll want to spot early.
When you’re DIY inspecting, look for hairline cracks, granule loss along the valley, lifted shingles, and any corrosion on metal flashings. A simple internal check helps, tracing any moisture from the attic to the valley area and noting if leaks show up during heavy rain or freeze–thaw cycles. If you find problems, you’ll decide between resealing or replacing flashing, choose compatible materials (metal vs. flexible flashing), and determine whether shingle replacement or full valley re-flashing is warranted, all while keeping underlayment and valley drainage in good shape to prevent recurring leaks.
How to inspect a valley
When you’re checking your roof’s valleys, start by looking for streaking on the shingles. This can indicate water is pooling and leaking into your attic. Also, check for rusted nails or missing shingles along the valley line.
To inspect the valley liners without stripping off all the shingles, use a mirror to look underneath. You want to spot any hairline cracks or gaps in the flashing that could let water through. If you see granules washed away from around the valley, it’s likely there’s damage under the surface.
Another key sign is lifted shingles at the edges of the valley. This can happen when the sealant between layers breaks down over time. Rust or corrosion on metal flashings also points to potential leaks. Lastly, if you notice moisture stains in your attic sheathing directly below a roof valley, that’s a clear indicator of water intrusion.
Patch vs. replace guidance
If you find small issues like minor cracks or gaps in the flashing, start with patching them up using compatible sealants and caulk. For larger problems, such as worn-out metal flashings or extensive damage to shingles along the valley line, it might be time for a full replacement.
To install new metal valley flashing, make sure you use the correct type that matches your roof material. Metal flashing is durable but can rust if not properly maintained. If you opt for flexible flashing instead, ensure it’s compatible with your existing shingles and won’t peel away over time due to expansion or contraction.
When deciding whether to patch or replace, consider the extent of damage and the overall condition of your roof. A DIY patch can buy you some time but may not be a long-term solution if the valley is severely compromised. In such cases, re-sheeting the entire valley with new shingles and proper flashing will provide better protection against future leaks.
4. Clogged or Damaged Gutters and Downspouts
Clogged gutters and downspouts back up rainwater, and that pressure pushes moisture under eaves, soaking fascia and soffits and giving water a ready-made path toward the roof line. You’ll see sagging or damaged gutters, standing water, peeling fascia paint, rust, moss, and even ice damming at downspouts that tell you something is wrong before a leak shows up inside the attic. This condition misdirects water, often due to poor slope, missing downspouts, or extensions that aren’t directing water away from the house, so the fascia and roof deck stay damp and vulnerable.
Along with signs of trouble, a quick DIY diagnostic helps you decide what to fix first: visually clear debris, flush the gutters to test flow, check slope and downspout integrity, and inspect joints and seals for gaps. Regular maintenance—cleaning on a schedule, guards or filters, resealing joints, correcting slope, extending downspouts, and splash blocks—keeps water away from the fascia and foundation and reduces the chance of hidden damage. If active leaks persist or you notice rot, mold, or cracks in the fascia, treat it as a warning and consider professional help, all while staying safe on ladders and away from roof edges.
Quick maintenance checklist
This checklist should be used seasonally to ensure your gutters and downspouts are in good working order.
- Clean debris: Remove leaves, twigs, and other debris. Confirm by visually checking the gutter is clear of obstructions.
- Check slope: Ensure water flows towards downspout. Use a level to confirm proper slope; otherwise, water may overflow or cause roof damage.
- Inspect joints: Look for gaps or cracks at corners and seams. Confirm by checking for water leakage during rain; leaks can lead to structural issues.
- Secure fasteners: Check nails and screws are tight. Pull on the gutter gently to confirm it’s secure; loose gutters can pull away from the house.
- Inspect downspouts: Look for cracks or blockages. Confirm by running water through them; blocked downspouts cause overflow issues.
- Check brackets: Ensure they are firmly attached to fascia and walls. Pull on each bracket gently; loose brackets can lead to gutter sagging.
- Evaluate height: Gutters should be above windowsills. Measure from the bottom of the gutter to a window sill; low gutters may cause water damage.
- Look for rust: Check metal components for signs of corrosion. Confirm by touching surfaces; rust can weaken structural integrity over time.
- Clear downspout extensions: Ensure they are free from debris and properly angled away from the house. Test with water to confirm proper drainage.
- Inspect hangers: Check for any missing or damaged support brackets. Pull on each hanger; weak supports can cause gutters to sag or fall.
- Check leaf guards: Ensure they are securely attached and free of debris. Confirm by visually checking the guard’s condition; blocked guards lead to clogs.
Quick rule: Clean your gutters twice a year, before winter and summer storms.
Simple DIY fixes
To keep your gutters and downspouts working properly, start by clearing out any debris that’s causing blockages. Use a garden trowel or gloved hands to remove leaves, twigs, and other junk from the gutters and downspout openings.
If you notice water pooling in certain areas of your gutters instead of flowing smoothly towards the downspouts, it might be time to re-pitch them. This means adjusting the slope so that water flows downhill correctly. A level can help you check if the gutter is pitched right; aim for about a quarter-inch drop per ten feet.
Sealing seams and joints with caulk or sealant prevents leaks, especially after winter freeze-thaw cycles. Make sure to clean out any old sealant before applying new material to ensure good adhesion. Also consider installing gutter guards if you have persistent clogging issues; they can save a lot of time but make sure to choose the right type for your roof’s pitch and debris load.
Smart gutter alternatives
If you’re dealing with clogged or damaged gutters and downspouts, consider upgrading to seamless gutters. They reduce the chance of leaks and blockages since there are fewer joints for water to escape from or debris to collect in.
In climates where freezing is common, heated gutter systems can prevent ice dams and icicles that damage your roof and siding. Check local regulations before installing any heating system.
Don’t forget splash blocks or diverters at the base of downspouts to protect your foundation from water erosion. These simple additions help direct water away from your home’s walls, reducing the risk of basement leaks and structural damage.
5. Ice Dams and Winter-Related Leaks
Ice dams form when heat in the attic melts snow near the roof and the water refreezes at the cold eaves, creating a dam that backs up water under the shingles. Poor attic insulation or air leakage lets heat reach the roof, which accelerates the melt and drives that dam. During thaw cycles you’ll see water at the eaves, ceiling stains, warped decking, damp insulation, mold risk, and gutter damage.
Prevention comes down to better insulation, ventilation, and sealing leaks in the attic, with careful attention to airflow paths and penetrations. In thaw events, be conservative and safe: remove snow from the roof edge from ground level, avoid walking on the roof, and use smart heat-management tactics; decide DIY versus professional repairs based on how extensive the damage is. If you notice signs of structural damage or widespread water intrusion, involve professionals or your insurer and document the damage for claims.
Prevention tactics
To prevent ice dams, start with your attic. Proper insulation is key—aim for an R-value of at least 49 to keep heat from escaping and melting snow on the roof. Use baffles to maintain clear ventilation channels.
Next, ensure your roof has adequate ventilation. This helps balance temperatures across the roof deck, reducing ice dam formation. Install drip edges that direct water away from the eaves during thaw cycles.
Air-sealing is another crucial step. Seal gaps around chimneys, vents, and other penetrations to prevent warm air from escaping into the attic. Use caulk or foam sealant for small openings.
Safe removal and short-term fixes
During a thaw cycle, gently remove snow from the roof edge with a broom to prevent ice dams. Avoid walking on icy roofs—use ladders or long-handled tools instead.
If an ice dam has formed, use ice melt socks or heated cables along the eaves for temporary relief. These products can help clear water pathways and reduce damage during a thaw event.
For DIY fixes, focus on minor repairs like sealing gaps around vents or chimneys to prevent further heat loss. However, if extensive damage is visible, call in professionals who have the right equipment and expertise to handle roof repairs safely.
Long-term upgrades
To tackle ice dams long term, consider a comprehensive insulation upgrade. This includes adding more attic insulation and sealing air leaks to prevent heat from escaping into the attic space.
Metal roofing is another option that can help reduce ice dam formation. Metal roofs shed snow effectively, reducing the chance of water backing up at the eaves during thaw cycles.
For those looking for a major overhaul, consider installing new gutters and downspouts designed to handle heavy snow loads better. These systems can divert water more efficiently and reduce the risk of ice dams forming in winter.
6. Roof Penetration Issues (satellite mounts, HVAC units, plumbing vents)
Roof penetrations are the common trouble spots that can leak if you don’t treat them right. Flashing gaps, nail or screw vulnerabilities, and movement from temperature swings and wind create pathways for water to find its way in. Proper flashing and fastening — using step flashing, boot or flashing collars, and ensuring tight integration with the roofing material — keeps these penetrations from becoming leaks and failures.
That’s why the details matter: you’re aiming to minimize movement, seal around edges, and use compatible materials that won’t trap moisture behind the flashing. In practice, install the correct flashing method for each penetration, avoid over-tightening fasteners, and replace old flashing when needed to prevent retrofitting gaps. Finally, do a simple maintenance routine: yearly visual checks, post-storm inspections, and watch for rust, cracking, or lifted shingles; know when to bring in a pro for satellite mounts, large HVAC curbs, or vent stacks.
Inspection focus points
Use this checklist after a storm, during yearly maintenance, and before winter to catch potential leaks early.
- Sealant gaps: Look for cracks or missing sealant around penetrations. If ignored, water can seep in.
- Loose fasteners: Check screws or nails are tight; loose ones let water through.
- Crushed collars: Inspect rubber boots and metal collars for compression damage. Replace if deformed.
- Flashings lifted: Ensure flashings are securely attached to the roof. Loose flashings allow water entry.
- Shingles around penetrations: Check shingles near vents, pipes, or mounts aren’t damaged or missing.
- Rust on metal parts: Look for signs of corrosion on flashing and fasteners. Replace rusted components.
- Water stains nearby: Note any discoloration around penetrations indicating past leaks.
- Proper overlap: Ensure flashings extend over shingles by at least an inch to prevent water intrusion.
Quick rule: Regular checks catch issues before they become major problems.
DIY repair and reinforcement
To fix sealant gaps, clean the area thoroughly with a wire brush. Apply new sealant around penetrations to prevent leaks.
If rubber boots are damaged or missing, replace them completely. Ensure they fit snugly over pipes or vents for proper sealing.
For loose flashings, reattach using appropriate fasteners and sealants. Use compatible materials that won’t degrade over time.
Add collar flashing around penetrations to provide extra protection against water entry. Secure it properly to prevent movement.
Professional alternatives
Reroute equipment like HVAC units or plumbing vents if possible, reducing the number of roof penetrations and potential leaks.
Use low-profile roof mounts for satellite dishes to minimize wear on the roof surface. This reduces long-term damage from wind and weather.
If a heavy unit is causing significant stress on your roof, consider relocating it to another part of the building or using reinforced supports.
Consult with a professional to assess if any existing penetrations can be modified for better sealing and durability against environmental factors.
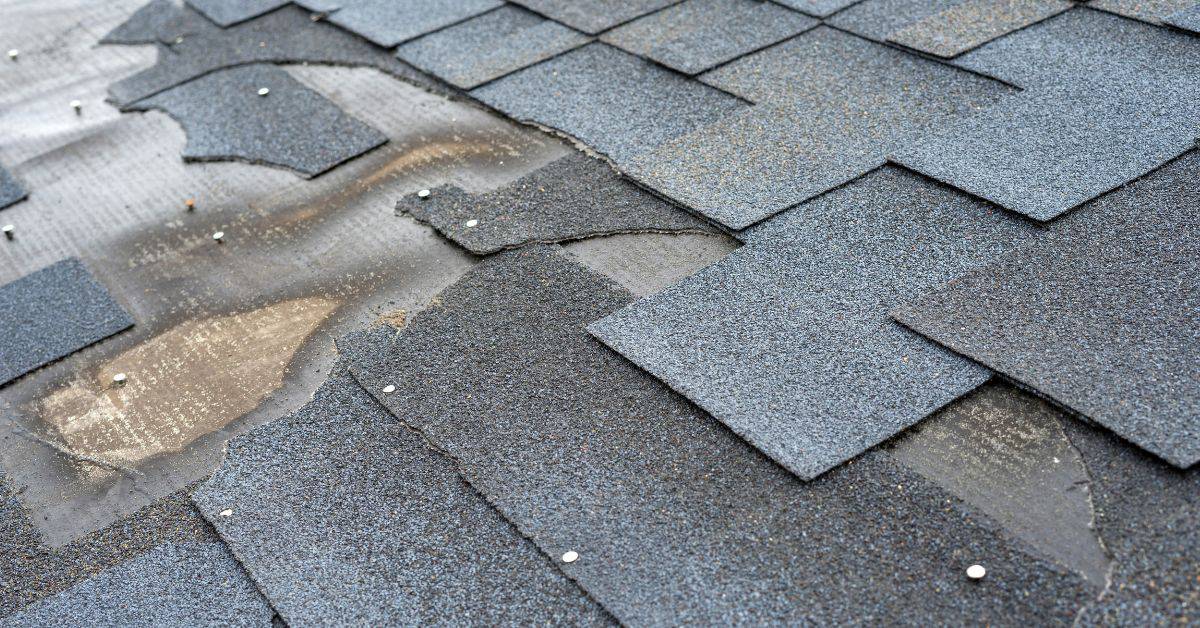
7. Underlayment and Decking Problems (blisters, rot, or failed roof felt)
Underlayment that degrades and deck rot create hidden channels for water to bypass the visible surface and creep into framing, insulation, and sheathing, accelerating interior damage that you may not feel until staining or odor shows up. Blisters, wrinkling, or a soft, spongey feel on the underlayment or roof felt, plus visible rot or soft spots on the deck, are the telltale signs that water has been getting through and working behind the scenes. Punctures or tears in the deck or underlayment also open leaks that undermine shingles, flashing, and fasteners, so address them promptly rather than hoping the problem will go away on its own.
This matters because once water finds a path past the surface, you end up with mold growth, staining, warped decking, and hidden corrosion that are much harder to fix than the surface you can see. A practical DIY check starts in the attic looking for staining or mildew, then a careful exterior walkaround to spot blistering or loose edges, and finally probing suspected soft spots while avoiding damage to fragile materials. A moisture meter can help you gauge elevated readings and locate moisture sources and routes, and you should know when to replace decking or underlayment with licensed help and focus on prevention and proper installation to stop future leaks.
Signs of underlying deck issues
When you spot blistering or wrinkling on your underlayment or felt, it’s a clear sign that water is finding its way through. But the real trouble starts when this moisture reaches the decking underneath. Soft spots and visible rot are red flags for compromised sheathing.
In the attic, look for staining or mildew growth on the underside of the roof deck. These signs indicate that water has been seeping in from above. Probing soft areas with a screwdriver can help you pinpoint exactly where the damage is occurring. Don’t forget to use a moisture meter to check for elevated levels of dampness.
Attic inspections are crucial because they reveal hidden issues before they become major problems. If you see water stains on ceiling drywall or mold growth in corners, it’s time to act fast and find the source. Addressing these signs early can save you thousands down the road.
When DIY is feasible
Determining whether a repair is something you can handle yourself depends on the extent of the damage. Small sections of decking that are rotted or blistered underlayment can often be patched up with new material.
If only a few spots need attention, replacing those sections and re-securing the underlayment might do the trick. However, if large areas of your roof deck are compromised, it’s best to call in professionals who have the tools and experience for full-scale repairs or replacements.
DIY fixes can be effective when you catch issues early, but don’t underestimate the importance of proper installation techniques. A job done right now will save you money and hassle later on.
Material Upgrades to Prevent Recurrence
Selecting the right materials can make all the difference in preventing future leaks. Here are some options:
- Synthetic underlayment: Provides better protection against moisture and lasts longer than traditional felt.
- Treated sheathing: Resists rot and decay, extending the life of your roof deck.
- Breathable membranes: Allow water vapor to escape while keeping rain out, reducing condensation issues.
Using these materials can prevent common problems like cracking or staining that occur with inferior products. Always check for specific ratings and certifications when choosing new materials.
Preventative Maintenance: Seasonal Checklist and Long-Term Care
A solid preventative plan means a seasonal, month-by-month checklist that targets the typical leak sources—flashing, joints, gutters, and roof penetrations—so you catch trouble before it drips. It covers roof surface checks, attic moisture, and aging components, plus a simple way to log tasks and results. The goal is to keep water out, extend life, and reduce surprise repairs by staying on top of routine care rather than waiting for a stain to appear.
This approach matters because it translates into fewer big headaches and clearer budget planning. By coupling gutter and drainage care with surface and penetration inspections, you spot deteriorating sealant, loose flashing, and ventilation issues before they fail. A documented maintenance rhythm plus an annual or biennial pro inspection helps you track wear, plan replacements, and align with warranty rules. When you err on the side of routine, you’ll see lower risk of leaks and longer-lead times between major repairs; check product labels or datasheets for compatible materials and follow local guidance.
Quarterly and Annual Tasks
Use this checklist every season to catch potential roof leaks early.
- Clean gutters: Remove leaves, debris; ensure water flows freely. Clogged gutters can cause water backup onto the roof edges.
- Inspect flashing: Look for cracks or gaps around chimneys and vents. Missing or damaged flashing lets water seep into your home.
- Check attic ventilation: Ensure soffit and ridge vents are clear of obstructions. Poor ventilation leads to moisture buildup, causing rot and leaks.
- Reseal penetrations: Reapply sealant around plumbing vents, satellite mounts, and HVAC units. Dried-out or cracked sealants allow water entry.
- Verify downspout extensions: Ensure they are long enough to direct water away from the foundation. Short downspouts can cause water pooling near your home.
- Inspect roof surface: Look for loose, damaged shingles or tiles; replace as needed. Missing or broken shingles expose your roof deck to water damage.
- Check valley flashing: Inspect valleys for cracks and gaps; reseal if necessary. Leaky valleys can cause significant interior damage over time.
- Maintain insulation quality: Seal any gaps around pipes, wires, or other penetrations. Poorly sealed areas allow moisture to enter the attic space.
Quick rule: Regular inspections and maintenance keep your roof in top shape and prevent costly repairs down the line.
Tools and Materials Checklist
This list helps you gather everything needed for routine roof maintenance tasks.
- Gutter cleaning tools: Use a sturdy rake or scoop to remove debris. Skipping this can lead to water damage and ice dams.
- Ladder safety gear: Wear slip-resistant shoes, use stabilizers, and secure the ladder properly. Falls are common without proper equipment.
- Roof inspection kit: Include a flashlight, hammer, pry bar, and magnifying glass to spot issues easily. Missing tools can delay repairs.
- Sealants and caulk: Have silicone or butyl-based sealant for flashing and penetrations. Dried-out seals let water in if not replaced.
- Safety harness: Wear a full-body harness with an anchor point when working on steep roofs. Falls can be fatal without proper protection.
- Roofing nails and screws: Keep a supply of appropriate fasteners for securing loose shingles or flashing. Loose materials let water in quickly.
- Rubber gloves: Protect your hands from sharp edges, hot surfaces, and chemicals while working. Gloves prevent cuts and burns.
Quick rule: Always prioritize safety by using the right tools and protective gear for each job.
Conclusion
Take action now with safety and durability in mind. A proactive, careful approach keeps water out, protects your home’s appearance, and saves you money in the long run.
Do a quick, practical check: start from the top edge of the roof and look for obvious damage, then inspect flashing around chimneys, vents, and skylights; check valleys for pooling; clear and inspect gutters and downspouts; note any ice dam signs in winter; verify roof penetrations are sealed and secure; and finally assess underlayment or decking for blisters or rot. Move in a steady pass from one area to the next, testing any repairs on a small, safe patch first and avoiding anything that would cause more damage or void warranties.
Common mistakes to avoid are rushing repairs, skipping safety gear or fall protection, and using improper fasteners or sealants that don’t suit your climate. Always avoid stepping on damaged shingles or soft decking without testing strength first, and never seal up a leak without addressing the source area first. A simple rule: fix the obvious leak source, then confirm nearby areas are still dry after a moderate rain or a quick test with a hose on a low setting.
If you encounter stubborn flashing failures, extensive rot, or large gaps around penetrations, or if the project requires working on the roof for an extended time, don’t push ahead alone. Call a professional to ensure a proper, code-compliant fix. With good planning, clear priorities, and careful work, you’ll protect the roof, the home, and your time and budget.
FAQ
How can I tell where a roof leak is coming from?
Inside, look for water stains and follow them to the ceiling line. In the attic, trace wet spots back to the roof, checking seams, vents, and flashing. Water travels; the source is often not right above the stain.
Should I repair leaks myself or call a pro?
Small leaks can be DIY if you know what you’re doing. But bad flashing, sagging roofs, or widespread leaks need a pro. Don’t fix with duct tape or caulk as a long-term solution.
Are roof leaks dangerous to DIY?
Yes. Working on a wet roof is slippery and risky. If you’re unsure about flashing, shingles, or roof integrity, call a licensed roofer.
What are smart, temporary fixes and safer long-term options?
Temporary fixes include tarps or roof patch products for small, dry leaks. For a real fix, replace damaged shingles and reseal flashing; consider upgrading ventilation and gutters to prevent future leaks.