

Introduction
Metal valley flashing is a weatherproof metal strip that seals roof valleys to prevent leaks. This guide will show you what it does, when it’s needed, and the practical steps, tips, and common mistakes involved in installing valley flashing. You’ll learn how to choose the right profile, position and seal joints, and maintain the flashing for durable performance.
Key takeaways
- Valley flashing directs water away from roof valleys, preventing leaks and damage.
- Choose closed-cut, open-cut, or apron valley styles based on roof type.
- Ensure proper underlayment, correct fasteners, and sealant compatibility with metal roofing.
- Use non-compressive sealant and lap joints to drain runoff efficiently.
- Inspect after storms; repair promptly to prevent rust, leaks, and deck rot.
- Consult a professional when roof pitch is steep or metal is severely corroded.
Table of Contents
- Introduction
- Key takeaways
- What is metal valley flashing and why it matters
- Types of roof flashing (with valley-focused details)
- Tools, materials, and material specs checklist
- Step-by-step DIY guide to repairing or installing metal valley flashing
- Safety procedures and working on metal roofs
- Common mistakes when installing or repairing valley flashing (and how to avoid them)
- Maintenance, inspection schedule, and storm/rapid repair tips
- DIY vs. professional repair: cost, complexity, and when to call a pro
- Conclusion
- FAQ
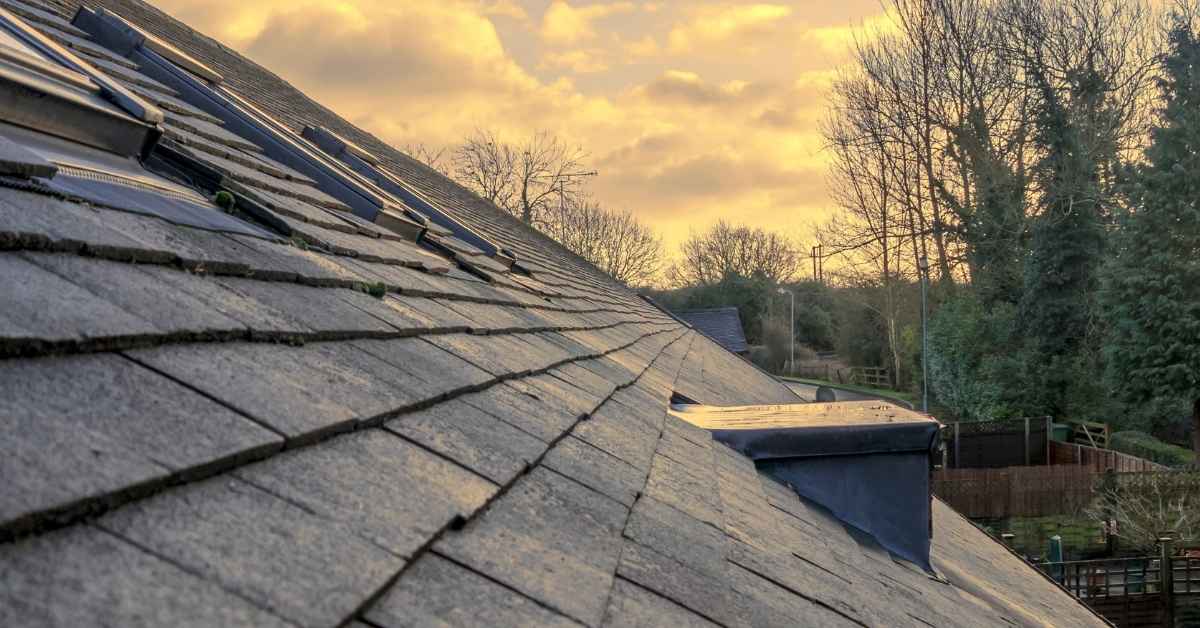
What is metal valley flashing and why it matters
Metal valley flashing sits at the intersection where two roof planes meet, and its main job is to manage runoff from both sides before it gets into the joints. Unlike drip edges, kick-out, rake, or other flashing, valley flashing is shaped to channel water down and away from vulnerable seams, keeping the path clear. Proper installation matters because a weak seal or misalignment creates leak pathways, especially when shingles age or heavy rain and snow push more water into the valley.
For DIY homeowners, the payoff is simple: a correctly installed valley flashing reduces the chance of interior leaks and costly roof damage. Before you repair or replace, do quick checks: look for loose shingles, debris buildup, and signs of inadequate underlayment, and feel for smooth, continuous metal with no gaps; check the product label or datasheet for sealant and fastener guidance. Be mindful of common mistakes—over-tightening fasteners, using incompatible sealants, or failing to tie the valley into surrounding flashing—and know when to bring in a pro for complex valleys.
Flashing purpose and common materials
The material you choose for your metal valley flashing can make a big difference in how well it performs over time. Here are some key points to consider:
- Galvanized steel: Often used due to its durability; look for thicker gauge (26-28) for better longevity; avoid using thin material as it can rust and crack.
- Aluminum: Lightweight and corrosion-resistant; ideal for coastal areas; ensure you use a minimum of 0.032-inch thickness to prevent bending or denting.
- Copper: Highly durable with natural patina that resists weathering; check for proper alloy (95-100% pure) to avoid staining and weak bonding issues.
- Galvalume: Combines aluminum and zinc for superior corrosion resistance; look for a minimum thickness of 24-gauge for maximum durability against harsh conditions.
Where valley flashing is installed
Metal valley flashing is crucial at the intersection where two roof planes meet, such as hip-to-valley junctions or intersecting rooflines. Proper installation ensures water flows smoothly down the roof without pooling.
The design of your roof can significantly impact how valley flashing performs. For example, a shallow pitch may require special attention to ensure proper drainage and prevent water from backing up into the attic.
Inspect areas where different roof sections meet, especially if there are changes in elevation or direction. These spots often experience more wear and tear due to increased exposure to wind-driven rain and snow accumulation.
Types of roof flashing (with valley-focused details)
Roof flashing comes in several valley styles, with open valleys and closed metal valleys forming the core water-control difference. W-valleys and lined/formed valleys are common profiles that affect drainage, durability, and how forgiving a DIY setup will be on different roof slopes. Beyond valleys, you’ll also see step flashing, apron, counterflashing, and drip edge, all playing a role near hips, ridges, and eaves.
Understanding how these profiles install—where folds meet, how seams are treated, and where a hatch or weep path belongs—helps prevent leaks. This matters for DIYers because wrong folds, gaps, or sealant misapplication are the usual leak culprits, especially in valley intersections. Choose tools and materials to fit your roof type, and plan a clean, straight alignment, then verify edges and drains after placement.
Open vs. closed (woven) valleys
When it comes to roof valleys, you have two main options: open and closed (or woven). Open valleys are more straightforward, with the roofing material cut back to expose the valley metal flashing. This approach is easier for DIYers but can look less neat compared to closed valleys.
Closed valleys use a woven pattern where the shingles or metal sheets overlap in a fish-scale pattern over the valley metal. This method looks cleaner and more professional, especially on metal roofs. However, it’s trickier to install correctly, often requiring professional help for a watertight seal.
For metal roofs, closed valleys are preferred as they blend better with the sleek look of metal panels. Open valleys can work but might show more wear over time due to exposed flashing.
Shingle roofs often use open valleys for simplicity and cost-effectiveness, though closed valleys offer superior aesthetics and waterproofing. Always check local building codes before deciding on your valley type to ensure compliance with regional standards.
Valley liners and underlayment options
When it comes to valley flashing, you’ve got a few choices for liners: asphaltic liners, self-adhering membranes, and metal liners. Each has its place depending on your roof’s needs.
Asphaltic liners are great for woven valleys where water can sneak through the weave. They’re easy to install but might not last as long in harsh weather conditions. Make sure you use them with a good metal valley flashing to keep the water out.
Self-adhering membranes stick directly to your roof deck, providing an extra layer of protection against leaks. They’re ideal for open valleys where water flows freely down the center of the roof. These are more expensive but offer better long-term performance and durability.
Tools, materials, and material specs checklist
This checklist nails down the tools, fasteners, sealants, and flashing materials you need for valley flashing. Include essential hand and power tools, plus safety gear. Note that for fasteners, sealants, and flashing you should check labels for gauge, finish, corrosion resistance, and compatibility—don’t guess.
You’ll want to know what to buy and how much, plus how the pieces fit with your roof and underlayment. Pro tip: verify overlaps, lap directions, and coatings so metal doesn’t corrode or leak. Check product labels and datasheets for any exact numbers and specs; if unsure, check the label/datasheet or local guidance.
Safety and handling tools for metal work
Before you start cutting and shaping your flashing, make sure you have the right gear to stay safe.
- Cut-resistant gloves: Wear them when handling sharp edges. Check they fit snugly; cuts happen if hands are exposed.
- Eye protection: Use safety glasses or goggles. Confirm lenses aren’t scratched and frame fits securely; eye injuries can be serious.
- Metal snips: Choose aviation snips for curves, straight snips for straight lines. Ensure blades are sharp and clean cuts; dull blades waste metal.
- Bending brake: Use a sheet metal brake to form angles accurately. Check it’s set up correctly with proper stops; misalignment leads to wasted material.
- Hammers and punches: For setting rivets or bending edges. Make sure they fit the job size; wrong tools can damage flashing.
- Tape measure: Accurate measurements are key. Use a metal tape for durability and accuracy; mistakes lead to wasted material.
- Crimping tool: For sealing seams tightly. Ensure it fits your flashing gauge; improper crimping leads to leaks.
- Rivet gun: For securing pieces together. Check it’s charged or ready, with correct rivet size; loose connections can fail.
Quick rule: Always wear gloves and eye protection when handling metal edges.
Fasteners, sealants, and corrosion prevention
Choosing the right fasteners and sealants is crucial for long-lasting flashing performance.
- Galvanized nails: Use coated or stainless steel. Check they match metal type; wrong materials cause galvanic corrosion.
- Screws with washers: For added grip strength. Ensure screws are self-tapping and compatible with flashing material; loose connections can leak.
- Asphalt sealant: Compatible with metal surfaces. Check it’s flexible and UV resistant; brittle sealants crack over time.
- Zip sealant: For sealing gaps tightly. Ensure it adheres well to both flashing and roofing material; poor adhesion leads to leaks.
- Gap-filling sealant: For valley seams. Confirm it’s flexible and durable; rigid sealants can crack under stress.
- Underlayment compatibility: Ensure proper overlap. Check underlayment is compatible with flashing material; improper overlap leads to water intrusion.
- Rubberized asphalt: For added waterproofing. Confirm it’s applied evenly and sealed properly; uneven application can leave gaps.
- Copper or brass fasteners: Avoid galvanic corrosion. Ensure they’re coated if necessary; bare metal reacts with flashing material.
Quick rule: Always use compatible sealants to prevent leaks and corrosion.
Step-by-step DIY guide to repairing or installing metal valley flashing
We start with a clear, practical inspection: check valley width and slope, review the layout of adjacent flashings, and note how the joints are handled. Verify the valley material and gauge you plan to use, and test fit pieces before any fasteners go in. Look underlayment or liner condition, confirm clean decking, and decide if you need to repair or replace damaged sheathing before you touch metal.
From there, this guide keeps you on a safe, logical path: plan the sequence from removal to final sealing, fit and fasten the metal valley with proper overlap in mind, and seal laps so water sheds away. You’ll learn how to choose compatible liner and flashing options for common roof types and how to integrate valley flashing with drip edges, ridge caps, and material transitions. The goal is a durable, watertight result, with attention to proper sealant choice, corrosion-resistant fasteners, and a final water test after sealing so you don’t chase leaks later.
Step-by-Step Installation Process
This sequence guides you through the process of repairing or installing metal valley flashing, ensuring a watertight seal and proper integration with your roof.
- Begin by setting up scaffolding and securing fall protection gear. Check that all tools are within easy reach.
- Inspect the existing roof for damage and remove any old flashing or damaged roofing materials carefully to avoid puncturing underlayment.
- Clean the substrate thoroughly, repairing any sheathing or decking as needed before installing a new liner if required.
- Measure and pre-cut your metal valley pieces, fitting them dry to ensure proper overlap and drainage direction. Adjust for any irregularities in the roof geometry.
- Securely fasten the flashing using corrosion-resistant clips or nails, ensuring even spacing and secure attachment without over-tightening which can cause buckling.
- Apply sealant along all laps and terminations to create a watertight barrier. Allow sufficient time for curing before proceeding with final roof coverings.
- Reinstall shingles or panels around the flashing, ensuring proper overlap and sealing at edges and joints. Verify water shed by pouring water over the valley area.
Preparation and roof inspection checklist
Use this checklist before starting any work to ensure all necessary steps are covered for a successful repair or installation.
- Measure valley width: Use a tape measure to confirm the exact dimensions of your valley. Ensure it matches your flashing material’s specifications.
- Inspect roof deck: Check for any damage or rot in the sheathing beneath the valley area. Repair or replace as needed before installing new materials.
- Remove old shingles: Carefully strip away existing roofing to expose the substrate and flashing area. Dispose of debris properly.
- Plan water diversion: Ensure that your work will not disrupt proper drainage paths on the roof. Use temporary barriers if necessary.
- Check valley slope: Confirm that the valley slopes correctly towards a downspout or gutter for effective water runoff. A flat valley can cause pooling and leaks.
- Select appropriate flashing material: Choose galvanized, aluminum, or stainless steel based on your roof type and local climate conditions. Avoid using materials prone to corrosion.
- Verify underlayment condition: Inspect the existing underlayment for any damage that needs repair before installing new flashing. A compromised underlayment can lead to leaks.
- Test fit flashing pieces: Dry-fit your metal valley pieces to ensure proper alignment and overlap with adjacent roofing materials. Adjust as needed for a snug fit.
Quick rule: Always double-check measurements and material compatibility before cutting or installing any components.
Cutting, shaping, and installing the flashing
Measure your valley accurately to determine the length of metal needed. Use a square and straight edge for precision cuts with tin snips.
Form any necessary bends or angles in the metal using a hammer and dolly or bending brake to fit the geometry of your roof’s valleys. Ensure all pieces align properly before fastening.
Overlap flashing pieces by at least 3 inches, ensuring that water flows downward towards the gutter system. Securely attach each piece with corrosion-resistant nails or clips spaced evenly apart.
Check for any gaps or misalignments during installation and adjust as necessary to maintain a watertight seal throughout the valley area.
Fastening and sealing best practices
Secure flashing pieces using corrosion-resistant fasteners spaced no more than 12 inches apart. Hemmed edges or clips should be used where specified to prevent water intrusion.
Apply sealant along all laps, terminations, and penetrations to create a watertight barrier. Ensure proper overlap of materials for additional protection against leaks.
Allow sufficient time for the sealant to cure according to manufacturer instructions before reinstalling roofing material or exposing it to rain. This prevents premature failure due to insufficient bonding strength.
Verify that all fasteners are securely set without over-tightening, which can cause buckling or deformation of the flashing material.

Safety procedures and working on metal roofs
Safety first on metal roofs means planning ahead, wearing the right PPE, and sticking to a buddy system every step of the way. Start with proper ladder setup, secure footing, three-point contact, and clear, non-slip landings at the roof edge, then move carefully along the edge with appropriate fall protection and anchor points. Handle large sheets with team coordination, secure them before movement, and watch for wind, glare, heat, and quick changes in conditions that can turn into a fall or a crash.
This matters because metal roofing changes the game: awkward lifts, sharp edges, and hot surfaces demand deliberate, practiced habits rather than ad-hoc improvisation. Knowing how to inspect harnesses and lanyards, choosing the right restraint or arrest system, and having a simple emergency plan keeps a small mistake from turning into a serious injury. A solid routine—pre-job planning, clear communication, and safe storage away from the roof line—lets you work faster with less risk, and makes it easier to handle unexpected weather or a rush job without compromising anyone’s safety.
Fall protection and ladder best practices
Safety first when working on metal roofs. Always wear a full-body harness with an appropriate fall-arrest system, ensuring your anchor points are secure and inspected regularly. Use a sturdy ladder that is the right length for your roof’s height, setting it at a 75-degree angle to prevent tipping.
Secure your ladder firmly against the roof edge using stabilizers or tie-off ropes. Always maintain three-point contact when climbing up or down—two hands and one foot, or two feet and one hand—to avoid slips. Ensure you have a clear, non-slip landing zone at least 3 feet wide where the ladder meets the ground.
For steep slopes or high roofs, consider hiring professionals who are trained in working at heights. DIY work can be risky if you’re not confident about your setup and safety measures. If unsure, it’s better to err on the side of caution and bring in experts.
Cutting metal and burn/cut hazards
When cutting metal sheets for valley flashing, use a reciprocating saw or shears designed for metal. Always wear gloves and eye protection to shield against sharp edges and flying debris. After cutting, deburr the edges with a file or grinder to remove any rough spots that could cause cuts.
Metal can get very hot from friction during cutting, so keep your hands away until it cools down. Use pliers or clamps to hold pieces securely while working to prevent accidental slips and injuries. Store cut metal sheets safely off the roof edge to avoid wind hazards.
Be mindful of sparks and flames when using power tools near flammable materials like wood or plastic. Have a fire extinguisher nearby in case of emergencies, and always follow manufacturer instructions for tool use and maintenance.
Common mistakes when installing or repairing valley flashing (and how to avoid them)
Valley flashing trips up DIYs when you pick the wrong material, miss overlaps, misplace fasteners, or skip proper underlayment. Use this guide to spot the mistakes and fix them before you seal the valley. Focus on making the seams tight, the fasteners correct, and the underlayment continuous.
Material choice affects longevity and how well it ties into metal systems. Check the label or datasheet for compatibility, thickness, and coatings to decide metal valley flashing or an alternative. Then follow best practices: precise seam overlaps, correct fastening pattern, use of sealant or waterproof mastic, and continuous underlayment; finish with a quick inspection to catch creeping gaps or rust and know when to call a pro.
Mistakes that cause leaks
Avoid these common mistakes to ensure your valley flashing performs as intended and prevents water from seeping into your roof.
- Improper slope: Ensure the valley is pitched correctly for proper drainage. Use a level or straight edge to check slopes during installation.
- Inadequate overlap: Overlap metal flashing by at least 3 inches on all sides to prevent water from seeping underneath. Measure and mark accurately before cutting.
- Sealed seams: Avoid sealing the valley’s seams completely, as this traps moisture inside. Use a breathable sealant or mastic that allows for some air flow.
- Poor fastener placement: Place screws at least 1 inch from edges and spaced evenly along the flashing to prevent tearing or lifting. Check manufacturer guidelines for specific spacing requirements.
By avoiding these mistakes, you’ll ensure your valley flashing is watertight and durable over time.
Mistakes that cause premature corrosion or damage
Avoid these common issues to keep your metal valley flashing in good condition for years to come.
- Mismatched metals: Use compatible materials like aluminum with stainless steel fasteners. Check alloy compatibility charts before installation.
- Incompatible sealants: Choose a sealant that matches the flashing material’s coating and won’t react negatively over time. Test on scrap pieces first if unsure.
- Improper storage: Store metal flashing in dry, protected areas to prevent rust or damage before installation. Use plastic sheeting or tarps for protection.
Avoid these mistakes to ensure your valley flashing remains corrosion-free and performs reliably over time.
Maintenance, inspection schedule, and storm/rapid repair tips
Establish a simple maintenance routine: schedule biannual seasonal checks and a post-storm inspection to catch wear, corrosion, and loose fasteners before they become leaks or failures. Clear debris from valleys and gutters, verify drainage paths, and reseal or reseat flashing as needed with corrosion-resistant fasteners. When you inspect, focus on sealant integrity, fastener security, and overall roof health, and keep notes so you can track wear over time.
This matters because small issues today become big problems after a storm if left unchecked, and a solid inspection habit saves money and stress later. Safety comes first during debris clearing and access—use sturdy ladders, harnesses, PPE, and avoid working on wet or icy surfaces. For minor storm damage, reseat flashing, replace damaged sealant, and apply a temporary patch if needed, but don’t rely on it long-term; know when to call in a pro and always follow the product label or datasheet for materials. Common mistakes to avoid include over-tightening nails, using the wrong sealant for metal, and delaying repairs after a storm.
Visual checkpoints and signs of damaged valley flashing
Use this checklist after major storms or during biannual inspections to spot issues early.
- Rust spots: Look for reddish-brown patches on metal. Rust means corrosion is weakening the flashing.
- Gaps and cracks: Check edges and joints for openings where water can seep in. Water stains nearby indicate leaks.
- Lifted edges: Flashing should be flush with roof surface. Lifted edges let water run under, causing leaks.
- Loose fasteners: Screws or nails that are loose allow flashing to shift and create gaps for water entry.
- Stained shingles: Dark stains around the valley indicate past leaks. This shows where water is getting in.
- Interior water marks: Check ceilings and walls below valleys for signs of moisture damage, indicating ongoing issues.
- Water test: Use a garden hose to simulate rain on flashing. Look for drips or wet spots that confirm leaks.
Quick rule: Address any sign of wear immediately to prevent bigger problems down the line.
Quick storm-repair methods and when they are temporary
Use these quick fixes after storms, but plan for a full repair soon.
- Tarp cover: Secure a tarp over damaged areas to prevent further leaks. Tarp is only good until the next rain.
- Metal tape patch: Apply metal tape to small holes or cracks. Tape holds but needs replacing after heavy rains.
- Sealant application: Reapply sealant around loose flashing edges. Sealant can crack and fail in harsh weather.
- Temporary fasteners: Use corrosion-resistant screws to reattach lifted flashing temporarily. Screws may rust or loosen.
Quick rule: Temporary fixes buy time but must be followed by a proper repair within days, not weeks.
DIY vs. professional repair: cost, complexity, and when to call a pro
DIY fixes can save on materials but demand time and the right know‑how. Compare what you’d spend on flashing metal, sealants, and fasteners with what a contractor would typically bill for labor and permits. When the risk is high or the task is out of reach, bring in a pro.
Knowing warranty implications, codes, and permit needs helps you decide before you start. This section covers who does diagnosis, material sourcing, installation, sealing, and final inspection, plus a simple decision framework you can use to choose DIY or pro help. Trust your instincts and safety first.
Cost breakdown and time estimates
For a DIY valley flashing repair, you’ll need to budget around $50-$100 for materials like metal flashing, sealants, and fasteners. If you outsource the job, expect labor costs to range from $200-$400 depending on your location and contractor rates.
DIY repairs typically take about 3-6 hours if you’re familiar with basic roofing techniques. This includes time for cutting and shaping the flashing, fastening it in place, and sealing all joints properly. For a pro, add another 2-4 hours to account for setup, cleanup, and quality checks.
Remember, time is money. If you’re short on time or unsure about handling metal safely at height, consider the extra cost of hiring a professional who can get it done right and fast.
Permit, code, and warranty considerations
Before starting any roof work, check if permits are required in your area. Local building codes often mandate inspections for major repairs or replacements to ensure compliance with wind uplift standards.
DIY work can sometimes void manufacturer warranties on roofing materials. Check the terms of your warranty before proceeding; some manufacturers require installation by certified professionals to maintain coverage.
Ignoring local codes and permits could lead to fines, delays in selling your home, or even structural issues down the line. It’s worth taking a few minutes to confirm what’s needed with your city hall or building department.

Conclusion
The core idea is simple: metal valley flashing protects your roof from leaks, boosts durability, and keeps the look clean. Do the work right, and you harden the roof against weather and keep the attic dry and comfortable.
When you step into the work, run a quick, practical checklist in your head: inspect the valley area and surrounding flashing, map out the repair or install plan, gather the exact tools and materials, measure and cut accurately, set and fasten the flashing firmly, seal joints and overlaps, and finally test by gently simulating water flow and inspecting for drips from a safe height. Work in daylight, on a dry surface, and pace yourself so you don’t rush or mismeasure.
Two common mistakes to avoid are over-tightening fasteners and leaving gaps at joints. Do not skip a proper sealant or seam treatment, and never walk on a wet, slippery valley. Keep safety as your top rule: harness or guard, stable footing, and never lean over the edge or work alone when you’re on a metal roof.
If the roof already shows extensive damage, the pitch is too steep, or you’re unsure about flashing type or weatherproof sealing, call a professional. It costs less to do it right than to repair repeated leaks later, and a pro can finish quickly with lasting results. Stay steady, follow the plan, and you’ll have a valley that sheds water and looks solid for years to come.
FAQ
What is metal valley flashing and why do I need it?
Metal valley flashing sits at the intersection where two roof planes meet. It channels water away and protects the structure from leaks. Skip it and you’ll pay later with water intrusion and rot.
What material should I use for the valley flashing?
Stainless steel or copper are durable options for long life. Aluminum is cheaper but can corrode quicker in harsh weather. Choose based on budget and the roof environment, not just price.
How should I install metal valley flashing?
Measure accurately, cut cleanly, and seal the edges. Nail or fasten per your roof type, then bed with sealant and cover with shingles. Don’t skip the sealant; a bad seal is a leak waiting to happen.
What common mistakes should I avoid?
Don’t bend too sharp a corner or leave gaps. Don’t trap water behind the flashing or rely on nails alone for closure. Poor alignment or improper flashing can cause big leaks fast.