
Introduction
Diagnose and repair common roof leaks yourself with a clear, step-by-step approach.
You’ll learn how to locate the source of a leak, assess damage, and perform practical fixes with tips and real-world considerations that matter for safe, lasting results.
Key takeaways
- Identify active leaks by tracing water marks and ceiling stains after rain.
- Inspect flashing, shingles, and vents for gaps, cracks, or missing caulk.
- Gather essential tools: ladder, pry bar, fresh sealant, and roofing cement.
- Cost range: budget for tarps, sealant, asphalt shingles, nails, and gloves.
- Avoid DIY on structurally damaged roofs; hire pros for sagging studs or rot.
- Document repairs with dated photos and receipts for insurance or resale.
Table of Contents
- Introduction
- Key takeaways
- Quick Overview & When to Act
- How to Locate the Source of a Roof Leak
- Tools, Materials, and Estimated Costs for DIY Repairs
- Step-by-Step DIY Repairs (Common Scenarios)
- When DIY Is Appropriate — And When to Call a Professional
- Preventative Maintenance & Seasonal Checklist
- Common Mistakes, Troubleshooting, and Repair Pitfalls
- Insurance, Documentation, and Cost Considerations
- Conclusion
- FAQ
Quick Overview & When to Act
Immediate diagnosis and timely repair matter because safety comes first and quick action helps prevent structural failure, interior damage, and insurance headaches. Stay focused on a quick-diagnosis mindset: identify hazards, stop the water if you can, and start documenting what is happening so you can decide what to patch and what to escalate. Keep the plan simple and practical so you don’t waste time chasing problems that require a pro.
What you can handle includes obvious drips, moisture on ceilings or walls, and loose or curling shingles, while hidden structural damage, large-scale leaks, and failing flashing or vents clearly call for a professional. Use a short priority checklist: stop the water, contain damage with tarps or plastic, document the damage, assess risk to occupants and the structure, and decide if DIY patching is safe or if you need a pro. Photograph the scene, note date and time, and prepare questions for a roofer, so you know when to escalate based on leak size, location, and the roof’s age.
Key Takeaways
The first step when you spot a leak is to act quickly. Your immediate goal is to stop the water from causing further damage and assess whether it’s safe to do so yourself or if you need professional help.
Safety comes first: If there are active leaks, slippery surfaces, or electrical risks, address these hazards immediately. Stop the water source if possible but avoid climbing on a wet roof unless absolutely necessary.
Your priority checklist includes stopping the water flow, containing damage with tarps or plastic sheeting, documenting the leak, and assessing any risk to occupants and structure. If you can’t see the source of the leak or it’s too large for a quick fix, call in a professional.
Safety First: Before You Climb
Before tackling any roof repair, ensure your safety. Avoid climbing on roofs with steep pitches or where there’s significant risk of falling. Always use a sturdy ladder and secure it properly.
If the leak is minor and visible from ground level, you can often fix it yourself without risking a fall. However, if you need to climb up, make sure the roof isn’t slippery due to moisture or debris.
Wear appropriate personal protective equipment (PPE), such as non-slip shoes and gloves. Working with another person is also recommended for added safety and support.

How to Locate the Source of a Roof Leak
The visible stain isn’t the leak’s real source. Use a stepwise approach that starts inside and works outward to identify the entry points, not the stain.
Tracing the path helps you find common entry points like flashing, joints, and vents, while gravity and hidden channels can mislead you. Document everything with photos and a simple map so you know what to fix or show a pro. Check the product labels and local rules before any patching.
Step-by-Step Process
This sequence helps you methodically find the source of a roof leak, ensuring safety and accuracy.
- Check for safety gear, like gloves and hard hats. Ensure ladders are stable before climbing.
- Inspect ceilings and attics for stains or damp spots using a flashlight. Note any signs of mold growth.
- Trace water paths from interior marks to exterior entry points, such as roof joints or flashing areas.
- Climb the ladder safely to examine shingles, flashings, and valleys for damage like missing granules or cracked sealant.
- Use a garden hose to simulate rain in sections. Start at the bottom of the roof and work your way up.
Inspect the Interior and Attic
Start by checking ceilings for water stains or active drips using a flashlight. Look closely around electrical fixtures and light switches.
In the attic, inspect insulation and rafters for damp spots. Use moisture indicators to check if materials are still wet.
Note any signs of mold growth or rotting wood, which can indicate long-term water damage. Document these areas with photos.
Examine Exterior Clues on the Roof
Start by looking at shingles for missing granules or curling edges, which can indicate wear and tear. Check step flashing around chimneys for any gaps.
Inspect valleys where two roof planes meet for debris buildup or damaged sealant. Look closely at vent pipes and skylights for signs of water intrusion.
Note any nail pops or lifted shingles that could allow water to seep through. Document these areas with photos before proceeding further.
Water-Test Method (Hose Test)
The hose test simulates rain conditions safely and methodically. Start by setting up a garden hose at the base of your roof.
Climb the ladder to begin testing from bottom to top, sectioning off areas as you go. Have helpers on the ground ready to spot leaks immediately.
Work in dry weather for safety reasons. If you find a leak, mark it with chalk and take photos before moving to another area.
Tools, Materials, and Estimated Costs for DIY Repairs
DIY repairs like shingle fixes, flashing reseals around vents, or small decking patches can be tackled with a basic tools list and a sensible materials plan. You’ll want fundamental hand tools, safety gear, and patch materials matched to your roof type, plus a rough idea of safe cost ranges—check local suppliers for current pricing and options. Know when a leak is a surface patch vs. something that needs more involved work, and follow the label directions for sealants and patch fabrics.
This section helps you choose the right quality tiers and compatibility so patches don’t fail prematurely, and it guides you on estimating quantities and delivery options. You’ll see how to balance temporary fixes with longer-term durability, and when to escalate to a professional if structure, step-by-step failure, or uncertain sources come into play. Use it to plan, buy smart, and avoid bad practices that waste time and money.
Basic Roof Repair Kit (Tools & Consumables)
Before you start any roof repair, gather your basic tools and consumables. This kit will help you tackle common issues like shingle repairs or flashing reseals.
- Ladder: Choose a sturdy extension ladder with slip-resistant feet for safety. Always follow the 4:1 rule when setting up.
- Pry Bar: Use to lift and remove damaged shingles without damaging the roof deck. Keep it sharp but not too aggressive to avoid tearing.
- Roofing Cement: Essential for sealing around nails, vents, and chimneys. Look for high-quality brands that offer good adhesion and flexibility.
- Replacement Shingles: Match the existing shingle type exactly or use a universal patch kit if you can’t find an exact match. Always have extras on hand.
- Utility Knife: For cutting tar paper, felt, or flashing tape. Keep it sharp and store safely when not in use to avoid accidents.
Material Specs & What to Avoid
The right materials can make your roof repair last longer and look better. Choose wisely to avoid common pitfalls that lead to future leaks or damage.
- Roofing Cement: Use for sealing around nails, vents, and chimneys. Look for high-quality brands with good adhesion and flexibility. Avoid using regular caulk as it won’t withstand weather changes.
- Asphalt Shingles vs Silicone: For asphalt roofs, use roofing cement or silicone sealant designed specifically for exterior use. Don’t use interior sealants like expanding foam; they will crack and fail over time.
Step-by-Step DIY Repairs (Common Scenarios)
Here are the five most common roof-leak scenarios in priority order, with clear steps for a DIY repair. You’ll see when a patch is enough to stop the rain and when a durable component replacement is needed for long‑term integrity. Use this as a practical, safety‑first guide that separates temporary fixes from permanent solutions.
Follow a quick safety and prep routine: check the forecast, use a ladder and PPE, and verify roof material compatibility before you start. We’ll keep the action focused on quick diagnostics, a tight tools-and-materials list, and aftercare basics like documenting the repair and simple preventive care. When in doubt, check product labels, manufacturer instructions, or local rules before proceeding.
Step-by-Step Repair Process
This sequence guides you through a safe and effective repair process, from preparation to cleanup.
- Check the weather forecast. Avoid working in wet or windy conditions.
- Inspect your ladder for stability and safety before climbing up.
- Wear proper PPE: gloves, hard hat, non-slip shoes, and eye protection.
- Identify the leak source using water testing methods if needed.
- Remove damaged materials carefully to avoid further damage.
- Install new shingles or flashing according to manufacturer instructions.
- Seal all edges and joints with roofing cement for a watertight seal.
- Clean up debris and tools, ensuring no nails are left on the roof.
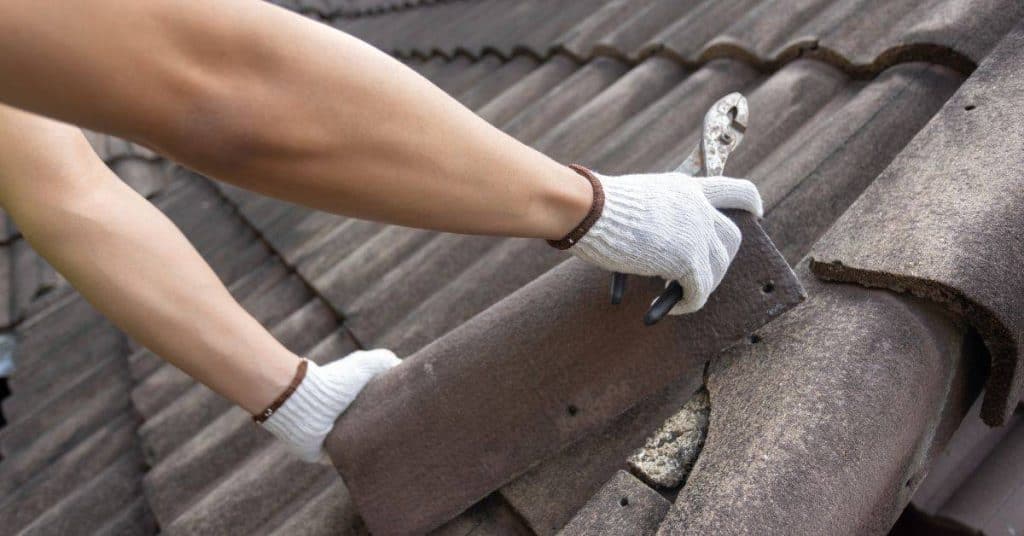
Replacing or Repairing Damaged Shingles
To fix a damaged shingle, start by removing any loose or broken pieces. Use a pry bar to gently lift the nails and slide out the old shingle.
Next, place your new shingle in position, ensuring it aligns with existing ones for proper coverage. Nail it down using galvanized roofing nails at recommended intervals.
If multiple adjacent shingles are damaged, consider replacing a full section to maintain uniformity and prevent further leaks.
Finally, apply roofing cement around the edges of the new shingle to seal any gaps or cracks, ensuring no water can penetrate.
Fixing Flashing, Vents, and Pipe Boots
To diagnose flashing issues, look for signs of rust, gaps, or displaced metal around roof penetrations like chimneys, vents, and plumbing stacks.
If you find a damaged area, remove old flashing carefully to avoid tearing the underlying roofing material. Replace with new flashing that fits snugly against the surface.
For vent boots, reseat them firmly over the pipe or penetration, ensuring no gaps exist between the boot and roof deck. Apply sealant around all edges for added protection.
Maintaining proper sealing techniques is crucial to prevent water from entering your home through these critical areas.
Emergency Tarping and Temporary Patches
In case of urgent leaks, cover the affected area with a heavy-duty tarp. Secure it using boards placed along the ridge overhang to prevent wind damage.
For temporary patches, cut a piece of roofing felt or rubber membrane slightly larger than the leak site. Apply adhesive around the edges and press firmly into place.
Ensure all seams are sealed tightly with additional layers of tape or caulk to provide extra protection until you can perform a permanent repair.
This method buys time for proper repairs while protecting your home from further water damage.

When DIY Is Appropriate — And When to Call a Professional
DIY makes sense when the leak is small, accessible, and does not involve structural risk. Use a quick yardstick: if you can isolate the leak area without entering a dangerous zone, you can proceed with basic fixes. If you see large roof-area damage, sagging decking, visible structural rot, steep or high roofs, active severe leaks, or any electrical wiring near the leak, stop and plan to hire a pro.
Start with an attic check for trapped water and note staining, shingle condition, flashing gaps, and vent penetrations to map the leak path. Prioritize safety, use temporary measures only if you can do them safely, and separate quick fixes from permanent repairs. When you bring in a roofer, have photos, rough measurements, roof pitch, and access notes ready so they can scope the job.
Homeowner-Doable Repairs
If you’ve got a small, isolated leak that’s easy to access from the ground, you can probably handle it yourself. Common DIY fixes include replacing a single damaged shingle or patching up minor punctures with roofing cement and a metal repair kit.
For temporary measures, securing loose shingles or applying a tarp over an area where water is clearly entering can buy you time until you get the materials for a proper fix. Remember, these are just stop-gap solutions to prevent further damage while you plan your repairs.
A basic repair kit with tools like a pry bar and roofing nails will help you tackle minor issues efficiently. Just make sure that any DIY work is done safely and doesn’t compromise the integrity of your roof structure.
Call a Roofer: Critical Signs
If you notice soft or rotten decking, it’s time to call in the pros. This kind of damage often indicates deeper structural issues that need professional assessment and repair.
Multiple leak sources scattered across your roof are another red flag. A roofer can diagnose complex flashing problems or other systemic issues that require specialized knowledge and equipment to fix properly.
Chimney flashing failures, especially if they’re part of storm damage covered by insurance, should also prompt a professional visit. These areas often need custom work that DIYers aren’t equipped for.
Lastly, if accessing the roof is dangerous due to steep slopes or high heights, it’s best to leave it to someone with proper safety gear and experience. Your safety comes first—don’t risk injury trying to fix a leak you can’t safely reach.
Preventative Maintenance & Seasonal Checklist
Preventative maintenance is about treating your roof and gutters as a living system you watch regularly, not chasing leaks after they start; it’s about reducing risk by sticking to a predictable upkeep mindset and a practical schedule. It calls for a bi-annual cadence with clear post-storm add-ons, and a simple season-by-season plan to guide tasks in winter, spring, summer, and fall. Core tasks stay focused and practical: gutter cleaning, debris removal, moss or algae control, roof surface cleanliness, and flashing checks, all done with safety first in mind and without skipping the obvious red flags.
This approach matters because it helps you distinguish superficial wear from issues that could become leaks, guiding when to seal, reseal, or replace flashing based on evidence you observe on-site. A small, consistent routine saves time and money by catching problems early and avoiding emergency fixes after a storm or heavy rain. Keep a simple maintenance log, set reminders, and build a basic seasonal calendar so tasks don’t slip, because the payoff is fewer leaks and less guesswork when you’re on the ladder or inspecting aging components.
Bi-Annual Maintenance Tasks
Spring and fall are the best times to give your roof a thorough check-up. Use this checklist every six months to catch issues early and extend your roof’s life.
- Clean gutters: Remove leaves, twigs, and debris; clogged gutters can cause water overflow and leaks.
- Inspect shingles: Look for missing or damaged shingles; replace any that are curled, cracked, or broken to prevent further damage.
- Check flashing: Inspect around chimneys, vents, and roof edges for loose or rusted flashing; secure or replace as needed to avoid water intrusion.
- Clear moss/algae: Use a stiff brush or power washer (carefully) to remove growths that can trap moisture and cause rot.
- Examine valleys: Check for debris accumulation in roof valleys; clean out any blockages to ensure proper water drainage.
- Sweep attic: Look for signs of leaks or dampness, such as stains on the ceiling or walls; address issues promptly before they worsen.
- Test downspouts: Ensure all downspouts are clear and direct water away from your foundation; blocked spouts can lead to basement flooding.
- Evaluate roof deck: Look for soft spots, cracks, or signs of rot in the decking material; repair any damage before it leads to major leaks.
Quick rule: Regular checks keep your roof healthy and prevent costly repairs down the road.
Long-Term Care: When to Consider Replacement
Knowing when it’s time for a full roof replacement is crucial. Use this checklist to evaluate your roof’s condition and decide if repairs are still worth the investment.
- Age over 20 years: If your roof is older than two decades, consider its overall condition; aging materials often require frequent repairs.
- Widespread shingle failure: More than a few damaged or missing shingles may indicate structural issues that can’t be fixed with simple patches.
- Recurring leaks: Persistent water damage despite multiple repairs suggests deeper problems; addressing these might require major work.
- Significant roof deck damage: Extensive rot, splits, or soft spots in the decking indicate a compromised structure that needs replacement.
- Rust on metal components: Severe rusting of flashing, vents, and other metal parts can lead to water penetration; replace these as needed.
- High repair costs: If ongoing repairs are expensive or frequent, it may be more cost-effective to invest in a new roof.
- Insurance claims history: Multiple recent insurance claims for roof damage could mean your roof is nearing its end and needs replacement.
Quick rule: When repairs become too costly or frequent, it’s time to plan for a full roof replacement.
Common Mistakes, Troubleshooting, and Repair Pitfalls
Common homeowner errors can turn a simple roof leak fix into a bigger mess. Avoid misdiagnosing the source, ignoring interior moisture, and patching without addressing flashing, ventilation, or structural issues. When a DIY fix fails, re-check flashing, joints, valleys, gutters, and underlayment, and don’t skip a careful attic moisture check or a controlled water test to re-evaluate the leak source.
This section also flags repair pitfalls that sneak in during DIY work, like over-tightening fasteners, weakening flashing, using the wrong patch materials, or neglecting proper attic ventilation and underlayment replacement. Verifying success means watching through several rain events, inspecting interiors for new stains or moisture, using a moisture meter in affected spots, and documenting conditions with photos for future reference. When leaks persist across zones, there’s visible structural rot, or codes require licensed pros, it’s time to call in a pro; keep a maintenance log and photos to guide future repairs and prevent recurring issues.
What Not to Do
Avoid the temptation of fixing only what you see inside your home. Interior signs like water stains and mold are just symptoms; they don’t tell you where the leak is coming from. Focus on finding and addressing the source outside.
Another common mistake is using sealants that aren’t compatible with your roof material. For example, silicone-based caulk might look good for a quick fix but can trap moisture underneath it, leading to more damage over time. Use products recommended by roofing experts or manufacturers.
If you find rot or extensive water damage under shingles, don’t just patch the surface. You need to replace damaged wood and ensure proper ventilation to prevent future issues. This is especially true for areas around chimneys, vents, and skylights where moisture can accumulate over time.
Lastly, never work alone on steep roofs or without safety gear like harnesses and ladders that are in good condition. Safety should always come first before any repair work starts.
Troubleshooting Persistent Leaks
If your roof still leaks after repairs, start by re-checking the flashings around chimneys, vents, and skylights. These areas are often overlooked but can be major sources of water intrusion if not properly sealed.
Next, inspect the underlayment for any signs of damage or wear. If you find wet spots or missing pieces, replace them immediately to prevent further leakage. Also, check gutters and downspouts for blockages that might redirect water onto your roof instead of away from it.
A cautious attic moisture test can also reveal hidden leaks. Look for damp insulation or stains on the underside of the roof deck. If you find these signs, trace back to where they originate from outside and address those areas specifically.
Finally, if all else fails, consider performing a controlled water test by spraying your roof with a hose in suspected leak locations during dry weather. This can help pinpoint exactly where water is entering the structure so you can make targeted repairs.
Insurance, Documentation, and Cost Considerations
Document everything you plan to claim: take clear photos before and after, keep a dated log of when leaks or damage are observed, and gather a simple timeline of events and contractor assessments. Organize a basic claims folder with photos, notes, and itemized quotes so you can show insurers exactly what happened and when. Be prepared to present an itemized breakdown that includes materials, labor, and any permit or eligibility considerations.
This matters because insurers often want a clear, verifiable record and a defensible cost picture before approving repairs or payments. Use credible estimates and keep receipts for any tools or materials you buy, plus notes on temporary fixes and warranties. Compare DIY vs pro options by weighing workmanship, risk, and what the policy will cover, and always check with your insurer about exclusions, deductibles, and what must be professionally done for flood or roof-related claims.
How to Document Damage for Claims
When your roof starts leaking, the first step is documenting the damage thoroughly. Take photos of both the interior and exterior of your home, focusing on areas where water has entered or pooled. Include shots showing the extent of the leak and any visible signs of wear like missing shingles or damaged flashing.
Note down the dates when you observed the leaks and any significant weather events that might have caused them. Keep a log detailing each observation to help establish a timeline for your insurance claim. If possible, include scale references in photos to give context on the size and location of damage.
As soon as you notice issues, contact your insurer to report the damage promptly. They’ll guide you through the process but generally want to see detailed documentation of the problem before they can start assessing your claim. This includes any temporary measures you take to prevent further water damage, like placing tarps over compromised areas.
Organize all your photos and notes in a simple claims folder for easy reference during discussions with your insurance provider. Keeping everything well-documented from day one will make the process smoother and increase your chances of getting a fair settlement.
Comparing DIY vs Pro Costs and Warranties
Evaluating whether to tackle roof repairs yourself or hire a professional involves weighing the costs against potential benefits. Materials for DIY fixes can be cheaper, but labor costs are often lower when you do it yourself. However, more complex roofs with multiple layers or unusual designs might require specialized skills and equipment that make hiring pros worthwhile.
Warranties also play a key role in deciding between DIY and professional work. If you use high-quality materials and follow best practices, your DIY repairs could last several years without issues. But if the roof damage is extensive or involves critical components like flashing around chimneys, professional warranties might offer better peace of mind.
When considering long-term value, think about how much time and effort you’re willing to invest in maintaining a DIY repair versus having it done right by experts who can provide comprehensive warranties. For instance, if the roof needs extensive work or has multiple leaks, professional repairs are likely more cost-effective over time due to reduced risk of future issues.
Ultimately, assessing whether DIY is worth it comes down to understanding your specific situation and weighing all factors involved. If you’re confident in your skills and have access to quality materials, going the DIY route can save money initially. But for complex repairs or when safety concerns are high, professional help offers better long-term value.

Conclusion
You now have a practical, action-ready plan to tackle roof leaks without wasting time or money. The core idea is clear: act safely, diagnose carefully, and fix with parts and methods you can verify in real conditions.
Move forward with a simple check sequence: inspect the attic for drips and dark spots, map the likely source from interior signs to exterior features, gather the listed tools and materials, test repair ideas on a small, inconspicuous area first, and then apply the chosen fix in the recommended order while rechecking for new signs of moisture. Keep the process steady, document what you see, and cost-check as you go to avoid overreaching.
Common mistakes to avoid include rushing repairs without confirming the source, using the wrong materials for the surface, and ignoring safety gear or working from unstable surfaces. Always wear appropriate PPE, work from solid footing, and test any patch or seal in a dry, controlled spot before committing to the full area. If you notice extensive damage, widespread staining, or moisture that returns after a patch, stop and reassess rather than pushing ahead under pressure.
When in doubt, or if the leak threatens structure, electrical systems, or insulation, call a professional. A pro can confirm the source, perform higher-risk repairs, and help with documentation for insurance and future maintenance. Stay methodical, stay safe, and you’ll protect your home and your budget while making a lasting fix.
FAQ
What common signs show a roof is leaking?
You’ll see water stains on ceilings or walls near the attic. Look for damp insulation, puddles, or dripping inside after a rain. Quick clue: active leaks usually show up where two roof planes meet or around flashing.
Can I diagnose a leak from inside or do I need to go on the roof?
Start inside: trace water paths to find the entry point. But many leaks hide where the roof edge or flashing fails, so you’ll need to inspect from outside too. If you’re unsure, hire a pro to confirm the leak’s source.
Is it safe to repair a leak myself?
Simple fixes can be safe, like resealing a loose shingle or replacing a missing vent boot. Don’t mess with tall ladders, hard-to-reach areas, or slick shingles during rain. If the roof is steep or the damage is widespread, stop and call a pro.
What quick fixes help temporarily stop a leak before I repair it properly?
Use roofing cement or patching tape on obvious gaps as a temporary seal. Cover exposed areas with a tarp to keep rain out until you can repair properly. Remember, these are temporary fixes, not a full repair.