
Introduction
Two layers of shingles simply means two courses of roofing material are layered one over the other on the roof. To spot it, look at the edges from the ground or in the attic and notice if there are two rows of shingles visible in a single area. If you see nails or fasteners that appear to pass through two shingle layers, or if you notice thick, uneven seams, you may have a double layer.
Two-layer roofs can be heavier and may hide damage or complicate repairs, so proceed with caution. Look for signs of failure such as blown shingles, nail pops, or unusual bending, and reference local rules and manufacturer guidance for limits on layered roofing. If you’re unsure, plan to address the layers properly or consult a professional, and always verify the roof structure can handle the weight.
Key takeaways
- Inspect for uneven edge lines and alternating shingle patterns indicating layered roofing.
- Watch for nail pops, blistering, or loose shingles signaling excess layer weight.
- Check local code guidance on layer limits and permit requirements before work.
- Layered roofs raise structural load and reduce ventilation, increasing leak risk.
- Options: safely remove entire roof down to deck or strip only top layer.
- Safety note: never walk on damaged areas; use fall protection and ladders.
- Consult a contractor with questions on feasibility, warranties, and cost implications.
Table of Contents
- Introduction
- Key takeaways
- Quick Visual Signs That Indicate Multiple Shingle Layers
- Confirming Layers Safely — Methods and Precautions
- Legal Limits and Code Considerations for Layered Roofing
- Risks and Consequences of Having Two (or More) Layers
- Options to Fix or Replace When Two Layers Are Present
- Step-by-Step DIY Inspection and What Not to Do
- Hiring a Contractor — Questions to Ask and Red Flags
- Cost Factors and Budgeting for Roofs with Two Layers
- Conclusion
- FAQ
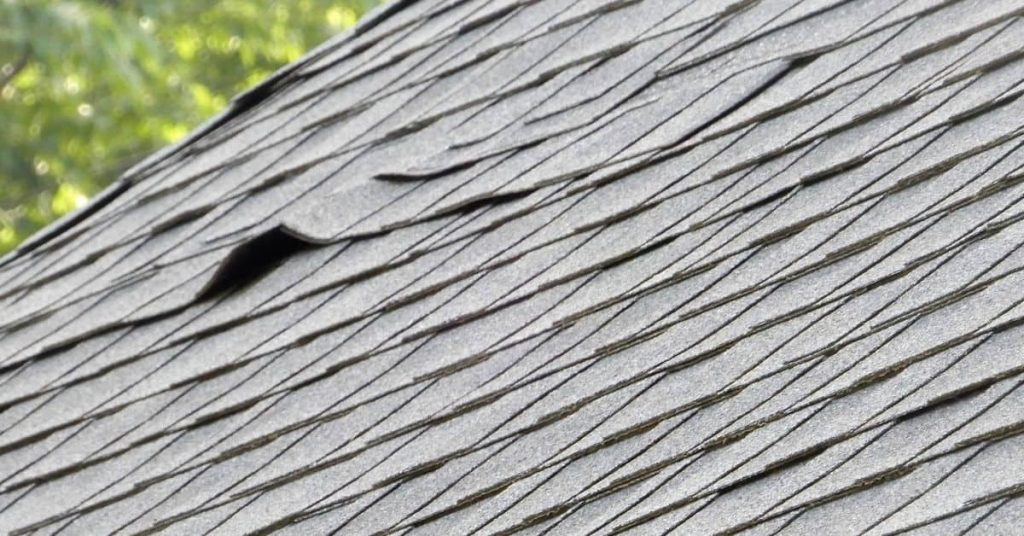
Quick Visual Signs That Indicate Multiple Shingle Layers
From ground level or a ladder, look for thicker eaves and raised ridges where shingles seem stacked. You may see lines that don’t align neatly across the roof or clusters of nail heads visible at the edge. These cues often hint at more than one layer beneath the surface.
Differentiate temporary cosmetic signs from real layering by checking for uneven lines or noticeable bumpiness that isn’t just weathering. Use a simple checklist, snap photos, and avoid stepping onto fragile areas. If you’re unsure, stop and call a pro for a safe evaluation.
Eave and rake inspection cues
Inspect the roof edges, soffit overhangs, and rakes (slopes) first. These areas show layering clearly.
- Check eaves: Thicker than usual? That’s extra layers.
- Observe rakes: Raised ridges or misaligned lines indicate layered shingles.
- Soffit overhangs: If they’re thicker, it might be due to added shingle layers.
- Look for nail heads: Clusters could mean extra layers. Use a flashlight if needed.
- Avoid edge slips: Be careful; edges can slip off, causing injuries.
- Weak decking check: Gently press on the roof; if it feels spongy or gives way, stop and call a pro.
- Hidden rot warning: If you spot any soft spots, don’t walk there. It might be hidden rot.
Quick rule: If you find any signs of layering, document them. If you’re unsure or find weak spots, stop and call a pro.
Close-up checks on valleys, flashings, and step areas
Next, inspect roof penetrations like chimneys, vents, and skylights. Also, check valleys where water flows.
Valleys: Look for extra material or misaligned shingles. These could indicate layered shingles.
Flashings around penetrations should lie flat. If they’re raised or buckled, it might be due to added layers underneath.
Step areas (where roof planes meet) can show layering too. Check for misaligned lines or extra material here as well.
Attic and interior indicators
Now, check your attic. It’s safer than walking on the roof, and you might find clues there too.
Nail exposure: If nails are shorter or more numerous, it could mean extra layers above.
Walk around gently. If the decking vibrates or feels spongy, stop. It might be weak due to added weight from layered shingles.
Light from below: If you can see light through the roof, it’s a sign of thin layers or missing shingles. Both need fixing.
Confirming Layers Safely — Methods and Precautions
Safely confirm layers with a roofing probe or small test-strip removal only where you can see from the attic or edge. Check manufacturer markings or part numbers on shingles for layering clues, and count visible nail lines. Document what you find with photos and notes before disturbing the roof.
Follow ladder safety rules: sturdy, rated ladder on solid ground, fall protection, and PPE. Avoid windy or wet conditions and never work alone. If any sign of damage or uncertainty appears, get professional help before proceeding.
Non-invasive checks (probe, binoculars, ladder)
Before you climb onto your roof, use these non-destructive methods to gather evidence without tearing shingles.
Roofing probe: Use a long, thin probe tool to poke through the shingles. If it hits another layer, mark the spot. Be careful not to damage the underlayment or sheathing.
Binoculars: Inspect your roof from ground level with binoculars. Look for any visible signs of multiple layers like different colors or textures in shingles.
After, use a sturdy ladder to get a closer look at the eaves and rakes. Don’t climb onto the roof yet; just observe from the ladder.
When to perform a small test strip removal
A controlled test strip can confirm layers, but be cautious. Here’s how:
Remove a small 1-2 sq ft section of shingles in an inconspicuous area. Check for the number of layers and their condition.
Be aware: If you find rot or complex problems under the shingles, stop immediately. These could indicate structural issues that need professional attention.
If the sheathing looks good, note the layer count. Replace the removed shingles to keep your roof protected until you decide on next steps.
Documentation for contractors or inspectors
Keep detailed records of your findings. This helps contractors and building inspectors understand your roof’s condition:
Take clear, labeled photos from multiple angles. Show suspected areas with arrows or notes.
Log layer counts and mark their locations on a diagram of your roof. Keep measurements for reference.
Prepare a brief note summarizing your findings. Include any concerns about the roof’s condition or necessary repairs. This helps potential contractors understand the scope of work before they even set foot on your roof.
Legal Limits and Code Considerations for Layered Roofing
Many jurisdictions cap layering at two, but rules vary by code year and local amendments. Understand how fully adhered shingles, underlayment, and deck integrity factor into any limit. Confirm what your area actually allows before planning removal or overlay work.
Check with the building department or code officials for required permits and approved methods. Document approvals and keep notes on material-specific rules for asphalt versus other roofing types. Ask contractors about codes, warranties, and insurance implications related to layering.
How to quickly check local requirements
Finding out your local roofing code requirements is crucial before you start any work. Here’s how:
1. Contact your municipal building department. They’re the authority on local codes and permits.
2. Ask about ‘roofing over existing’ or ‘layered roofing’ rules. Mention you want to know the typical limits, if they vary by material (asphalt, metal, etc.), and any restrictions tied to roof pitch or venting.
3. Check online resources. Many cities post their building codes online. Search for keywords like ‘roofing code’, ‘building codes’, or your city’s name plus ‘codes’.
Insurance and resale implications
Multi-layer roofs can impact your home insurance and resale value. Here’s why:
1. Insurers may refuse coverage or charge higher premiums if they find out you’ve layered shingles without following code. This is because multi-layer roofs can increase the risk of damage during storms or fires.
2. Lenders might require a roof inspection before approving a mortgage or refinancing. If your roof doesn’t meet code, it could delay or even derail the process.
3. When selling your home, you’ll need to disclose any non-compliant work. This includes layered roofs that don’t follow code. Failure to do so could lead to legal issues later on.
Risks and Consequences of Having Two (or More) Layers
Extra layers add weight, which can bow or stress rafters and the sheathing. Look for signs of sagging or unusual deck movement during inspections. If you notice these, plan for professional assessment before any repair or replacement work.
Layering complicates leaks, hides moisture, and speeds shingle wear. Verify attic ventilation, flashing integrity, and gutter drainage, since multi-layer roofs push other components harder. Document suspected damage and be prepared for possible deck repair or full replacement if needed.
Structural and load concerns
Adding another layer of shingles increases your roof’s weight. This extra burden can cause issues over time.
Rafters may start to sag or bow under the added stress, leading to structural damage. If you notice any dips in your roofline, consult a pro immediately.
Decking, the plywood base of your roof, also bears this extra weight. Inspect it for signs of rot or soft spots before any repairs. In snowy regions, the added weight can cause snow to accumulate and slide off in large chunks, potentially damaging gutters or causing injuries.
If you’re concerned about your roof’s ability to handle another layer, consult a structural engineer or experienced roofer before proceeding.
Performance problems (leaks, ventilation, lifespan)
Layering shingles can mask underlying damage to your roof. Water stains on the ceiling or walls may indicate a leak, but finding its source becomes more difficult with each added layer.
Flashing, which seals around chimneys and vents, can become dislodged or damaged under multiple layers. This can lead to water intrusion and further damage.
Ventilation is also compromised when you add another layer. Proper attic ventilation prevents moisture buildup, which could lead to mold growth and structural damage. The added layers can block airflow, making your roof less effective at regulating temperature and preventing ice dams in winter.
The lifespan of the new shingle layer may also be reduced due to trapped heat and moisture. It’s like putting a blanket over a damp surface – it traps the moisture and speeds up deterioration.
Aesthetic and material compatibility issues
When you add another layer of shingles, it’s important to consider how they’ll look with your existing roof. Incompatible materials can lead to premature failure.
- Color mismatch: If the new shingles don’t match the old ones, your roof will have a patchwork appearance that detracts from your home’s curb appeal.
- Profile incompatibility: Different shingle profiles (like 3-tab vs. architectural) may not lay flat together, creating bumps and ridges that can trap water or snow.
- Adhesion issues: Some materials don’t stick well to others. This can cause the new layer to lift or peel off in high winds or heavy rain.
- Material ratings: Check the wind resistance, fire rating, and other specs of both layers to ensure they’re compatible.
- Telegraphing: Bumps or imperfections in the underlying layers can show through the new shingles, creating an uneven appearance.

Options to Fix or Replace When Two Layers Are Present
Start by identifying immediate safety concerns and confirm the exact number of layers with careful inspection. Note delamination, sagging, and moisture intrusion as signs that require closer look. Use this as the baseline for choosing a plan with a pro.
Temporary fixes, overlays, or full tear-off each have limits. Overlay is only viable where allowed and the deck remains sound; a full tear-off may be necessary for long-term performance. Plan for permits, flashing, and ventilation changes as part of the solution.
Temporary repairs and interim protection
When you find two layers of shingles on your roof, immediate action is crucial to prevent further damage. Here are some temporary fixes:
Tarping: Use heavy-duty tarps to cover leaks until permanent repair can be scheduled. Secure them tightly with nails or screws.
Sealants and cement patches: For small leaks, use roofing sealant or cement to patch the affected area. This is a quick fix but not a long-term solution.
Flashing repair: Inspect and repair any damaged flashing around chimneys, vents, or skylights. Use caulk or flashing cement to reseal these areas.
Overlay vs full tear-off — decision checklist
Before deciding between an overlay and a full tear-off, consult this checklist to ensure you’re making the right choice.
- Code allowance: Check local building codes. Some areas allow only one layer of shingles.
- Deck condition: Inspect your roof deck. If it’s rotted or damaged, a tear-off is necessary.
- Structural damage: Look for signs of structural damage like sagging or warping. If present, a full tear-off is needed.
- Insurance/warranty restrictions: Check your insurance policy and warranty. Some may require a full tear-off to maintain coverage.
- Roof pitch: Overlays are not recommended for steep-pitched roofs due to increased risk of leaks.
- Attic ventilation: Ensure your attic has proper ventilation. An overlay can trap heat and moisture, leading to further damage.
- Existing layers: Most areas allow no more than two layers of shingles. If you have three or more, a tear-off is necessary.
- Budget: Consider your budget. A full tear-off is more expensive but provides better long-term results.
Quick rule: If in doubt, consult a licensed roofing contractor. They can provide expert advice tailored to your specific situation.
Proper full tear-off workflow
A full tear-off involves several steps to ensure your roof is properly prepared for new shingles. Here’s the professional workflow:
Inspection: Begin by inspecting the roof deck and underlayment. Remove any damaged or rotted materials.
Deck repair: Repair any damage found during inspection. This may involve replacing sections of the roof deck.
Underlayment installation: Install a new layer of underlayment to protect your roof from moisture. Use a breathable, synthetic underlayment for best results.
Flashing replacement: Replace any damaged or outdated flashing around chimneys, vents, and skylights. Ensure proper sealing to prevent leaks.
New shingle installation: Finally, install new shingles according to the manufacturer’s instructions. Use proper nailing techniques and ensure each shingle is securely fastened.
Step-by-Step DIY Inspection and What Not to Do
Schedule work for calm, dry days and wear PPE, using a stable ladder. Avoid walking on soft or cracked shingles to prevent a fall. Prioritize attic checks for moisture and then survey the roof edge from a safe vantage point for two-layer indicators.
What not to do includes removing large sections, attempting complex flashing repairs, or venturing onto fragile mid-surface areas. Bring a camera, flashlight, and a simple checklist to map problem zones. If anything looks uncertain, stop and call a professional for an inspection.
Step-by-Step Process
Use this checklist before, during, and after your DIY roof inspection to ensure safety and thoroughness.
- Preparation: Check weather forecast, gather tools, wear PPE (hard hat, gloves, safety glasses).
- Ladder Safety: Use stable ladders, secure them at the top, avoid steep or compromised sections.
- Attic Inspection: Look for leaks, moisture, signs of water damage on rafters and joists.
- Roof Survey (from a safe vantage point): Check for two-layer indicators, damaged flashing, curved or buckling shingles, gutter/drain issues.
- Avoid Walking On: Visibly soft, cracked, or fragile mid-surface areas to prevent falls.
- Document Findings: Take photos, measure dimensions, note problem zones for contractor quotes or insurance claims.
- Temporary Repairs (if necessary): Apply interim protection, prioritize professional assessment.
- Cleanup: Remove debris, secure any loose materials, store tools properly.
Quick rule: Never attempt complex repairs or remove large sections without professional guidance.
Tools and Materials Checklist for Inspection
Gather these tools and PPE before starting your DIY roof inspection to ensure safety and efficiency.
- Ladder: Extension or folding ladder, with stabilizer if needed.
- PPE (Personal Protective Equipment): Hard hat, gloves, safety glasses, non-slip shoes.
- Flashlight: To inspect dark areas and eaves.
- Camera or Phone: For before/after shots and mapping problem zones.
- Tape Measure: To record dimensions for contractors or insurance claims.
- Pencil and Notebook: To note findings, measurements, and observations.
- Binoculars (optional): For safe inspection from the ground level.
- Probe (optional): To check for soft spots or damage without walking on them.
Quick rule: Always prioritize safety over speed; use tools that help you inspect without causing damage.
Visual Checkpoints and Photo Guide
Capture these areas and markers during your DIY roof inspection to document findings for contractors or insurance claims.
- Eaves: Check for water stains, peeling paint, or damaged flashing. Photograph from multiple angles.
- Valleys: Inspect for missing or damaged shingles, signs of leaks. Take photos at different times of day to show light and shadow.
- Ridge: Examine for cracks, gaps, or displaced materials. Photograph from various distances.
- Chimneys: Look for damaged flashing, missing mortar, or cracked bricks. Capture photos with a clear background for reference.
- Gutters and Drains: Check for clogs, leaks, or improper drainage. Photograph from ground level if possible.
- Problem Zones: Document any visible damage, cracks, or soft spots with close-up photos and measurements.
- Before/After Shots: Capture the entire roof before starting repairs, then again after completing temporary fixes or interim protection.
Quick rule: The more detailed your documentation, the better equipped you’ll be to discuss findings with contractors or insurance providers.
Hiring a Contractor — Questions to Ask and Red Flags
Ask about tear-off policies and how layering affects project scope, permits, and pricing. Clarify disposal procedures and whether extra debris fees apply. Ensure they disclose all logistics up front.
Verify licenses, insurance, and familiarity with local codes. Request material and workmanship warranties, and beware of pressure tactics or vague bids. Ask for references and prior project photos to gauge performance.
What an accurate contractor estimate includes
A trustworthy estimate breaks down the job clearly. Here’s what to expect:
Scope of Work: It should detail whether they’ll do a full tear-off or overlay, based on your discussion about layers.
Repairs and Materials: It lists deck repairs, materials used (shingles, underlayment), ventilation work, and flashing replacement.
Permit Costs: They should include any necessary permit fees in their estimate. Ask if they’ll pull the permits or if that’s your responsibility.
Verifying credentials and warranties
Before hiring, check these crucial aspects to ensure you’re working with a reliable contractor:
Licenses: Ask for their state-issued license number. You can verify it online with your state’s licensing board.
Insurance: They should have both general liability and workers’ compensation insurance. Request copies of the policies to confirm coverage.
Warranties: Ensure they follow manufacturer guidelines for warranty compliance. Ask about material warranties and workmanship guarantees, their duration, what they cover, and if they’re transferable.
References: Request references or examples of past local jobs. A reputable contractor should be happy to provide these.
Cost Factors and Budgeting for Roofs with Two Layers
Major cost drivers include tear-off labor, disposal, decking inspection or repair, and the cost of new materials plus any permit fees. Consider incidental costs such as scaffolding or safety gear when estimating the total. Gather line items to compare bids accurately.
Two layers often change labor and debris expectations and may affect decking needs or permit requirements. Build a realistic contingency and request phase-by-phase estimates to prevent surprise charges. Compare multiple bids and verify contractor credentials and warranty terms.
When a Tear-Off Makes Financial Sense
A full tear-off might seem expensive upfront, but it can save you money long-term. Here’s when it makes sense:
Decking Rot: If your roof has two layers and the decking underneath is rotted or damaged, a tear-off is necessary. Ignoring this could lead to costly repairs down the line.
Multiple Repairs Expected: If you’re already planning on multiple repairs (like replacing flashing or repairing vents), it’s cheaper to do them all at once during a tear-off rather than scheduling separate jobs.
Warranty Needs: Many manufacturers require a full tear-off for their warranties to be valid. Skipping the tear-off could void your warranty, leaving you unprotected against future issues.
Minimizing Surprises and Negotiating Scope
The key to avoiding unexpected costs is a detailed contract scope. Here’s how:
Detailed Contract Scope: Make sure your contract includes every detail of the job, from materials to labor. This helps prevent change orders due to misunderstandings.
Allowance for Deck Repairs: If there’s a chance you’ll need deck repairs, include an allowance in your contract. This way, you’re prepared if unexpected damage is found during the tear-off.
Clear Payment Schedule: A clear payment schedule helps manage expectations and prevents disputes. It should be tied to project milestones rather than time periods.
Conclusion
You need to know if two layers are on your roof because it affects safety, durability, and how your roof will look for years to come. Acting now with the right checks keeps damage limited and avoids costly surprises later.
To verify and act, start with a ground visual pass to spot irregular edge lines, then climb only if you’re equipped and comfortable, check an attic deck or visible underside for thickness and felt, test a small, inconspicuous patch on the roof if you can do so safely, and confirm with a professional if the layers or condition are uncertain or code rules apply in your area; proceed with a plan for repair or replacement based on what you find, and prioritize fixes that restore proper deck exposure and flashing alignment.
Common mistakes to avoid are pulling shingle patches without knowing the underlying layers, overloading ladders or stepping on wet or slick surfaces, and attempting to remove or re-nail shingles without understanding how it will affect the roof structure or attic ventilation; follow basic safety rules—never work on a roof in wind, rain, or glare, wear a harness or fall protection where required, and test decisions in a small area before committing to a full repair.
If the inspection shows uncertain roof health, if local codes limit layering, or if you face extensive repair needs, call a pro rather than pushing on alone; with clear questions and a focused plan, you can move from concern to a solid, safe fix and keep the roof durable for years to come.
FAQ
How can I tell if my roof has two layers of shingles without tearing it apart?
Look at the edge of a roof where it’s exposed. If you see a second set of seams parallel to the first, or a visible seam run across the edge, you may have two layers. You can also probe a loose shingle edge with a pry bar to see if there’s a second layer beneath.
What signs suggest two-layer roofing is causing damage like nail pops or blown-off areas?
Watch for unusually raised or lifted shingles, nails that push up or pop out, and soft or spongy spots after a storm. These are common when extra weight from a second layer stresses the underlayment and sheathing. If you notice flashing or ridge areas failing, treat it as a warning sign.
Should I worry about thickness limits on layered roofs, and how do I check?
Weight and support change with extra layers. Check with your local rules and the roof manufacturer instructions for maximum allowed layers. If unsure, inspect the attic floor for deflection or sagging and ask a pro to confirm what your structure can safely handle.
Is DIY diagnosis enough, or should I call a pro for layered-roof issues?
DIY can identify obvious signs, but a pro will assess load, attic ventilation, and deck condition. If you’re unsure about weight, fastener corrosion, or deck rot, stop and get a professional opinion. Always verify the contractor’s methods against manufacturer guidance and local requirements.