
Introduction
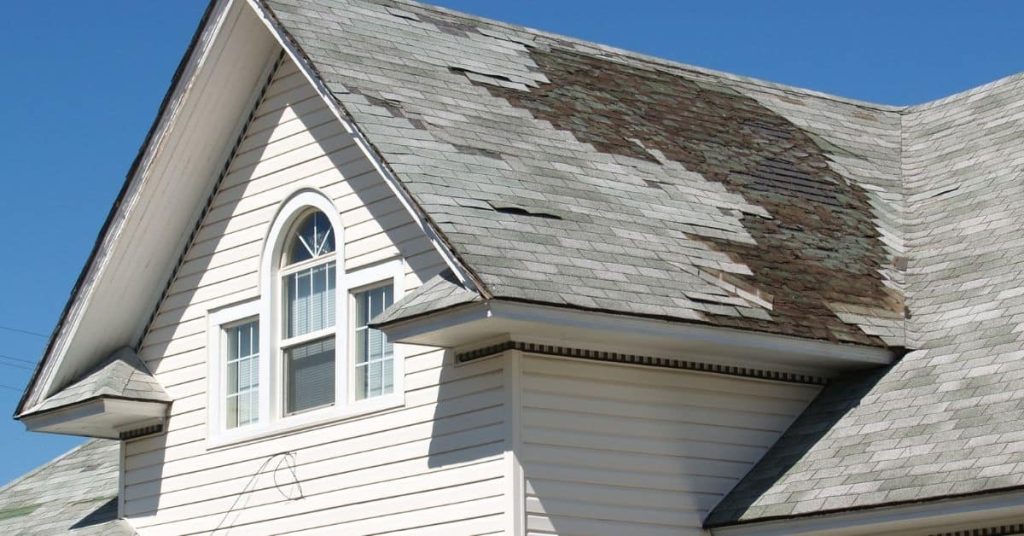
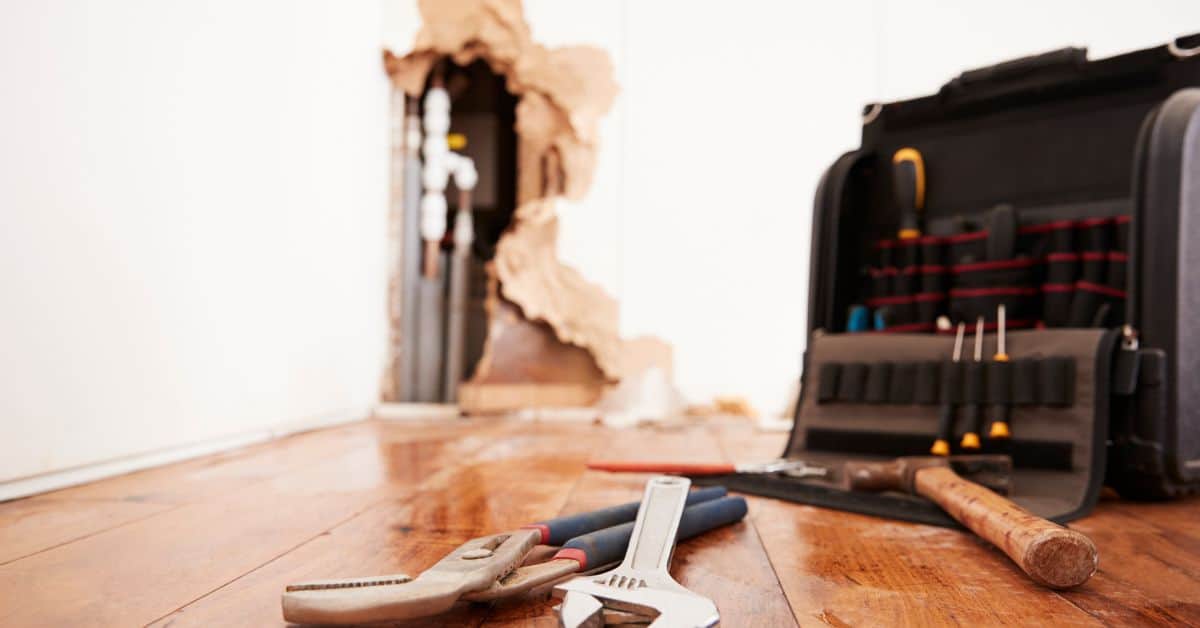
Pipe boot leaks occur when the seal around a vent or plumbing pipe boot fails, letting water into the roof or attic. You’ll usually see staining, damp insulation, or peeling shingle nearby. This article explains how to diagnose the problem and replace the boot safely.
Start by inspecting the boot for cracks, splits, or detachment from the roof or pipe. Look for UV-dried rubber, loose nails, or misaligned flashing as common signs. When replacing, follow the boot manufacturer’s instructions and check your local rules or codes for any specific requirements.
Key takeaways
- Inspect flashing around vent pipes for cracks, UV wear, and loose seams.
- Check attic side for staining, mold, or damp insulation indicating leaks.
- Use appropriate safety gear and ladder stability before any roof inspection.
- Replace only with compatible boot size and material per manufacturer guidance.
- Document damaged areas and temporary fixes, then plan full replacement outside weather.
- Check local codes and permit requirements before any major roof repair.
Table of Contents
- Introduction
- Key takeaways
- Quick Overview: What a Pipe Boot Is and Why Leaks Matter
- Common Causes and How to Distinguish Them
- Visual Checkpoints for Diagnosis (Roof and Attic)
- Tools and Materials Checklist for Inspection, Temporary Repair, and Replacement
- Step-by-Step Replacement Process (DIY-Friendly)
- Temporary and Emergency Repair Options
- Material Selection and Specs Explained (How to Choose the Right Replacement)
- Safety, Permits, and When to Avoid DIY
- Conclusion
- FAQ
Quick Overview: What a Pipe Boot Is and Why Leaks Matter
A pipe boot is the flashing that surrounds a vent pipe as it passes through the roof deck. It acts as a waterproof seal between the roof surface and the pipe opening. When the boot fails, water can find its way into the attic and beyond, which can lead to roof leaks, hidden rot, and mold growth.
Understanding the role of the boot helps you see why a small tear or crack matters. A leaking boot can affect not just the roof surface but the attic and the interior spaces below. Verify what the boot is made of and how it should seal by checking the manufacturer guidance and local code notes.
What a pipe boot does
A pipe boot is like a rubber sleeve that seals the gap around pipes sticking out of your roof. It’s crucial for keeping water out.
Pipe boots integrate with flashing – that’s the metal stuff you see on your roof. Together, they direct water away from the pipe and into your gutter system.
Without a proper boot, water can seep in, causing all sorts of trouble.
Consequences of a leaking boot
A leaky pipe boot isn’t just an annoyance. It can cause serious damage to your home.
Water stains on your ceiling are the first sign. But it doesn’t stop there. Water can rot wood, damage insulation, and even lead to mold growth.
If left untreated, these problems can weaken your roof’s structure, leading to expensive repairs down the line.
Common Causes and How to Distinguish Them
Cracks in the boot or flashing are a frequent source of leaks and are usually visible at the seam points. UV degradation softens or bakes the material, leading to cracks over time. Mechanical wear from foot traffic or hail can wear through the material too, especially along the edges.
Poor installation can leave gaps or improper flange seating that invites water intrusion. Distinguishing these causes matters for repair choice because a patch might work for some issues, while others require full boot replacement. Check product instructions and local guidance to confirm recommended remedies for each failure mode.
Cracks and material splits
The material used for your pipe boot plays a significant role in its durability. Inferior materials can lead to cracks, splits, and other physical failures.
- Fine hairline cracks: These are early signs of stress. Check the boot’s rating; if it’s too low, upgrade.
- Deep, wide cracks: These indicate severe stress or impact damage. Inspect for underlying issues before replacing.
- Material splits: Tears in the boot material suggest poor flexibility. Opt for materials with higher elongation ratings.
- Cracking around fasteners: This points to inadequate sealant or improper installation. Ensure proper sealing and torquing of fasteners.
- Staining around cracks: Water intrusion is causing staining. Address the crack first, then apply a waterproof sealer.
UV and weather-related degradation
Prolonged sun exposure can degrade pipe boots, leading to leaks. Look for these signs:
Surface chalking: This white powdery residue indicates UV damage. It’s a sign the boot’s protective layer is breaking down.
Color fade: A faded boot may still function, but it’s a sign of weathering. Inspect for other signs of degradation.
Loss of flexibility: Check if the boot feels brittle or stiff. This loss of flexibility can lead to cracking under stress.
Installation and flashing failures
Poor installation practices can mimic pipe boot failure. Inspect for these issues:
Inadequate flashing overlap: Water can get behind the boot, causing leaks. Ensure proper flashing overlap.
Failed sealant beads: Check if the sealant around the boot is intact and adhering properly. Replace if necessary.
Gaps around fasteners: Inspect for gaps between the boot and its mounting surface. These can allow water intrusion, mimicking a boot failure.
Visual Checkpoints for Diagnosis (Roof and Attic)
Start outside with a careful roof surface scan for cracks, tears, or loose flashing around the boot. Look for dark staining or granule loss near the vent area that signals water entry. Inside the attic, observe for wet insulation, staining on sheathing, or a musty smell that points to a leak source.
Prioritize checks around the vent and along the surrounding shingles or metal seam. Use a methodical path from the vent outward to map potential pathways for water travel. When in doubt, document locations and compare with the visible boot edge and flashing details.
Exterior Roof Inspection Points
Before you grab your ladder, use this checklist to spot potential issues from the ground. It’s best to do this on a clear, dry day.
- Gaps around pipe: Check for any visible spaces between the pipe and the roof surface. Gaps allow water to seep in.
- Split seams: Inspect the flashing seams. If they’re cracked or split, water can leak through.
- Loose flashing: Ensure the flashing is securely attached. Loose pieces can let water in.
- Fastener issues: Check nails and screws holding down the boot. Missing or loose fasteners can cause leaks.
- Damaged boot material: Look for cracks, splits, or other damage to the boot itself.
- UV damage: Check for discoloration or brittleness around the pipe. These are signs of UV degradation.
- Debris buildup: Remove any dirt, leaves, or other debris that could be blocking water from draining off the roof.
- Roof age: Consider the age of your roof. Older roofs are more likely to have leaks.
Quick rule: If you spot any issues, don’t wait. Address them promptly to prevent further damage.
Interior and Attic Indicators
Once you’ve checked the roof, head inside to confirm your findings. It’s best to do this after a rainstorm.
- Water stains: Look for discoloration on ceilings or walls. These could indicate a leak above.
- Damp insulation: Check the insulation around the pipe in your attic. If it’s damp, water is likely leaking from above.
- Drip patterns: Follow any drip patterns to their source. They should lead you to the leak.
- Musty smell: A musty odor can indicate mold growth due to a leak.
- Visible water: If it’s raining, look for actual water drops or puddles inside your home.
- Attic age: Consider the age of your attic. Older attics are more likely to have leaks.
- Ventilation issues: Check your attic’s ventilation. Poor ventilation can lead to condensation and moisture buildup.
- Plumbing checks: While you’re in the attic, check your plumbing for any obvious leaks or issues.
Quick rule: If you find water stains or other signs of a leak inside, don’t ignore them. They’re a clear sign that there’s a problem outside that needs fixing.
Tools and Materials Checklist for Inspection, Temporary Repair, and Replacement
Assemble a basic set of safety gear, a ladder stabilization plan, and a few hand tools for removing sealant and flashing. Include a tape measure, a utility knife, and a putty knife to help with inspection and patching. Have sealant, flashing tape, and a replacement boot on hand if you plan a quick swap.
Category items include inspection aids, temporary patch materials, and the replacement components. For each item, verify compatibility with your roof type and the vent size by checking the packaging or manufacturer notes. If unsure, read the labeling and local rules before purchasing.
Essential tools
Before you start, make sure you have the right gear. This checklist helps keep you safe and efficient.
- Hard hat: Protects from falling debris.
- Safety glasses: Shields eyes from dust and hazards.
- Work gloves: Prevents hand injuries.
- Tape measure: Accurate measurements for new boots.
- Chalk line: Marking out replacement areas.
- Utility knife: Clean cuts for old boot removal.
- Circular saw: For cutting new boots to size (if needed).
- Sealant gun: Even application of sealants.
- Roofing hammer: Nailing down new boots securely.
- Ladder stabilizer: Safe access to high roofs.
Quick rule: Always prioritize safety gear. Don’t start work without it.
Recommended materials and sealants
Choosing the right materials ensures a durable repair. Here’s what to look for when shopping.
- Pipe boot material: Look for EPDM, TPO, or PVC. They’re roofing-compatible and long-lasting.
- Sealant type: Opt for butyl-based or silicone sealants. They stick well to most materials.
- Adhesive: Use a roofing-specific adhesive for extra hold.
- Roofing nails: Galvanized or stainless steel for rust resistance.
- Flashings: Match the material to your roof (e.g., aluminum for metal roofs).
- Caulk: For filling small gaps and cracks before applying sealant.
- Primer: Prepares surfaces for better adhesion of sealants and adhesives.
- Roofing cement: Temporary fix for leaks until a proper repair can be made.
Quick rule: Always match materials to your roof type. Incompatible materials can cause more damage.
Step-by-Step Replacement Process (DIY-Friendly)
Break the job into phases: prep and removal, install and seal, finish and test. During prep, protect surrounding shingles and remove the old boot carefully without tearing the roof underlayment. Install the new boot so the base sits flush against the roof and the vent fits properly.
Apply sealant or flashing as directed by the manufacturer and ensure all edges are sealed. Refinish surrounding areas and inspect the seal after a light moisture test. If any step is unclear, pause and check the product instructions or local building guidance before proceeding.
Step-by-Step Process
This section walks you through the step-by-step replacement process of your pipe boot, ensuring a DIY-friendly approach that keeps your home safe and dry.
- Preparation: Clear the roof area, lay down tarps to protect shingles, and gather all necessary tools and materials. Safety first – wear appropriate gear and secure the work area.
- Remove old boot: Carefully cut away the old boot using a utility knife or reciprocating saw. Be cautious not to enlarge the pipe penetration.
- Prepare pipe: Clean the pipe thoroughly to remove any debris or old sealant. Ensure the surface is dry and free of contaminants for optimal adhesion.
- Install new boot: Position the new boot over the pipe, ensuring it’s properly seated and centered. Follow manufacturer’s instructions for sizing if needed.
- Integrate flashing: Overlap the flashing with the boot, following best practices to ensure proper waterproofing. Apply sealant where materials meet using a caulking gun.
- Seat and fasten: Press down firmly on the boot to ensure it’s properly seated. Use screws or nails to secure it in place, following manufacturer’s guidelines for spacing and depth.
- Water test: Perform a visual water test by pouring water over the boot from above. Check for any leaks or signs of water intrusion from below.
- Repair roofing materials: If necessary, repair disturbed shingles or other roofing materials to maintain the integrity of your roof.
Preparation and safe removal of the old boot
Before you start, ensure the roof is clear of debris and any obstacles. Wear appropriate safety gear, including a harness if necessary.
Safety first: Always have someone spotting you from below when working on a roof.
Carefully loosen and remove the old flashing around the boot. Use a flathead screwdriver or pry bar to gently lift it away from the pipe. Once removed, use a utility knife or reciprocating saw to cut away the old boot. Be cautious not to enlarge the pipe penetration.
Installing the new boot and integrating flashing
Begin by positioning the new boot over the pipe, ensuring it’s properly seated and centered. Follow manufacturer’s instructions for sizing if needed.
Next, overlap the flashing with the boot, following best practices to ensure proper waterproofing. The flashing should extend at least 4 inches up the roof slope and 2 inches onto the boot itself.
Apply sealant where materials meet using a caulking gun. Ensure a smooth, even bead is applied along the edges of the boot and flashing. Allow the sealant to cure according to manufacturer’s instructions before exposing it to water.
Final sealing, testing, and roof repairs
Press down firmly on the boot to ensure it’s properly seated. Use screws or nails to secure it in place, following manufacturer’s guidelines for spacing and depth. Ensure you don’t overtighten and damage the boot.
Perform a visual water test by pouring water over the boot from above. Check for any leaks or signs of water intrusion from below. If no leaks are present, your boot is properly installed.
If necessary, repair disturbed shingles or other roofing materials to maintain the integrity of your roof. Ensure all nails and screws are securely fastened and that there are no gaps or openings that could allow water penetration.
Temporary and Emergency Repair Options
Temporary fixes can stop active leaks, such as applying a patch over the boot seam or sealing with an appropriate roof sealant. These methods are short term and should not replace a full replacement. Follow safety procedures when applying any patch on a roof surface.
Understand the limitations of quick fixes, including potential peeling and reduced protection in wind-driven rain. Use these options only as a stopgap while arranging for a proper replacement, and verify any suggested time frames with product labels and local codes.
Emergency patch methods
When you’ve got a leaky pipe boot and need to stop water ASAP, these temporary fixes can buy you time.
Roofing tape is quick and easy. Just clean the area, apply the tape, and press down firmly. It’s not a permanent solution, but it’ll hold until you can do a proper repair.
For bigger gaps or cracks, use a compatible sealant. Silicone or polyurethane caulks work well on pipe boots. Apply liberally, smooth with a putty knife, and let it cure before testing.
In a pinch, you can even fashion a temporary collar from a piece of rubber or plastic. Wrap it around the boot, secure with duct tape, and check back regularly to ensure it’s still doing its job.
When a temporary fix is acceptable
A patch isn’t always a bad idea. It can be a lifesaver when you’re facing weather delays, waiting on parts, or scheduling professional help.
For instance, if a storm’s rolling in and you need to protect your home fast, slapping on some tape or sealant will do the trick. Just remember to follow up with a permanent repair as soon as possible.
Similarly, if you’re waiting for a pro or specific materials, a temporary fix can keep water out until then. But don’t make it a long-term solution – patches degrade over time and can cause more damage if left too long.
Rule of thumb: If you can’t replace the boot within a few weeks to a month, it’s better to do the job right the first time.
Material Selection and Specs Explained (How to Choose the Right Replacement)
Compare the common pipe boot materials by looking at the packaging or the data sheet for each option. Key attributes to check include compatibility with your roof type and vent size, along with installation requirements. Do not rely on memory; confirm details from the product label or manufacturer instructions.
Understand how each material handles sun exposure and temperature changes in your climate. Check the warranty language and service life estimates as guidance rather than committing to numbers without verification. When in doubt, consult the instruction sheet and local building codes for the correct choice.
Types of boot materials and trade-offs
Choosing the right material for your pipe boot is crucial as it affects its performance, lifespan, and appearance.
- Rubber/EPDM: Flexible, durable, and affordable. Good UV resistance but can stain over time. Look for high rubber content and avoid low-quality versions.
- Silicone: Highly flexible, resistant to extreme temperatures, and maintains elasticity over time. Expensive but long-lasting. Check for 100% silicone content and avoid blends with lower quality materials.
- Metal-Alternative Collars: Inexpensive, durable, and easy to install. Not as flexible as rubber or silicone, which can lead to cracking over time. Look for thick gauge metal and avoid thin, low-quality versions that may rust or corrode.
What to check on labels and datasheets
Before purchasing, review the product label and datasheet to ensure it’s suitable for your needs.
- UV Resistance: Check the UV rating to ensure it can withstand sun exposure in your area. Ignoring this can lead to premature degradation.
- Temperature Range: Ensure it can handle both high and low temperatures in your region to prevent cracking or warping.
- Recommended Roofing Substrates: Confirm it’s compatible with your roof material. Using the wrong one can cause adhesion issues.
- Warranty/Lifespan: Check the stated warranty period and expected lifespan to ensure you’re getting good value.
Quick rule: Always compare multiple products and choose the one that best fits your needs and budget.
Safety, Permits, and When to Avoid DIY
Roofwork carries fall hazards, so follow basic rooftop safety practices such as securing ladders and wearing a harness if required by your site. If you are unsure about your setup or weather conditions, pause and reassess. Local rules may call for a permit for certain roof work, so check with the municipal authority.
Some situations are better handled by a professional, such as steep pitches, complex vent configurations, or compromised structural elements. When in doubt about safety or code requirements, consult a licensed contractor and verify what permits or inspections may apply with the local building department.
Rooftop safety essentials
Before you start any work on your roof, safety should be your top priority. Here are some basics to keep in mind:
Fall Protection: Always use a harness and secure it to an anchor point. Never rely on just the boot’s edge for support.
Ladder Safety: Use a sturdy ladder that extends at least 3 feet above the roofline. Secure it at the top and bottom. Climb slowly, facing the ladder, and maintain three-point contact.
Additionally, be aware of seasonal limitations. Working in extreme heat, cold, or wet conditions can affect your safety and the quality of your work. Plan accordingly.
Local codes, permits, and warranty concerns
Before you begin any replacement work, it’s crucial to understand that some jobs might require local permits or could potentially void your roof’s warranty.
Permits: Check with your local municipality. Some areas require permits for roof work, especially if you’re replacing more than one boot or making significant changes.
Warranty Concerns: Replacing a pipe boot might seem minor, but it could affect your roof’s warranty if not done correctly. Always check with the manufacturer first to ensure you’re following their guidelines.
It’s also a good idea to document any work you do in case of an inspection or future claims. Keep records of materials used and steps taken for each replacement job.
Conclusion
Take control of the leak now by sticking to solid, tested steps and putting safety first. A proper boot replacement protects your roof, stops water intrusion, and keeps your attic dry and durable.
First, do a real-world check: look at the boot on the roof and in the attic to confirm cracks, UV wear, or loose flashing; gather the necessary tools and replacement parts, then perform a careful temporary fix if water is still getting in while you plan the full replacement; once you’re ready, follow the DIY-friendly replacement steps, seal the joint, and test with a small amount of water or a hose at low pressure to verify you’ve got a solid seal. After that, monitor the area for a day or two and inspect after the next rain.
Common mistakes to avoid include skipping safety steps, using the wrong boot size or material, or applying sealant or fasteners inconsistently. Don’t work on a roof or ladder with no fall protection, and don’t rush the replacement—misfitting a boot or over-tightening clamps can create more leaks. Always plan for a safe, temporary stopgap if the roof line or attic conditions aren’t ideal, and verify the repair with a cautious test before trusting it long term.
If the job would require climbing in poor weather, handling uncertain roof slopes, or if the boot is severely damaged beyond a DIY-friendly fix, call a professional. When in doubt, an expert can verify you’ve chosen the right replacement, ensure proper flashing integration, and secure any necessary permits. Stay deliberate, keep safety in front, and you’ll protect the roof, the attic, and your budget from costly mistakes.
FAQ
How can I tell if a pipe boot is UV-damaged and needs replacement?
Look for cracks, fading, or a rubbery texture that doesn’t spring back. UV damage often shows up as brittle edges or small splits around the flange. If you’re unsure, inspect the boot’s surface and edges closely and compare to a fresh replacement label or instructions.
What’s the safest way to do a temporary patch on a leaking boot?
Use a temporary repair that seals the gap without forcing water into the attic. Clean the area, dry it well, and apply a compatible repair tape or sealant per the product label. Remember, a temporary fix is just that—plan a proper replacement soon.
How do I choose the right replacement boot without guessing?
Match it to the existing roof penetration and boot style, and check the label or manufacturer instructions for material type and dimensions. If you’re unsure, check the product label, the installation instructions, or ask the seller to confirm roof and vent compatibility.
What are common mistakes to avoid during replacement?
Don’t skip cleaning the flange or leave debris under the flashing. Don’t over-tighten or misalign the boot, which can cause leaks or damage. If the roof surface is brittle or you’re not confident, pause and verify your approach with the instructions or a pro.