
Introduction
Repairing water-damaged plaster means removing the wet, compromised material and drying the area before patching. You should cut out all obviously damaged plaster and lath, and then dry the wall cavity with ventilation and heat as needed. Stay alert for mold, structural clues, and electrical hazards, and follow safe practices on the job site.
Document the damage you find and keep notes on what you remove and what you replace. Consider temporary fixes to cover leaks or reduce further moisture until permanent repair can happen, and plan for attic drying and insulation removal if applicable. Check product labels, manufacturer instructions, and local rules to confirm what is allowed and what steps are required.
Key takeaways
- Assess hazards first: verify electrical, mold, and structural risks before touching plaster.
- Photograph and document damage to support insurance and repairs claims.
- Implement temporary dam or cover to limit further water entry immediately.
- Start drying from the top, gradually working down to prevent rewetting.
- Decide what plaster can be saved vs cut out with careful assessment.
- Coordinate HVAC and electrical after exposure; do not restart systems until inspected.
Table of Contents
- Introduction
- Key takeaways
- Safety First: Assess Hazards Before Any Work
- Visual Signs and Examples to Look for
- Immediate Temporary Repairs to Limit Further Water Entry
- Drying Strategy: Start at the Top and Work Down
- Assessing Plaster: What Can Be Saved Vs. What Must Be Cut Out
- Cleaning and Restoring Wood Features, Fixtures, and Contents
- HVAC, Ductwork, and Electrical Systems After Water Exposure
- Cost Considerations, Timelines, and Common Mistakes to Avoid
- Conclusion
- FAQ
Safety First: Assess Hazards Before Any Work
Begin with a quick risk scan to spot structural danger and unstable areas. Look for cracking, bulging walls, or sagging ceilings and note any debris that could collapse. Establish a safe perimeter and avoid working under questionable sections.
Before entering, shut off and verify utilities according to label or manufacturer instructions. Confirm breakers are off and power is disconnected in affected zones. If you smell gas or suspect leaks, cap or seal lines only with professional guidance and evacuate if directed.
Electrical and Gas Precautions
Before entering any water-damaged area, safety is paramount. The first step is to shut off and verify utilities.
Electricity: Locate your home’s main electrical panel. Turn off the circuit breakers for the affected zones. If you’re unsure about any wires or outlets, do not attempt to fix them yourself. Call a licensed electrician immediately.
Gas: If you smell gas, leave the area immediately and call your gas company. They will shut off the main valve and check for leaks. Do not re-enter until they’ve given the all-clear.
Personal Protective Equipment and Contamination Risks
Protecting yourself is crucial when dealing with water damage. Here’s what you’ll need:
- Gloves: Use chemically resistant gloves to protect your hands from harsh cleaning chemicals.
- Respirator/N95 Mask: Wear a respirator or N95 mask to filter out mold spores, dust, and other contaminants. Ensure it fits properly for maximum protection.
- Eye Protection: Safety glasses or goggles will shield your eyes from debris and chemicals.
- Hard Hat: If there’s a risk of falling debris, wear a hard hat to protect your head.
- Sturdy Footwear: Wear boots with good grip and ankle support to prevent slips and falls.
When to Hire a Pro
While DIY repairs can save you money, there are times when it’s crucial to call in the professionals. Here are some red flags:
Structural Damage: If you notice bulging walls, collapsing ceilings, or major structural movement, stop work immediately and call a licensed contractor. These issues require expert assessment and repair.
Extensive Mold: If mold covers an area larger than 10 square feet, it’s best to hire a professional mold remediation service. They have the equipment and training to handle large-scale mold problems safely.
Unknown Contaminants: If you suspect there are unknown contaminants like asbestos or lead-based paint, do not attempt to remove them yourself. Hire licensed professionals for safe abatement.

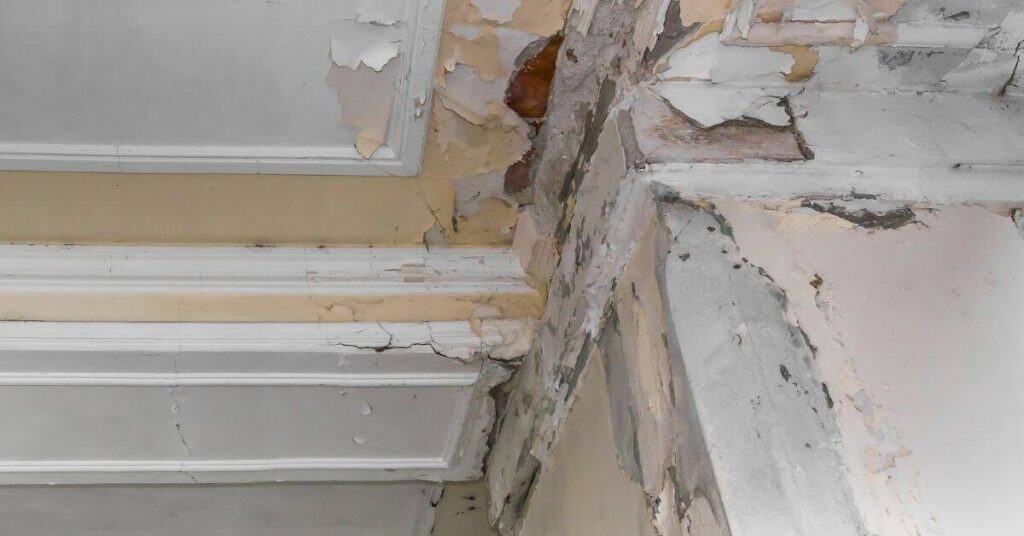
Visual Signs and Examples to Look for
Document moisture indicators across surfaces such as stains, soft plaster, bulging ceilings, and mold growth. Note color, texture, and location to build a clear damage picture. Keep a room-by-room log of affected areas for reference.
Capture odors and humidity clues like musty smells or damp insulation. Include quick ambient room descriptions to supplement photos. Preserve evidence by photographing hazards before accessing them.
Photo and video checklist
Use this checklist when documenting water damage to ensure you capture all necessary evidence.
- Ceilings: Check for stains, bulges, or sagging. Take photos from multiple angles, including close-ups of any damaged areas.
- Walls: Inspect walls for staining, efflorescence, soft spots, cracks, and peeling paint. Photograph each issue with a wide shot and close-up.
- Baseboards: Check baseboards for warping or cracking. Document any damage found.
- Floors: Inspect floors for standing water, warping, or buckling. Take photos of the entire room and any affected areas.
- HVAC: Look for moisture around vents, leaks, or condensation. Photograph any issues found.
- Contents: Inventory all affected items. Photograph each item’s condition with estimated value or salvage status.
- Moisture symptoms: Document dampness on walls, musty smells, and any visible pipe or roof leakage points. Take photos of these issues.
- Ambient conditions: Briefly describe the room’s temperature, humidity, and lighting in your notes or photo metadata.
Quick rule: Always take time-stamped photos to maintain a clear record of when damage was documented.
Recordkeeping and communication with insurers
Proper recordkeeping is crucial for filing insurance claims. Keep detailed logs of all conversations, receipts, and documents related to your claim.
After documenting damage, contact your insurance company immediately. Note the date, time, and name of the representative you speak with. Keep a log of all future communications as well.
If temporary repairs are necessary, keep receipts for these expenses. Insurers may reimburse you for these costs if they are approved as part of your claim.
Information insurers commonly request: A detailed description of the damage, photos and videos documenting the extent of the damage, inventory of affected items, estimated repair costs, and any relevant receipts or documents. Provide this information promptly to expedite your claim.
Immediate Temporary Repairs to Limit Further Water Entry
Focus on stopping new water entry from the roof, gutters, and openings. Use tarps, sturdy tape, and clean fasteners, and check for loose shingles or damaged flashing. Photograph the area before and after applying temporary fixes.
Seal windows and doors temporarily with film and removable caulk to minimize drafts while keeping ventilation safe. Manage exterior drainage by clearing debris and guiding water away from the structure with temporary measures if needed.
Roof and Window Patching Options
When water’s coming in through your roof or windows, you need to act fast. Here are some quick fixes:
Tarps: Heavy-duty tarps are great for covering holes. Secure them with tape and sturdy fasteners like screws or nails.
Plywood: For larger gaps, use plywood. Cut it to size, then secure it over the opening with screws or nails.
Felt paper: This can be used as a temporary fix for small holes in the roof. Just cut it to size and staple it on.
Taped plastic: For windows, use clear plastic sheeting and tape. Seal all edges to keep water out.
Interior Containment to Limit Spread
Once you’ve stopped the water from coming in, it’s time to contain the damage inside.
Plastic sheeting: Use it to isolate wet zones. Seal all edges with tape to prevent moisture from spreading.
Remove any wet curtains or porous furnishings from the affected area. They can absorb water and spread contamination.
Create airflow paths using fans, but make sure they’re blowing away from the wet zones to avoid spreading contaminants.
Drying Strategy: Start at the Top and Work Down
Set a safety and moisture baseline before starting. Confirm electrical safety and structural integrity, and note mold risk with basic PPE. Take initial readings with moisture meters as a reference.
Explain why attic and ceiling areas are dried first to reduce gravity-driven movement. Then plan walls, floors, and interiors in stages with checkpoints for moisture targets. Document progress with photos and measurements as you go.
Attic and ceiling drying steps
Start your drying process at the top. Water damage often begins here, so controlling it early protects the rest of your home.
Remove wet insulation. It’s a sponge for moisture, trapping heat and encouraging mold growth. Cut it out, bag it, and dispose properly.
Inspect your roofline. Check for damaged shingles or flashing that may have let water in. Open any blocked vents to encourage airflow.
Safely monitor your ceilings. Look for trapped water behind plaster or sagging due to weight. Use a moisture meter to check for hidden dampness.
Walls and cavity drying
Now, move down to your walls. Water can hide in cavities, causing unseen damage.
Drain and ventilate wall cavities. Remove baseboards, drill weep holes at the bottom of walls, and use air movers to push out trapped moisture. Keep fans pointed up, blowing into the cavity.
If insulation is wet, consider removing it. It might not dry properly and could harbor mold. But wait until you’ve drained as much water as possible first.
Use dehumidifiers sparingly on walls. They can pull moisture too quickly, causing plaster to crack. Keep them aimed at the floor instead.
Floors and lower levels (including basements)
Finally, tackle your floors and basements. These areas can hold a lot of water, putting pressure on foundations.
Pump out basement water in stages to avoid structural stress. Keep the pump running until no more water comes out.
Dry wood floors differently than subfloors. Wood expands when wet, so don’t try to dry it too fast. Use air movers on low speed and keep them aimed at the floor, not up into the room.
Remove flooring materials if they’re damaged or can’t be dried properly. Carpet, vinyl, and laminate may need to go if they’ve been underwater for more than 24 hours.
Assessing Plaster: What Can Be Saved Vs. What Must Be Cut Out
Describe visual and tactile signs that show plaster can be dried and repaired versus needs removal. Look for firm substrate, cohesive surface, and moisture readings trending down. Flag any bulging or active delamination as a warning sign.
Address contamination and safety by identifying hazards such as possible lead paint, asbestos, or mold. Outline steps to minimize exposure and when to call professionals for testing before disturbing affected areas.
Signs plaster can be salvaged
The first step is to assess the damage. If you find any of these signs, your plaster might still be salvageable:
Minimal softening: Gently press on the plaster with a dry cloth or gloved hand. If it feels firm and doesn’t give way easily, it can likely be dried and repaired.
No significant mold: Look for any visible signs of mold growth. A few small spots can often be cleaned and treated, but extensive mold may require professional help.
Isolated damp areas: Check if the dampness is localized to a specific area or spread throughout the entire wall. Isolated damp patches can usually be dried and repaired.
Indicators plaster must be cut out
In some cases, it’s best to remove the damaged plaster. Here are signs that indicate removal is necessary:
Spongy feel: If the plaster feels soft and spongy under light pressure, it has likely absorbed too much water and needs to be removed.
Extensive mold into lath: If you see mold growing deep into the lath or wooden support behind the plaster, removal is crucial to prevent further damage and health risks.
Large sagging/ruptures: If there are large areas of bulging, sagging, or cracks that have widened over time, the plaster should be cut out and replaced.
Removal techniques and safe disposal
When removing damaged plaster, safety is paramount. Here are some steps to follow:
Cutting out: Use a utility knife or reciprocating saw with a fine-tooth blade to carefully cut along the edges of the damaged area. Then, use a pry bar or flathead screwdriver to gently lift off the plaster in large chunks.
Protecting adjacent finishes: Cover nearby surfaces and floors with drop cloths to protect them from dust and debris during removal.
Minimizing dust: Wet down the area before cutting to minimize dust. Wear a respirator, safety glasses, and gloves for protection.
Disposal: Place removed plaster in heavy-duty plastic bags and seal tightly. If mold is present, treat it as hazardous waste and follow local guidelines for disposal. Do not compost or reuse contaminated material.
Cleaning and Restoring Wood Features, Fixtures, and Contents
Start with safety and moisture control to protect wood from warping or mold. Remove standing water and establish dehumidification and airflow. Keep a log of changes in moisture as you work.
Triage wood elements to decide what is salvageable versus replacement. Document condition for insurance and record-keeping. Follow cleaning protocols appropriate to painted versus stained finishes and avoid aggressive abrasion on delicate surfaces.
Wood trim, floors, and built-ins
Start by gently cleaning wood surfaces with a soft brush and mild soap solution. Avoid harsh chemicals that could damage finishes.
Drying is crucial to prevent warping. Set up fans and dehumidifiers to keep air circulating and moisture levels low. For large pieces, use weights or professional drying services to maintain their shape.
If a piece is beyond saving, document its condition for insurance purposes before disposing of it.
Carpets, upholstery, and soft furnishings
Remove wet textiles immediately to prevent mold growth. If possible, take them outside for natural drying.
Do not leave wet textiles inside during drying. They can release moisture back into the air, slowing down the overall drying process and increasing humidity levels in your home.
For heavily contaminated items, consider professional cleaning services to ensure proper decontamination.
Special-care items (artwork, photos, books)
Gently rinse mud off valuable or historic items. Do not attempt to dry them with heat as this can cause warping or damage.
Contact a conservator immediately for precious items. They have the expertise and equipment to preserve these materials.
For short-term storage, consider freezing or drying in a cool, dark place to prevent further damage until professional help arrives.
HVAC, Ductwork, and Electrical Systems After Water Exposure
Prioritize safety first by powering down and locking out circuits in affected zones. Verify no live wiring before any work and determine if a licensed electrician and HVAC tech should assess. Plan inspections with documentation of observed hazards.
Inspect ductwork and HVAC units for moisture, mold, and insulation wetness. Decide on cleaning versus replacement and note components like dampers and condensate lines. Keep a record for insurance or contractor reference.
Duct and furnace inspection/cleaning
Before diving into cleaning, ensure it’s safe. Turn off power to HVAC system at the main panel.
- Check for standing water: Inspect ducts, especially low points and connections. Water can pool here, leading to mold growth if left unaddressed.
- Inspect furnace: Check for rust or corrosion on the furnace cabinet. Any signs mean it needs professional assessment.
- Check insulation: Feel around ductwork for wetness. Wet insulation can’t insulate and may harbor mold.
- Examine boot connections: These are prone to leaks. Check all boots connecting ducts to the furnace or air handler.
- Inspect dampers: Ensure they’re functioning properly. Stuck dampers can cause airflow issues and pressure imbalances.
- Check condensate lines: Make sure they’re draining correctly. Clogged lines can lead to water backup and mold growth in ducts.
- Inspect filters: Replace any compromised filters to prevent cross-contamination during cleanup.
- Seal plenums: If accessible, seal off plenums to contain contaminants during cleaning.
Quick rule: If ducts or furnace show significant damage, replace them. Cleaning may not be enough to ensure safety and efficiency.
Electrical systems and receptacles
Safety first: Turn off power at the main panel before inspecting electrical components. Use a non-contact voltage tester to confirm wires are dead.
Inspect circuits, outlets, and breakers: Look for moisture, corrosion, or discoloration. These signs indicate damage that requires replacement.
Check all GFCI outlets in areas prone to water exposure (like bathrooms, kitchens, and basements). Test them by pressing the ‘test’ button. If they don’t trip, replace them.
Before re-energizing: Ensure all components are dry and clean. Replace any damaged parts. Have a licensed electrician inspect your work before turning power back on.
Controlling indoor humidity and air quality
Size dehumidifiers properly: Measure affected areas. A dehumidifier should remove at least 10-25 pints of water per day for every 800-1,600 square feet.
Place dehumidifiers wisely: Position them in central locations or where humidity is highest. Use ductwork to distribute treated air if possible.
Monitor humidity levels: Keep indoor relative humidity between 30-50%. Use a hygrometer to track levels. If humidity rebounds, adjust dehumidifier settings or size accordingly.
Test for mold: After cleanup and drying, test for mold using a DIY kit or hire a professional. Mold can grow quickly in damp environments, even after initial water damage is addressed.
Cost Considerations, Timelines, and Common Mistakes to Avoid
Outline how scope and containment influence costs and durations without quoting specific prices. Focus on factors like extent of damage and required containment. Emphasize checking local estimates for accuracy and scope alignment.
Highlight common homeowner mistakes such as rushing drying, skipping documentation, or improper heating. Provide practical steps to avoid these errors and keep records organized for claims and repairs.
Typical timeline and what affects it
The time it takes to repair water-damaged plaster varies greatly. Here’s a rough guide:
Initial assessment to demo: 1-2 days. Drying: 3-7 days, depending on moisture level and climate. Repair and replacement: 5-14 days. Finishing: 1-3 days.
Factors affecting timeline include:
Temperature and humidity: Warmer, drier conditions speed drying. Material types: Some plasters dry faster than others. Ventilation: Good airflow helps dry walls quicker. Contamination: Mold or other contaminants may add days to the process.
Cost drivers and when to get multiple quotes
The cost of repairing water-damaged plaster depends on several factors:
Plaster repair extent: The more damage, the higher the cost. Structural work: If studs or lath need replacing, costs increase. Mold remediation: If present, expect additional costs. HVAC rebuild: If ducts or systems were affected, budget accordingly.
To get accurate quotes, ask for written estimates from at least three local contractors. Specify the scope of work to ensure apples-to-apples comparisons. Include dehumidification, air movement equipment, and containment measures in your requests.
Common DIY mistakes
Here are some common homeowner errors to avoid:
- Rushing drying: Too much heat or improper ventilation can cause more damage.
- Improper heating/fans: Using household fans incorrectly can spread moisture. Heating too quickly can crack plaster.
- Skipping wet insulation/carpet removal: Wet materials harbor mold and hinder drying.
- Neglecting moisture level monitoring: Without regular checks, you won’t know when it’s safe to start repairs.
Avoid these pitfalls by being patient, thorough, and diligent in your DIY efforts. Always consult a professional if unsure about any aspect of the process.
Conclusion
The core idea is simple: protect people, protect the structure, and prevent costly repairs by following a disciplined, stepwise plan from top to bottom. When you finish, you want a safe, solid shell that dries properly and looks right.
First, you’ll now follow a practical check in order: stop any active water input, verify the area is safe to work in, inspect plaster and wood for damage, start drying from the highest point and move downward, decide what can stay and what must be cut out, clean and restore wood features and contents only after moisture is controlled, address HVAC, ductwork, and electrical systems with care, and track timelines and costs so you don’t chase delays or miss damage. Do small tests first in a hidden spot to confirm materials won’t crumble or warp, then proceed in clear, measured steps.
Common mistakes to avoid are trying to dry or patch too soon, skipping moisture testing, and pushing ahead with repairs without confirming what is salvable. Always prioritize safety and test a small area first before wider work, and don’t assume all plaster is salvageable without probing for hidden moisture and rot. Do not neglect electrical or duct systems when water has been involved, and never ignore unusual musty odors or soft spots as signs of deeper trouble.
If you see ongoing leaks, extensive rot, or feel unsure about the extent of damage, it makes sense to call a professional rather than press on. When in doubt, halt and get a second opinion to avoid costly mistakes. Stay methodical, document what you find, and you’ll move from assessment to a durable, safe recovery with confidence.
FAQ
Health and safety concerns during drying and removal work
Wear proper PPE and avoid dusty or moldy areas. If you suspect mold growth or electrical hazards, pause and verify with a professional or follow manufacturer guidance.
How should I document the damage for records or insurance purposes?
Take dated photos and noting problem areas as you find them. Keep a simple log of tasks done, wet areas, and any materials removed or opened for drying.
What counts as a safe temporary repair and what about attic drying or insulation removal?
Use a temporary cover or plastic to limit water entry, and secure any loose materials. In the attic, remove or loosen saturated insulation only if you know the area is being dried and ventilated; follow local guidance and manufacturer instructions for materials being disturbed.
Ceiling inspection and wall cavity drainage: what to check?
Inspect for sagging or soft spots on ceilings and signs of water behind the plaster. If walls show staining or dampness, look for where water can drain away in the cavity and stop further intrusion; do not force open cavities without proper support and guidance. Check access points and plan safe drainage paths before opening any wall.