

Introduction
Shingle exposure is how much of each shingle is visible along the roof slope. For 3-tab and laminate, the exposure affects water shedding, appearance, and wind resistance. Always follow the manufacturer’s guidance and local rules.
Keep a consistent exposure by lining up the tabs as you go and verifying with a straightedge. Use the starter row to establish the correct exposure and check with the manufacturer’s instructions. Stop points to watch for include an uneven roof edge, damaged shingles, or unexpected wind conditions that require reassessment.
Key takeaways
- Verify shingle exposure per manufacturer instructions before starting any row installation.
- Differentiate 3-tab and laminate needs; laminate often requires careful exposure alignment.
- Read packaging to confirm starter courses and nailing should follow specified exposure.
- Pre-install planning includes measuring roof length and choosing gradual exposure increments.
- Pause at visible misalignment, damaged shingles, or inconsistent exposure across courses.
- Wear eye protection and secure ladders; stop work if weather or slipping risk.
Table of Contents
- Introduction
- Key takeaways
- Why Shingle Exposure Matters
- Understanding 3-Tab Vs Laminate Shingles
- Standard Exposure Recommendations and How to Read Packaging
- Pre-Installation Planning and Tools/Materials Checklist
- Step-by-Step DIY Installation with Correct Exposure
- Common Stop Points and When to Pause the Job
- Visual Checkpoints and Quality Control During and After Installation
- Troubleshooting and Corrective Techniques
- Conclusion
- FAQ
Why Shingle Exposure Matters
Shingle exposure is the visible portion of each row that protects the underlayment from weather. The amount exposed affects water shedding, wind resistance, and overall roof life. Choosing the right exposure helps keep the roof watertight and aesthetically balanced.
For 3-tab shingles, too much exposure can reveal fragile edges and shorten the weather protection window. Laminate shingles tolerate a slightly different look but still rely on proper exposure for performance. Always verify the specific model’s guidance before committing to a measurement.
Function and failure modes
Shingle exposure – the gap between courses (rows) of shingles – plays a crucial role in your roof’s performance. It affects wind resistance, water shedding, and prevents blow-off.
Correct exposure allows wind to flow over your roof smoothly, minimizing uplift. Incorrect exposure can cause excessive uplift, leading to blow-offs, where shingles are lifted and removed entirely.
Proper exposure also helps water shed correctly off the roof. Too little exposure traps water, causing it to back up under shingles and potentially leak into your home. Too much exposure allows water to flow underneath shingles, again leading to leaks.
Warranty and manufacturer tolerances
Manufacturers specify a range of acceptable exposure for their shingles. Following these tolerances is crucial for maintaining your roof’s warranty.
For example, 3-tab shingles typically have an exposure of 5/8″ to 3/4″. Laminate shingles usually require more exposure, around 1/2″ to 5/8″ due to their thicker construction. Check your manufacturer’s specifications for exact details.
Incorrect exposure can void warranties. Too little exposure may cause blow-offs or leaks, while too much exposure can lead to rapid granule loss and reduced lifespan of the shingles.
Understanding 3-Tab Vs Laminate Shingles
3-tab shingles are typically built with uniform, smaller tabs and a simpler fastening pattern. Laminate shingles have layered sections that create deeper profiles and different shading. These construction differences guide how you set their exposure.
Exposure ranges and installation steps shift between the two types, affecting starter course, alignment, and edge exposure. When in doubt, consult the manufacturer’s instructions for the exact product you’re using. Check the packaging or data sheet for guidance on your model.
3-tab shingles characteristics
3-tab shingles are single-layer, with three tabs per strip. They’re typically around 1/4″ thick.
Alignment is key. Each tab should line up perfectly with the one below it. Start at the bottom left, work your way across, then move up a row.
Exposure range is usually 5/8″ to 3/4″. Too much exposure can lead to blow-offs in high winds. Too little might cause nail pops due to insufficient nailing area.
Laminate (architectural) shingles characteristics
Laminates are multi-layered, giving them a 3D look. Thickness varies but is typically around 1/2″ to 1/4″ more than 3-tab.
Each layer has its own tabs, so alignment must be precise. Start with the bottom left corner, work across, then up a row.
Exposure ranges vary by brand. Some recommend 5/8″, others 1/2″. Check your shingles’ specific exposure range. Laminates may need reduced exposure for better wind resistance due to their layered construction.
Standard Exposure Recommendations and How to Read Packaging
Most shingles reference a standard exposure on the bundle label or wrapper. The data sheet inside often lists the recommended exposure for that product family. Start there, then compare against what you plan to install on your roof.
Always verify model-specific data before laying shingles. Look for the exact exposure figure in the manufacturer instructions, product data sheet, or labeling on the packaging. If something doesn’t match your project, pause and confirm with the supplier or installer guide.
Typical exposure values (safe ranges)
When installing shingles, it’s crucial to maintain the correct exposure. This is the gap between courses of shingles. Here are some common safe ranges:
For 3-tab shingles, aim for an exposure of 5/8″ to 3/4″.
For laminate (architectural) shingles, the range is typically 1/2″ to 5/8″.
Always double-check your specific product’s data before cutting or laying. Manufacturers may have slight variations.
Decoding product labels and spec sheets
Before you start, understand what your shingles’ packaging and spec sheets are telling you. Here’s what to look for:
Exposure: This is the gap between courses of shingles. It should be clearly stated (e.g., 1/2″ exposure).
Headlap: This is the overlap from one course to the next. It’s usually around 5″ for both 3-tab and laminate shingles.
Starter requirements: Some shingles have specific starter strips or courses. Check if yours do.
Wind rating: This is how well your shingles can withstand wind uplift. It’s usually expressed in miles per hour (mph). If any of this info is missing, contact the manufacturer for clarification.
Pre-Installation Planning and Tools/Materials Checklist
Plan your exposure before the first cut or nail goes in. Make a rough exposure map and confirm it works with hips, ridges, and eaves. Gather a chalk line, framing square, measuring tool, and the necessary fasteners for your shingle type.
Prepare starter shingles, underlayment, and flashing materials. Verify that rake edges and hip details are compatible with your chosen exposure. Have a safety plan and weather window in mind during planning.
Measurement and layout tools
Before you start mixing concrete, ensure your measurements are accurate and layout is correct. This checklist helps you verify everything before pouring.
- Tape Measure: Check it’s calibrated and in good condition. Stretch it to confirm it doesn’t sag or kink.
- Chalk Line: Test it by snapping a line on a flat surface. The line should be straight and continuous.
- Straight Edge: Use it to check if your layout lines are true. It should sit level without wobbling.
- Level: Ensure it’s in good working order. Check for bubbles in both vials.
- Square: Verify its 90-degree angle by checking it against a known straight edge.
- Layout Strings: Stretch them taut to ensure they’re not twisted or kinked, which can cause inaccurate layout lines.
- Marking Pencil/Grease Pencil: Test it on paper first. It should leave a clear, visible mark.
- Layout Stakes/Wooden Dowels: Ensure they’re clean and free of debris. They should stand upright when tapped into the ground.
Quick rule: Always double-check your measurements and layout lines before mixing concrete. Inaccurate layouts can lead to costly rework or structural issues.
Fasteners, starter strips, and underlayment
Use this checklist before you start installing your roofing material. It’ll help you ensure you’ve got the right stuff and that it’s all laid out properly.
- Nails: Check they’re the correct length (usually 1-1/4″ to 2-1/2″). Too short won’t hold, too long can damage rafters. Confirm by measuring a few.
- Number of nails per shingle: Typically 4 or 6 per shingle. Check your specific roofing material’s instructions. Count them on a test shingle to confirm.
- Nail gun setting: Ensure it’s set to drive nails just below the surface, not too deep or too shallow. Test on scrap wood to check.
- Starter strips: Verify they’re the correct type for your roofing material. Check the manufacturer’s recommendations. Lay out a few to confirm fit and appearance.
- Underlayment width: Ensure it’s wide enough to overlap seams by at least 4″ (check local building codes). Measure a roll to confirm.
- Underlayment type: Choose between felt paper or synthetic. Felt is cheaper, synthetics last longer and perform better in high winds. Check product labels for details.
- Ice & water shield: If required (check local climate), ensure it’s applied correctly at eaves, rakes, valleys, and penetrations. Inspect the application to confirm.
- Drip edge flashing: Ensure it’s installed along eaves and rakes. Check visually that it’s in place before installing roofing material.
Quick rule: Always double-check your specific roofing material’s manufacturer instructions. They know best how to install their product.
Step-by-Step DIY Installation with Correct Exposure
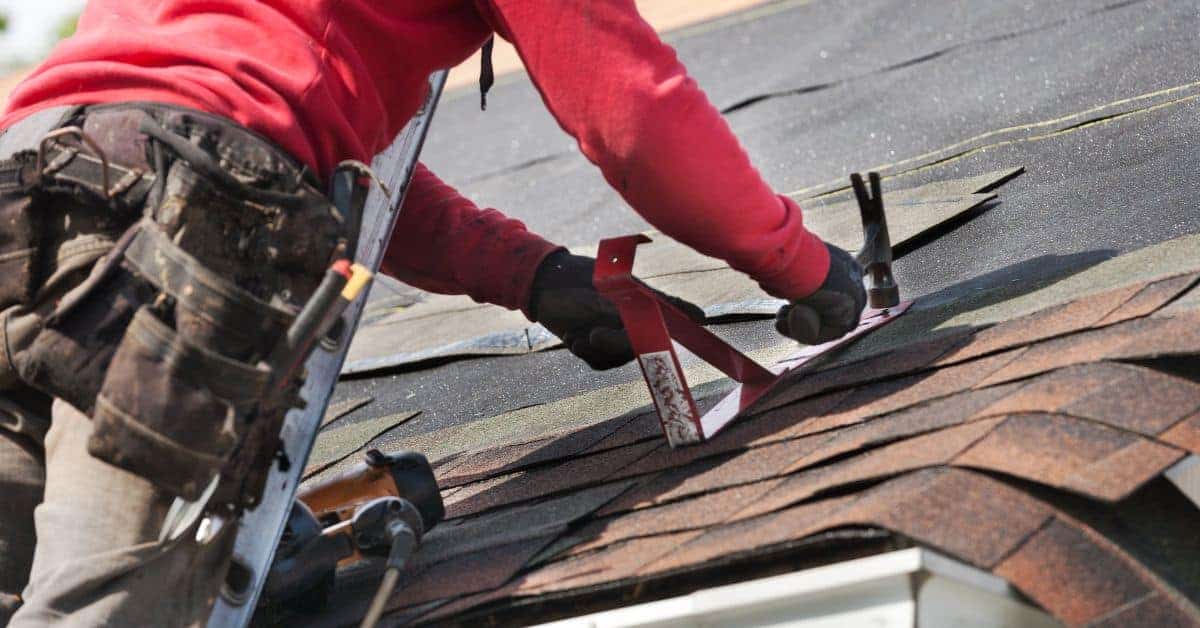
Begin with a solid starter row aligned to the eave line. Set the first course so the exposure matches the plan and the edges stay even along the rake. Maintain a consistent gap and check alignment as you progress.
As you move up, verify exposure at each course and adjust if needed at hips and ridges. Transition smoothly at drip edges, and recheck the final alignment before nailing the last panel. Keep the workflow steady to avoid sudden exposure changes.
Step-by-Step Installation Process
The following steps guide you through the DIY installation of roof shingles with correct exposure, ensuring a secure and aesthetically pleasing result.
- Preparation: Check weather conditions, gather tools (hammer, nail gun, tape measure, chalk line, level), and ensure safety equipment (harness, hard hat).
- Underlayment: Install underlayment starting from the bottom edge of the roof, overlapping each piece by at least 18 inches.
- Starter Row: Begin with starter strips at the eaves, ensuring they’re properly aligned and secured. Mark the first exposure line using a chalk line.
- First Course: Start laying shingles from the bottom up, aligning them with the starter strip and maintaining correct exposure as you work your way up.
- Hips, Ridges, and Drip Edges: Transition carefully at hips, ridges, and drip edges, ensuring proper alignment and exposure. Use cut shingles where necessary.
- Final Checks: Once completed, inspect your work for any missed nails or improperly installed shingles. Clean up the worksite.
Setting the starter course and first exposure line
Properly positioning your starter strips and marking the initial exposure line is crucial for maintaining consistent shingle alignment and exposure throughout your installation.
Begin by snapping a chalk line parallel to the eaves, using the recommended exposure as your guide. This will serve as your first exposure line.
Start laying your starter strips along this line, ensuring they’re properly aligned and secured with roofing nails. The exposed portion of the starter strip should match the intended exposure for your shingles.
Tip: Double-check your chalk line and starter strip alignment before proceeding to ensure consistent results.
Laying successive courses and verifying exposure
As you lay each subsequent course, maintaining correct exposure is key. Regularly measure and adjust to account for shingle dimensional tolerances.
Use your chalk line as a guide, snapping new lines at the recommended exposure intervals. Lay each shingle along these lines, ensuring they’re properly aligned with the starter strip below.
Checking Exposure: After every few courses, step back and visually inspect your work. Ensure that the exposed portion of each shingle matches the intended exposure. Make any necessary adjustments before proceeding.
Tolerance Adjustments: Be prepared to make minor adjustments for dimensional tolerances. If a shingle is slightly too long or short, trim it accordingly to maintain consistent exposure.
Common Stop Points and When to Pause the Job
Stop if you discover an incorrect exposure pattern or if edges look uneven. Wind risk or loose underlayment can also require pausing to reassess. Pausing early helps protect the roof and aligns with warranty expectations.
Also pause if you find substrate issues, flashing misfits, or an undersized starter. If materials run short or miscuts appear, halt and verify before continuing. Document the pause and next steps for clarity on the project log.
Discovery of incorrect exposure or mismatched shingles
While installing, you might realize that the exposure isn’t as expected or find mixed product lines. Here’s how to spot and fix this:
Check packaging: Re-read the packaging of your shingles. It should specify the correct exposure. If it doesn’t match what you’re seeing, stop and double-check.
If you’ve got mixed product lines, stop immediately. Mixing 3-tab with laminate can cause issues. Remove any incorrectly installed shingles and start again with the right ones.
If you’re unsure, contact the manufacturer. They’ll confirm if your exposure is correct or if there’s a problem with your product.
Substrate, flashing, or weather-related stop points
Certain issues require you to pause work. Here are some common ones:
Substrate problems: If you find soft spots, rot, or other damage on your roof decking, stop and repair. Working around these can lead to bigger issues.
Flashing gaps: Gaps in flashing can let water in. If you spot any, pause work, apply caulk or sealant, and ensure it’s secure before continuing.
Adverse weather conditions: High winds, heavy rain, or extreme temperatures can make installing shingles dangerous. If the forecast changes, stop work until conditions improve.
Visual Checkpoints and Quality Control During and After Installation
During installation, inspect each course for straight lines, uniform exposure, and nail placement. Look for confirms that the shingles seal properly at overlaps and fasteners are secure. Take notes or photos to document for warranty purposes.
After installation, review overall alignment, edge exposure, and flashing fit. Check the rake, hips, and drip edge for consistent coverage. Record results and any deviations for future reference or claims.
Mid-roof and end-of-day checks
Use this checklist at midday and before wrapping up each day to catch exposure drift and other issues early.
- Check exposure: Measure a few shingles’ exposure. If it’s off, adjust your layout line.
- Nail placement: Inspect nail lines. They should be straight and consistent. Crooked nails mean crooked rows.
- Stagger joints: Ensure each course’s bottom edge is staggered over the joint below. Not doing so weakens your roof.
- Gaps between tabs: Check for gaps between shingle tabs. Gaps let in water, leading to leaks.
- Drip edge: Ensure drip edge is properly installed at eaves and rakes. Without it, water can damage fascia and siding.
- Valley metal: Check valley metal installation. Improper installation causes premature wear and leaks.
- Flashing details: Inspect flashing around chimneys, vents, and skylights. Poor flashing leads to water intrusion.
- Waste removal: Ensure debris is removed from the roof at day’s end. Debris can damage shingles or cause falls.
Quick rule: If you find issues, fix them immediately to prevent compounding problems.
Final inspection checklist
Before signing off on the job, use this checklist to ensure your roof is installed correctly and ready for warranty claims.
- Exposure samples: Measure exposure at several points. If it’s outside spec, you may need to adjust courses.
- Nail pattern verification: Check nail lines again. They should be straight and evenly spaced. Inconsistencies void warranties.
- Edge details: Inspect edges for proper starter strip installation. Without it, wind can lift shingles.
- Corner details: Check corners for proper flashing. Improper corner flashing causes leaks and damage.
- Hip and ridge caps: Ensure hip and ridge caps are properly installed. Poor installation leads to blow-offs in high winds.
- Gutter integration: Check that gutters are securely attached and aligned with drip edges. Water overflows cause damage.
- Document results: Take photos of your work, noting exposure measurements and any issues addressed. This protects your warranty claim.
Quick rule: If you find major issues, address them immediately or risk voiding warranties.
Troubleshooting and Corrective Techniques
If exposure looks inconsistent, identify whether you have overexposure, underexposure, or misaligned courses. Plan a controlled correction to avoid damaging surrounding shingles. Start with the affected area and proceed carefully.
Common fixes include partial removal, reseating shingles, and re-laying refined courses. Preserve surrounding shingles to minimize damage and maintain the overall roof performance. Recheck exposure after fixes to ensure uniformity.
Fixing a row with incorrect exposure
If you’ve laid a course with incorrect exposure, don’t panic. Here’s how to fix it:
Partial Removal: If the error is minor, you might not need to remove the entire course. Carefully lift up the affected shingles and adjust their position.
Re-laying a Course: For major errors, it’s best to remove the whole course. Start by removing the nails using a pry bar or nail puller. Be careful not to damage surrounding shingles. Re-lay the course with correct exposure.
Addressing wind-lift and blow-off concerns post-installation
After discovering incorrect exposure, it’s crucial to address potential wind-related issues:
Additional Fasteners: If shingles are lifting in high winds, add more nails or use screws where possible. This will secure them better.
Sealant Application: Apply a bead of roofing sealant along the exposed edges of the shingles to prevent blow-off. Be sure to follow manufacturer’s instructions for best results.
Replacing Affected Shingles: If some shingles are severely damaged, replace them entirely. Remove and discard the damaged ones, then install new shingles with correct exposure.
Conclusion
The right shingle exposure protects your roof from leaks, keeps wind from lifting shingles, and makes the job look clean and durable. Stay focused on safety, follow the pack guidelines, and verify exposure as you go so you don’t waste time or materials.
First, check the packaging for the correct exposure spec, then align the starter row, set a consistent exposure using a simple measurement method, install row by row in logical runs, pause at each common stop point to verify alignment and full coverage, perform a quick visual check after every major section, and only proceed after every check confirms you’re on plan. If something looks off, stop and recheck before you proceed, and keep the work surface and tools secure. Use the planned tools and materials, test a small area first, and treat every step as a quality control point to avoid costly fixes later.
Common mistakes to avoid are overexposing or underexposing shingles, skipping the pause points, and rushing through corners or hips. Always measure and double-check before nailing, and never drive fasteners when you’re unsure of the alignment. Remember safety first: keep your ladder stable, wear eye protection, and don’t work in wet or windy conditions that can cause slips or lost nails.
If you’re near the edge of your comfort zone or the job spans a complex roof, it makes sense to call a professional rather than push ahead and risk leaks or damage. Stay deliberate, follow the steps, and you’ll finish with a roof that looks right and lasts. You’ve got this—steady pace, right exposure, solid results.
FAQ
How do I confirm the correct shingle exposure for 3-tab and laminate shingles without guessing?
Always start by reading the packaging and the manufacturer instructions for your exact shingles. Compare the exposure guidance on the label to what you’re laying and use any built-in alignment guides on the shingles. If in doubt, check local rules or the manufacturer’s datasheet for the recommended exposure.
What should I do if I see uneven exposure along a row?
Pause and recheck the previous courses for proper alignment and nail placement. Fix any misaligned shingles before continuing, then continue with consistent spacing per the manufacturer’s guidance. If you can’t resolve the issue, consult the label or instructions for corrective steps.
Can I reuse shingles if I realize I messed up the exposure after I’ve started?
Don’t reuse damaged or misexposed shingles. Replace the affected shingles and recheck the exposure for the entire course. If the issue spans multiple shingles, consider replacing the whole run to maintain uniform exposure.
How do I stay safe while adjusting exposure on the roof?
Use proper fall protection and secure ladders before you move along the eave. Keep tools stable and work from solid surfaces. If you’re unsure about anything, slow down and verify with the product label, manufacturer instructions, or local rules.