
Introduction
Painting cabinet doors correctly means preparing the surface, choosing the right paint, and applying even coats.
You’ll want to clean and sand, then wipe dust before priming. Then choose a finish that matches your cabinet style and follow the paint label for drying times.
Start with light, even coats and avoid runs by keeping a steady pace. Check the product instructions for open time and recoats, and work in a dust-free area. If you’re unsure about adhesion or sanding grit, test a small area and adjust your process.
Key takeaways
- Inspect cabinet doors for loose panels and warping before painting begins.
- Degrease surfaces thoroughly and remove grease, dust, and old finishes.
- Sand with even strokes to smooth edges without gouging veneer.
- Prime properly and allow adequate drying time per manufacturer instructions.
- Wear eye protection and a mask; ensure adequate ventilation during painting.
- Reassemble hardware only after fresh coats cure and inspect alignment.
Table of Contents
- Introduction
- Key takeaways
- Overview and Project Scope
- Tools and Materials Checklist
- Assessing and Preparing Your Cabinet Doors
- Surface Prep: Cleaning, Sanding, and Priming
- Painting Techniques for a Professional Finish
- Reassembly, Hardware, and Final Touches
- Troubleshooting Common Problems
- Long-Term Care and Maintenance
- Conclusion
- FAQ
Overview and Project Scope
This guide explains how to paint cabinet doors correctly and safely. It covers common DIY steps, expected effort, and typical time and cost considerations based on door count and material. It also clarifies which door types the plan applies to, including wood, MDF, and laminate, and when to call a pro versus tackling the job yourself.
Use this as a practical reference for planning, not a fixed price sheet. Check local rules and product labels for any specific requirements. If you’re unsure about your project scope, compare your doors to the guide’s criteria and decide whether DIY is appropriate.
Who this guide is for
This guide is designed for homeowners, renters with permission from their landlord, and DIY enthusiasts looking to upgrade their kitchen or bathroom cabinets. You should have basic tools like a screwdriver, paintbrushes, sandpaper, and safety gear. A well-ventilated workspace is crucial for proper painting.
Some experience with DIY projects helps, but this guide walks you through each step in detail. If you’re new to painting or unsure about any part of the process, don’t hesitate to ask a professional for advice.
This guide applies to wooden, MDF, and laminate cabinet doors. Each material has its own quirks, but with proper prep and paint choice, you can achieve great results.
Results to expect
With careful preparation and the right materials, you can expect a durable, professional-looking finish that transforms your cabinets. The final result depends on several factors:
Preparation quality: A thorough cleaning, sanding, and priming will give you the best results. Rushing through these steps may lead to peeling or chipping paint.
Paint type: High-quality cabinet paints designed for durability and adhesion are essential. Latex-based paints with built-in primers often work well. Avoid using cheap, low-quality paints that can peel or fade over time.
While you won’t achieve a perfect factory finish at home, the results should be impressive. If you’re not satisfied with your first attempt, don’t worry – practice makes perfect! If you’re still struggling after a few tries, it might be time to call in a professional.
Tools and Materials Checklist
Set aside a dedicated workspace and gather the essential hand tools, brushes, rollers, a compatible primer, and the topcoat. Separate essential items from optional gear so you don’t overbuy. Consider safe, user-friendly finishes such as water-based options and follow label recommendations for your door material.
Label everything as you go and keep spare parts or hardware in a small tray. For each item, verify the manufacturer instructions or product data sheets before use. If in doubt, opt for the more forgiving option and test on a hidden area first.
Tools you’ll need
Before you start, make sure you have all the necessary tools at hand. This checklist will help you gather everything you need.
- Screwdriver (Phillips and Flathead): To remove cabinet door hardware.
- Claw Hammer: For tapping off hinges if needed.
- Orbital Sander (optional, but recommended): For smoothing surfaces. Rent or buy depending on frequency of use.
- Sandpaper (120-grit and 220-grit): For prep work. Get both grits for best results.
- Respirator: Essential for sanding and painting to protect against fumes.
- Eye Protection: Safety glasses or goggles to keep debris out of your eyes.
- Painter’s Tape: For masking off areas you don’t want painted.
- Paint Brushes/Rollers (2-2.5 inches): For applying paint. Choose a good quality brush or roller for best results.
Quick rule: Always prioritize safety gear – respirator, eye protection, and gloves.
Paints, primers and consumables
Selecting the right paints, primers, and consumables is crucial for a successful cabinet door painting project. Here’s what you’ll need.
- Primer (Water-based or Oil-based): To seal surfaces and improve paint adhesion. Choose water-based for easier cleanup, oil-based for better durability.
- Paint (Water-based Enamel or Oil-based): For the final finish. Water-based is low-odor and easy to clean up, oil-based offers better durability.
- Tack Cloth: To remove dust before painting.
- Masking Tape: For protecting areas you don’t want painted.
- Sandpaper (220-grit for final sanding): For smoothing surfaces after priming and between coats.
- Painter’s Putty: To fill any holes or cracks before painting.
- Paint Thinner/Solvent (if using oil-based paint): For cleaning brushes and rollers.
Quick rule: Always use a primer to ensure better paint adhesion and durability.
Assessing and Preparing Your Cabinet Doors
Inspect each door and drawer front for damage, warping, or loose hardware. Remove all hardware if you can safely do so, and label each piece so it goes back in the same place. Decide whether to remove doors for full painting or to paint in place with doors on the cabinet.
When labeling, note the hinge side and top orientation to ensure proper reassembly. If you encounter structural issues beyond minor scuffs, plan for repairs or professional assistance as needed. Keep the cabinet frames accessible but protected during prep.
Inspecting for damage and repairs
Before you start painting, give your cabinet doors a thorough once-over. You’re looking for any signs of damage that need fixing before you break out the paint.
Warping: Check if doors are bowed or twisted. If it’s minor, sanding might help. Severe warping may require replacement.
Loose joints: Tighten any screws securing the door to its frame. If a joint is separating, use wood glue and clamps to repair it.
Veneer issues: Check for peeling or bubbling veneer. Lightly sand and re-glue if minor. Severe damage may need replacement.
How to remove, label, and store doors
Safety first: Remove all hardware – hinges, knobs, pulls – using a screwdriver. Be careful not to scratch the door face.
Number each door with painter’s tape and a marker as you remove it. Start at one end of the cabinet run and work your way across. This ensures doors go back in the right spot.
Lay doors flat on saw horses or a large, clean drop cloth. Never paint cabinets while they’re hanging; gravity will cause drips and runs.
Store doors in a cool, dry place away from direct sunlight. Keep them level to prevent warping.
Surface Prep: Cleaning, Sanding, and Priming
Start with a thorough cleaning to remove grease, dust, and residues. Use a method appropriate for your door material and the existing finish. Deglossing or light scuffing helps ensure the new coat adheres well.
Follow a sensible sanding progression based on the current surface and primer choice, and prime to promote adhesion and a smooth finish. Always consult the product label or manufacturer instructions for recommended prep steps specific to your doors. If you’re unsure, test a small area first and adjust based on results.
Cleaning and deglossing procedures
Start by removing all hardware – knobs, hinges, and screws. Use a mild soap solution like Murphy Oil Soap to clean the doors. Grease and grime can prevent paint from adhering properly.
Deglossing: For laminate or sealed surfaces, you might need to degloss instead of sand. Use a deglosser like TSP Substrate Prep or sand lightly with 220-grit sandpaper. Always spot test first!
Rinse thoroughly with clean water and let dry completely before moving on.
Sanding strategy and visual checkpoints
Use this checklist when sanding your cabinet doors for a smooth finish. Start with coarse grit, then progress to finer grits.
- Start with 120-grit: Remove any major imperfections or old paint.
- Feel for surface: Run your hand over the door. You should feel no rough spots.
- Wipe off dust: Use a damp cloth to remove sanding dust between grits.
- Progress to 150-grit: Smooth out any remaining imperfections.
- Feel again: Check for smoothness. No rough spots!
- Wipe off dust: Clean the door thoroughly.
- Finish with 220-grit (optional): For a super-smooth finish, use this grit to remove any remaining sanding marks.
- Final wipe: Ensure no dust remains before priming.
Quick rule: Always sand with the grain of the wood. Never against it!
Choosing and applying primer
Primer selection: Choose a primer that suits your substrate – oil-based for oil paint, water-based for latex. Zinsser B-I-N is great for most surfaces.
Application: Apply using a brush or roller, depending on the primer’s recommendation. Work in manageable sections to avoid lap marks.
Dry time and sanding: Let dry according to manufacturer’s instructions – usually 24 hours. Lightly sand with 220-grit between coats for a smooth finish. Wipe off dust before applying the next coat.

Painting Techniques for a Professional Finish
Choose brushing, rolling, or spraying methods that suit the door material and your space. Use even strokes and avoid heavy coats that can sag or run. Plan for thin, controlled applications and proper overlap between passes.
Let each coat dry per the product’s guidance before applying the next. Maintain consistent technique and keep the surface dust-free during curing. If you encounter brush marks or texture, reassess your approach and consult the label for tips specific to your finish.
Brushing and rolling tips
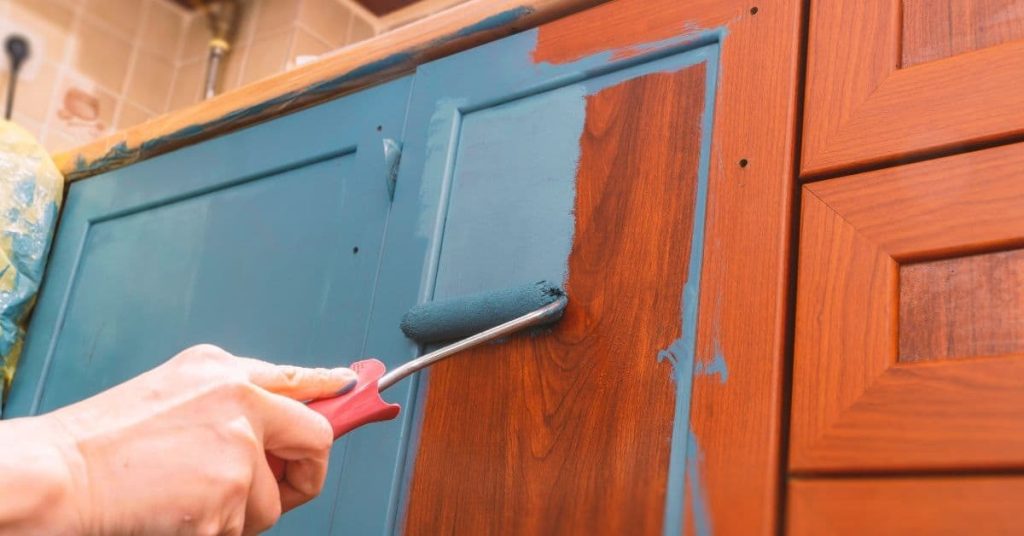
When painting cabinet doors, start by cutting in the edges with a good quality angled brush. This helps you get clean lines and avoid overrunning onto other surfaces.
For the main areas, use a foam roller or fine-nap roller for smooth surfaces. These give a stipple-free finish. Work in small sections at a time, about 2′ x 2′, to keep a wet edge.
Tip: Don’t overload your roller. A light touch helps avoid drips and runs.
Using a paint sprayer (DIY-friendly)
A paint sprayer can give a professional finish, but it’s not always necessary. If you’re tackling a large project or want to save time, consider renting one.
Safety first: Wear a respirator and protect your eyes. Set up in a well-ventilated area or outside if possible. Keep the nozzle moving at a steady pace for even coverage.
Troubleshooting common issues:
– Orange peel: You’re spraying too fast or too far away.
– Runs: You’re applying too much paint at once.
Layering and sanding between coats
Most cabinet doors need 2-3 coats for full coverage. Apply thin, even coats to avoid drips and runs.
After each coat, let it dry according to the manufacturer’s instructions (usually 16-24 hours). Then, lightly sand with fine grit sandpaper (220 or higher) to smooth out any raised grain. Wipe off dust with a damp cloth.
Check for any missed spots or imperfections before applying the next coat. If it’s still wet or tacky, give it more time to dry.
Reassembly, Hardware, and Final Touches
Install or clean hardware and reattach doors with the alignment you marked earlier. Check hinge gaps and door alignment, adjusting as needed for consistent reveals. Add protective features like corner pads or bumpers where appropriate.
Test the operation of each door, ensuring smooth opening and closing without rubbing. Reinstall all fasteners securely and verify that the final appearance matches your plan. When in doubt, verify hardware instructions or seek guidance on hinge adjustment from the manufacturer.
Cleaning or replacing hardware
Start by assessing your cabinet hardware – knobs, pulls, and hinges. If they’re still in good shape but just dirty, clean them up.
For metal hardware, use a mild soap and water solution, then dry and polish with a soft cloth. For painted or plastic pieces, gently scrub with a soft brush and warm water, rinse, and let dry.
If you’re replacing hardware, measure the center point of your existing holes to ensure new hardware aligns properly. If you need to drill new holes, use a guide or template for accuracy. Fill old holes with wood filler if necessary, then sand smooth before priming.
Hanging and adjusting doors
Begin by matching each door to its corresponding opening. Align the hinges on the door with the hinge holes on the cabinet frame, ensuring they’re level.
Screw in the top hinge first, then adjust the bottom one for proper alignment. Use a screwdriver or drill to secure them tightly. Test the door’s operation – it should open and close smoothly with consistent reveal at the top and sides.
If gaps are uneven, loosen the hinge screws, adjust the door slightly using the hinge’s adjustment screws, then retighten. Repeat until all doors hang evenly. For stubborn doors, you might need to shim behind the hinges or sand the door edge.
Troubleshooting Common Problems
Identify issues such as blistering, adhesion problems, visible brush marks, or dust nibs. Note when and where the problem appears to guide corrective actions. Use manufacturer guidance to select appropriate fixes for your finish type.
Apply recommended corrections, let coatings cure between steps, and refine your technique to prevent recurrences. Document what worked for future touch-ups and be prepared to repeat steps if necessary. If problems persist, check product labels or contact support for specific advice tailored to your finish.
Fixing runs, drips and orange peel
If you notice runs or drips after painting your cabinet doors, don’t panic. Here’s how to fix them:
First, let the paint dry completely. Then, lightly sand the affected areas using fine-grit sandpaper (220-grit works well). Feather the edges of the run or drip so it blends with the rest of the door.
Important: Always wear a dust mask when sanding and clean off any dust before proceeding. Let the area dry, then apply a light coat of paint, following your original painting technique.
To prevent runs and drips in future coats, make sure you’re using the right brush or roller for your paint type. Also, avoid overbrushing or applying too much paint at once.
Dealing with adhesion or peeling failures
If your painted cabinet doors are peeling or the paint isn’t adhering properly, it’s likely due to insufficient preparation or using the wrong primer. Here’s how to fix this:
First, identify the root cause. If the paint is peeling in large sheets, it might be due to inadequate surface prep (like not sanding enough or not cleaning properly). If it’s only happening in certain areas, it could be a primer issue.
If the problem is severe and you can’t salvage the situation with light sanding and repainting, you may need to strip the paint back to bare wood. Use a paint stripper following the manufacturer’s instructions, then sand lightly and start over with proper prep and primer.
Prevention tip: Always clean, degloss, and sand your cabinet doors before painting. Also, use a high-quality primer suitable for your paint type to ensure good adhesion.
Long-Term Care and Maintenance
Establish a routine cleaning method that avoids harsh scrubbers or solvents that can damage the finish. Use products recommended for the door material and finish, and avoid anything that could dull or degrade the coating. Schedule periodic checks of hinges and hardware for smooth operation.
Know how to touch up chips and worn areas without starting over, and store touch-up products properly. Maintain hinges and hardware by tightening screws and addressing misalignment promptly. When in doubt, verify care recommendations on product labels or with the manufacturer to protect your investment.
Cleaning routines and safe products
Regular cleaning keeps your cabinet doors looking fresh. But be gentle, harsh chemicals can damage the finish.
Use a soft cloth or sponge with warm water and mild dish soap for everyday dirt. For tougher grime, try a solution of equal parts white vinegar and warm water.
Avoid abrasive cleaners, steel wool, or harsh chemicals like bleach or ammonia. They can strip the paint and dull the finish.
Dry the doors thoroughly after cleaning to prevent water spots.
Touch-up and small repairs
Nicks and chips happen. Here’s how to fix them quickly:
First, lightly sand the area with fine-grit sandpaper. Wipe off dust with a damp cloth.
Using a small artist’s brush or toothpick, apply matching paint to the damaged area. Let it dry.
If the chip is large or the damage extensive, you might need to refinish the entire door. But for minor nicks, this touch-up method works well. Blend the edges with a damp cloth or fine-grit sandpaper if needed.
Conclusion
Takeaways: a solid plan, careful prep, and deliberate, even application make the finish durable and the look professional, while safety keeps the work from turning costly or risky.
First, check the scope and your prep steps in order: confirm door surfaces, gather the right tools and materials, clean and inspect for damage, test in a small area if you’re unsure, sand and prime as needed, apply smooth coats of paint with proper drying between passes, and finally reassemble and adjust hardware with care, then monitor for any touch‑ups after a full cure.
Common mistakes to avoid include skipping the test area and rushing the prep or paint Work, using improper ventilation or skipping safety gear, and skipping thorough surface preparation or using heavy-handed brushes that leave streaks; keep safety first, work in a well‑ventilated space, and apply even coats in controlled conditions to prevent drips and peeling.
If the doors are warped, you’ve got lead or other hazards, damage is beyond simple patching, or you’re not achieving a uniform match, don’t push on alone—call a professional. When you stick to the plan, follow the steps, and finish with care, you’ll have cabinet doors that look sharp and hold up well for years to come.
FAQ
Can I use spray paint on cabinet doors, and what should I watch out for?
Yes, spray can work, but you need a clean, dust-free surface and proper ventilation. Use light, even passes and avoid over-building the finish. Check the label for recoat times and any curing guidance since these vary by product.
How long should I wait between coats and before handling the doors again?
Follow the product’s label for recoat times and cure times. In general, don’t rush the cure—handling too soon can smear or lift the finish. If in doubt, test a small area on a scrap piece first.
What’s the best technique to avoid brush marks or roller stippling?
Use thin coats and keep your tool at a consistent angle. Avoid heavy pressure and back-roll lightly after a stroke. If you see texture, let it dry fully and sand lightly before the next coat, per manufacturer instructions.
Should I mix latex and oil-based finishes or switch between them?
Stick to one system for the project to avoid adhesion issues. If you must change, consult the label or manufacturer instructions for compatibility and recommended primers. Local rules or a paint pro can confirm safe options.